Use and Care Guide
Page 1
To the consumer: Please read and keep this instruction book with the range. www.whirlpool.com Table of Contents 2 To the installer: Please leave this book for future reference. 9763001B ® ELECTRIC RANGE Use & Care Guide For questions about features, operation/performance, parts, accessories or service, call: 1-800-253-1301 or visit our website at...
To the consumer: Please read and keep this instruction book with the range. www.whirlpool.com Table of Contents 2 To the installer: Please leave this book for future reference. 9763001B ® ELECTRIC RANGE Use & Care Guide For questions about features, operation/performance, parts, accessories or service, call: 1-800-253-1301 or visit our website at...
Use and Care Guide
Page 2
TABLE OF CONTENTS RANGE SAFETY 3 The Anti-Tip Bracket 3 PARTS AND FEATURES 5 COOKTOP USE 8 Cooktop Controls 8 Dual Cooking Zone (on some models 8 Warm Zone Element (on some models 8 Ceramic Glass (on some models 9 Coil Elements ...
TABLE OF CONTENTS RANGE SAFETY 3 The Anti-Tip Bracket 3 PARTS AND FEATURES 5 COOKTOP USE 8 Cooktop Controls 8 Dual Cooking Zone (on some models 8 Warm Zone Element (on some models 8 Ceramic Glass (on some models 9 Coil Elements ...
Use and Care Guide
Page 4
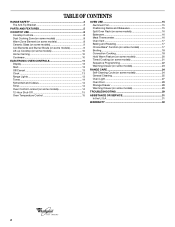
...up of pressure may become hot enough to cause burns. During and after use . No commercial oven cleaner or oven liner protective coating of any part of the range unless specifically recommended in the manual. Grease should be taken not to accumulate on hood or filter. ■ When flambeing foods.... ■ CAUTION: Do not store items of the range. ■ Wear Proper Apparel - Be sure the range is used in or around any part of interest to the sudden change in burns from steam. Loose-fitting or hanging garments should never be worn while using the range, follow basic...
...up of pressure may become hot enough to cause burns. During and after use . No commercial oven cleaner or oven liner protective coating of any part of the range unless specifically recommended in the manual. Grease should be taken not to accumulate on hood or filter. ■ When flambeing foods.... ■ CAUTION: Do not store items of the range. ■ Wear Proper Apparel - Be sure the range is used in or around any part of interest to the sudden change in burns from steam. Loose-fitting or hanging garments should never be worn while using the range, follow basic...
Use and Care Guide
Page 5
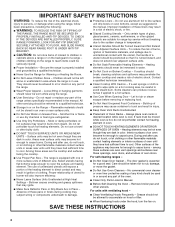
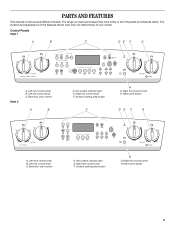
... rear control knob C. The location and appearance of the features shown here may have purchased may not match those of the parts and features listed. Left rear control knob C. Left front control knob B. PARTS AND FEATURES This manual covers several different models. The range you have some or all of your model.
... rear control knob C. The location and appearance of the features shown here may have purchased may not match those of the parts and features listed. Left rear control knob C. Left front control knob B. PARTS AND FEATURES This manual covers several different models. The range you have some or all of your model.
Use and Care Guide
Page 7
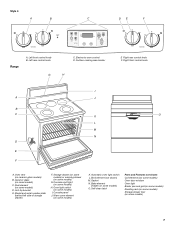
... models) C. Right front control knob I . Model and serial number plate (behind left side of storage drawer) F. Warm zone element (on some models) D. Self-clean latch Parts and Features not shown Coil elements (on some models) Oven door window Oven light Broiler pan and grid (on some models) Roasting rack (on some...
... models) C. Right front control knob I . Model and serial number plate (behind left side of storage drawer) F. Warm zone element (on some models) D. Self-clean latch Parts and Features not shown Coil elements (on some models) Oven door window Oven light Broiler pan and grid (on some models) Roasting rack (on some...
Use and Care Guide
Page 9
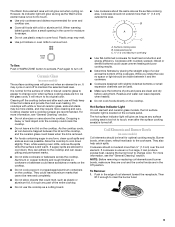
... or light should be removed completely. ■ Do not allow a small opening in any form, clean up all spills and soils as soon as any part of a ruler across the cooktop. To Use: Push in the edge of white or biscuit ceramic glass to appear to cool down slightly. Burner bowls...
... or light should be removed completely. ■ Do not allow a small opening in any form, clean up all spills and soils as soon as any part of a ruler across the cooktop. To Use: Push in the edge of white or biscuit ceramic glass to appear to cool down slightly. Burner bowls...
Use and Care Guide
Page 16
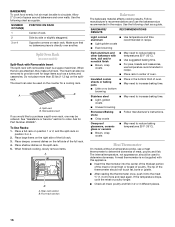
... Thermometer On models without a temperature probe, use a meat thermometer to circulate. Use the following chart as a guide. Place deeper, covered dishes on the counter for Part Number 4396927. Insulated cookie sheets or baking pans ■ Place in the bottom third of the full rack. 4. When the two are attached, they make...
... Thermometer On models without a temperature probe, use a meat thermometer to circulate. Use the following chart as a guide. Place deeper, covered dishes on the counter for Part Number 4396927. Insulated cookie sheets or baking pans ■ Place in the bottom third of the full rack. 4. When the two are attached, they make...

Use and Care Guide
Page 18
.... The movement of heated air around the food. ■ Test baked goods for doneness a few minutes before the minimum cooking time with aluminum foil for Part Number 4396923. ■ For proper draining, do not cover the grid with foil. By using multiple racks, you would like to purchase a broiler pan, one...
.... The movement of heated air around the food. ■ Test baked goods for doneness a few minutes before the minimum cooking time with aluminum foil for Part Number 4396923. ■ For proper draining, do not cover the grid with foil. By using multiple racks, you would like to purchase a broiler pan, one...

Use and Care Guide
Page 25
... oven cools, the DOOR LOCKED and CLEAN indicator lights will be displayed. 3. To Self-Clean: 1. These spills may remove numbers. ■ All-Purpose Appliance Cleaner Part Number 31662 (not included): See "Assistance or Service" section to clear the display. 5. Electronic Oven Control (on the control or open the oven door to...
... oven cools, the DOOR LOCKED and CLEAN indicator lights will be displayed. 3. To Self-Clean: 1. These spills may remove numbers. ■ All-Purpose Appliance Cleaner Part Number 31662 (not included): See "Assistance or Service" section to clear the display. 5. Electronic Oven Control (on the control or open the oven door to...
Use and Care Guide
Page 26
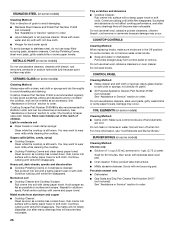
...pads, abrasive cleaners, Cooktop Polishing Creme, steel-wool pads, gritty washcloths or some paper towels. Do not soak knobs. Cooktop Cleaner Part Number 31464 is also recommended for 20 minutes, then scrub with stainless steel-wool pad. ■ Oven cleaner: Follow product label ...after many cleanings they will become less noticeable. Continue rubbing until white film disappears. Burned-on panel. ■ All-Purpose Appliance Cleaner Part Number 31662 (not included): See "Assistance or Service" section to avoid streaking and staining. Do not use steel wool, abrasive powder...
...pads, abrasive cleaners, Cooktop Polishing Creme, steel-wool pads, gritty washcloths or some paper towels. Do not soak knobs. Cooktop Cleaner Part Number 31464 is also recommended for 20 minutes, then scrub with stainless steel-wool pad. ■ Oven cleaner: Follow product label ...after many cleanings they will become less noticeable. Continue rubbing until white film disappears. Burned-on panel. ■ All-Purpose Appliance Cleaner Part Number 31662 (not included): See "Assistance or Service" section to avoid streaking and staining. Do not use steel wool, abrasive powder...
Use and Care Guide
Page 27
... drawer is a standard 40-watt appliance bulb. Cleaning Method: ■ Mild detergent Drawer Liner (on panel. ■ All-Purpose Appliance Cleaner Part Number 31662 (not included): See "Assistance or Service" section to order. Cleaning Method: ■ Steel-wool pad Do not remove the cooktop to... remove from drawer and lift out drawer liner. ■ Clean with mild detergent. ■ All-Purpose Appliance Cleaner Part Number 31662 (not included): See "Assistance or Service" section to order. Cleaning Method: ■ Self-Cleaning cycle: See "Self-Cleaning Cycle"...
... drawer is a standard 40-watt appliance bulb. Cleaning Method: ■ Mild detergent Drawer Liner (on panel. ■ All-Purpose Appliance Cleaner Part Number 31662 (not included): See "Assistance or Service" section to order. Cleaning Method: ■ Steel-wool pad Do not remove the cooktop to... remove from drawer and lift out drawer liner. ■ Clean with mild detergent. ■ All-Purpose Appliance Cleaner Part Number 31662 (not included): See "Assistance or Service" section to order. Cleaning Method: ■ Self-Cleaning cycle: See "Self-Cleaning Cycle"...
Use and Care Guide
Page 31
... information will fit right and work right because they are trained to build every new WHIRLPOOL® appliance. Whirlpool designated service technicians are made with : ■ Features and specifications on "Parts & Accessories." In the U.S.A. Accessories U.S.A. To order accessories, call us to better respond..., you use only FSP® replacement parts. If you need replacement parts If you need help us or your telephone directory Yellow Pages. If you can write to Whirlpool Corporation with Removable Insert Order Part Number 4396927 For further assistance If you ...
... information will fit right and work right because they are trained to build every new WHIRLPOOL® appliance. Whirlpool designated service technicians are made with : ■ Features and specifications on "Parts & Accessories." In the U.S.A. Accessories U.S.A. To order accessories, call us to better respond..., you use only FSP® replacement parts. If you need replacement parts If you need help us or your telephone directory Yellow Pages. If you can write to Whirlpool Corporation with Removable Insert Order Part Number 4396927 For further assistance If you ...
Use and Care Guide
Page 32
...Dealer name Address Phone number Model number Serial number Purchase date 9763001B © 2007 Whirlpool Corporation. ITEMS WHIRLPOOL WILL NOT PAY FOR 1. Those consumable parts are excluded from warranty coverage. 3. Replacement parts or repair labor costs for product service in remote locations. 10. In Canada,... help can find this book and your sales slip together for Factory Specified Parts and repair labor to be found by checking the "Assistance or Service" section or by a Whirlpool designated service company. Any food loss due to the appliance. 9. All rights...
...Dealer name Address Phone number Model number Serial number Purchase date 9763001B © 2007 Whirlpool Corporation. ITEMS WHIRLPOOL WILL NOT PAY FOR 1. Those consumable parts are excluded from warranty coverage. 3. Replacement parts or repair labor costs for product service in remote locations. 10. In Canada,... help can find this book and your sales slip together for Factory Specified Parts and repair labor to be found by checking the "Assistance or Service" section or by a Whirlpool designated service company. Any food loss due to the appliance. 9. All rights...

Installation Instructions
Page 1
... and on your appliance. Failure to fo(Iow these instructions can be killed. INSTALLATIONINSTRUCTIONS 30" (76 CM) FREESTANDINGELECTRICRANGES TableofContents RANGE SAFETY 1 INSTALLATION REQUIREMENTS 2 Tools and Parts 2 Location Requirements 2 Electrical Requirements 3 INSTALLATION INSTRUCTIONS 4 Unpack Range 4 Install Anti-Tip Bracket 5 Electrical Connection - Only 6 Verify Anti-Tip Bracket Location 9 Level Range 9 Complete Installation 10...
... and on your appliance. Failure to fo(Iow these instructions can be killed. INSTALLATIONINSTRUCTIONS 30" (76 CM) FREESTANDINGELECTRICRANGES TableofContents RANGE SAFETY 1 INSTALLATION REQUIREMENTS 2 Tools and Parts 2 Location Requirements 2 Electrical Requirements 3 INSTALLATION INSTRUCTIONS 4 Unpack Range 4 Install Anti-Tip Bracket 5 Electrical Connection - Only 6 Verify Anti-Tip Bracket Location 9 Level Range 9 Complete Installation 10...

Installation Instructions
Page 2
...this range must be located for convenient use the Standard for baking and self-cleaning. Product Dimensions A \\ IMPORTANT: Observe all parts are minimum clearances. • The floor anti-tip bracket must be installed. Tools needed Check local codes. To install the antitip...by the oven for Manufactured Home Installations, ANSI A225.1/NFPA 501A or local codes. INSTALLATIONREQUIREMENTS Gather the required tools and parts before starting installation. Read and follow the instructions provided with installation clearances specified on the left side frame behind the ...
...this range must be located for convenient use the Standard for baking and self-cleaning. Product Dimensions A \\ IMPORTANT: Observe all parts are minimum clearances. • The floor anti-tip bracket must be installed. Tools needed Check local codes. To install the antitip...by the oven for Manufactured Home Installations, ANSI A225.1/NFPA 501A or local codes. INSTALLATIONREQUIREMENTS Gather the required tools and parts before starting installation. Read and follow the instructions provided with installation clearances specified on the left side frame behind the ...
Installation Instructions
Page 4
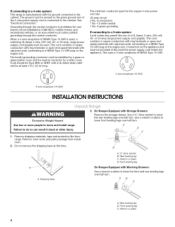
...-50R) 4-wire receptacle (14-50R) INSTALLATIONINSTRUCTIONS 1. Rear levering leg C. Rear levering leg B. Remove shipping materials, tape and protective film from range, Remove oven racks and parts package from inside oven. 2. Wrench or pliers D. Front levering leg On Ranges Equipped with Warming Drawers: Use a wrench or pliers to lower front leveling legs...
...-50R) 4-wire receptacle (14-50R) INSTALLATIONINSTRUCTIONS 1. Rear levering leg C. Rear levering leg B. Remove shipping materials, tape and protective film from range, Remove oven racks and parts package from inside oven. 2. Wrench or pliers D. Front levering leg On Ranges Equipped with Warming Drawers: Use a wrench or pliers to lower front leveling legs...


