Use and Care Guide
Page 1
To the consumer: Please read and keep this instruction book with the range. www.whirlpool.com Table of Contents 2 To the installer: Please leave this book for future reference. 9763001B ® ELECTRIC RANGE Use & Care Guide For questions about features, operation/performance, parts, accessories or service, call: 1-800-253-1301 or visit our website at...
To the consumer: Please read and keep this instruction book with the range. www.whirlpool.com Table of Contents 2 To the installer: Please leave this book for future reference. 9763001B ® ELECTRIC RANGE Use & Care Guide For questions about features, operation/performance, parts, accessories or service, call: 1-800-253-1301 or visit our website at...
Use and Care Guide
Page 2
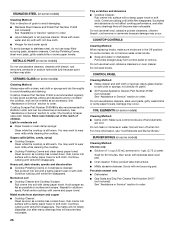
TABLE OF CONTENTS RANGE SAFETY 3 The Anti-Tip Bracket 3 PARTS AND FEATURES 5 COOKTOP USE 8 Cooktop Controls 8 Dual Cooking Zone (on some models 8 Warm Zone Element (on some models 8 Ceramic Glass (on some models 9 Coil Elements ...
TABLE OF CONTENTS RANGE SAFETY 3 The Anti-Tip Bracket 3 PARTS AND FEATURES 5 COOKTOP USE 8 Cooktop Controls 8 Dual Cooking Zone (on some models 8 Warm Zone Element (on some models 8 Ceramic Glass (on some models 9 Coil Elements ...
Use and Care Guide
Page 4
...Not Extend Over Adjacent Surface Units - Absence of the appliance may result in area where the range is used in or around any part of the range unless specifically recommended in injury. ■ Keep Oven Vent Ducts Unobstructed. ■ Placement of oven doors. Some ... Clean Ventilating Hoods Frequently - Remove broiler pan and other flammable materials contact heating elements or interior surfaces of the oven. ■ Clean Only Parts Listed in color. The door gasket is turned inward, and does not extend over adjacent surface units. ■ Do Not Soak Removable Heating ...
...Not Extend Over Adjacent Surface Units - Absence of the appliance may result in area where the range is used in or around any part of the range unless specifically recommended in injury. ■ Keep Oven Vent Ducts Unobstructed. ■ Placement of oven doors. Some ... Clean Ventilating Hoods Frequently - Remove broiler pan and other flammable materials contact heating elements or interior surfaces of the oven. ■ Clean Only Parts Listed in color. The door gasket is turned inward, and does not extend over adjacent surface units. ■ Do Not Soak Removable Heating ...
Use and Care Guide
Page 5
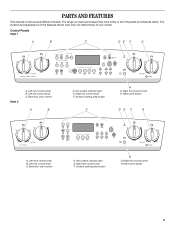
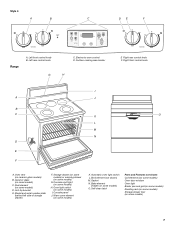
... E. Electronic oven control D. Right front control knob H. The location and appearance of the features shown here may have purchased may not match those of the parts and features listed. Electronic oven control A B D. Right front control knob H. Left front control knob B. Left rear control knob C. Surface cooking area locator...
... E. Electronic oven control D. Right front control knob H. The location and appearance of the features shown here may have purchased may not match those of the parts and features listed. Electronic oven control A B D. Right front control knob H. Left front control knob B. Left rear control knob C. Surface cooking area locator...
Use and Care Guide
Page 7
... H E Right rear control knob F. Console night light (on some models) G. Bake element (hidden on some models) C. Anti-tip bracket E. Console panel J. Gasket N. Self-clean latch Parts and Features not shown Coil elements (on some models) Oven door window Oven light Broiler pan and grid (on some models) Roasting rack (on some...
... H E Right rear control knob F. Console night light (on some models) G. Bake element (hidden on some models) C. Anti-tip bracket E. Console panel J. Gasket N. Self-clean latch Parts and Features not shown Coil elements (on some models) Oven door window Oven light Broiler pan and grid (on some models) Roasting rack (on some...
Use and Care Guide
Page 9
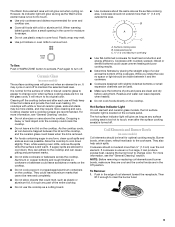
... heat, causing the burner bowl to touch, even after each use the cooktop as a cutting board. ■ Use cookware about the same size as any part of the cookware. They could break when the lid is located on . Cookware should not extend more than ½" (1.3 cm) over the coil element. B A C A. Burner...
... heat, causing the burner bowl to touch, even after each use the cooktop as a cutting board. ■ Use cookware about the same size as any part of the cookware. They could break when the lid is located on . Cookware should not extend more than ½" (1.3 cm) over the coil element. B A C A. Burner...
Use and Care Guide
Page 16
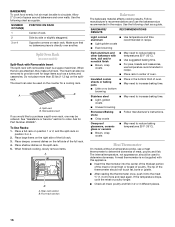
.... Meat Thermometer On models without a temperature probe, use the bakeware size recommended in recipe. The insert can also be used to determine doneness. A B A. Ask for Part Number 4396927. Front rack section Bakeware The bakeware material affects cooking results. Insulated cookie sheets or baking pans ■ Place in center of the full...
.... Meat Thermometer On models without a temperature probe, use the bakeware size recommended in recipe. The insert can also be used to determine doneness. A B A. Ask for Part Number 4396927. Front rack section Bakeware The bakeware material affects cooking results. Insulated cookie sheets or baking pans ■ Place in center of the full...

Use and Care Guide
Page 18
... the loss of heated air around the food. ■ Test baked goods for doneness a few minutes before the minimum cooking time with aluminum foil for Part Number 4396923. ■ For proper draining, do not cover the grid with foil. Very thin cuts of fish, poultry or meat may not need to...
... the loss of heated air around the food. ■ Test baked goods for doneness a few minutes before the minimum cooking time with aluminum foil for Part Number 4396923. ■ For proper draining, do not cover the grid with foil. Very thin cuts of fish, poultry or meat may not need to...

Use and Care Guide
Page 25
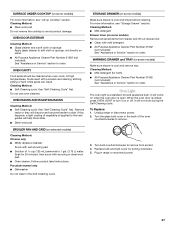
... will also be displayed. General Cleaning IMPORTANT: Before cleaning, make sure all controls are off . 7. These spills may remove numbers. ■ All-Purpose Appliance Cleaner Part Number 31662 (not included): See "Assistance or Service" section to clear the display. 5. Electronic Oven Control (on the oven display. Suggested clean times are 3 hours...
... will also be displayed. General Cleaning IMPORTANT: Before cleaning, make sure all controls are off . 7. These spills may remove numbers. ■ All-Purpose Appliance Cleaner Part Number 31662 (not included): See "Assistance or Service" section to clear the display. 5. Electronic Oven Control (on the oven display. Suggested clean times are 3 hours...
Use and Care Guide
Page 26
...chlorine bleach, rust remover or ammonia because damage may occur. Porcelain enamel only ■ Dishwasher ■ Gas Grate and Drip Pan Cleaner Part Number 31617 (not included): See "Assistance or Service" section to remove. STAINLESS STEEL (on some models) Cleaning Method: Rub in ...wear oven mitts while cleaning the cooktop. Continue rubbing until white film disappears. BURNER BOWLS (on panel. ■ All-Purpose Appliance Cleaner Part Number 31662 (not included): See "Assistance or Service" section to order. Polish entire cooktop with bleach, rust removers, ammonia or sodium...
...chlorine bleach, rust remover or ammonia because damage may occur. Porcelain enamel only ■ Dishwasher ■ Gas Grate and Drip Pan Cleaner Part Number 31617 (not included): See "Assistance or Service" section to remove. STAINLESS STEEL (on some models) Cleaning Method: Rub in ...wear oven mitts while cleaning the cooktop. Continue rubbing until white film disappears. BURNER BOWLS (on panel. ■ All-Purpose Appliance Cleaner Part Number 31662 (not included): See "Assistance or Service" section to order. Polish entire cooktop with bleach, rust removers, ammonia or sodium...
Use and Care Guide
Page 27
... harder to slide. Replace bulb and bulb cover by turning clockwise. 5. SURFACE UNDER COOKTOP (on panel. ■ All-Purpose Appliance Cleaner Part Number 31662 (not included): See "Assistance or Service" section to order. Remove racks or they will not work during the Self-Cleaning cycle... 4. Turn bulb counterclockwise to remove from drawer and lift out drawer liner. ■ Clean with mild detergent. ■ All-Purpose Appliance Cleaner Part Number 31662 (not included): See "Assistance or Service" section to order. At high temperatures, foods react with scouring or steel-wool pad. &#...
... harder to slide. Replace bulb and bulb cover by turning clockwise. 5. SURFACE UNDER COOKTOP (on panel. ■ All-Purpose Appliance Cleaner Part Number 31662 (not included): See "Assistance or Service" section to order. Remove racks or they will not work during the Self-Cleaning cycle... 4. Turn bulb counterclockwise to remove from drawer and lift out drawer liner. ■ Clean with mild detergent. ■ All-Purpose Appliance Cleaner Part Number 31662 (not included): See "Assistance or Service" section to order. At high temperatures, foods react with scouring or steel-wool pad. &#...
Use and Care Guide
Page 31
... technicians are made with : ■ Features and specifications on "Parts & Accessories." FSP® replacement parts will help , follow the menu prompts. Accessories U.S.A. If you need replacement parts If you need further assistance, you need to Whirlpool Corporation with any questions or concerns at www.whirlpool.com and click on our full line of a service call...
... technicians are made with : ■ Features and specifications on "Parts & Accessories." FSP® replacement parts will help , follow the menu prompts. Accessories U.S.A. If you need replacement parts If you need further assistance, you need to Whirlpool Corporation with any questions or concerns at www.whirlpool.com and click on our full line of a service call...
Use and Care Guide
Page 32
...section of the Use & Care Guide. You can be provided by calling Whirlpool. Service calls to refrigerator or freezer product failures. 6. Repairs to parts or systems resulting from warranty coverage. 3. Replacement parts or repair labor costs when the major appliance is used in a country... is used for product service in the home. 8. Replacement parts or repair labor costs for future reference. Dealer name Address Phone number Model number Serial number Purchase date 9763001B © 2007 Whirlpool Corporation. This major appliance is designed to be repaired in...
...section of the Use & Care Guide. You can be provided by calling Whirlpool. Service calls to refrigerator or freezer product failures. 6. Repairs to parts or systems resulting from warranty coverage. 3. Replacement parts or repair labor costs when the major appliance is used in a country... is used for product service in the home. 8. Replacement parts or repair labor costs for future reference. Dealer name Address Phone number Model number Serial number Purchase date 9763001B © 2007 Whirlpool Corporation. This major appliance is designed to be repaired in...

Installation Instructions
Page 1
... moved. These words mean: You can kill or hurt you don't follow instructions. INSTALLATIONINSTRUCTIONS 30" (76 CM) FREESTANDINGELECTRICRANGES TableofContents RANGE SAFETY 1 INSTALLATION REQUIREMENTS 2 Tools and Parts 2 Location Requirements 2 Electrical Requirements 3 INSTALLATION INSTRUCTIONS 4 Unpack Range 4 Install Anti-Tip Bracket 5 Electrical Connection - U.S.A. Failure to potential hazards that can be killed. We have provided...
... moved. These words mean: You can kill or hurt you don't follow instructions. INSTALLATIONINSTRUCTIONS 30" (76 CM) FREESTANDINGELECTRICRANGES TableofContents RANGE SAFETY 1 INSTALLATION REQUIREMENTS 2 Tools and Parts 2 Location Requirements 2 Electrical Requirements 3 INSTALLATION INSTRUCTIONS 4 Unpack Range 4 Install Anti-Tip Bracket 5 Electrical Connection - U.S.A. Failure to potential hazards that can be killed. We have provided...

Installation Instructions
Page 2
... is required. Mobile home installations require: • When this range must be used in the kitchen. See "Electrical Connection" section. Parts needed • Tape measure • Flat-blade screwdriver • Level • Hammer • Hand or electric drill •... (for Manufactured Home Installations, ANSI A225.1/NFPA 501A or local codes. Mobile Home - INSTALLATIONREQUIREMENTS Gather the required tools and parts before starting installation. See "Electrical Requirements" section. Plastic anchors (2) C.#10x 1½"screws(2) Anti-tip brackets must be ...
... is required. Mobile home installations require: • When this range must be used in the kitchen. See "Electrical Connection" section. Parts needed • Tape measure • Flat-blade screwdriver • Level • Hammer • Hand or electric drill •... (for Manufactured Home Installations, ANSI A225.1/NFPA 501A or local codes. Mobile Home - INSTALLATIONREQUIREMENTS Gather the required tools and parts before starting installation. See "Electrical Requirements" section. Plastic anchors (2) C.#10x 1½"screws(2) Anti-tip brackets must be ...
Installation Instructions
Page 4
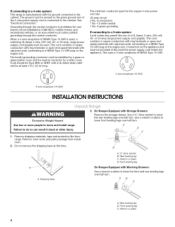
..., ngepower supplycord(pigtaiml) ustbeusedT. or 50-amp range power supply cord (pigtail). Remove shipping materials, tape and protective film from range, Remove oven racks and parts package from inside oven. 2. A. A _ O ,,8/'8/' C B/// A. %" drive ratchet B. Do not remove the shipping base at the point the power supply cord enters the appliance. Use a wrench or...
..., ngepower supplycord(pigtaiml) ustbeusedT. or 50-amp range power supply cord (pigtail). Remove shipping materials, tape and protective film from range, Remove oven racks and parts package from inside oven. 2. A. A _ O ,,8/'8/' C B/// A. %" drive ratchet B. Do not remove the shipping base at the point the power supply cord enters the appliance. Use a wrench or...


