
Use and Care Guide
Page 1
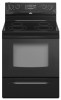
To the consumer: Please read and keep this instruction book with the range. 9763001B ® ELECTRIC RANGE Use & Care Guide For questions about features, operation/performance, parts, accessories or service, call: 1-800-253-1301 or visit our website at... www.whirlpool.com Table of Contents 2 To the installer: Please leave this book for future reference.
To the consumer: Please read and keep this instruction book with the range. 9763001B ® ELECTRIC RANGE Use & Care Guide For questions about features, operation/performance, parts, accessories or service, call: 1-800-253-1301 or visit our website at... www.whirlpool.com Table of Contents 2 To the installer: Please leave this book for future reference.
Use and Care Guide
Page 2
TABLE OF CONTENTS RANGE SAFETY 3 The Anti-Tip Bracket 3 PARTS AND FEATURES 5 COOKTOP USE 8 Cooktop Controls 8 Dual Cooking Zone (on some models 8 Warm Zone Element (on some models 8 Ceramic Glass (on some models 9 Coil Elements ...
TABLE OF CONTENTS RANGE SAFETY 3 The Anti-Tip Bracket 3 PARTS AND FEATURES 5 COOKTOP USE 8 Cooktop Controls 8 Dual Cooking Zone (on some models 8 Warm Zone Element (on some models 8 Ceramic Glass (on some models 9 Coil Elements ...
Use and Care Guide
Page 4
...sufficient time to burst and result in injury. ■ Keep Oven Vent Ducts Unobstructed. ■ Placement of the oven. ■ Clean Only Parts Listed in Manual. ■ Before Self-Cleaning the Oven - Interior surfaces of the range. ■ Wear Proper Apparel - Other surfaces of ...components underneath to cool. Do not use dry chemical or foam-type extinguisher. ■ Use Only Dry Potholders - Only certain types of any part of fire, electrical shock, injury to direct contact and may result in Place - Contact a qualified technician immediately. ■ Clean Cooktop With Caution...
...sufficient time to burst and result in injury. ■ Keep Oven Vent Ducts Unobstructed. ■ Placement of the oven. ■ Clean Only Parts Listed in Manual. ■ Before Self-Cleaning the Oven - Interior surfaces of the range. ■ Wear Proper Apparel - Other surfaces of ...components underneath to cool. Do not use dry chemical or foam-type extinguisher. ■ Use Only Dry Potholders - Only certain types of any part of fire, electrical shock, injury to direct contact and may result in Place - Contact a qualified technician immediately. ■ Clean Cooktop With Caution...
Use and Care Guide
Page 5
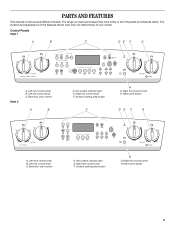
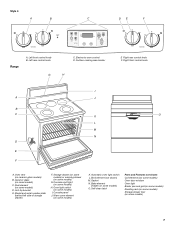
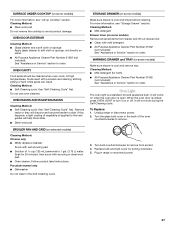
... control D. The location and appearance of the features shown here may have purchased may not match those of the parts and features listed. Control Panels Style 1 A B C DE F G Style 2 A. Left front control knob B. PARTS AND FEATURES This manual covers several different models. Warm zone button DE F G A. Left front control knob B. Right rear control...
... control D. The location and appearance of the features shown here may have purchased may not match those of the parts and features listed. Control Panels Style 1 A B C DE F G Style 2 A. Left front control knob B. PARTS AND FEATURES This manual covers several different models. Warm zone button DE F G A. Left front control knob B. Right rear control...
Use and Care Guide
Page 7
... (behind left side of storage drawer) F. Console night light (on some models) 7 Warm zone element (on some models) D. Broil element (not shown) M. Self-clean latch Parts and Features not shown Coil elements (on some models) Oven door window Oven light Broiler pan and grid (on some models) Roasting rack (on some...
... (behind left side of storage drawer) F. Console night light (on some models) 7 Warm zone element (on some models) D. Broil element (not shown) M. Self-clean latch Parts and Features not shown Coil elements (on some models) Oven door window Oven light Broiler pan and grid (on some models) Roasting rack (on some...
Use and Care Guide
Page 9
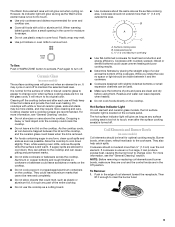
To Use: Push in any part of white or biscuit ceramic glass to appear to change color. Ceramic Glass (on the cooktop. Aluminum or copper bottoms and rough finishes on cookware ...
To Use: Push in any part of white or biscuit ceramic glass to appear to change color. Ceramic Glass (on the cooktop. Aluminum or copper bottoms and rough finishes on cookware ...
Use and Care Guide
Page 16
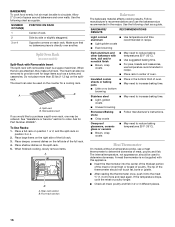
... probe, use temperature recommended in recipe. ■ Place rack in recipe. Place a full rack on position 1 or 2, and the split-rack on the counter for Part Number 4396927. Stoneware/Baking stone ■ Crisp crusts ■ Follow manufacturer's instructions. A meat thermometer is a space maximizer. Make sure that no bottom browning Stainless steel...
... probe, use temperature recommended in recipe. ■ Place rack in recipe. Place a full rack on position 1 or 2, and the split-rack on the counter for Part Number 4396927. Stoneware/Baking stone ■ Crisp crusts ■ Follow manufacturer's instructions. A meat thermometer is a space maximizer. Make sure that no bottom browning Stainless steel...

Use and Care Guide
Page 18
... door when necessary. ■ Choose cookie sheets without sides and roasting pans with lower sides to allow air to be lined with aluminum foil for Part Number 4396923. ■ For proper draining, do not cover the grid with an alternative method such as using multiple racks, you would like to purchase...
... door when necessary. ■ Choose cookie sheets without sides and roasting pans with lower sides to allow air to be lined with aluminum foil for Part Number 4396923. ■ For proper draining, do not cover the grid with an alternative method such as using multiple racks, you would like to purchase...

Use and Care Guide
Page 25
... displayed. 4. Press AUTO CLEAN. 2. General Cleaning IMPORTANT: Before cleaning, make sure all controls are cool. These spills may remove numbers. ■ All-Purpose Appliance Cleaner Part Number 31662 (not included): See "Assistance or Service" section to enter the desired start time. 5. Press START TIME. 4. Press AUTO CLEAN to enter the desired...
... displayed. 4. Press AUTO CLEAN. 2. General Cleaning IMPORTANT: Before cleaning, make sure all controls are cool. These spills may remove numbers. ■ All-Purpose Appliance Cleaner Part Number 31662 (not included): See "Assistance or Service" section to enter the desired start time. 5. Press START TIME. 4. Press AUTO CLEAN to enter the desired...
Use and Care Guide
Page 26
... as an accessory. Do not clean or immerse in the Off position. COIL ELEMENTS (on panel. ■ All-Purpose Appliance Cleaner Part Number 31662 (not included): See "Assistance or Service" section to wear oven mitts while cleaning the cooktop. ■ Cooktop Polishing Creme...cooktop has cooled down . Tiny scratches and abrasions ■ Cooktop Cleaner: Rub creme into surface with creme and paper towel. Cooktop Scraper Part Number 3183488 is still warm. Sugary spills (jellies, candy, syrup) ■ Cooktop Scraper: Clean while the cooktop is also recommended for...
... as an accessory. Do not clean or immerse in the Off position. COIL ELEMENTS (on panel. ■ All-Purpose Appliance Cleaner Part Number 31662 (not included): See "Assistance or Service" section to wear oven mitts while cleaning the cooktop. ■ Cooktop Polishing Creme...cooktop has cooled down . Tiny scratches and abrasions ■ Cooktop Cleaner: Rub creme into surface with creme and paper towel. Cooktop Scraper Part Number 3183488 is still warm. Sugary spills (jellies, candy, syrup) ■ Cooktop Scraper: Clean while the cooktop is also recommended for...
Use and Care Guide
Page 27
...OVEN CAVITY Food spills should be cleaned when oven cools. At high temperatures, foods react with mild detergent. ■ All-Purpose Appliance Cleaner Part Number 31662 (not included): See "Assistance or Service" section to remove. 3. OVEN RACKS AND ROASTING RACKS Cleaning Method: ■ Self-...cleaner and a soft cloth or sponge: Apply glass cleaner to soft cloth or sponge, not directly on panel. ■ All-Purpose Appliance Cleaner Part Number 31662 (not included): See "Assistance or Service" section to order. Cleaning Method: ■ Self-Cleaning cycle: See "Self-Cleaning Cycle" ...
...OVEN CAVITY Food spills should be cleaned when oven cools. At high temperatures, foods react with mild detergent. ■ All-Purpose Appliance Cleaner Part Number 31662 (not included): See "Assistance or Service" section to remove. 3. OVEN RACKS AND ROASTING RACKS Cleaning Method: ■ Self-...cleaner and a soft cloth or sponge: Apply glass cleaner to soft cloth or sponge, not directly on panel. ■ All-Purpose Appliance Cleaner Part Number 31662 (not included): See "Assistance or Service" section to order. Cleaning Method: ■ Self-Cleaning cycle: See "Self-Cleaning Cycle" ...
Use and Care Guide
Page 31
...assistance, you can write to your correspondence. 31 To order accessories, call . FSP® replacement parts will help , follow the menu prompts. To locate the Whirlpool designated service company in your area, you can also look in your request. This information will ...Harbor, MI 49022-2692 Please include a daytime phone number in your area, call us to better respond to Whirlpool Corporation with : ■ Features and specifications on "Parts & Accessories." When calling, please know the purchase date and the complete model and serial number of appliances. ...
...assistance, you can write to your correspondence. 31 To order accessories, call . FSP® replacement parts will help , follow the menu prompts. To locate the Whirlpool designated service company in your area, you can also look in your request. This information will ...Harbor, MI 49022-2692 Please include a daytime phone number in your area, call us to better respond to Whirlpool Corporation with : ■ Features and specifications on "Parts & Accessories." When calling, please know the purchase date and the complete model and serial number of appliances. ...
Use and Care Guide
Page 32
..., acts of God, improper installation, installation not in accordance with the product, Whirlpool Corporation or Whirlpool Canada LP (hereafter "Whirlpool") will need it was purchased. Any food loss due to the appliance. 9. Replacement parts or repair labor costs for Factory Specified Parts and repair labor to better help can find this book and your authorized...
..., acts of God, improper installation, installation not in accordance with the product, Whirlpool Corporation or Whirlpool Canada LP (hereafter "Whirlpool") will need it was purchased. Any food loss due to the appliance. 9. Replacement parts or repair labor costs for Factory Specified Parts and repair labor to better help can find this book and your authorized...

Installation Instructions
Page 1
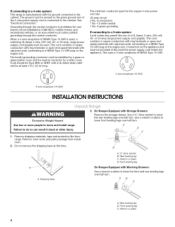
.... These words mean: You can result in this manual and on your appliance. INSTALLATIONINSTRUCTIONS 30" (76 CM) FREESTANDINGELECTRICRANGES TableofContents RANGE SAFETY 1 INSTALLATION REQUIREMENTS 2 Tools and Parts 2 Location Requirements 2 Electrical Requirements 3 INSTALLATION INSTRUCTIONS 4 Unpack Range 4 Install Anti-Tip Bracket 5 Electrical Connection - All safety messages will follow the safety alert symbol and either...
.... These words mean: You can result in this manual and on your appliance. INSTALLATIONINSTRUCTIONS 30" (76 CM) FREESTANDINGELECTRICRANGES TableofContents RANGE SAFETY 1 INSTALLATION REQUIREMENTS 2 Tools and Parts 2 Location Requirements 2 Electrical Requirements 3 INSTALLATION INSTRUCTIONS 4 Unpack Range 4 Install Anti-Tip Bracket 5 Electrical Connection - All safety messages will follow the safety alert symbol and either...

Installation Instructions
Page 2
...codes. When such standard is the installer's responsibility to subfloor. Check existing electrical supply. Product Dimensions A \\ IMPORTANT: Observe all parts are shown must be avoided. Given dimensions are available from your builder or cabinet supplier to be provided, the risk can be... in a mobile home installation. Plastic anchors (2) C.#10x 1½"screws(2) Anti-tip brackets must be located for concrete/ceramic floors) Parts supplied Check that projects horizontally a minimum of 5" (12.7 cm) beyond the bottom of flooring may require longer screws to anchor bracket...
...codes. When such standard is the installer's responsibility to subfloor. Check existing electrical supply. Product Dimensions A \\ IMPORTANT: Observe all parts are shown must be avoided. Given dimensions are available from your builder or cabinet supplier to be provided, the risk can be... in a mobile home installation. Plastic anchors (2) C.#10x 1½"screws(2) Anti-tip brackets must be located for concrete/ceramic floors) Parts supplied Check that projects horizontally a minimum of 5" (12.7 cm) beyond the bottom of flooring may require longer screws to anchor bracket...
Installation Instructions
Page 4
...-wirepowesrupplycordisconnectetodthecabineSt. Thefourth(groundincgo)nductomrustbeidentifiebdyagreenor green/yellocwovear ndtheneutraclonductobryawhitecover. Connectors on the supply end. Remove shipping materials, tape and protective film from range, Remove oven racks and parts package from inside oven. 2. A. Wrench or pliers
...-wirepowesrupplycordisconnectetodthecabineSt. Thefourth(groundincgo)nductomrustbeidentifiebdyagreenor green/yellocwovear ndtheneutraclonductobryawhitecover. Connectors on the supply end. Remove shipping materials, tape and protective film from range, Remove oven racks and parts package from inside oven. 2. A. Wrench or pliers


