Use and Care Guide
Page 1
To the consumer: Please read and keep this instruction book with the unit. ® ELECTRIC RANGE Use & Care Guide For questions about features, operation/performance, parts, accessories or service, call: 1-800-253-1301 or visit our website at...www.whirlpool.com Table of Contents ...2 To the installer: Please leave this book for future reference. 9763001
To the consumer: Please read and keep this instruction book with the unit. ® ELECTRIC RANGE Use & Care Guide For questions about features, operation/performance, parts, accessories or service, call: 1-800-253-1301 or visit our website at...www.whirlpool.com Table of Contents ...2 To the installer: Please leave this book for future reference. 9763001
Use and Care Guide
Page 2
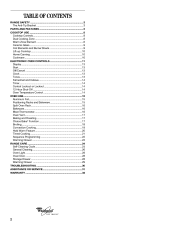
TABLE OF CONTENTS RANGE SAFETY ...3 The Anti-Tip Bracket ...3 PARTS AND FEATURES...5 COOKTOP USE ...8 Cooktop Controls...8 Dual Cooking Zone ...8 Warm Zone Element ...8 Ceramic Glass ...9 Coil Elements and Burner Bowls ...9 ... Roasting...17 Choice Bake® Function ...17 Broiling...18 Convection Cooking...19 Hold Warm Feature ...20 Timed Cooking ...21 Sequence Programming ...22 Warming Drawer ...23 RANGE CARE ...24 Self-Cleaning Cycle...24 General Cleaning...26 Oven Light ...28 Oven Door ...28 Storage Drawer ...28 Warming Drawer ...29 TROUBLESHOOTING ...30 ASSISTANCE OR...
TABLE OF CONTENTS RANGE SAFETY ...3 The Anti-Tip Bracket ...3 PARTS AND FEATURES...5 COOKTOP USE ...8 Cooktop Controls...8 Dual Cooking Zone ...8 Warm Zone Element ...8 Ceramic Glass ...9 Coil Elements and Burner Bowls ...9 ... Roasting...17 Choice Bake® Function ...17 Broiling...18 Convection Cooking...19 Hold Warm Feature ...20 Timed Cooking ...21 Sequence Programming ...22 Warming Drawer ...23 RANGE CARE ...24 Self-Cleaning Cycle...24 General Cleaning...26 Oven Light ...28 Oven Door ...28 Storage Drawer ...28 Warming Drawer ...29 TROUBLESHOOTING ...30 ASSISTANCE OR...

Use and Care Guide
Page 3
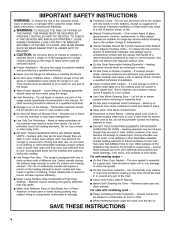
...either the word "DANGER" or "WARNING." Always read and obey all safety messages. Connect anti-tip bracket to such substances. Range Foot The California Safe Drinking Water and Toxic Enforcement Act requires the Governor of California to publish a list of substances known to...cancer, birth defects, or other reproductive harm. WARNING: This product contains a chemical known to the State of potential exposure to rear range foot. RANGE SAFETY Your safety and the safety of the substances listed, including benzene, formaldehyde, carbon monoxide, and toluene. 3 Anti-Tip Bracket...
...either the word "DANGER" or "WARNING." Always read and obey all safety messages. Connect anti-tip bracket to such substances. Range Foot The California Safe Drinking Water and Toxic Enforcement Act requires the Governor of California to publish a list of substances known to...cancer, birth defects, or other reproductive harm. WARNING: This product contains a chemical known to the State of potential exposure to rear range foot. RANGE SAFETY Your safety and the safety of the substances listed, including benzene, formaldehyde, carbon monoxide, and toluene. 3 Anti-Tip Bracket...
Use and Care Guide
Page 4
...Oven Racks - Grease should not be hot even though they are dark in water. s SAVE THESE INSTRUCTIONS 4 children climbing on the Range - Flammable materials should not be positioned so that may become hot enough to cause burns - Absence of the appliance may ignite. ...Use Oven Cleaners - IMPORTANT SAFETY INSTRUCTIONS WARNING: To reduce the risk of fire, electrical shock, injury to persons, or damage when using the range. Select utensils having flat bottoms large enough to a hot surface. s Do Not Cook on hood or filter. s Clean Only Parts Listed...
...Oven Racks - Grease should not be hot even though they are dark in water. s SAVE THESE INSTRUCTIONS 4 children climbing on the Range - Flammable materials should not be positioned so that may become hot enough to cause burns - Absence of the appliance may ignite. ...Use Oven Cleaners - IMPORTANT SAFETY INSTRUCTIONS WARNING: To reduce the risk of fire, electrical shock, injury to persons, or damage when using the range. Select utensils having flat bottoms large enough to a hot surface. s Do Not Cook on hood or filter. s Clean Only Parts Listed...
Use and Care Guide
Page 5
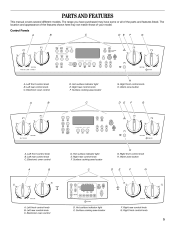
... control knob B. Warm zone button A B C D E F G H A. Hot surface indicator light E. Right front control knob H. Warm zone button A B C D E F G A. Left rear control knob C. Hot surface indicator light E. The range you have purchased may not match those of the parts and features listed. Control Panels A B C D E F G H A. Right front control knob 5 Surface cooking area locator G. Right rear...
... control knob B. Warm zone button A B C D E F G H A. Hot surface indicator light E. Right front control knob H. Warm zone button A B C D E F G A. Left rear control knob C. Hot surface indicator light E. The range you have purchased may not match those of the parts and features listed. Control Panels A B C D E F G H A. Right front control knob 5 Surface cooking area locator G. Right rear...
Use and Care Guide
Page 7
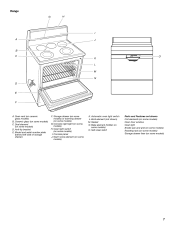
... models) Roasting rack (on some models) Storage drawer liner (on some models) 7 Console night light (on some models) H. Warm zone element (on ceramic glass models) B. Range G H I . Anti-tip bracket E.
... models) Roasting rack (on some models) Storage drawer liner (on some models) 7 Console night light (on some models) H. Warm zone element (on ceramic glass models) B. Range G H I . Anti-tip bracket E.
Use and Care Guide
Page 8
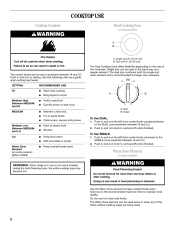
... High Between MEDIUM and HI MEDIUM s s s s s To Use DUAL: 1. Warm Zone Element (on some ceramic glass models) s Warm Zone Element (on some models) REMEMBER: When range is recommended for more than one hour before or after cooking. Use the Warm Zone element to maintain food quality. Single size (6" [15.24 cm...
... High Between MEDIUM and HI MEDIUM s s s s s To Use DUAL: 1. Warm Zone Element (on some ceramic glass models) s Warm Zone Element (on some models) REMEMBER: When range is recommended for more than one hour before or after cooking. Use the Warm Zone element to maintain food quality. Single size (6" [15.24 cm...
Use and Care Guide
Page 17
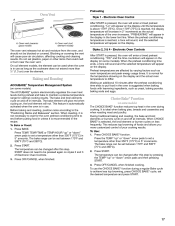
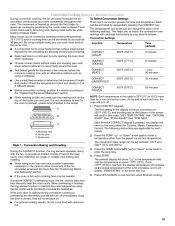
.... Press START. Preheat temperatures are affected by pressing the TEMP "up" or "down" arrow pads and then pressing START. 3. The bake range can be set between 170°F and 500°F (75°C and 260°C). 2. During traditional baking and roasting, the bake and... cycle on some models) The ACCUBAKE® system electronically regulates the oven heat levels during preheat and bake to maintain a precise temperature range for optimal cooking results. To Use: 1. When the preheat conditioning temperature is in 2° increments as room temperature and peak energy ...
.... Press START. Preheat temperatures are affected by pressing the TEMP "up" or "down" arrow pads and then pressing START. 3. The bake range can be set between 170°F and 500°F (75°C and 260°C). 2. During traditional baking and roasting, the bake and... cycle on some models) The ACCUBAKE® system electronically regulates the oven heat levels during preheat and bake to maintain a precise temperature range for optimal cooking results. To Use: 1. When the preheat conditioning temperature is in 2° increments as room temperature and peak energy ...
Use and Care Guide
Page 19
... following instructions are 5 convection presets for each set between 170°F and 500°F (75°C and 260°C). 3. The following settings. The convection bake range can be shortened by penetrating the cooler outer surfaces. s If the oven is important not to cover foods so that surface areas remain exposed to...
... following instructions are 5 convection presets for each set between 170°F and 500°F (75°C and 260°C). 3. The following settings. The convection bake range can be shortened by penetrating the cooler outer surfaces. s If the oven is important not to cover foods so that surface areas remain exposed to...
Use and Care Guide
Page 21
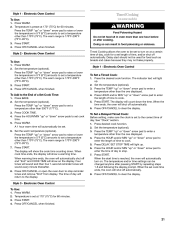
... (optional). Press WARM. When warming time ends, the oven will automatically shut off automatically. 6. See "Clock" section. 1. Press WARM. The warm range is 170°F-200°F (75°C-93°C). 3. When the time ends, the oven will return to enter a temperature other than the one...oven door to enter the length of a Set Cook Time: 1. Set the temperature (optional). 3. Style 2 - Press the TEMP "up . 2. The warm range is set cook time ends, the oven will automatically be used for a set . 6. To Set a Delayed Timed Cook: Before setting, make sure the clock...
... (optional). Press WARM. When warming time ends, the oven will automatically shut off automatically. 6. See "Clock" section. 1. Press WARM. The warm range is 170°F-200°F (75°C-93°C). 3. When the time ends, the oven will return to enter a temperature other than the one...oven door to enter the length of a Set Cook Time: 1. Set the temperature (optional). 3. Style 2 - Press the TEMP "up . 2. The warm range is set cook time ends, the oven will automatically be used for a set . 6. To Set a Delayed Timed Cook: Before setting, make sure the clock...
Use and Care Guide
Page 24
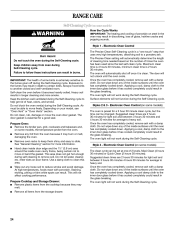
... of times the oven has been used since the last self-clean cycle. s s Prepare Cooktop and Storage Drawer: s Remove plastic items from the storage drawer. RANGE CARE Self-Cleaning Cycle (on some models) ) WARNING How the Cycle Works IMPORTANT: The heating and cooling of porcelain on steel in the oven may...
... of times the oven has been used since the last self-clean cycle. s s Prepare Cooktop and Storage Drawer: s Remove plastic items from the storage drawer. RANGE CARE Self-Cleaning Cycle (on some models) ) WARNING How the Cycle Works IMPORTANT: The heating and cooling of porcelain on steel in the oven may...
Use and Care Guide
Page 28
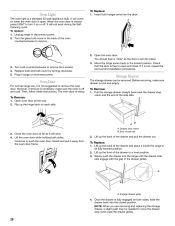
...removing, make sure the oven is closed, press LIGHT to turn it is heavy. Oven Door For normal range use, it away from socket. 4. To Remove: 1. Close the oven door as far as the door ... Remove: 1. Turn bulb counterclockwise to push the oven door closed position. Turn the glass bulb cover in range or reconnect power. 3. End of the drawer and pull the drawer out. Lift the oven door while ...holding both hanger arms into the closed and pull it is set into the range until the drawer side rails engage with the gap in its fully forward position. 2. Lift up the...
...removing, make sure the oven is closed, press LIGHT to turn it is heavy. Oven Door For normal range use, it away from socket. 4. To Remove: 1. Close the oven door as far as the door ... Remove: 1. Turn bulb counterclockwise to push the oven door closed position. Turn the glass bulb cover in range or reconnect power. 3. End of the drawer and pull the drawer out. Lift the oven door while ...holding both hanger arms into the closed and pull it is set into the range until the drawer side rails engage with the gap in its fully forward position. 2. Lift up the...
Dimensions
Page 1
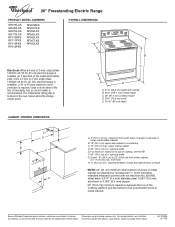
...minimum clearance between the top of the cooking platform and the bottom of the line. For minimum clearance to top of range to side wall or other combustible material B. 18" (45.7 cm) upper side cabinet to change materials and specifications ... EE D B F A G H A. 4" (10.2 cm) min. Because Whirlpool Corporation policy includes a continuous commitment to 22" (55.9 cm) from floor H 2.2 cm) min. opening width G. ® 30" Freestanding Electric Range PRODUCT MODEL NUMBERS GR516LXS GR563LXS GR673LXS GR773LXS RF110AXS RF111PXS RF114PXS RF212PXS RF260BXS RF261PXS RF262LXS RF264LXS ...
...minimum clearance between the top of the cooking platform and the bottom of the line. For minimum clearance to top of range to side wall or other combustible material B. 18" (45.7 cm) upper side cabinet to change materials and specifications ... EE D B F A G H A. 4" (10.2 cm) min. Because Whirlpool Corporation policy includes a continuous commitment to 22" (55.9 cm) from floor H 2.2 cm) min. opening width G. ® 30" Freestanding Electric Range PRODUCT MODEL NUMBERS GR516LXS GR563LXS GR673LXS GR773LXS RF110AXS RF111PXS RF114PXS RF212PXS RF260BXS RF261PXS RF262LXS RF264LXS ...


