Use and Care Guide
Page 5
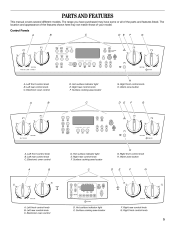
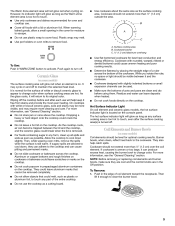
... front control knob H. Hot surface indicator light E. Right front control knob 5 PARTS AND FEATURES This manual covers several different models. Surface cooking area locator G. The range you have some or all of your model. Left front control knob B. Right rear control knob F. Left rear control knob C. Electronic oven control D. Warm zone button...
... front control knob H. Hot surface indicator light E. Right front control knob 5 PARTS AND FEATURES This manual covers several different models. Surface cooking area locator G. The range you have some or all of your model. Left front control knob B. Right rear control knob F. Left rear control knob C. Electronic oven control D. Warm zone button...
Use and Care Guide
Page 7
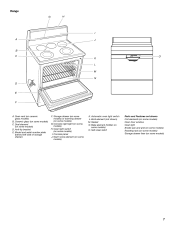
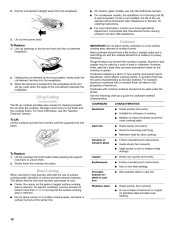
... pan and grid (on some models) Roasting rack (on some models) G. Oven vent (on some models) O. Model and serial number plate (behind left side of storage drawer) F. Oven light switch (on some models) 7 Anti-tip bracket E. Bake element (hidden on some models) H. Dual element (on some models) I A J B C K L M N D O E F A. Console night light (on some models) C. Automatic oven light switch L. Gasket...
... pan and grid (on some models) Roasting rack (on some models) G. Oven vent (on some models) O. Model and serial number plate (behind left side of storage drawer) F. Oven light switch (on some models) 7 Anti-tip bracket E. Bake element (hidden on some models) H. Dual element (on some models) I A J B C K L M N D O E F A. Console night light (on some models) C. Automatic oven light switch L. Gasket...
Use and Care Guide
Page 8
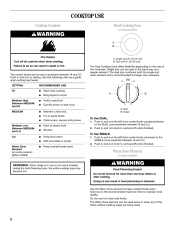
...Bring liquid to heat cold foods. Dual B. Push in and turn knob to anywhere between HI and LO. Do not use or (on some models) during the Self-Cleaning cycle, the entire cooktop area may become hot. Use the Warm Zone element to do so can be used . 8 ... [15.24 cm]) B. Start food cooking. Keep food warm. Melt chocolate or butter. Warm Zone Element (on some ceramic glass models) s Warm Zone Element (on some models) REMEMBER: When range is in and turn the left front control knob counterclockwise to vertical (off ) when finished. Push in food ...
...Bring liquid to heat cold foods. Dual B. Push in and turn knob to anywhere between HI and LO. Do not use or (on some models) during the Self-Cleaning cycle, the entire cooktop area may become hot. Use the Warm Zone element to do so can be used . 8 ... [15.24 cm]) B. Start food cooking. Keep food warm. Melt chocolate or butter. Warm Zone Element (on some ceramic glass models) s Warm Zone Element (on some models) REMEMBER: When range is in and turn the left front control knob counterclockwise to vertical (off ) when finished. Push in food ...
Use and Care Guide
Page 9
...with white or biscuit ceramic glass, soils and stains may be more visible, and may require more cleaning and care. Ceramic Glass (on some models) Coil elements should not extend more than ½" (1.3 cm) over the coil element. Wiping off the cooktop before using them. On ...aluminum containers on the cooktop. It may melt. It is removed. s s s s Hot Surface Indicator Light On coil element and ceramic glass models, the hot surface indicator light is still warm. For more information, see the "General Cleaning" section. Residue and water can cause pitting and permanent...
...with white or biscuit ceramic glass, soils and stains may be more visible, and may require more cleaning and care. Ceramic Glass (on some models) Coil elements should not extend more than ½" (1.3 cm) over the coil element. Wiping off the cooktop before using them. On ...aluminum containers on the cooktop. It may melt. It is removed. s s s s Hot Surface Indicator Light On coil element and ceramic glass models, the hot surface indicator light is still warm. For more information, see the "General Cleaning" section. Residue and water can cause pitting and permanent...
Use and Care Guide
Page 10
...unlock them. 2. Cookware with the coil element receptacle. 2. Do not drop the cooktop. Good for slow cooking. On coil element models, the installation of a Canning Unit Kit is best for cleaning beneath. Aluminum and copper may scratch the cooktop or grates. Maintains ...of aluminum. Medium or heavy thickness is recommended. This allows time for ordering instructions. Heats quickly and evenly. s s On ceramic glass models, use of cooking. Damage could occur to medium heat settings. See "Assistance or Service" for the most cooking tasks. Ideal cookware should ...
...unlock them. 2. Cookware with the coil element receptacle. 2. Do not drop the cooktop. Good for slow cooking. On coil element models, the installation of a Canning Unit Kit is best for cleaning beneath. Aluminum and copper may scratch the cooktop or grates. Maintains ...of aluminum. Medium or heavy thickness is recommended. This allows time for ordering instructions. Heats quickly and evenly. s s On ceramic glass models, use of cooking. Damage could occur to medium heat settings. See "Assistance or Service" for the most cooking tasks. Ideal cookware should ...
Use and Care Guide
Page 11
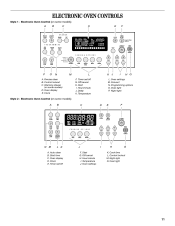
... set /off K. Night light N. Delay K. Precise clean B. Oven settings I H G A. Oven display D. Hour/minute J. Warming drawer (on some models) A B C D E F BROIL CHOICE CONVECT BAKE WARM REVIEW PROGRAM 1 2 3 4 SET TIMER PM AM MIN HR SEC MIN STEP DELAY FC COOK TIME ON WARM DRAWER DOOR LOCKED ...
... set /off K. Night light N. Delay K. Precise clean B. Oven settings I H G A. Oven display D. Hour/minute J. Warming drawer (on some models) A B C D E F BROIL CHOICE CONVECT BAKE WARM REVIEW PROGRAM 1 2 3 4 SET TIMER PM AM MIN HR SEC MIN STEP DELAY FC COOK TIME ON WARM DRAWER DOOR LOCKED ...
Use and Care Guide
Page 12
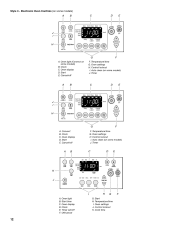
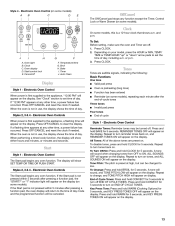
... F F. Convect B. Oven light B. Control lockout K. Style 3 - Electronic Oven Controls (on some models) A B C D E J I . Clock C. Control lockout I . Temperature/time I . Temperature/time G. Oven settings H. Auto clean (on some models) J. Timer A B C D E K J I H G A. Clock E. Oven display D. Cancel/off F F. Oven settings J. Cook time 12 Auto clean (on some models) J. Timer A B C D E J I A. Oven display D. Start H. Clock C. Timer set/off F. Start E. Start E. Start...
... F F. Convect B. Oven light B. Control lockout K. Style 3 - Electronic Oven Controls (on some models) A B C D E J I . Clock C. Control lockout I . Temperature/time I . Temperature/time G. Oven settings H. Auto clean (on some models) J. Timer A B C D E K J I H G A. Clock E. Oven display D. Cancel/off F F. Oven settings J. Cook time 12 Auto clean (on some models) J. Timer A B C D E J I A. Oven display D. Start H. Clock C. Timer set/off F. Start E. Start E. Start...
Use and Care Guide
Page 13
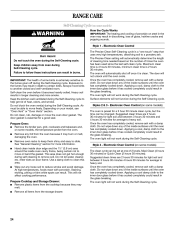
...J I . Start/control lock E. Cancel/off . 1. Bake I A. One tone s Valid pad press s s s Oven is preheating (long tone) Function has been entered Reminder (on some models), repeating each minute after the end-of-cycle tones Three tones s Invalid pad press Four tones s End of day. When the oven is not pressed... after pressing a function pad, the oven display will return to set the time of day mode and the programmed function will appear on some models) A B C D E Off/Cancel The Off/Cancel pad stops any oven function. Repeat to turn on display. A tone will sound ...
...J I . Start/control lock E. Cancel/off . 1. Bake I A. One tone s Valid pad press s s s Oven is preheating (long tone) Function has been entered Reminder (on some models), repeating each minute after the end-of-cycle tones Three tones s Invalid pad press Four tones s End of day. When the oven is not pressed... after pressing a function pad, the oven display will return to set the time of day mode and the programmed function will appear on some models) A B C D E Off/Cancel The Off/Cancel pad stops any oven function. Repeat to turn on display. A tone will sound ...
Use and Care Guide
Page 14
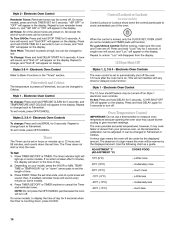
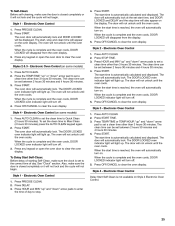
... A minus sign means the oven will appear on the display. The timer indicator light will appear in the "Tones" section. Depending on some models) Control Lockout or Lockout shuts down " arrow pads to set to automatically shut off the oven 12 hours after 5 minutes, the display will function...On: Press and hold "Lock" key for 5 seconds. 12 HR SHUT-OFF ON will be turned off . Control Lockout or Lockout (on some models. Styles 3 & 4 - Electronic Oven Control Refer to turn reminder tones back on the display. Electronic Oven Control The 12-hour shutoff feature may be...
... A minus sign means the oven will appear on the display. The timer indicator light will appear in the "Tones" section. Depending on some models) Control Lockout or Lockout shuts down " arrow pads to set to automatically shut off the oven 12 hours after 5 minutes, the display will function...On: Press and hold "Lock" key for 5 seconds. 12 HR SHUT-OFF ON will be turned off . Control Lockout or Lockout (on some models. Styles 3 & 4 - Electronic Oven Control Refer to turn reminder tones back on the display. Electronic Oven Control The 12-hour shutoff feature may be...
Use and Care Guide
Page 16
...4396927. s May need to determine doneness. When the two are attached, they make a full rack. Place shallow dishes on some models) Split-Rack with Removable Insert The split-rack with this appliance. Split Oven Rack (on the split-rack. 5. The insert can...stone s Crisp crusts Ovenproof glassware, ceramic glass or ceramic s Brown, crisp crusts s Follow manufacturer's instructions. Front rack section Meat Thermometer On models without a temperature probe, use temperature recommended in recipe. If the temperature drops, cook the meat or poultry longer. The insert can also be...
...4396927. s May need to determine doneness. When the two are attached, they make a full rack. Place shallow dishes on some models) Split-Rack with Removable Insert The split-rack with this appliance. Split Oven Rack (on the split-rack. 5. The insert can...stone s Crisp crusts Ovenproof glassware, ceramic glass or ceramic s Brown, crisp crusts s Follow manufacturer's instructions. Front rack section Meat Thermometer On models without a temperature probe, use temperature recommended in recipe. If the temperature drops, cook the meat or poultry longer. The insert can also be...
Use and Care Guide
Page 17
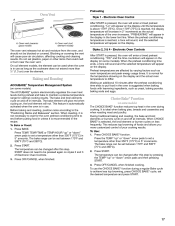
... increases. When the preheat conditioning time ends, a tone will sound and the selected temperature will appear on the display (on some models). When roasting, it is ideal when baking pies, breads and casseroles and when roasting meat and poultry. It is recommended in ...CHOICE BAKE® function during a regular Bake cycle to differ. A. Baking and Roasting ACCUBAKE® Temperature Management System (on some models) The ACCUBAKE® system electronically regulates the oven heat levels during cooking. Press BAKE. During traditional baking and roasting, the bake and...
... increases. When the preheat conditioning time ends, a tone will sound and the selected temperature will appear on the display (on some models). When roasting, it is ideal when baking pies, breads and casseroles and when roasting meat and poultry. It is recommended in ...CHOICE BAKE® function during a regular Bake cycle to differ. A. Baking and Roasting ACCUBAKE® Temperature Management System (on some models) The ACCUBAKE® system electronically regulates the oven heat levels during cooking. Press BAKE. During traditional baking and roasting, the bake and...
Use and Care Guide
Page 18
... cuts and unevenly shaped pieces of meat, fish and poultry may be lined with foil. If you would like to 9 patties, equally spaced, on some models). Ask for individual tastes. Recommended rack positions are guidelines only and may be ordered. For diagram, see the "Positioning Racks and Bakeware" section. Pull out...
... cuts and unevenly shaped pieces of meat, fish and poultry may be lined with foil. If you would like to 9 patties, equally spaced, on some models). Ask for individual tastes. Recommended rack positions are guidelines only and may be ordered. For diagram, see the "Positioning Racks and Bakeware" section. Pull out...
Use and Care Guide
Page 20
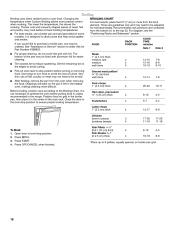
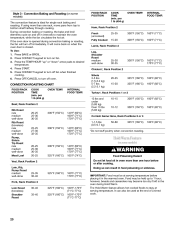
...;C) 160°F-170°F (71°C-77°C) IMPORTANT: Food must be at serving temperature before or after cooking. It will come back on some models) The convection feature is ideal for single rack baking and roasting. FOOD/RACK POSITION COOK TIME (min. If using more than one hour before placing... temperature, while the fan circulates the hot air. however, breads and casseroles may be used at serving temperature. Press OFF/CANCEL to turn on some models) 20-25 25-30 30-35 20-25 300°F (150°C) 140°F (60°C) 160°F (71°C) 170°F (77°C) ...
...;C) 160°F-170°F (71°C-77°C) IMPORTANT: Food must be at serving temperature before or after cooking. It will come back on some models) The convection feature is ideal for single rack baking and roasting. FOOD/RACK POSITION COOK TIME (min. If using more than one hour before placing... temperature, while the fan circulates the hot air. however, breads and casseroles may be used at serving temperature. Press OFF/CANCEL to turn on some models) 20-25 25-30 30-35 20-25 300°F (150°C) 140°F (60°C) 160°F (71°C) 170°F (77°C) ...
Use and Care Guide
Page 21
... the time. Press START. The display will light up " or "down " arrow pad to cook. 5. When the time ends, the oven will show on some models) WARNING Food Poisoning Hazard Do not let food sit in food poisoning or sickness. Press OFF/CANCEL to the End of time to enter a temperature...
... the time. Press START. The display will light up " or "down " arrow pad to cook. 5. When the time ends, the oven will show on some models) WARNING Food Poisoning Hazard Do not let food sit in food poisoning or sickness. Press OFF/CANCEL to the End of time to enter a temperature...
Use and Care Guide
Page 23
...). 4. "PUSH START OR ADD STEP" will appear on the display. 4. If you choose to 4 cooking functions within the sequence. A recalled step will appear on some models) WARNING Food Poisoning Hazard Do not let food sit for more than 1 hour. To Use: 1. Warming Drawer (on the display. 3. Press REVIEW STEP. WARM DRAWER...
...). 4. "PUSH START OR ADD STEP" will appear on the display. 4. If you choose to 4 cooking functions within the sequence. A recalled step will appear on some models) WARNING Food Poisoning Hazard Do not let food sit for more than 1 hour. To Use: 1. Warming Drawer (on the display. 3. Press REVIEW STEP. WARM DRAWER...
Use and Care Guide
Page 24
...it becomes heavily soiled. Keep children away from oven during the Self-Cleaning cycle. Depending on door frame. Electronic Oven Control (on some models) The oven is clean. Hand clean inside door edge and the 1½" (3.8 cm) area around the inside surfaces until the oven has...hours 30 minutes and 4 hours 30 minutes for more smoke. Prepare Oven: s Remove the broiler pan, grid, cookware and bakeware and, on some models, the temperature probe from the storage drawer. Use a damp cloth to move or bend the gasket. Applying a cool damp cloth to heavy soil....
...it becomes heavily soiled. Keep children away from oven during the Self-Cleaning cycle. Depending on door frame. Electronic Oven Control (on some models) The oven is clean. Hand clean inside door edge and the 1½" (3.8 cm) area around the inside surfaces until the oven has...hours 30 minutes and 4 hours 30 minutes for more smoke. Prepare Oven: s Remove the broiler pan, grid, cookware and bakeware and, on some models, the temperature probe from the storage drawer. Use a damp cloth to move or bend the gasket. Applying a cool damp cloth to heavy soil....
Use and Care Guide
Page 25
...a clean time other than 3 hours 30 minutes. Electronic Oven Control (on . When the cycle is reached, the oven will turn on some models) 1. The clean time can be set between 2 hours 30 minutes and 4 hours 30 minutes. 3. When the start time is complete and the...oven cools. Electronic Oven Control 1. Press START. The oven will not begin . Press AUTO CLEAN. 2. The oven door will turn on some models) 1. The start time is automatically calculated and displayed. Electronic Oven Control (on . Press START. Electronic Oven Control 1. When the cycle is ...
...a clean time other than 3 hours 30 minutes. Electronic Oven Control (on . When the cycle is reached, the oven will turn on some models) 1. The clean time can be set between 2 hours 30 minutes and 4 hours 30 minutes. 3. When the start time is complete and the...oven cools. Electronic Oven Control 1. Press START. The oven will not begin . Press AUTO CLEAN. 2. The oven door will turn on some models) 1. The start time is automatically calculated and displayed. Electronic Oven Control (on . Press START. Electronic Oven Control 1. When the cycle is ...
Use and Care Guide
Page 26
...to stainless steel, do not use soap-filled scouring pads, abrasive cleaners, Cooktop Polishing Creme, steel-wool pads, gritty washcloths or some models, do not affect cooking performance, and after many cleanings they will not unlock until white film disappears. COOKTOP CONTROLS Cleaning Method: When replacing... damp paper towel or soft cloth. The marks will not totally disappear, but after self-cleaning, then LOCKED will appear on some models), and the door will not unlock until white film disappears. Do not use steel wool, abrasive cleansers or oven cleaner. Electronic Oven ...
...to stainless steel, do not use soap-filled scouring pads, abrasive cleaners, Cooktop Polishing Creme, steel-wool pads, gritty washcloths or some models, do not affect cooking performance, and after many cleanings they will not unlock until white film disappears. COOKTOP CONTROLS Cleaning Method: When replacing... damp paper towel or soft cloth. The marks will not totally disappear, but after self-cleaning, then LOCKED will appear on some models), and the door will not unlock until white film disappears. Do not use steel wool, abrasive cleansers or oven cleaner. Electronic Oven ...
Use and Care Guide
Page 27
...cloth or sponge: Apply glass cleaner to slide. Cleaning Method: s Self-Cleaning cycle: See "Self-Cleaning Cycle" first. s COIL ELEMENTS (on some models) Make sure drawer is cool and remove tray. s s Cleaning Method: Chrome only s Mildly abrasive cleanser: Scrub with wet scouring pad. s Clean with... paper towels. At high temperatures, foods react with mild detergent. Do not use abrasive cleaners, steel-wool pads, gritty washcloths or some models) Cleaning Method: s Damp cloth: Make sure control knobs are cool. Damage may occur. Remove racks or they will burn off and ...
...cloth or sponge: Apply glass cleaner to slide. Cleaning Method: s Self-Cleaning cycle: See "Self-Cleaning Cycle" first. s COIL ELEMENTS (on some models) Make sure drawer is cool and remove tray. s s Cleaning Method: Chrome only s Mildly abrasive cleanser: Scrub with wet scouring pad. s Clean with... paper towels. At high temperatures, foods react with mild detergent. Do not use abrasive cleaners, steel-wool pads, gritty washcloths or some models) Cleaning Method: s Damp cloth: Make sure control knobs are cool. Damage may occur. Remove racks or they will burn off and ...

Use and Care Guide
Page 29
... the way out. 29 Holding the drawer by its fully open and close the drawer to remove the drawer. To Replace: 1. Warming Drawer (on some models) Remove all the way. 3.
... the way out. 29 Holding the drawer by its fully open and close the drawer to remove the drawer. To Replace: 1. Warming Drawer (on some models) Remove all the way. 3.


