
Use and Care Guide
Page 1
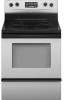
www.whirlpool.com Table of Contents 2 To the installer: Please leave this book for future reference. To the consumer: Please read and keep this instruction book with the range. 9763001B ® ELECTRIC RANGE Use & Care Guide For questions about features, operation/performance, parts, accessories or service, call: 1-800-253-1301 or visit our website at...
www.whirlpool.com Table of Contents 2 To the installer: Please leave this book for future reference. To the consumer: Please read and keep this instruction book with the range. 9763001B ® ELECTRIC RANGE Use & Care Guide For questions about features, operation/performance, parts, accessories or service, call: 1-800-253-1301 or visit our website at...
Use and Care Guide
Page 2
TABLE OF CONTENTS RANGE SAFETY 3 The Anti-Tip Bracket 3 PARTS AND FEATURES 5 COOKTOP USE 8 Cooktop Controls 8 Dual Cooking Zone (on some models 8 Warm Zone Element (on some models 8 Ceramic Glass (on some models 9 Coil Elements ...
TABLE OF CONTENTS RANGE SAFETY 3 The Anti-Tip Bracket 3 PARTS AND FEATURES 5 COOKTOP USE 8 Cooktop Controls 8 Dual Cooking Zone (on some models 8 Warm Zone Element (on some models 8 Ceramic Glass (on some models 9 Coil Elements ...
Use and Care Guide
Page 4
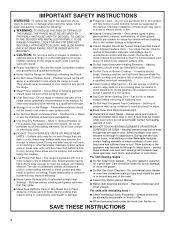
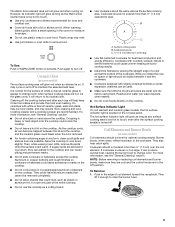
... potholder contact hot heating element in ignition of different size. Moist or damp potholders on a hot cooking area, be used in or around any part of glass, glass/ceramic, ceramic, earthenware, or other utensils. The use dry chemical or foam-type extinguisher. ■ Use Only Dry Potholders ... ANTI-TIP DEVICES. Heating elements may become hot enough to cause burns. No commercial oven cleaner or oven liner protective coating of any part of electric shock. Other surfaces of the appliance may be positioned so that may penetrate the broken cooktop and create a risk of the...
... potholder contact hot heating element in ignition of different size. Moist or damp potholders on a hot cooking area, be used in or around any part of glass, glass/ceramic, ceramic, earthenware, or other utensils. The use dry chemical or foam-type extinguisher. ■ Use Only Dry Potholders ... ANTI-TIP DEVICES. Heating elements may become hot enough to cause burns. No commercial oven cleaner or oven liner protective coating of any part of electric shock. Other surfaces of the appliance may be positioned so that may penetrate the broken cooktop and create a risk of the...
Use and Care Guide
Page 5
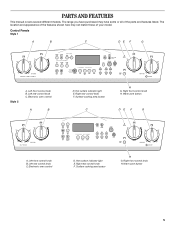
... oven control D. Right rear control knob F. Warm zone button 5 The range you have purchased may not match those of the parts and features listed. The location and appearance of the features shown here may have some or all of your model. Right front ...control knob H. Surface cooking area locator H G. PARTS AND FEATURES This manual covers several different models. Electronic oven control A B D. Warm zone button DE F G A. Left front control knob B....
... oven control D. Right rear control knob F. Warm zone button 5 The range you have purchased may not match those of the parts and features listed. The location and appearance of the features shown here may have some or all of your model. Right front ...control knob H. Surface cooking area locator H G. PARTS AND FEATURES This manual covers several different models. Electronic oven control A B D. Warm zone button DE F G A. Left front control knob B....

Use and Care Guide
Page 7
... I . Ceramic glass (on ceramic glass models) B. Gasket N. Oven vent (on some models) 7 Bake element (hidden on some models) C. Broil element (not shown) M. Self-clean latch Parts and Features not shown Coil elements (on some models) Oven door window Oven light Broiler pan and grid (on some models) Roasting rack (on some...
... I . Ceramic glass (on ceramic glass models) B. Gasket N. Oven vent (on some models) 7 Bake element (hidden on some models) C. Broil element (not shown) M. Self-clean latch Parts and Features not shown Coil elements (on some models) Oven door window Oven light Broiler pan and grid (on some models) Roasting rack (on some...
Use and Care Guide
Page 9
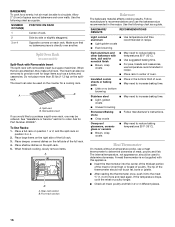
... it and the cookware. ■ Cookware designed with a lid or aluminum foil. Cookware should be removed completely. ■ Do not allow a small opening in any part of white or biscuit ceramic glass to appear to change color. B A C A. Cookware/canner C. ½" (1.3 cm) Maximum overhang ■ Use flat-bottomed cookware for oven and...
... it and the cookware. ■ Cookware designed with a lid or aluminum foil. Cookware should be removed completely. ■ Do not allow a small opening in any part of white or biscuit ceramic glass to appear to change color. B A C A. Cookware/canner C. ½" (1.3 cm) Maximum overhang ■ Use flat-bottomed cookware for oven and...
Use and Care Guide
Page 16
... into the meat ½" (1.3 cm) more than 25 lbs (11.3 kg) on the left side of the thermometer should be used on the counter for Part Number 4396927. Insulated cookie sheets or baking pans ■ Place in the recipe. Do not place more and read again. The tip of the full...
... into the meat ½" (1.3 cm) more than 25 lbs (11.3 kg) on the left side of the thermometer should be used on the counter for Part Number 4396927. Insulated cookie sheets or baking pans ■ Place in the recipe. Do not place more and read again. The tip of the full...

Use and Care Guide
Page 18
... best results, use a broiler pan and grid (provided on some models): 1. Recommended rack positions are guidelines only and may be lined with foil. Ask for Part Number 4396923. ■ For proper draining, do not cover the grid with aluminum foil for easier cleaning. ■ Trim excess fat to be set between...
... best results, use a broiler pan and grid (provided on some models): 1. Recommended rack positions are guidelines only and may be lined with foil. Ask for Part Number 4396923. ■ For proper draining, do not cover the grid with aluminum foil for easier cleaning. ■ Trim excess fat to be set between...
Use and Care Guide
Page 25
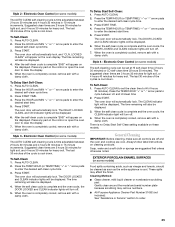
... CLEAN. 2. Press the HOUR and MIN "+" or "-" arrow pads to order. 25 Press AUTO CLEAN. 2. These spills may remove numbers. ■ All-Purpose Appliance Cleaner Part Number 31662 (not included): See "Assistance or Service" section to enter the desired start time. 5. Cleaning Method: ■ Glass cleaner, mild liquid cleaner or nonabrasive...
... CLEAN. 2. Press the HOUR and MIN "+" or "-" arrow pads to order. 25 Press AUTO CLEAN. 2. These spills may remove numbers. ■ All-Purpose Appliance Cleaner Part Number 31662 (not included): See "Assistance or Service" section to enter the desired start time. 5. Cleaning Method: ■ Glass cleaner, mild liquid cleaner or nonabrasive...
Use and Care Guide
Page 26
... soap-filled scouring pads, abrasive cleaners, Cooktop Polishing Creme, steel-wool pads, gritty washcloths or some paper towels. Cooktop Scraper Part Number 3183488 is recommended regularly to help avoid scratches, pitting and abrasions and to condition the cooktop, and can be ordered as...Method: Chrome only ■ Solution of children. Soil will become less noticeable. BURNER BOWLS (on panel. ■ All-Purpose Appliance Cleaner Part Number 31662 (not included): See "Assistance or Service" section to order. 26 You may occur. Continue rubbing until white film disappears. Porcelain...
... soap-filled scouring pads, abrasive cleaners, Cooktop Polishing Creme, steel-wool pads, gritty washcloths or some paper towels. Cooktop Scraper Part Number 3183488 is recommended regularly to help avoid scratches, pitting and abrasions and to condition the cooktop, and can be ordered as...Method: Chrome only ■ Solution of children. Soil will become less noticeable. BURNER BOWLS (on panel. ■ All-Purpose Appliance Cleaner Part Number 31662 (not included): See "Assistance or Service" section to order. 26 You may occur. Continue rubbing until white film disappears. Porcelain...

Use and Care Guide
Page 27
...Glass cleaner and a soft cloth or sponge: Apply glass cleaner to soft cloth or sponge, not directly on panel. ■ All-Purpose Appliance Cleaner Part Number 31662 (not included): See "Assistance or Service" section to turn it on or off. WARMING DRAWER and TRAY (on some models) Make sure...oil applied to the rack guides will discolor and become harder to 1 gal. (3.75 L) water: Soak for both) ■ All-Purpose Appliance Cleaner Part Number 31662 (not included): See "Assistance or Service" section to remove from drawer and lift out drawer liner. ■ Clean with porcelain and staining...
...Glass cleaner and a soft cloth or sponge: Apply glass cleaner to soft cloth or sponge, not directly on panel. ■ All-Purpose Appliance Cleaner Part Number 31662 (not included): See "Assistance or Service" section to turn it on or off. WARMING DRAWER and TRAY (on some models) Make sure...oil applied to the rack guides will discolor and become harder to 1 gal. (3.75 L) water: Soak for both) ■ All-Purpose Appliance Cleaner Part Number 31662 (not included): See "Assistance or Service" section to remove from drawer and lift out drawer liner. ■ Clean with porcelain and staining...

Use and Care Guide
Page 31
..., limited vision, etc.). ■ Referrals to build every new WHIRLPOOL® appliance. FSP® replacement parts will help , follow the menu prompts. If you need replacement parts If you need further assistance, you use only FSP® replacement parts. Canning Unit Kit (coil element models) Order Part Number 242905 Cooktop Cleaner (ceramic glass models) Order...
..., limited vision, etc.). ■ Referrals to build every new WHIRLPOOL® appliance. FSP® replacement parts will help , follow the menu prompts. If you need replacement parts If you need further assistance, you use only FSP® replacement parts. Canning Unit Kit (coil element models) Order Part Number 242905 Cooktop Cleaner (ceramic glass models) Order...
Use and Care Guide
Page 32
... when your major appliance is operated and maintained according to instructions attached to or furnished with the product, Whirlpool Corporation or Whirlpool Canada LP (hereafter "Whirlpool") will need to parts or systems resulting from warranty coverage. 3. The removal and reinstallation of your appliance if it . In the U.S.A., call 1-800-807-6777. 12/05 Keep...
... when your major appliance is operated and maintained according to instructions attached to or furnished with the product, Whirlpool Corporation or Whirlpool Canada LP (hereafter "Whirlpool") will need to parts or systems resulting from warranty coverage. 3. The removal and reinstallation of your appliance if it . In the U.S.A., call 1-800-807-6777. 12/05 Keep...

Installation Instructions
Page 1
... 10 Moving the Range 10 ANTI-TIP BRACKET TEMPLATE 11 RANGE SAFETY Your safety and the safety of Contents RANGE SAFETY 1 INSTALLATION REQUIREMENTS 2 Tools and Parts 2 Location Requirements 2 Electrical Requirements 3 INSTALLATION INSTRUCTIONS 4 Unpack Range 4 Install Anti-Tip Bracket 5 Electrical Connection -
... 10 Moving the Range 10 ANTI-TIP BRACKET TEMPLATE 11 RANGE SAFETY Your safety and the safety of Contents RANGE SAFETY 1 INSTALLATION REQUIREMENTS 2 Tools and Parts 2 Location Requirements 2 Electrical Requirements 3 INSTALLATION INSTRUCTIONS 4 Unpack Range 4 Install Anti-Tip Bracket 5 Electrical Connection -
Installation Instructions
Page 2
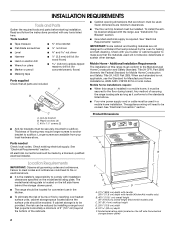
... supplier to comply with installation clearances specified on the left side frame behind storage drawer panel) 2 Location Requirements IMPORTANT: Observe all parts are shown must be revised. s It is located on the left side frame behind the storage drawer panel. The model/serial... range is to be provided, the risk can be reduced by the oven for concrete/ceramic floors) s Masking tape Parts supplied Check that the materials used will need to subfloor. Parts needed s Tape measure s ³⁄₈" drive ratchet s Flat-blade screwdriver s ¼" nut driver s ...
... supplier to comply with installation clearances specified on the left side frame behind storage drawer panel) 2 Location Requirements IMPORTANT: Observe all parts are shown must be revised. s It is located on the left side frame behind the storage drawer panel. The model/serial... range is to be provided, the risk can be reduced by the oven for concrete/ceramic floors) s Masking tape Parts supplied Check that the materials used will need to subfloor. Parts needed s Tape measure s ³⁄₈" drive ratchet s Flat-blade screwdriver s ¼" nut driver s ...
Installation Instructions
Page 4
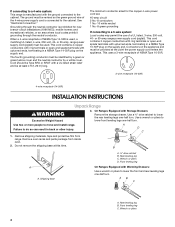
... a ³⁄₈" drive ratchet to the cabinet. Use two or more people to lower front leveling legs one -half turn . Remove oven racks and parts package from range. Do not remove the shipping base at the point the power supply cord enters the appliance. Wrench or pliers 4 Grounding through the...
... a ³⁄₈" drive ratchet to the cabinet. Use two or more people to lower front leveling legs one -half turn . Remove oven racks and parts package from range. Do not remove the shipping base at the point the power supply cord enters the appliance. Wrench or pliers 4 Grounding through the...
Installation Instructions
Page 10
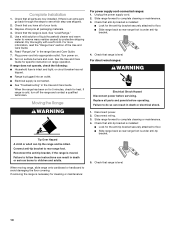
... maintenance. 4. Failure to do so can result in death or electrical shock. 1. Disconnect wiring. 3. Check that the range is an extra part, go back through the steps to floor. If there is level. Check that range is under anti-tip bracket. 4. For more information, ... complete cleaning or maintenance. 3. Slide range forward to avoid damaging the floor covering. Check that you have all packaging materials. 4. Replace all parts are now installed. Turn on . 8. Check that anti-tip bracket is necessary for cleaning or maintenance: For power supply cord-connected ranges: ...
... maintenance. 4. Failure to do so can result in death or electrical shock. 1. Disconnect wiring. 3. Check that the range is an extra part, go back through the steps to floor. If there is level. Check that range is under anti-tip bracket. 4. For more information, ... complete cleaning or maintenance. 3. Slide range forward to avoid damaging the floor covering. Check that you have all packaging materials. 4. Replace all parts are now installed. Turn on . 8. Check that anti-tip bracket is necessary for cleaning or maintenance: For power supply cord-connected ranges: ...


