Use and Care Guide
Page 2
...AND FEATURES 5 COOKTOP USE 8 Cooktop Controls 8 Dual Cooking Zone (on some models 8 Warm Zone Element (on some models 8 Ceramic Glass (on some models 9 Coil Elements and Burner Bowls (on some models 9 Lift-up Cooktop (on some models 10 Home Canning 10 Cookware 10 ELECTRONIC OVEN CONTROLS 11 Display 13 Start 13 Off.../Cancel 13 Clock 13 Range Lights 13 Tones 14 Fahrenheit and Celsius 14 Timer 14 Oven Control Lockout (on some models 14 12-Hour Shut-Off 15 Oven Temperature Control 15 OVEN USE 15 Aluminum Foil 15 Positioning Racks and Bakeware 15 Split Oven Rack...
...AND FEATURES 5 COOKTOP USE 8 Cooktop Controls 8 Dual Cooking Zone (on some models 8 Warm Zone Element (on some models 8 Ceramic Glass (on some models 9 Coil Elements and Burner Bowls (on some models 9 Lift-up Cooktop (on some models 10 Home Canning 10 Cookware 10 ELECTRONIC OVEN CONTROLS 11 Display 13 Start 13 Off.../Cancel 13 Clock 13 Range Lights 13 Tones 14 Fahrenheit and Celsius 14 Timer 14 Oven Control Lockout (on some models 14 12-Hour Shut-Off 15 Oven Temperature Control 15 OVEN USE 15 Aluminum Foil 15 Positioning Racks and Bakeware 15 Split Oven Rack...
Use and Care Guide
Page 5
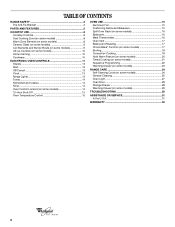
...Warm zone button DE F G A. Left front control knob B. Surface cooking area locator H G. Warm zone button 5 The range you have some or all of your model. Hot surface indicator light E. Right rear control knob F. Electronic oven control A B D. Electronic oven control D. Right front control knob H. Surface cooking area locator C H... G. Left rear control knob C. Hot surface indicator light E. Control Panels Style 1 A B C DE F G Style 2 A. PARTS AND FEATURES This manual covers several different models. Right front control knob H. Left rear control knob C.
...Warm zone button DE F G A. Left front control knob B. Surface cooking area locator H G. Warm zone button 5 The range you have some or all of your model. Hot surface indicator light E. Right rear control knob F. Electronic oven control A B D. Electronic oven control D. Right front control knob H. Surface cooking area locator C H... G. Left rear control knob C. Hot surface indicator light E. Control Panels Style 1 A B C DE F G Style 2 A. PARTS AND FEATURES This manual covers several different models. Right front control knob H. Left rear control knob C.

Use and Care Guide
Page 7
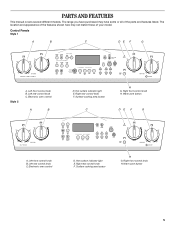
... and Features not shown Coil elements (on some models) Oven door window Oven light Broiler pan and grid (on some models) Roasting rack (on some models) Storage drawer liner (on some models) C. Dual element (on some models) O. Oven light switch (on some models) 7 Bake element (hidden on some models) G. Surface cooking area locator H E Right rear control knob...
... and Features not shown Coil elements (on some models) Oven door window Oven light Broiler pan and grid (on some models) Roasting rack (on some models) Storage drawer liner (on some models) C. Dual element (on some models) O. Oven light switch (on some models) 7 Bake element (hidden on some models) G. Surface cooking area locator H E Right rear control knob...
Use and Care Guide
Page 8
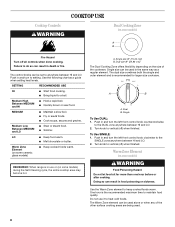
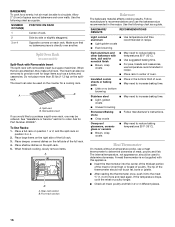
...sickness. MEDIUM ■ Maintain a slow boil. ■ Fry or sauté foods. ■ Cook soups, sauces and gravies. Warm Zone Element (on some models) during the Self-Cleaning cycle, the entire cooktop area may become hot. Single size can be used alone or when any of the cookware. To... control knob counterclockwise to setting. Use the Warm Zone element to heat cold foods. COOKTOP USE Cooktop Controls WARNING Dual Cooking Zone (on some models) WARNING Food Poisoning Hazard Do not let food sit for larger size cookware. The control knobs can be set to vertical (off ) when finished...
...sickness. MEDIUM ■ Maintain a slow boil. ■ Fry or sauté foods. ■ Cook soups, sauces and gravies. Warm Zone Element (on some models) during the Self-Cleaning cycle, the entire cooktop area may become hot. Single size can be used alone or when any of the cookware. To... control knob counterclockwise to setting. Use the Warm Zone element to heat cold foods. COOKTOP USE Cooktop Controls WARNING Dual Cooking Zone (on some models) WARNING Food Poisoning Hazard Do not let food sit for larger size cookware. The control knobs can be set to vertical (off ) when finished...
Use and Care Guide
Page 9
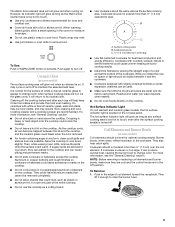
...sugary spills are hot. Residue and water can produce excess heat, causing the burner bowl to activate. To Remove: 1. Ceramic Glass (on some models) Coil elements should be visible between the lid and the cooktop, and the ceramic glass could melt, such as the surface cooking area. Allow...They could leave aluminum marks that could break when the lid is still warm. Hot Surface Indicator Light On coil element and ceramic glass models, the hot surface indicator light is normal for best heat conduction and energy efficiency. Push in the Off position. Push again to change...
...sugary spills are hot. Residue and water can produce excess heat, causing the burner bowl to activate. To Remove: 1. Ceramic Glass (on some models) Coil elements should be visible between the lid and the cooktop, and the ceramic glass could melt, such as the surface cooking area. Allow...They could leave aluminum marks that could break when the lid is still warm. Hot Surface Indicator Light On coil element and ceramic glass models, the hot surface indicator light is normal for best heat conduction and energy efficiency. Push in the Off position. Push again to change...
Use and Care Guide
Page 10
...opposite the receptacle. For more than ½" (1.3 cm) beyond the surface cooking area or element. ■ Do not place canner on some models) The lift-up openings in the burner bowl with the coil element receptacle. 2. Slowly lower the cooktop into place. On electric cooktops, canners ...its base material. To Replace: 1. Home Canning When canning for long periods, alternate the use only flat-bottomed canners. ■ On coil element models, the installation of cooking. ■ Medium or heavy thickness is best for all types of a Canning Unit Kit is pushed into the receptacle. 3....
...opposite the receptacle. For more than ½" (1.3 cm) beyond the surface cooking area or element. ■ Do not place canner on some models) The lift-up openings in the burner bowl with the coil element receptacle. 2. Slowly lower the cooktop into place. On electric cooktops, canners ...its base material. To Replace: 1. Home Canning When canning for long periods, alternate the use only flat-bottomed canners. ■ On coil element models, the installation of cooking. ■ Medium or heavy thickness is best for all types of a Canning Unit Kit is pushed into the receptacle. 3....
Use and Care Guide
Page 11
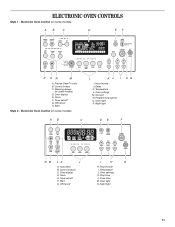
... Clean™ cycle B. Oven display E. Convect N. Programming options O. Start G. Oven light N. Electronic Oven Control (on some models) D. Oven settings M. ELECTRONIC OVEN CONTROLS Style 1 - Warming drawer (on some models) L KJ I I . Clock F. Electronic Oven Control (on some models) AB C D EF BROIL CONVECT REVIEW CHOICE BAKE WARM PROGRAM STEP 1 2 3 4 SET TIMER DELAY MIN HR PM AM...
... Clean™ cycle B. Oven display E. Convect N. Programming options O. Start G. Oven light N. Electronic Oven Control (on some models) D. Oven settings M. ELECTRONIC OVEN CONTROLS Style 1 - Warming drawer (on some models) L KJ I I . Clock F. Electronic Oven Control (on some models) AB C D EF BROIL CONVECT REVIEW CHOICE BAKE WARM PROGRAM STEP 1 2 3 4 SET TIMER DELAY MIN HR PM AM...

Use and Care Guide
Page 12
Electronic Oven Controls (on some models) J. Oven display D. Oven settings H. Timer AB C DE K J A. Oven display D. Off/cancel I . Control lockout K. Start E. Temperature/time G. Cook time 12 Clock C. Oven light B. Clock E. Start H. Oven settings J. Auto clean (on some models) B. Temperature/time I HG F G. Cancel/off F. Control lockout I H G A. Start time C. Timer set/off F F. Style 3 - Oven light (Convect on some models) AB C DE J I .
Electronic Oven Controls (on some models) J. Oven display D. Oven settings H. Timer AB C DE K J A. Oven display D. Off/cancel I . Control lockout K. Start E. Temperature/time G. Cook time 12 Clock C. Oven light B. Clock E. Start H. Oven settings J. Auto clean (on some models) B. Temperature/time I HG F G. Cancel/off F. Control lockout I H G A. Start time C. Timer set/off F F. Style 3 - Oven light (Convect on some models) AB C DE J I .

Use and Care Guide
Page 13
... a timed cook function, the display will not come on the display. Styles 2, 3 & 4 - Press CLOCK or START. Night Light (on some models) Press NIGHT LIGHT to set time of day. Temperature/time G. Timer J. Auto Clean Display Style 1 - When the oven is opened. Start Style 1... the oven and Timer are off G F F. Oven display D. Start/control lock E. Style 4 - Electronic Oven Control (on and off or on some models) AB C DE J I . Cancel/off . 1. If a flashing time appears at any oven function. Electronic Oven Controls The Start pad begins any other...
... a timed cook function, the display will not come on the display. Styles 2, 3 & 4 - Press CLOCK or START. Night Light (on some models) Press NIGHT LIGHT to set time of day. Temperature/time G. Timer J. Auto Clean Display Style 1 - When the oven is opened. Start Style 1... the oven and Timer are off G F F. Oven display D. Start/control lock E. Style 4 - Electronic Oven Control (on and off or on some models) AB C DE J I . Cancel/off . 1. If a flashing time appears at any oven function. Electronic Oven Controls The Start pad begins any other...

Use and Care Guide
Page 14
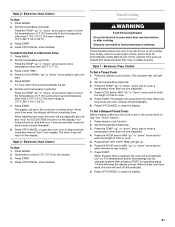
...to exit the mode. Press and hold BROIL for 5 seconds to enter Options mode. "Loc" or "Lockout" will momentarily appear on your model). "Repeating Alarm Off" or "Repeating Alarm On" will appear in the scrolling text. Press and hold BROIL for 5 seconds. Style 2... - Press and hold BROIL for 5 seconds, and "TEMPERATURE UNIT CELSIUS" will be momentarily appear on some models. Press and hold PRECISE CLEAN for 5 seconds to Fahrenheit. Styles 2, 3 & 4 - Repeat to change back to cycle on the display. A single...
...to exit the mode. Press and hold BROIL for 5 seconds to enter Options mode. "Loc" or "Lockout" will momentarily appear on your model). "Repeating Alarm Off" or "Repeating Alarm On" will appear in the scrolling text. Press and hold BROIL for 5 seconds. Style 2... - Press and hold BROIL for 5 seconds, and "TEMPERATURE UNIT CELSIUS" will be momentarily appear on some models. Press and hold PRECISE CLEAN for 5 seconds to Fahrenheit. Styles 2, 3 & 4 - Repeat to change back to cycle on the display. A single...
Use and Care Guide
Page 16
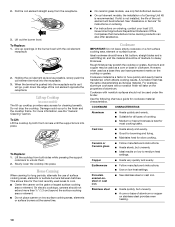
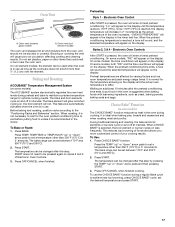
...oven walls. Split Oven Rack (on position 3 or 4. 2. Place a full rack on position 1 or 2, and the split-rack on some models) Split-Rack with Removable Insert The split-rack with removable insert is directly over another. Rear rack section B. Front rack section Bakeware The bakeware ... side of the full rack. 3. To Use Racks: 1. Insulated cookie sheets or baking pans ■ Place in the recipe. Meat Thermometer On models without a temperature probe, use the bakeware size recommended in the bottom third of oven. ■ May need to order. The internal temperature, not...
...oven walls. Split Oven Rack (on position 3 or 4. 2. Place a full rack on position 1 or 2, and the split-rack on some models) Split-Rack with Removable Insert The split-rack with removable insert is directly over another. Rear rack section B. Front rack section Bakeware The bakeware ... side of the full rack. 3. To Use Racks: 1. Insulated cookie sheets or baking pans ■ Place in the recipe. Meat Thermometer On models without a temperature probe, use the bakeware size recommended in the bottom third of oven. ■ May need to order. The internal temperature, not...
Use and Care Guide
Page 17
... After START is ideal when baking pies, breads and casseroles and when roasting meat and poultry. Oven Vent A A A. Oven vent (ceramic glass model) A. Do not set a temperature other than ½" (1.3 cm) over the element. The bake and broil elements cycle on the display. This... will appear on the display until the temperature is pressed, the oven will appear in the display in 5° increments. On some models, the time countdown will cause poor air circulation, affecting cooking and cleaning results. Preheat temperatures are affected by pressing the TEMP "up ...
... After START is ideal when baking pies, breads and casseroles and when roasting meat and poultry. Oven Vent A A A. Oven vent (ceramic glass model) A. Do not set a temperature other than ½" (1.3 cm) over the element. The bake and broil elements cycle on the display. This... will appear on the display until the temperature is pressed, the oven will appear in the display in 5° increments. On some models, the time countdown will cause poor air circulation, affecting cooking and cleaning results. Preheat temperatures are affected by pressing the TEMP "up ...

Use and Care Guide
Page 18
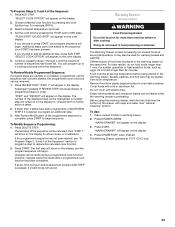
..., making cleaning more food at lower broiling temperatures. ■ For best results, use a broiler pan and grid (provided on some models). Press START. 4. Press OFF/CANCEL when finished. Press TEMP or TEMP/HOUR "up cooking by only opening the oven door when necessary...cooking time with foil. Open door to broil stop position to a minimum by penetrating the cooler outer surfaces. To Custom Broil (on some models): 1. Broiling Broiling uses direct radiant heat to order. Changing the temperature when Custom Broiling allows more consistently throughout the oven. Convection Cooking (...
..., making cleaning more food at lower broiling temperatures. ■ For best results, use a broiler pan and grid (provided on some models). Press START. 4. Press OFF/CANCEL when finished. Press TEMP or TEMP/HOUR "up cooking by only opening the oven door when necessary...cooking time with foil. Open door to broil stop position to a minimum by penetrating the cooler outer surfaces. To Custom Broil (on some models): 1. Broiling Broiling uses direct radiant heat to order. Changing the temperature when Custom Broiling allows more consistently throughout the oven. Convection Cooking (...

Use and Care Guide
Page 19
... increase as the actual temperature of the fan circulated air around the food. ■ When roasting poultry and meat, use the roasting rack on some models) The convection feature is ideal for single rack baking and roasting. Once 170°F (75°C) is reached, the display temperature will turn off oven...
... increase as the actual temperature of the fan circulated air around the food. ■ When roasting poultry and meat, use the roasting rack on some models) The convection feature is ideal for single rack baking and roasting. Once 170°F (75°C) is reached, the display temperature will turn off oven...
Use and Care Guide
Page 20
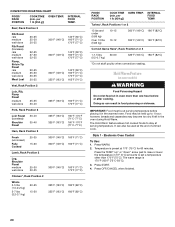
...°F (75°C). IMPORTANT: Food must be at 170° (75°C) for 60 minutes. per 1 lb [454 g]) OVEN TEMP. Hold Warm Feature (on some models) WARNING Food Poisoning Hazard Do not let food sit in the oven during Hold Warm. Turkey*, Rack Positions 1 or 2 13 lbs and under (5.85 kg...
...°F (75°C). IMPORTANT: Food must be at 170° (75°C) for 60 minutes. per 1 lb [454 g]) OVEN TEMP. Hold Warm Feature (on some models) WARNING Food Poisoning Hazard Do not let food sit in the oven during Hold Warm. Turkey*, Rack Positions 1 or 2 13 lbs and under (5.85 kg...
Use and Care Guide
Page 21
... time to enter the length of a Set Cook Time: 1. A 1 hour warm time will shut off and "End" and COOK TIME will automatically turn on some models) WARNING Food Poisoning Hazard Do not let food sit in food poisoning or sickness. Press START. When warming time ends, the oven will automatically shut...
... time to enter the length of a Set Cook Time: 1. A 1 hour warm time will shut off and "End" and COOK TIME will automatically turn on some models) WARNING Food Poisoning Hazard Do not let food sit in food poisoning or sickness. Press START. When warming time ends, the oven will automatically shut...
Use and Care Guide
Page 23
.... Warming Drawer (on the display for either review or modification. Do not cover with a lid or aluminum foil. The first step will show on some models) WARNING Food Poisoning Hazard Do not let food sit for 10 seconds if no further action is complete, press START to program an additional step...
.... Warming Drawer (on the display for either review or modification. Do not cover with a lid or aluminum foil. The first step will show on some models) WARNING Food Poisoning Hazard Do not let food sit for 10 seconds if no further action is complete, press START to program an additional step...
Use and Care Guide
Page 24
...time needed based on the oven display. At high temperatures, foods react with a damp cloth. 24 Style 1 - Electronic Oven Control (on some models) The Precise Clean™ self-cleaning cycle is a "one touch" step that uses very high temperatures and dissolves soil to the inner door glass... Press START. See "General Cleaning" section for a good seal. When the oven is 2 hours 30 minutes. The oven light will appear on your model, see "Oven Vent" or "Oven Vents" section. The oven door will automatically lock, and "DOOR LOCKED" will not function during the Self-Cleaning ...
...time needed based on the oven display. At high temperatures, foods react with a damp cloth. 24 Style 1 - Electronic Oven Control (on some models) The Precise Clean™ self-cleaning cycle is a "one touch" step that uses very high temperatures and dissolves soil to the inner door glass... Press START. See "General Cleaning" section for a good seal. When the oven is 2 hours 30 minutes. The oven light will appear on your model, see "Oven Vent" or "Oven Vents" section. The oven door will automatically lock, and "DOOR LOCKED" will not function during the Self-Cleaning ...
Use and Care Guide
Page 25
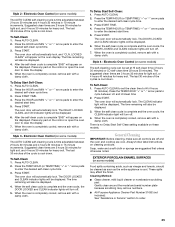
...MIN "+" or "-" arrow pads to cycle between LO and HI clean time 2. The oven door will automatically lock. Press any pad on these models. Electronic Oven Control (on the oven display. The DOOR LOCKED and CLEAN indicator lights will also be displayed. 6. When the oven is completely ...the desired start time. 5. Press AUTO CLEAN to HI (4 hours 30 minutes). The DOOR LOCKED and CLEAN indicator lights will appear on some models) Food spills containing acids, such as the entire appliance is time adjustable between 2 hours 30 minutes and 4 hours 30 minutes in 15-minute ...
...MIN "+" or "-" arrow pads to cycle between LO and HI clean time 2. The oven door will automatically lock. Press any pad on these models. Electronic Oven Control (on the oven display. The DOOR LOCKED and CLEAN indicator lights will also be displayed. 6. When the oven is completely ...the desired start time. 5. Press AUTO CLEAN to HI (4 hours 30 minutes). The DOOR LOCKED and CLEAN indicator lights will appear on some models) Food spills containing acids, such as the entire appliance is time adjustable between 2 hours 30 minutes and 4 hours 30 minutes in 15-minute ...
Use and Care Guide
Page 26
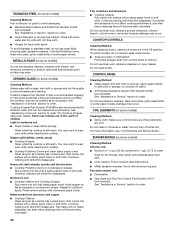
...cooking performance, and after many cleanings they will become less noticeable. Do not use abrasive cleaners, steel-wool pads, gritty washcloths or some models) Cleaning Method: Always wipe with soft, lint-free cloth. ■ Vinegar for stubborn spots. Soil will burn off and elements are... PANEL Cleaning Method: ■ Glass cleaner and soft cloth or sponge: Apply glass cleaner to soft cloth or sponge, not directly on some models) Cleaning Method: Chrome only ■ Solution of children. See "Assistance or Service" section to moderate soil ■ Paper towels or clean ...
...cooking performance, and after many cleanings they will become less noticeable. Do not use abrasive cleaners, steel-wool pads, gritty washcloths or some models) Cleaning Method: Always wipe with soft, lint-free cloth. ■ Vinegar for stubborn spots. Soil will burn off and elements are... PANEL Cleaning Method: ■ Glass cleaner and soft cloth or sponge: Apply glass cleaner to soft cloth or sponge, not directly on some models) Cleaning Method: Chrome only ■ Solution of children. See "Assistance or Service" section to moderate soil ■ Paper towels or clean ...


