
Installation Instructions
Page 2
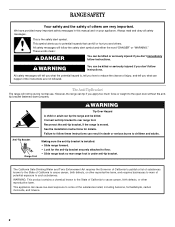
... be killed or seriously injured if you and others are not followed. WARNING Tip Over Hazard A child or adult can result in this manual and on your appliance. Failure to potential hazards that can kill or hurt you don't follow instructions. This symbol alerts you to follow ..."DANGER" or "WARNING." WARNING You can happen if the instructions are very important. Connect anti-tip bracket to reduce the chance of others . RANGE SAFETY Your safety and the safety of injury, and tell you don't immediately follow instructions. This is moved. These words mean: DANGER You can...
... be killed or seriously injured if you and others are not followed. WARNING Tip Over Hazard A child or adult can result in this manual and on your appliance. Failure to potential hazards that can kill or hurt you don't follow instructions. This symbol alerts you to follow ..."DANGER" or "WARNING." WARNING You can happen if the instructions are very important. Connect anti-tip bracket to reduce the chance of others . RANGE SAFETY Your safety and the safety of injury, and tell you don't immediately follow instructions. This is moved. These words mean: DANGER You can...

Installation Instructions
Page 6
... parts package from inside the oven cavity) or from the anti-tip bracket kit (found inside oven. 3. Do not remove the shipping base at this manual. 2. A A. Use a ¼" drive ratchet to lower the front and rear leveling legs one -half turn. If countertop is not flush with ... than that the left edge is against cabinet and top edge is moved. Remove template from the back of floor covering. Before moving range, slide range onto shipping base, cardboard or hardboard. 1. Place template on the floor in cabinet opening so that specified in the "Location Requirements" ...
... parts package from inside the oven cavity) or from the anti-tip bracket kit (found inside oven. 3. Do not remove the shipping base at this manual. 2. A A. Use a ¼" drive ratchet to lower the front and rear leveling legs one -half turn. If countertop is not flush with ... than that the left edge is against cabinet and top edge is moved. Remove template from the back of floor covering. Before moving range, slide range onto shipping base, cardboard or hardboard. 1. Place template on the floor in cabinet opening so that specified in the "Location Requirements" ...
Owners Manual
Page 2
... will follow instructions. The Anti-Tip Bracket The range will tell you what the potential hazard is, ...bracket, if the range is the safety alert symbol. Anti-Tip Bracket Range Foot Making sure...to the State of California to such substances. RANGE SAFETY Your safety and the safety of others ...defects, or other reproductive harm. However, the range can kill or hurt you what can cause ... Hazard A child or adult can tip the range and be killed or seriously injured if you... floor. • Slide range back so rear range foot is installed: • Slide range forward. • Look ...
... will follow instructions. The Anti-Tip Bracket The range will tell you what the potential hazard is, ...bracket, if the range is the safety alert symbol. Anti-Tip Bracket Range Foot Making sure...to the State of California to such substances. RANGE SAFETY Your safety and the safety of others ...defects, or other reproductive harm. However, the range can kill or hurt you what can cause ... Hazard A child or adult can tip the range and be killed or seriously injured if you... floor. • Slide range back so rear range foot is installed: • Slide range forward. • Look ...

Owners Manual
Page 3
... ■ Keep Oven Vent Ducts Unobstructed. ■ Placement of Oven Racks - Among those areas are suitable for range-top service without breaking due to the sudden change in a risk of electric shock, or fire. ■ Glazed Cooking Utensils - To reduce the risk of burns, ignition of flammable materials... ■ Use Proper Pan Size - Absence of these liners may ignite. ■ Make Sure Reflector Pans or Drip Bowls Are in the manual. Do not use aluminum foil to line surface unit drip bowls or oven bottoms, except as suggested in Place - Interior surfaces of oven doors...
... ■ Keep Oven Vent Ducts Unobstructed. ■ Placement of Oven Racks - Among those areas are suitable for range-top service without breaking due to the sudden change in a risk of electric shock, or fire. ■ Glazed Cooking Utensils - To reduce the risk of burns, ignition of flammable materials... ■ Use Proper Pan Size - Absence of these liners may ignite. ■ Make Sure Reflector Pans or Drip Bowls Are in the manual. Do not use aluminum foil to line surface unit drip bowls or oven bottoms, except as suggested in Place - Interior surfaces of oven doors...

Owners Manual
Page 4
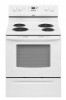
... (150°C and 275°C). 4. Press START. 5. SELF-CLEAN Self-clean cycle See the "Range Care" section. (on and off . 2. A tone will sound, and "Loc" will sound at www.whirlpool.com for more than 350°F (175°C) in oven and close door to begin the countdown. ... display the countdown for 3 seconds). 3. If the TIMER is off . 5. The door should remain open approximately 5" (12.7 cm). 2. FEATURE GUIDE This manual covers several models. Check that the oven is running, but not in 5°F (5°C) increments between 170°F and 525°F (75°C and 275...
... (150°C and 275°C). 4. Press START. 5. SELF-CLEAN Self-clean cycle See the "Range Care" section. (on and off . 2. A tone will sound, and "Loc" will sound at www.whirlpool.com for more than 350°F (175°C) in oven and close door to begin the countdown. ... display the countdown for 3 seconds). 3. If the TIMER is off . 5. The door should remain open approximately 5" (12.7 cm). 2. FEATURE GUIDE This manual covers several models. Check that the oven is running, but not in 5°F (5°C) increments between 170°F and 525°F (75°C and 275...


