
Dimension Guide
Page 1
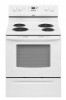
... codes do not permit ground through flexible or nonmetallic sheathed, copper or aluminum cable. opening width C. opening width E. Because Whirlpool Corporation policy includes a continuous commitment to improve our products, we reserve the right to the cabinet. Ref. when bottom of... are for use with leveling legs screwed all the way in the "Product Dimensions" section. 30" (76 cm) Freestanding Electric Range PRODUCT MODEL NUMBERS GFE461LV GFE471LV WFE301LV WFE361LV WFE364LV WFE366LV WFE371LV WFE374LV WFE381LV WFE114LW WFE115LX RF110AXS RF111PXS RF114PXS RF212PXS RF263LXT...
... codes do not permit ground through flexible or nonmetallic sheathed, copper or aluminum cable. opening width C. opening width E. Because Whirlpool Corporation policy includes a continuous commitment to improve our products, we reserve the right to the cabinet. Ref. when bottom of... are for use with leveling legs screwed all the way in the "Product Dimensions" section. 30" (76 cm) Freestanding Electric Range PRODUCT MODEL NUMBERS GFE461LV GFE471LV WFE301LV WFE361LV WFE364LV WFE366LV WFE371LV WFE374LV WFE381LV WFE114LW WFE115LX RF110AXS RF111PXS RF114PXS RF212PXS RF263LXT...

Installation Instructions
Page 1
U.S.A. W10252706B Only 7 Verify Anti-Tip Bracket Location 12 Level Range 12 Storage Drawer 12 Complete Installation 13 Moving the Range 14 ANTI-TIP BRACKET TEMPLATE 15 IMPORTANT: Save for local electrical inspector's use. Only 4 INSTALLATION INSTRUCTIONS 6 Unpack Range 6 Install Anti-Tip Bracket 6 Electrical Connection - INSTALLATION INSTRUCTIONS 30" (76 CM) FREESTANDING ELECTRIC RANGES Table of Contents RANGE SAFETY 2 INSTALLATION REQUIREMENTS 3 Tools and Parts 3 Location Requirements 3 Electrical Requirements - U.S.A.
U.S.A. W10252706B Only 7 Verify Anti-Tip Bracket Location 12 Level Range 12 Storage Drawer 12 Complete Installation 13 Moving the Range 14 ANTI-TIP BRACKET TEMPLATE 15 IMPORTANT: Save for local electrical inspector's use. Only 4 INSTALLATION INSTRUCTIONS 6 Unpack Range 6 Install Anti-Tip Bracket 6 Electrical Connection - INSTALLATION INSTRUCTIONS 30" (76 CM) FREESTANDING ELECTRIC RANGES Table of Contents RANGE SAFETY 2 INSTALLATION REQUIREMENTS 3 Tools and Parts 3 Location Requirements 3 Electrical Requirements - U.S.A.

Installation Instructions
Page 4
upper cabinet depth B. 30" (76.2 cm) min. from either cabinet, 5¹⁄₂" (14.0 cm) max. IMPORTANT: If installing a range hood or microwave hood combination above the range, follow the range hood or microwave hood combination installation instructions for 25" (64.0 cm) countertop depth,... Association One Batterymarch Park Quincy, MA 02269. For minimum clearance to whether the appliance is recommended that a qualified electrical installer determine that the electrical connection and wire size are in * D. 29⁷⁄₈" (75.9 cm) width E. 25" (63...
upper cabinet depth B. 30" (76.2 cm) min. from either cabinet, 5¹⁄₂" (14.0 cm) max. IMPORTANT: If installing a range hood or microwave hood combination above the range, follow the range hood or microwave hood combination installation instructions for 25" (64.0 cm) countertop depth,... Association One Batterymarch Park Quincy, MA 02269. For minimum clearance to whether the appliance is recommended that a qualified electrical installer determine that the electrical connection and wire size are in * D. 29⁷⁄₈" (75.9 cm) width E. 25" (63...

Owners Manual
Page 6
... walls. Use the following : Basic Functions One tone ■ Valid pad press ■ Oven is preset at Fahrenheit, but can be set between 30°F (15°C) and -30°F (-15°C). 3. Rack Positions Rack 5: Toasting bread or broiling thin, non-fatty foods. Press CANCEL/OFF to disable the 12-hour shutoff...
... walls. Use the following : Basic Functions One tone ■ Valid pad press ■ Oven is preset at Fahrenheit, but can be set between 30°F (15°C) and -30°F (-15°C). 3. Rack Positions Rack 5: Toasting bread or broiling thin, non-fatty foods. Press CANCEL/OFF to disable the 12-hour shutoff...

Owners Manual
Page 8
... 5. When the start time/delay oven indicator light will automatically lock. The oven door will light up. 6. Press START. Exposure to HI (4 hours 30 minutes). 2. When the oven is completely cooled, remove ash with a damp cloth. 8 Press the TEMP/TIME "+" or "-" arrow pads to set at... and/or time settings can result in discoloring, loss of day to enter the time of gloss, hairline cracks and popping sounds. Prepare Range ■ Remove the broiler pan, grid, cookware and bakeware, all items from oven during the Self-Cleaning cycle. Once the oven has...
... 5. When the start time/delay oven indicator light will automatically lock. The oven door will light up. 6. Press START. Exposure to HI (4 hours 30 minutes). 2. When the oven is completely cooled, remove ash with a damp cloth. 8 Press the TEMP/TIME "+" or "-" arrow pads to set at... and/or time settings can result in discoloring, loss of day to enter the time of gloss, hairline cracks and popping sounds. Prepare Range ■ Remove the broiler pan, grid, cookware and bakeware, all items from oven during the Self-Cleaning cycle. Once the oven has...

Owners Manual
Page 12
... for product service if your major appliance is used in the country in accordance with electrical or plumbing codes, or use or when it was purchased. This warranty is contrary to Whirlpool with original model/serial numbers that is void if the factory applied serial number has ...DAMAGES. If outside the 50 United States and Canada, contact your model number and serial number on the label, located on how to Whirlpool within 30 days from your major appliance. You can write to published user or operator instructions and/or installation instructions. 4. Service calls to correct ...
... for product service if your major appliance is used in the country in accordance with electrical or plumbing codes, or use or when it was purchased. This warranty is contrary to Whirlpool with original model/serial numbers that is void if the factory applied serial number has ...DAMAGES. If outside the 50 United States and Canada, contact your model number and serial number on the label, located on how to Whirlpool within 30 days from your major appliance. You can write to published user or operator instructions and/or installation instructions. 4. Service calls to correct ...

Warranty
Page 1
.... Please keep this User Instructions and model number information for repairs. W10200356B SP PN W10204501A © 2008 Whirlpool Corporation. Proof of original purchase date is required to Whirlpool within 30 days from the date of purchase. 6. Damage resulting from accident, alteration, misuse, abuse, fire, flood...include a daytime phone number in accordance with electrical or plumbing codes, or use your model number and serial number on the label, located on how to use of consumables or cleaning products not approved by a Whirlpool designated service company. You can write to ...
.... Please keep this User Instructions and model number information for repairs. W10200356B SP PN W10204501A © 2008 Whirlpool Corporation. Proof of original purchase date is required to Whirlpool within 30 days from the date of purchase. 6. Damage resulting from accident, alteration, misuse, abuse, fire, flood...include a daytime phone number in accordance with electrical or plumbing codes, or use your model number and serial number on the label, located on how to use of consumables or cleaning products not approved by a Whirlpool designated service company. You can write to ...


