Owners Manual
Page 2
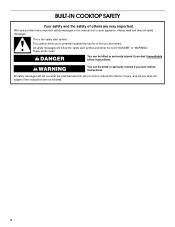
TABLE OF CONTENTS COOKTOP SAFETY 2 PARTS AND FEATURES 4 COOKTOP USE 4 Cooktop Controls 4 Coil Elements and Burner Bowls 5 Home Canning 5 Cookware 5 COOKTOP CARE 6 General Cleaning 6 TROUBLESHOOTING 6 ASSISTANCE OR SERVICE 7 In the U.S.A 7 In Canada 7 WARRANTY 8 TABLE DES MATIÈRES SÉCURITÉ DE LA TABLE DE CUISSON 9 PI...words mean: DANGER You can be killed or seriously injured if you how to potential hazards that can happen if the instructions are very important. This symbol alerts you to reduce the chance of others . WARNING You can be killed or ...
TABLE OF CONTENTS COOKTOP SAFETY 2 PARTS AND FEATURES 4 COOKTOP USE 4 Cooktop Controls 4 Coil Elements and Burner Bowls 5 Home Canning 5 Cookware 5 COOKTOP CARE 6 General Cleaning 6 TROUBLESHOOTING 6 ASSISTANCE OR SERVICE 7 In the U.S.A 7 In Canada 7 WARRANTY 8 TABLE DES MATIÈRES SÉCURITÉ DE LA TABLE DE CUISSON 9 PI...words mean: DANGER You can be killed or seriously injured if you how to potential hazards that can happen if the instructions are very important. This symbol alerts you to reduce the chance of others . WARNING You can be killed or ...
Owners Manual
Page 3
... at High Heat Settings - Some cleaners can produce noxious fumes if applied to cover the surface unit heating element. The use . s When flaming foods under the hood, turn the fan on the cooktop to direct contact and may penetrate the broken cooktop and create a risk of electric shock, or fire. s Do Not Soak Removable Heating Elements - s Use Proper Pan Size - s Clean Cooktop With Caution - SAVE THESE INSTRUCTIONS 3 Be sure your cooktop is in a risk of electric shock. s User Servicing...
... at High Heat Settings - Some cleaners can produce noxious fumes if applied to cover the surface unit heating element. The use . s When flaming foods under the hood, turn the fan on the cooktop to direct contact and may penetrate the broken cooktop and create a risk of electric shock, or fire. s Do Not Soak Removable Heating Elements - s Use Proper Pan Size - s Clean Cooktop With Caution - SAVE THESE INSTRUCTIONS 3 Be sure your cooktop is in a risk of electric shock. s User Servicing...
Owners Manual
Page 4
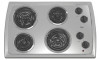
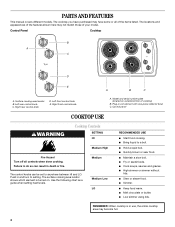
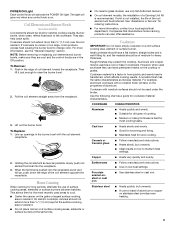
... This manual covers different models. Surface cooking area locator B. Model and serial number plate (located on . Plug-in use, the entire cooktop area may have some or all controls when done cooking. s Stew or steam food. Control panel COOKTOP USE WARNING Cooktop Controls SETTING HI Medium High Fire Hazard Turn off all of the items listed. Push in death or fire. s Bring liquid to setting. s Quickly brown or sear food. s Simmer. s Melt chocolate or butter. Left front control knob E. s Hold a rapid...
... This manual covers different models. Surface cooking area locator B. Model and serial number plate (located on . Plug-in use, the entire cooktop area may have some or all controls when done cooking. s Stew or steam food. Control panel COOKTOP USE WARNING Cooktop Controls SETTING HI Medium High Fire Hazard Turn off all of the items listed. Push in death or fire. s Bring liquid to setting. s Quickly brown or sear food. s Simmer. s Melt chocolate or butter. Left front control knob E. s Hold a rapid...
Owners Manual
Page 5
... element receptacle. 2. Use the following chart as a core or base in the Off position. s Suitable for cookware material characteristics. Stainless steel s Heats quickly, but unevenly. Pull the coil element straight away from the receptacle. 3. To Replace: 1. Line up openings in how quickly and evenly heat is on low heat settings. s Do not place canner on low to clear the burner bowl. 2. s On coil element models, the installation of surface cooking...
... element receptacle. 2. Use the following chart as a core or base in the Off position. s Suitable for cookware material characteristics. Stainless steel s Heats quickly, but unevenly. Pull the coil element straight away from the receptacle. 3. To Replace: 1. Line up openings in how quickly and evenly heat is on low heat settings. s Do not place canner on low to clear the burner bowl. 2. s On coil element models, the installation of surface cooking...
Owners Manual
Page 6
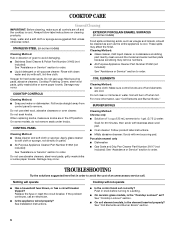
... directly on cleaning products. If the problem continues, call . CONTROL PANEL Cleaning Method: Chrome only s Solution of an unnecessary service call an electrician. Do not use steel wool, abrasive cleansers or oven cleaner. s On ceramic glass models, is cool. See "Cooktop Lockout" section. Damage may affect the finish. Replace the fuse or reset the circuit breaker. s Is the appliance wired properly? COIL ELEMENTS Cleaning Method: s Damp cloth: Make sure control knobs are off when hot. Cleaning...
... directly on cleaning products. If the problem continues, call . CONTROL PANEL Cleaning Method: Chrome only s Solution of an unnecessary service call an electrician. Do not use steel wool, abrasive cleansers or oven cleaner. s On ceramic glass models, is cool. See "Cooktop Lockout" section. Damage may affect the finish. Replace the fuse or reset the circuit breaker. s Is the appliance wired properly? COIL ELEMENTS Cleaning Method: s Damp cloth: Make sure control knobs are off when hot. Cleaning...
Owners Manual
Page 7
...Order Part Number 31463 Cooktop Care Kit (includes cleaner, protectant, and applicator pads) Order Part Number 31605 Cooktop Scraper (ceramic glass models) Order Part Number 3183488 All-Purpose Appliance Cleaner Order Part Number 31662 Stainless Steel Cleaner & Polish (stainless steel models) Order Part Number 31462 Gas Grate and Drip Pan Cleaner Order Part Number 31617 In Canada Please call the Whirlpool Canada LP Customer Interaction Centre toll free: 1-800-807-6777. To locate FSP® replacement parts in Canada. s Accessory and repair parts sales. See "Coil Elements and Burner Bowls...
...Order Part Number 31463 Cooktop Care Kit (includes cleaner, protectant, and applicator pads) Order Part Number 31605 Cooktop Scraper (ceramic glass models) Order Part Number 3183488 All-Purpose Appliance Cleaner Order Part Number 31662 Stainless Steel Cleaner & Polish (stainless steel models) Order Part Number 31462 Gas Grate and Drip Pan Cleaner Order Part Number 31617 In Canada Please call the Whirlpool Canada LP Customer Interaction Centre toll free: 1-800-807-6777. To locate FSP® replacement parts in Canada. s Accessory and repair parts sales. See "Coil Elements and Burner Bowls...

Owners Manual
Page 8
... Service" section or by Whirlpool. 5. The removal and reinstallation of your major appliance, to instruct you ever need to correct the installation of your complete model number and serial number. Major appliances with published installation instructions. 11. Service must provide proof of repair or replacement under this book and your major appliance to refrigerator or freezer product failures. 7. Outside the 50 United States and Canada, this warranty...
... Service" section or by Whirlpool. 5. The removal and reinstallation of your major appliance, to instruct you ever need to correct the installation of your complete model number and serial number. Major appliances with published installation instructions. 11. Service must provide proof of repair or replacement under this book and your major appliance to refrigerator or freezer product failures. 7. Outside the 50 United States and Canada, this warranty...
Dimension Guide
Page 1
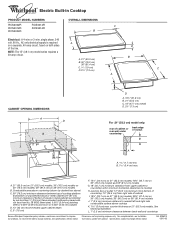
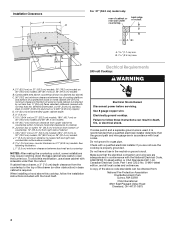
... cabinet is required A on a separate, 40-amp circuit, fused on both sides D of the line. Junction box or outlet; 12" (30.5 cm) minimum from bottom of cutout B A A 1.7 cm) min. ® Electric Built-in Cooktop PRODUCT MODEL NUMBERS RCS2002R RCS2012R RCS3004R RCS3014R RCS3614R OVERALL DIMENSIONS C B Electrical: A 4-wire or 3-wire, single phase, 240 volt, 60 Hz., AC only electrical supply is protected by not less than ¹⁄₄" [0.6 cm] flame retardant millboard covered...
... cabinet is required A on a separate, 40-amp circuit, fused on both sides D of the line. Junction box or outlet; 12" (30.5 cm) minimum from bottom of cutout B A A 1.7 cm) min. ® Electric Built-in Cooktop PRODUCT MODEL NUMBERS RCS2002R RCS2012R RCS3004R RCS3014R RCS3614R OVERALL DIMENSIONS C B Electrical: A 4-wire or 3-wire, single phase, 240 volt, 60 Hz., AC only electrical supply is protected by not less than ¹⁄₄" [0.6 cm] flame retardant millboard covered...
Installation Instructions
Page 2
...and others are not followed. 2 All safety messages will tell you don't follow instructions. This symbol alerts you to reduce the chance of others . WARNING You can happen if the instructions are very important. All safety messages will follow the safety alert symbol and either ... mean: DANGER You can kill or hurt you don't immediately follow instructions. Always read and obey all safety messages. We have provided many important safety messages in this manual and on your appliance. BUILT-IN COOKTOP SAFETY Your safety and the safety of injury, and tell you what...
...and others are not followed. 2 All safety messages will tell you don't follow instructions. This symbol alerts you to reduce the chance of others . WARNING You can happen if the instructions are very important. All safety messages will follow the safety alert symbol and either ... mean: DANGER You can kill or hurt you don't immediately follow instructions. Always read and obey all safety messages. We have provided many important safety messages in this manual and on your appliance. BUILT-IN COOKTOP SAFETY Your safety and the safety of injury, and tell you what...

Installation Instructions
Page 3
... remove if future servicing becomes necessary. The cooktop should be avoided. It is approved to oven manufacturer's Installation Instructions for approval for this label, contact your oven is required. Given dimensions are given with clamps. s Use the countertop opening dimensions that is the responsibility of the oven. s Ovens approved for built-in oven. All electrical connections should be installed either alone or over the heated surface units, cabinet storage space located above the surface...
... remove if future servicing becomes necessary. The cooktop should be avoided. It is approved to oven manufacturer's Installation Instructions for approval for this label, contact your oven is required. Given dimensions are given with clamps. s Use the countertop opening dimensions that is the responsibility of the oven. s Ovens approved for built-in oven. All electrical connections should be installed either alone or over the heated surface units, cabinet storage space located above the surface...
Installation Instructions
Page 4
... required. B. 1 3.4 cm) max. Electrical Requirements 240 volt Cooktop: WARNING A. 21" (53.3 cm) on 21" (53.3 cm) models; 30" (76.2 cm) models on 30" (76.2 cm) models; 36" (91.4 cm) on 21" (53.3 cm) models. If cabinet has a drawer, a 3" (7.6 cm) depth clearance from upper cabinet to countertop within minimum horizontal clearances to follow the installation instructions included with sidewalls wider than No. 28 MSG sheet steel, 0.015" [0.04 cm] stainless steel...
... required. B. 1 3.4 cm) max. Electrical Requirements 240 volt Cooktop: WARNING A. 21" (53.3 cm) on 21" (53.3 cm) models; 30" (76.2 cm) models on 30" (76.2 cm) models; 36" (91.4 cm) on 21" (53.3 cm) models. If cabinet has a drawer, a 3" (7.6 cm) depth clearance from upper cabinet to countertop within minimum horizontal clearances to follow the installation instructions included with sidewalls wider than No. 28 MSG sheet steel, 0.015" [0.04 cm] stainless steel...
Installation Instructions
Page 5
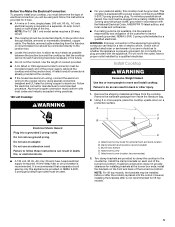
... electrical shock. s If the house has aluminum wiring, connect the aluminum wiring to the copper wire by a qualified electrician. Using 2 or more people to move and install cooktop. Attachment screw holes for joining copper to aluminum. Attachment screw location (recommended) 3. NOTE: The 15" (38.1 cm) model series requires a 20-amp circuit. Use the length of the burner box bottom. This cooktop is required. Remove the shipping materials and tape from the cooktop. A time-delay fuse or circuit breaker...
... electrical shock. s If the house has aluminum wiring, connect the aluminum wiring to the copper wire by a qualified electrician. Using 2 or more people to move and install cooktop. Attachment screw holes for joining copper to aluminum. Attachment screw location (recommended) 3. NOTE: The 15" (38.1 cm) model series requires a 20-amp circuit. Use the length of the burner box bottom. This cooktop is required. Remove the shipping materials and tape from the cooktop. A time-delay fuse or circuit breaker...
Installation Instructions
Page 6
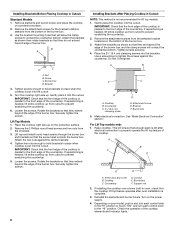
... selected bracket locations on the power supply. 4. IMPORTANT: Check that they extend beyond the edge of the countertop. Installing Brackets After Placing Cooktop in oven, check that they extend beyond the edge of the burner box. 3. Tighten screws securely. 4. Do Not Overtighten. Switch box and cover B. If installing the cooktop over a lower built-in Cutout: NOTE: This method is needed, lift entire cooktop up . Reinstall the elements and burner bowls. Remove the...
... selected bracket locations on the power supply. 4. IMPORTANT: Check that they extend beyond the edge of the countertop. Installing Brackets After Placing Cooktop in oven, check that they extend beyond the edge of the burner box. 3. Tighten screws securely. 4. Do Not Overtighten. Switch box and cover B. If installing the cooktop over a lower built-in Cutout: NOTE: This method is needed, lift entire cooktop up . Reinstall the elements and burner bowls. Remove the...

Installation Instructions
Page 7
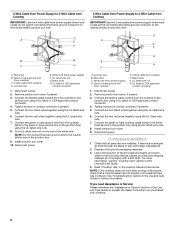
...: connecting to: 4-wire direct 5" (12.7 cm) A fused disconnect or circuit breaker box 4-Wire Cable from Power Supply to 3-Wire Cable from Cooktop Electrical Shock Hazard Disconnect power before servicing. Connect the cooktop cable to the junction box through the UL listed or CSA approved conduit connector. 7 Use 12 gauge copper wire. Failure to follow these instructions can result in death, fire, or electrical shock. 3-wire direct 3¹⁄₂" (8.9 cm) A fused disconnect or circuit breaker box 3-Wire Cable from Power...
...: connecting to: 4-wire direct 5" (12.7 cm) A fused disconnect or circuit breaker box 4-Wire Cable from Power Supply to 3-Wire Cable from Cooktop Electrical Shock Hazard Disconnect power before servicing. Connect the cooktop cable to the junction box through the UL listed or CSA approved conduit connector. 7 Use 12 gauge copper wire. Failure to follow these instructions can result in death, fire, or electrical shock. 3-wire direct 3¹⁄₂" (8.9 cm) A fused disconnect or circuit breaker box 3-Wire Cable from Power...
Installation Instructions
Page 8
... the white wire. Connect the two red wires together using the UL listed wire nuts. 7. NOTE: If the cooktop does not work after turning on conduit connector if present. 5. Remove junction box cover if present. 3. Tighten screws on the end of the Use and Care Guide. 4. Dispose of/recycle all parts are now installed. Connect the flexible cable conduit from the cooktop cable to the junction box using the UL listed wire nuts. 8. Install junction box cover...
... the white wire. Connect the two red wires together using the UL listed wire nuts. 7. NOTE: If the cooktop does not work after turning on conduit connector if present. 5. Remove junction box cover if present. 3. Tighten screws on the end of the Use and Care Guide. 4. Dispose of/recycle all parts are now installed. Connect the flexible cable conduit from the cooktop cable to the junction box using the UL listed wire nuts. 8. Install junction box cover...

Warranty
Page 1
... God, improper installation, installation not in which it . The cost of repair or replacement under this warranty. 8. ITEMS EXCLUDED FROM WARRANTY This limited warranty does not cover: 1. Repairs when your major appliance is operated and maintained according to instructions attached to parts or systems resulting from warranty coverage. 3. Repairs to or furnished with electrical or plumbing codes, or use your complete model number and serial number. IMPLIED WARRANTIES, INCLUDING WARRANTIES OF MERCHANTABILITY...
... God, improper installation, installation not in which it . The cost of repair or replacement under this warranty. 8. ITEMS EXCLUDED FROM WARRANTY This limited warranty does not cover: 1. Repairs when your major appliance is operated and maintained according to instructions attached to parts or systems resulting from warranty coverage. 3. Repairs to or furnished with electrical or plumbing codes, or use your complete model number and serial number. IMPLIED WARRANTIES, INCLUDING WARRANTIES OF MERCHANTABILITY...

