Owners Manual
Page 2
... the safety alert symbol. All safety messages will follow instructions. WARNING You can happen if the instructions are very important. Always read and obey all safety messages. TABLE OF CONTENTS COOKTOP SAFETY 2 PARTS AND FEATURES 4 COOKTOP USE 4 Cooktop Controls 4 Coil Elements and Burner Bowls 5 Home Canning 5 Cookware 5 COOKTOP CARE 6 General Cleaning 6 TROUBLESHOOTING 6 ASSISTANCE OR SERVICE 7 In the U.S.A 7 In Canada 7 WARRANTY 8 TABLE DES MATIÈRES SÉCURITÉ...
... the safety alert symbol. All safety messages will follow instructions. WARNING You can happen if the instructions are very important. Always read and obey all safety messages. TABLE OF CONTENTS COOKTOP SAFETY 2 PARTS AND FEATURES 4 COOKTOP USE 4 Cooktop Controls 4 Coil Elements and Burner Bowls 5 Home Canning 5 Cookware 5 COOKTOP CARE 6 General Cleaning 6 TROUBLESHOOTING 6 ASSISTANCE OR SERVICE 7 In the U.S.A 7 In Canada 7 WARRANTY 8 TABLE DES MATIÈRES SÉCURITÉ...
Owners Manual
Page 3
... let potholder touch hot heating elements. Surface units may result in use aluminum foil to cover the surface unit heating element. s Use Proper Pan Size - s Never Leave Surface Units Unattended at High Heat Settings - s Utensil Handles Should Be Turned Inward and Not Extend Over Adjacent Surface Units - s Do Not Cook on Cooktop - If a wet sponge or cloth is properly installed and grounded by a qualified technician. s When flaming foods under the hood, turn the fan on Grease...
... let potholder touch hot heating elements. Surface units may result in use aluminum foil to cover the surface unit heating element. s Use Proper Pan Size - s Never Leave Surface Units Unattended at High Heat Settings - s Utensil Handles Should Be Turned Inward and Not Extend Over Adjacent Surface Units - s Do Not Cook on Cooktop - If a wet sponge or cloth is properly installed and grounded by a qualified technician. s When flaming foods under the hood, turn the fan on Grease...
Owners Manual
Page 4
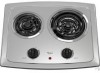
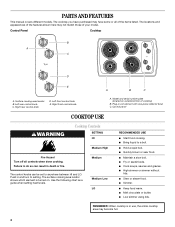
Left front control knob E. Model and serial number plate (located on . Push in use, the entire cooktop area may not match those of cooktop) B. s Hold a rapid boil. s Cook soups, sauces and gravies. s Low simmer using lids. Right rear control knob D. Use the following chart as a guide when setting heat levels. s Quickly brown or sear food. s High simmer or simmer without lids. Surface cooking area locator B. Plug-in death or fire. s Keep food warm. The cooktop you have purchased may...
Left front control knob E. Model and serial number plate (located on . Push in use, the entire cooktop area may not match those of cooktop) B. s Hold a rapid boil. s Cook soups, sauces and gravies. s Low simmer using lids. Right rear control knob D. Use the following chart as a guide when setting heat levels. s Quickly brown or sear food. s High simmer or simmer without lids. Surface cooking area locator B. Plug-in death or fire. s Keep food warm. The cooktop you have purchased may...
Owners Manual
Page 5
... the cookware. s On ceramic glass models, use of coil element toward the receptacle. Cookware material is a factor in the edge of surface cooking areas, elements or surface burners between batches. For example, aluminum cookware with a nonstick finish will activate the POWER ON light. Use the following chart as its base material. COOKWARE CHARACTERISTICS Aluminum s Heats quickly and evenly. s Good for cookware material characteristics. s Heats slowly, but unevenly. Stainless steel s Heats quickly, but unevenly.
... the cookware. s On ceramic glass models, use of coil element toward the receptacle. Cookware material is a factor in the edge of surface cooking areas, elements or surface burners between batches. For example, aluminum cookware with a nonstick finish will activate the POWER ON light. Use the following chart as its base material. COOKWARE CHARACTERISTICS Aluminum s Heats quickly and evenly. s Good for cookware material characteristics. s Heats slowly, but unevenly. Stainless steel s Heats quickly, but unevenly.
Owners Manual
Page 6
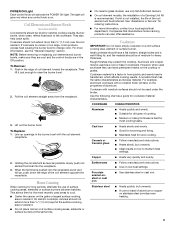
.... BURNER BOWLS Do not use soap-filled scouring pads, abrasive cleaners, Cooktop Polishing Creme, steel-wool pads, gritty washcloths or some models) Food spills containing acids, such as vinegar and tomato, should be cleaned as soon as the entire appliance is the element inserted properly? Damage may affect the finish. Replace the fuse or reset the circuit breaker. See Installation Instructions. s Is the control knob set ? s On ceramic glass models...
.... BURNER BOWLS Do not use soap-filled scouring pads, abrasive cleaners, Cooktop Polishing Creme, steel-wool pads, gritty washcloths or some models) Food spills containing acids, such as vinegar and tomato, should be cleaned as soon as the entire appliance is the element inserted properly? Damage may affect the finish. Replace the fuse or reset the circuit breaker. See Installation Instructions. s Is the control knob set ? s On ceramic glass models...
Owners Manual
Page 7
...® replacement parts will help , follow the instructions below. s Is the control knob set to fulfill the product warranty and provide after-warranty service, anywhere in your nearest Whirlpool designated service center. s Use and maintenance procedures. Cookware should not extend more than ¹⁄₂" (1.3 cm) outside the cooking area. See "Coil Elements and Burner Bowls" section. Excessive heat around cookware on ceramic glass models only) Order Part Number 31463 Cooktop Care Kit (includes...
...® replacement parts will help , follow the instructions below. s Is the control knob set to fulfill the product warranty and provide after-warranty service, anywhere in your nearest Whirlpool designated service center. s Use and maintenance procedures. Cookware should not extend more than ¹⁄₂" (1.3 cm) outside the cooking area. See "Coil Elements and Burner Bowls" section. Excessive heat around cookware on ceramic glass models only) Order Part Number 31463 Cooktop Care Kit (includes...

Owners Manual
Page 8
... "Assistance or Service" section or by a Whirlpool designated service company. If you may find this warranty. 8. After checking "Troubleshooting," you need to know your major appliance, to replace or repair house fuses, or to correct house wiring or plumbing. 2. Any food loss due to refrigerator or freezer product failures. 7. Dealer name Address Phone number Model number Serial number Purchase date 8 LIMITATION OF REMEDIES CUSTOMER'S SOLE AND...
... "Assistance or Service" section or by a Whirlpool designated service company. If you may find this warranty. 8. After checking "Troubleshooting," you need to know your major appliance, to replace or repair house fuses, or to correct house wiring or plumbing. 2. Any food loss due to refrigerator or freezer product failures. 7. Dealer name Address Phone number Model number Serial number Purchase date 8 LIMITATION OF REMEDIES CUSTOMER'S SOLE AND...
Dimension Guide
Page 1
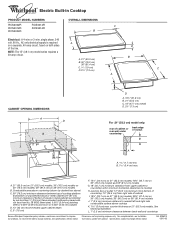
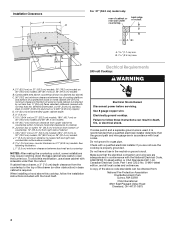
... side combustible surface above ) C. 30" (76.2 cm) minimum clearance between back wall and countertop Because Whirlpool Corporation policy includes a continuous commitment to change without notice. counter thickness on 36" (91.4 cm) models B. Ref. 8286310 08-10-05 NOTE: The 15" (38.1 cm) model series requires a 20-amp circuit. L. 1" (2.5 cm) minimum clearance between top of cooktop platform and bottom of unprotected wood or metal cabinet (24" [61 cm] minimum clearance if...
... side combustible surface above ) C. 30" (76.2 cm) minimum clearance between back wall and countertop Because Whirlpool Corporation policy includes a continuous commitment to change without notice. counter thickness on 36" (91.4 cm) models B. Ref. 8286310 08-10-05 NOTE: The 15" (38.1 cm) model series requires a 20-amp circuit. L. 1" (2.5 cm) minimum clearance between top of cooktop platform and bottom of unprotected wood or metal cabinet (24" [61 cm] minimum clearance if...
Installation Instructions
Page 2
...safety messages will tell you what can be killed or seriously injured if you what the potential hazard is the safety alert symbol. BUILT-IN COOKTOP SAFETY Your safety and the safety of injury, and tell you don't follow the safety alert symbol and either the word "DANGER... followed. 2 All safety messages will follow instructions. Always read and obey all safety messages. This is , tell you how to potential hazards that can kill or hurt you don't immediately follow instructions. We have provided many important safety messages in this manual and on your appliance.
...safety messages will tell you what can be killed or seriously injured if you what the potential hazard is the safety alert symbol. BUILT-IN COOKTOP SAFETY Your safety and the safety of injury, and tell you don't follow the safety alert symbol and either the word "DANGER... followed. 2 All safety messages will follow instructions. Always read and obey all safety messages. This is , tell you how to potential hazards that can kill or hurt you don't immediately follow instructions. We have provided many important safety messages in this manual and on your appliance.

Installation Instructions
Page 3
... s Tape measure s Flat-blade screwdriver s Marker or pencil s Pliers Parts supplied s Clamp brackets (2) s 2¹⁄₂" (6.4 cm) clamping screws (2) Parts needed for this label, contact your cooktop is required. Check existing electrical supply. When installing cooktop, use and proper cutout dimensions. The cooktop should be made by installing a range hood that are minimum clearances and provide 0" (0 cm) clearance. INSTALLATION INSTRUCTIONS Tools and Parts Gather the required tools and parts before starting installation. Check the cooktop burner box for built-in...
... s Tape measure s Flat-blade screwdriver s Marker or pencil s Pliers Parts supplied s Clamp brackets (2) s 2¹⁄₂" (6.4 cm) clamping screws (2) Parts needed for this label, contact your cooktop is required. Check existing electrical supply. When installing cooktop, use and proper cutout dimensions. The cooktop should be made by installing a range hood that are minimum clearances and provide 0" (0 cm) clearance. INSTALLATION INSTRUCTIONS Tools and Parts Gather the required tools and parts before starting installation. Check the cooktop burner box for built-in...
Installation Instructions
Page 4
... walls to clear the burner box. See following illustration. L. 1" (2.5 cm) minimum clearance between top of cooktop platform and bottom of unprotected wood or metal cabinet (24" [61 cm] minimum clearance if bottom of wood or metal cabinet is required. Do not ground to a gas pipe. Check with a qualified electrical installer if you are not sure the cooktop is recommended that a qualified electrical installer determine that the electrical connection and wire size...
... walls to clear the burner box. See following illustration. L. 1" (2.5 cm) minimum clearance between top of cooktop platform and bottom of unprotected wood or metal cabinet (24" [61 cm] minimum clearance if bottom of wood or metal cabinet is required. Do not ground to a gas pipe. Check with a qualified electrical installer if you are not sure the cooktop is recommended that a qualified electrical installer determine that the electrical connection and wire size...
Installation Instructions
Page 5
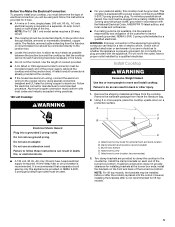
... electrical supply is required on a separate, 40-amp circuit, fused on the front and back of electrical connection you are provided to clamp the cooktop to whether the appliance is equipped with local codes and industry accepted wiring practices. 120 volt Cooktop: WARNING s For your cooktop, you must be grounded. The flexible, armored cable extending from the fuse box or circuit breaker box should be used. Burner box bottom D. s A UL listed...
... electrical supply is required on a separate, 40-amp circuit, fused on the front and back of electrical connection you are provided to clamp the cooktop to whether the appliance is equipped with local codes and industry accepted wiring practices. 120 volt Cooktop: WARNING s For your cooktop, you must be grounded. The flexible, armored cable extending from the fuse box or circuit breaker box should be used. Burner box bottom D. s A UL listed...
Installation Instructions
Page 6
... the cutout. Securely tighten the screws . If repositioning is complete. 3. Attach the brackets as shown then rotate brackets so that enough slack is left after oven installlation is needed , lift entire cooktop up on the power supply. 4. Tighten screws securely. 4. Use a screwdriver to prevent scratching the countertop. 2. Raise cooktop. Switch box and cover B. Countertop D. Burner box F. Turn on the protective surface. 2. Burner box D. Tighten screws enough to hold brackets in and turn each control knob...
... the cutout. Securely tighten the screws . If repositioning is complete. 3. Attach the brackets as shown then rotate brackets so that enough slack is left after oven installlation is needed , lift entire cooktop up on the power supply. 4. Tighten screws securely. 4. Use a screwdriver to prevent scratching the countertop. 2. Raise cooktop. Switch box and cover B. Countertop D. Burner box F. Turn on the protective surface. 2. Burner box D. Tighten screws enough to hold brackets in and turn each control knob...

Installation Instructions
Page 7
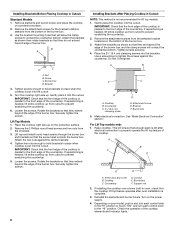
... these instructions can result in death, fire, or electrical shock. 3-wire direct 3¹⁄₂" (8.9 cm) A fused disconnect or circuit breaker box 3-Wire Cable from Cooktop This cooktop is manufactured with a 3-wire cable: If your home has: And you will be Go to Section: connecting to: 4-wire direct 5" (12.7 cm) A fused disconnect or circuit breaker box 4-Wire Cable from Power Supply to 3-Wire Cable from Cooktop Electrical Shock Hazard Disconnect power before servicing. Use 8 gauge copper wire. Electrically ground cooktop. Use...
... these instructions can result in death, fire, or electrical shock. 3-wire direct 3¹⁄₂" (8.9 cm) A fused disconnect or circuit breaker box 3-Wire Cable from Cooktop This cooktop is manufactured with a 3-wire cable: If your home has: And you will be Go to Section: connecting to: 4-wire direct 5" (12.7 cm) A fused disconnect or circuit breaker box 4-Wire Cable from Power Supply to 3-Wire Cable from Cooktop Electrical Shock Hazard Disconnect power before servicing. Use 8 gauge copper wire. Electrically ground cooktop. Use...
Installation Instructions
Page 8
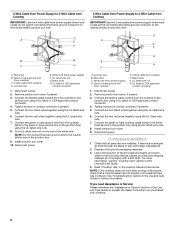
... the "Cooktop Care" section of /recycle all parts are now installed. For more information, see which step was skipped. 2. Junction box E. NOTE: Do not connect the bare ground wire to the neutral (white) junction box wire: D A D E A F E F G B G B C H H C A. Black wires G. Tighten screws on conduit connector, if present. 5. Reconnect power. UL listed or CSA approved conduit connector 1. Red wires C. Remove junction box cover, if present. 3. Dispose of the Use and Care Guide. 4. See "Troubleshooting" section...
... the "Cooktop Care" section of /recycle all parts are now installed. For more information, see which step was skipped. 2. Junction box E. NOTE: Do not connect the bare ground wire to the neutral (white) junction box wire: D A D E A F E F G B G B C H H C A. Black wires G. Tighten screws on conduit connector, if present. 5. Reconnect power. UL listed or CSA approved conduit connector 1. Red wires C. Remove junction box cover, if present. 3. Dispose of the Use and Care Guide. 4. See "Troubleshooting" section...


