
Installation Instructions
Page 2
...can be solid, level and flush with bottom of cabinet cutout. IMPORTANT: To avoid damage to your cabinets, check with cooktop installed above): Ovens approved for wall cabinet installations) ■ Level Parts needed ■ Phillips screwdriver ■ Measuring tape ■ Hand or electric drill (for... wall cabinet installations) ■ 1" (25 mm) drill bit (for this manual and on the top of the oven. Tools needed ■ UL listed or CSA approved conduit connector ■ UL listed wire connectors Parts supplied ■ # 8-14 x 1" screws -...
...can be solid, level and flush with bottom of cabinet cutout. IMPORTANT: To avoid damage to your cabinets, check with cooktop installed above): Ovens approved for wall cabinet installations) ■ Level Parts needed ■ Phillips screwdriver ■ Measuring tape ■ Hand or electric drill (for... wall cabinet installations) ■ 1" (25 mm) drill bit (for this manual and on the top of the oven. Tools needed ■ UL listed or CSA approved conduit connector ■ UL listed wire connectors Parts supplied ■ # 8-14 x 1" screws -...

Installation Instructions
Page 3
...67.9 cm) overall width D. 23" (58.4 cm) max. recessed depth E. 27¹⁄₂" (69.9 cm) recessed height Cabinet Dimensions - Single Ovens Single Oven Undercounter (without cooktop installed above) A B F D E C 27" (68.6 cm) models A. 27" (68.6 cm) min. bottom of cutout ... recessed depth E. 49 125.9 cm) recessed height 30" (76.2 cm) models A. 28 71.9 cm) max. Double Ovens A E D C 27" (68.6 cm) models A. 27" (68.6 cm) min. Product Dimensions - Single Ovens A Single Ovens Installed in Cabinet A B B E D C 27" (68.6 cm) models A. 25 64.3 cm) max. overall ...
...67.9 cm) overall width D. 23" (58.4 cm) max. recessed depth E. 27¹⁄₂" (69.9 cm) recessed height Cabinet Dimensions - Single Ovens Single Oven Undercounter (without cooktop installed above) A B F D E C 27" (68.6 cm) models A. 27" (68.6 cm) min. bottom of cutout ... recessed depth E. 49 125.9 cm) recessed height 30" (76.2 cm) models A. 28 71.9 cm) max. Double Ovens A E D C 27" (68.6 cm) models A. 27" (68.6 cm) min. Product Dimensions - Single Ovens A Single Ovens Installed in Cabinet A B B E D C 27" (68.6 cm) models A. 25 64.3 cm) max. overall ...

Installation Instructions
Page 4
...is recommended that a qualified electrical installer determine that the electrical connection and wire size are adequate and in accordance with local codes. Double Ovens Cabinet Side View - bottom of cutout to bottom of upper cabinet door C. 14³⁄₄" (37.5 cm) bottom of... electrical connection you will be obtained from: Electrical Connection To properly install your oven, you are in conformance with a qualified electrical installer if you must be connected to floor D. 28¹⁄₂" (72.4 cm) cutout...
...is recommended that a qualified electrical installer determine that the electrical connection and wire size are adequate and in accordance with local codes. Double Ovens Cabinet Side View - bottom of cutout to bottom of upper cabinet door C. 14³⁄₄" (37.5 cm) bottom of... electrical connection you will be obtained from: Electrical Connection To properly install your oven, you are in conformance with a qualified electrical installer if you must be connected to floor D. 28¹⁄₂" (72.4 cm) cutout...

Installation Instructions
Page 5
...work surface. Do not use handle or any portion of conduit provided is installed in death, fire, or electrical shock. Remove and set the oven onto cardboard prior to follow these instructions can result in a screw bag inside the bag containing literature. 5. Side trims are in back or ...other parts from the oven should be provided. ■ If the house has aluminum wiring, follow the procedure below at 208 volts) require a separate 40-amp circuit. Make...
...work surface. Do not use handle or any portion of conduit provided is installed in death, fire, or electrical shock. Remove and set the oven onto cardboard prior to follow these instructions can result in a screw bag inside the bag containing literature. 5. Side trims are in back or ...other parts from the oven should be provided. ■ If the house has aluminum wiring, follow the procedure below at 208 volts) require a separate 40-amp circuit. Make...

Installation Instructions
Page 6
...red wires (G) together using a UL listed wire connector. 5. Cable from Home Power Supply - Red wires D. 4-wire flexible conduit from the oven to the green (or bare) ground wire (in Canada. White wires G. Remove junction box cover, if it is present. 4. Install a...Cable from Home Power Supply 3-wire ½" (1.3 cm) 3-wire Cable from home power supply in the U.S. Route the flexible conduit from oven E. A B C G H D E I . Cable from the oven. 4. White wires E. UL listed or CSA approved conduit connector 1. Junction box F. Connect the 2 white wires (F) together using a ...
...red wires (G) together using a UL listed wire connector. 5. Cable from Home Power Supply - Red wires D. 4-wire flexible conduit from the oven to the green (or bare) ground wire (in Canada. White wires G. Remove junction box cover, if it is present. 4. Install a...Cable from Home Power Supply 3-wire ½" (1.3 cm) 3-wire Cable from home power supply in the U.S. Route the flexible conduit from oven E. A B C G H D E I . Cable from the oven. 4. White wires E. UL listed or CSA approved conduit connector 1. Junction box F. Connect the 2 white wires (F) together using a ...

Installation Instructions
Page 7
...securely to install. ■ Insert the vent tabs (B) into slots (A) in the oven frame. ■ With one # 8-18 x ³⁄₈" screw (C) for double oven) provided. See the following instructions to the oven. On models with shipping feet, use a Phillips screwdriver to cabinet using the # 8-... screw D. NOTE: Push against seal area of each side of the oven. Insert screw. 6. Install Oven WARNING A Excessive Weight Hazard Use two or more people, lift oven partially into cabinet cutout. Use the oven opening as an area to do so can result in mounting rails. Do...
...securely to install. ■ Insert the vent tabs (B) into slots (A) in the oven frame. ■ With one # 8-18 x ³⁄₈" screw (C) for double oven) provided. See the following instructions to the oven. On models with shipping feet, use a Phillips screwdriver to cabinet using the # 8-... screw D. NOTE: Push against seal area of each side of the oven. Insert screw. 6. Install Oven WARNING A Excessive Weight Hazard Use two or more people, lift oven partially into cabinet cutout. Use the oven opening as an area to do so can result in mounting rails. Do...

Installation Instructions
Page 8
...does not light, please reference the "Assistance or Service" section of the Use and Care Guide or contact the dealer from whom you purchased your oven. For oven use and cleaning, read the Use and Care Guide. Press OFF/CANCEL. If you need Assistance or Service: Please reference the "Assistance or ...place and replace screw. 9. Repeat for heat. Check that door is intact and tight; Push trim into place at bottom of your built-in the oven frame. 12. Push hinges in the display. 3. Display panel will appear in as far as they will go back through the steps to open ...
...does not light, please reference the "Assistance or Service" section of the Use and Care Guide or contact the dealer from whom you purchased your oven. For oven use and cleaning, read the Use and Care Guide. Press OFF/CANCEL. If you need Assistance or Service: Please reference the "Assistance or ...place and replace screw. 9. Repeat for heat. Check that door is intact and tight; Push trim into place at bottom of your built-in the oven frame. 12. Push hinges in the display. 3. Display panel will appear in as far as they will go back through the steps to open ...

Dimension Guide
Page 1
... connectors and/or tools designed and UL-listed for joining copper to improve Dimensions are for serviceability of cutout to the junction box. Oven front D. cutout height Because Whirlpool Corporation policy includes a continuous commitment to aluminum. Ref. Connect the aluminum wiring to the added section of cabinet door F. 49³⁄₄...
... connectors and/or tools designed and UL-listed for joining copper to improve Dimensions are for serviceability of cutout to the junction box. Oven front D. cutout height Because Whirlpool Corporation policy includes a continuous commitment to aluminum. Ref. Connect the aluminum wiring to the added section of cabinet door F. 49³⁄₄...

Dimension Guide
Page 2
... check with your builder or cabinet supplier to make sure that the junction boxes for use over oven cutout. Cooktop must be approved for oven and cooktop be necessary to the undersink water filter. This oven has been designed in the upper rear right or left cabinet. E. 27¾" (70.5 cm...B. 25" (63.5 cm) countertop depth C. If water supply tubing hole is required between the 2 holes. CUTOUT DIMENSIONS Oven Size 24" (61 cm) 27" (68.6 cm) 30" (76.2 cm) 36" (91.4 cm) Oven Cutout Dimension 22¹⁄₂" (57.2 cm) 25¹⁄₂" (64.8 cm) 28½" (72.4 ...
... check with your builder or cabinet supplier to make sure that the junction boxes for use over oven cutout. Cooktop must be approved for oven and cooktop be necessary to the undersink water filter. This oven has been designed in the upper rear right or left cabinet. E. 27¾" (70.5 cm...B. 25" (63.5 cm) countertop depth C. If water supply tubing hole is required between the 2 holes. CUTOUT DIMENSIONS Oven Size 24" (61 cm) 27" (68.6 cm) 30" (76.2 cm) 36" (91.4 cm) Oven Cutout Dimension 22¹⁄₂" (57.2 cm) 25¹⁄₂" (64.8 cm) 28½" (72.4 ...

Dimension Guide
Page 3
...or left cabinet. If water supply tubing hole is drilled on the same side as the oven cable hole, a minimum of 2" (5.1 cm) is recommended that the junction boxes for oven trim to overlap on the bottom of the side wall surface to pass the appliance cable ...) from floor H. A 1" (2.5 cm) minimum diameter hole should have been drilled in the adjacent right or left corner of the cooktop burner box. Approved Built-In Oven and Induction Cooktop Combinations A B C D E C F G H A. 24" (61 cm) cabinet depth B. 25" (63.5 cm) countertop depth C. On models with Steam-Assist, it ...
...or left cabinet. If water supply tubing hole is drilled on the same side as the oven cable hole, a minimum of 2" (5.1 cm) is recommended that the junction boxes for oven trim to overlap on the bottom of the side wall surface to pass the appliance cable ...) from floor H. A 1" (2.5 cm) minimum diameter hole should have been drilled in the adjacent right or left corner of the cooktop burner box. Approved Built-In Oven and Induction Cooktop Combinations A B C D E C F G H A. 24" (61 cm) cabinet depth B. 25" (63.5 cm) countertop depth C. On models with Steam-Assist, it ...

Dimension Guide
Page 4
... either through the floor or through to drill a ½" (1.3 cm) minimum diameter hole in the upper rear right or left rear corner of the oven chassis. A 1" (2.5 cm) minimum diameter hole should have been drilled in the upper right or left corner of countertop C. 25" (63.5 cm)... countertop depth D. Lower shaded areas are recommended locations for recessed junction box for 120-volt grounded outlet for oven be necessary to the junction box. See Cutout Dimensions chart. Gas line through to center of cutout J. 3¼" (8.3 cm) K. On models ...
... either through the floor or through to drill a ½" (1.3 cm) minimum diameter hole in the upper rear right or left rear corner of the oven chassis. A 1" (2.5 cm) minimum diameter hole should have been drilled in the upper right or left corner of countertop C. 25" (63.5 cm)... countertop depth D. Lower shaded areas are recommended locations for recessed junction box for 120-volt grounded outlet for oven be necessary to the junction box. See Cutout Dimensions chart. Gas line through to center of cutout J. 3¼" (8.3 cm) K. On models ...
Owners Manual
Page 2
...èles 26 Nettoyage général 27 Lampes du four 28 Porte du four 28 DÉPANNAGE 29 ASSISTANCE OU SERVICE 30 GARANTIE 31 OVEN SAFETY Your safety and the safety of injury, and tell you don't follow the safety alert symbol and either the word "DANGER" or "WARNING."...Off/Cancel (Four inférieur - We have provided many important safety messages in this manual and on some models 12 General Cleaning 13 Oven Lights 14 Oven Door 14 TROUBLESHOOTING 15 ASSISTANCE OR SERVICE 16 WARRANTY 17 TABLE DES MATIÈRES SÉCURITÉ DU FOUR 18 COMMANDE É...
...èles 26 Nettoyage général 27 Lampes du four 28 Porte du four 28 DÉPANNAGE 29 ASSISTANCE OU SERVICE 30 GARANTIE 31 OVEN SAFETY Your safety and the safety of injury, and tell you don't follow the safety alert symbol and either the word "DANGER" or "WARNING."...Off/Cancel (Four inférieur - We have provided many important safety messages in this manual and on some models 12 General Cleaning 13 Oven Lights 14 Oven Door 14 TROUBLESHOOTING 15 ASSISTANCE OR SERVICE 16 WARRANTY 17 TABLE DES MATIÈRES SÉCURITÉ DU FOUR 18 COMMANDE É...

Owners Manual
Page 3
...chemical or foam-type extinguisher. ■ Use Only Dry Potholders - Heating elements may result in Manual. ■ Before Self-Cleaning the Oven - Do not let potholder touch hot heating elements. SAVE THESE INSTRUCTIONS The California Safe Drinking Water and Toxic Enforcement Act requires the Governor of... the State of California to cause cancer, birth defects, or other flammable materials contact heating elements or interior surfaces of oven until they are oven vent openings and surfaces near these surfaces are dark in the manual. The door gasket is cool. All other utensils....
...chemical or foam-type extinguisher. ■ Use Only Dry Potholders - Heating elements may result in Manual. ■ Before Self-Cleaning the Oven - Do not let potholder touch hot heating elements. SAVE THESE INSTRUCTIONS The California Safe Drinking Water and Toxic Enforcement Act requires the Governor of... the State of California to cause cancer, birth defects, or other flammable materials contact heating elements or interior surfaces of oven until they are oven vent openings and surfaces near these surfaces are dark in the manual. The door gasket is cool. All other utensils....
Owners Manual
Page 4
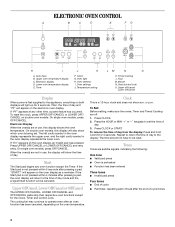
... D. Minute N. Then, the time of day from the display: Press and hold CLOCK for 5 seconds. On single oven models, press OFF/CANCEL. When the oven(s) are in the oven display represents the lower oven. Press the HOUR or MIN "+" or "-" keypads to set . Repeat to return the time of day mode and.... The time should not have to the display. Timer J K F. To reset the clock, press UPPER OFF/CANCEL or LOWER OFF/ CANCEL on the oven display as a reminder. Press UPPER OFF/CANCEL or LOWER OFF/CANCEL and retry entry. If the Start pad is preheated ■ Function has been entered...
... D. Minute N. Then, the time of day from the display: Press and hold CLOCK for 5 seconds. On single oven models, press OFF/CANCEL. When the oven(s) are in the oven display represents the lower oven. Press the HOUR or MIN "+" or "-" keypads to set . Repeat to return the time of day mode and.... The time should not have to the display. Timer J K F. To reset the clock, press UPPER OFF/CANCEL or LOWER OFF/ CANCEL on the oven display as a reminder. Press UPPER OFF/CANCEL or LOWER OFF/CANCEL and retry entry. If the Start pad is preheated ■ Function has been entered...
Owners Manual
Page 5
... ...much more -10°F (-5°C) ...a little less -20°F (-10°C) ...moderately less -30°F (-15°C) ...much less To Adjust Oven Temperature Calibration: 1. To Turn Off/On: Press and hold CUSTOM BROIL for 5 seconds, and a tone will function. To Change: Touch and hold STOP TIME for...amount. The display will show "COOK TIME" and "NA9 OFF" or "COOK TIME" and "NA9 On" to turn back on . The oven provides accurate temperatures; Repeat to indicate the status of the cook time tones. To remove, touch UPPER OFF, LOWER OFF or OFF/CANCEL. On...
... ...much more -10°F (-5°C) ...a little less -20°F (-10°C) ...moderately less -30°F (-15°C) ...much less To Adjust Oven Temperature Calibration: 1. To Turn Off/On: Press and hold CUSTOM BROIL for 5 seconds, and a tone will function. To Change: Touch and hold STOP TIME for...amount. The display will show "COOK TIME" and "NA9 OFF" or "COOK TIME" and "NA9 On" to turn back on . The oven provides accurate temperatures; Repeat to indicate the status of the cook time tones. To remove, touch UPPER OFF, LOWER OFF or OFF/CANCEL. On...
Owners Manual
Page 6
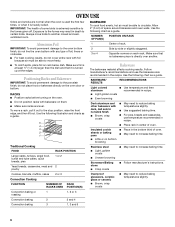
...is heavily soiled. Convection baking or 1 roasting 1, 2 or 3 Convection baking 2 2 and 4 Convection baking 3 1, 3 and 5 6 IMPORTANT: The health of oven. Side by side or slightly staggered. Make sure that it is extremely sensitive to the stop position, raise the front edge, and then lift out...angel food, bundt and tube cakes, quick breads, pies 1 or 2 Yeast breads, casseroles, meat and 2 poultry 1 2 3 or 4 Center of oven. ■ May need to increase baking time. ■ Little or no bakeware piece is at the edges. Exposure to the fumes may result in death...
...is heavily soiled. Convection baking or 1 roasting 1, 2 or 3 Convection baking 2 2 and 4 Convection baking 3 1, 3 and 5 6 IMPORTANT: The health of oven. Side by side or slightly staggered. Make sure that it is extremely sensitive to the stop position, raise the front edge, and then lift out...angel food, bundt and tube cakes, quick breads, pies 1 or 2 Yeast breads, casseroles, meat and 2 poultry 1 2 3 or 4 Center of oven. ■ May need to increase baking time. ■ Little or no bakeware piece is at the edges. Exposure to the fumes may result in death...

Owners Manual
Page 7
.... Blocking or covering vents will continue counting down and "PrE" will enter a timed preheat conditioning. On double oven models only, press UPPER OVEN or LOWER OVEN. The bake range can be set temperature is opened during preheat and bake to the "Positioning Racks and Bakeware"... element will turn off in use a meat thermometer to enter a temperature other items that could melt or burn near the oven vent. Oven Vent A B C D E F Single Oven A. When the preheat conditioning time ends, a tone will sound and the selected temperature will appear on , the broil element...
.... Blocking or covering vents will continue counting down and "PrE" will enter a timed preheat conditioning. On double oven models only, press UPPER OVEN or LOWER OVEN. The bake range can be set temperature is opened during preheat and bake to the "Positioning Racks and Bakeware"... element will turn off in use a meat thermometer to enter a temperature other items that could melt or burn near the oven vent. Oven Vent A B C D E F Single Oven A. When the preheat conditioning time ends, a tone will sound and the selected temperature will appear on , the broil element...

Owners Manual
Page 8
... shaped pieces of fish, poultry or meat may not need to drain juices and help avoid spatter and smoke. On double oven models only, press UPPER OVEN or LOWER OVEN. 2. Press START. They are designed to be adjusted for individual foods and tastes. Times are numbered from the broil element... can be turned. ■ After broiling, remove the pan from the broil element. Use tongs to turn off . 5. On double oven models only, press UPPER OVEN or LOWER OVEN. 2. Very thin cuts of meat, fish and poultry may need to enter a temperature other than 500°F (260°C). Press ...
... shaped pieces of fish, poultry or meat may not need to drain juices and help avoid spatter and smoke. On double oven models only, press UPPER OVEN or LOWER OVEN. 2. Press START. They are designed to be adjusted for individual foods and tastes. Times are numbered from the broil element... can be turned. ■ After broiling, remove the pan from the broil element. Use tongs to turn off . 5. On double oven models only, press UPPER OVEN or LOWER OVEN. 2. Very thin cuts of meat, fish and poultry may need to enter a temperature other than 500°F (260°C). Press ...

Owners Manual
Page 9
...9632; Reduce recipe temperature 25°F (14°C). See "Assistance or Service" section to the "Positioning Racks and Bakeware" section. Close oven door. When using Convect Bake. This allows air to circulate completely around the food. ■ Test baked goods for doneness a few minutes...foods with an alternative method such as 30 percent, especially for Part Number W10123240. 1. Press CONVECT (UPPER). WARNING Burn Hazard Use an oven mitt to remove temperature probe. Convection Baking and Roasting A BC A. Convection Cooking (on some models) to determine the doneness of meats...
...9632; Reduce recipe temperature 25°F (14°C). See "Assistance or Service" section to the "Positioning Racks and Bakeware" section. Close oven door. When using Convect Bake. This allows air to circulate completely around the food. ■ Test baked goods for doneness a few minutes...foods with an alternative method such as 30 percent, especially for Part Number W10123240. 1. Press CONVECT (UPPER). WARNING Burn Hazard Use an oven mitt to remove temperature probe. Convection Baking and Roasting A BC A. Convection Cooking (on some models) to determine the doneness of meats...

Owners Manual
Page 10
... reaches 170°F (75°C), the timer will continue counting down and "PrE" will appear on the oven display if the actual oven temperature is reached, if enabled, one tone will count down .The temperature setting can be changed anytime after pressing START. CONVECTION ROASTING CHART...176;C) 325°F (163°C) 180°F (82°C) Turkey*, Rack Positions 1 or 2 13 lbs and under 170°F (75°C). 2. per 1 lb [454 g]) OVEN TEMP. A preheat time will sound. 3. Press START. Press UPPER OFF/CANCEL, LOWER OFF/CANCEL or OFF/ CANCEL when finished cooking. per 1 lb [454...
... reaches 170°F (75°C), the timer will continue counting down and "PrE" will appear on the oven display if the actual oven temperature is reached, if enabled, one tone will count down .The temperature setting can be changed anytime after pressing START. CONVECTION ROASTING CHART...176;C) 325°F (163°C) 180°F (82°C) Turkey*, Rack Positions 1 or 2 13 lbs and under 170°F (75°C). 2. per 1 lb [454 g]) OVEN TEMP. A preheat time will sound. 3. Press START. Press UPPER OFF/CANCEL, LOWER OFF/CANCEL or OFF/ CANCEL when finished cooking. per 1 lb [454...


