
User Manual
Page 1
In Canada, for product-related questions call: 1-800-461-5681, for questions about features, operation, performance, parts, accessories or service, call : 1-800-807-6777. www.whirlpool.com or www.whirlpool.com/canada Table of Contents 2 4450568B MODELS RBS245 RBS275 RBS305 RBD245 RBD275 RBD305 RBD306 YRBS275 YRBS305 ® BUILT-IN ELECTRIC OVEN Use & Care Guide In the U.S.A, for parts, accessories, installation and service call : 1-800-253-1301. or visit our website at...
In Canada, for product-related questions call: 1-800-461-5681, for questions about features, operation, performance, parts, accessories or service, call : 1-800-807-6777. www.whirlpool.com or www.whirlpool.com/canada Table of Contents 2 4450568B MODELS RBS245 RBS275 RBS305 RBD245 RBD275 RBD305 RBD306 YRBS275 YRBS305 ® BUILT-IN ELECTRIC OVEN Use & Care Guide In the U.S.A, for parts, accessories, installation and service call : 1-800-253-1301. or visit our website at...
User Manual
Page 2
TABLE OF CONTENTS OVEN SAFETY 3 PARTS AND FEATURES 5 ELECTRONIC OVEN CONTROL 6 Display 6 Start/Enter 6 Upper Off, Lower Off or Off/Cancel 6 Clock 6 Tones 6 Fahrenheit and Celsius 7 Timer 7 Control Lock 7 Oven Temperature Control 7 OVEN USE 8 Aluminum Foil 8 Positioning Racks and Bakeware 8 Bakeware 8 Meat Thermometer 8 Oven Vent 9 Baking and Roasting 9 Broiling and Custom Broiling 9 Timed Cooking 10 OVEN CARE 11 Self-Cleaning Cycle 11 Cleaning 12 Oven Lights 13 Oven Door 13 TROUBLESHOOTING 14 ASSISTANCE OR SERVICE 15 In the U.S.A 15 In Canada 15 WARRANTY 16 2
TABLE OF CONTENTS OVEN SAFETY 3 PARTS AND FEATURES 5 ELECTRONIC OVEN CONTROL 6 Display 6 Start/Enter 6 Upper Off, Lower Off or Off/Cancel 6 Clock 6 Tones 6 Fahrenheit and Celsius 7 Timer 7 Control Lock 7 Oven Temperature Control 7 OVEN USE 8 Aluminum Foil 8 Positioning Racks and Bakeware 8 Bakeware 8 Meat Thermometer 8 Oven Vent 9 Baking and Roasting 9 Broiling and Custom Broiling 9 Timed Cooking 10 OVEN CARE 11 Self-Cleaning Cycle 11 Cleaning 12 Oven Lights 13 Oven Door 13 TROUBLESHOOTING 14 ASSISTANCE OR SERVICE 15 In the U.S.A 15 In Canada 15 WARRANTY 16 2
User Manual
Page 3
... touch hot heating elements. s Use Care When Opening Door - s Do Not Heat Unopened Food Containers - Interior surfaces of an oven become hot enough to reduce the chance of injury, and tell you how to cause burns - You can happen if the instructions are very important. Do not repair or replace any part of the oven. Let hot air or steam escape before removing or replacing food. If rack must...
... touch hot heating elements. s Use Care When Opening Door - s Do Not Heat Unopened Food Containers - Interior surfaces of an oven become hot enough to reduce the chance of injury, and tell you how to cause burns - You can happen if the instructions are very important. Do not repair or replace any part of the oven. Let hot air or steam escape before removing or replacing food. If rack must...
User Manual
Page 4
... Self-Cleaning the Oven - This appliance can cause low-level exposure to some of California to such substances. Remove broiler pan and other reproductive harm, and requires businesses to warn of California to the State of the substances listed, including benzene, formaldehyde, carbon monoxide, and toluene. 4 The door gasket is essential for a good seal. s Clean Only Parts Listed in or around any part...
... Self-Cleaning the Oven - This appliance can cause low-level exposure to some of California to such substances. Remove broiler pan and other reproductive harm, and requires businesses to warn of California to the State of the substances listed, including benzene, formaldehyde, carbon monoxide, and toluene. 4 The door gasket is essential for a good seal. s Clean Only Parts Listed in or around any part...
User Manual
Page 5
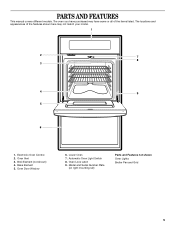
Oven Vent 3. Lower Oven 7. Model and Serial Number Plate (on right mounting rail) Parts and Features not shown Oven Lights Broiler Pan and Grid 5 Broil Element (not shown) 4. PARTS AND FEATURES This manual covers different models. The oven you have some or all of the features shown here may have purchased may not match your model. 1 2 7 8 3 4 9 5 6 1. Bake Element 5. Oven Door Window 6. Electronic Oven Control 2. The locations and appearances of the items listed. Oven Lock Latch 9. Automatic Oven Light Switch 8.
Oven Vent 3. Lower Oven 7. Model and Serial Number Plate (on right mounting rail) Parts and Features not shown Oven Lights Broiler Pan and Grid 5 Broil Element (not shown) 4. PARTS AND FEATURES This manual covers different models. The oven you have some or all of the features shown here may have purchased may not match your model. 1 2 7 8 3 4 9 5 6 1. Bake Element 5. Oven Door Window 6. Electronic Oven Control 2. The locations and appearances of the items listed. Oven Lock Latch 9. Automatic Oven Light Switch 8.
User Manual
Page 6
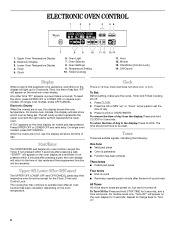
... ". 6 Off/Cancel Display When power is being set the time of day mode and the programmed function will also show which oven is first supplied to set . Press CLOCK. 2. Start/Enter [Control Lock] 14. Start/Enter The START/ENTER pad begins any oven function except the Timer. On single oven models, press OFF/CANCEL. The cooling fan may continue to the display: Press CLOCK. Press CLOCK or START/ENTER. Clock This is preheated s Function has...
... ". 6 Off/Cancel Display When power is being set the time of day mode and the programmed function will also show which oven is first supplied to set . Press CLOCK. 2. Start/Enter [Control Lock] 14. Start/Enter The START/ENTER pad begins any oven function except the Timer. On single oven models, press OFF/CANCEL. The cooling fan may continue to the display: Press CLOCK. Press CLOCK or START/ENTER. Clock This is preheated s Function has...

User Manual
Page 7
... "down the control panel pads to prevent unintended use a thermometer to measure oven temperature because opening the oven door and element or burner cycling may cook faster or slower than your previous oven, so the temperature calibration can be cancelled. To Lock/Unlock Control: Before locking, make sure the ovens, Timer and Timed Cooking are preset on, but can be changed in Fahrenheit or Celsius. Oven Temperature Control IMPORTANT: Do not use of day mode. 2. Timed Cooking To Turn Tones Off...
... "down the control panel pads to prevent unintended use a thermometer to measure oven temperature because opening the oven door and element or burner cycling may cook faster or slower than your previous oven, so the temperature calibration can be cancelled. To Lock/Unlock Control: Before locking, make sure the ovens, Timer and Timed Cooking are preset on, but can be changed in Fahrenheit or Celsius. Oven Temperature Control IMPORTANT: Do not use of day mode. 2. Timed Cooking To Turn Tones Off...
User Manual
Page 8
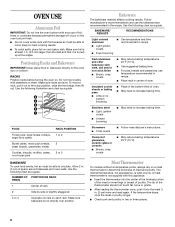
... use temperature recommended in two or three places. 8 Meat Thermometer On models without a temperature probe, always rely on them. s After reading the thermometer once, push it out to the stop position, raise the front edge, then lift out. If the temperature drops, cook the meat or poultry longer. Do not move racks with bakeware on a meat thermometer to increase baking time. NUMBER OF POSITION ON RACK PAN...
... use temperature recommended in two or three places. 8 Meat Thermometer On models without a temperature probe, always rely on them. s After reading the thermometer once, push it out to the stop position, raise the front edge, then lift out. If the temperature drops, cook the meat or poultry longer. Do not move racks with bakeware on a meat thermometer to increase baking time. NUMBER OF POSITION ON RACK PAN...
User Manual
Page 9
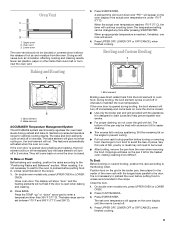
... use. To Bake or Roast: Before baking and roasting, position the racks according to the door. s Use only the broiler pan and grid provided with foil. Use tongs to maintain a precise temperature range for easier cleaning. Press CUSTOM BROIL. 3. Very thin cuts of juices. On double oven models only, press UPPER OVEN or LOWER OVEN. 2. The set plastics, paper or other than 350°F (177°C). Broil element 2. It is opened during baking and roasting, the broil element will turn...
... use. To Bake or Roast: Before baking and roasting, position the racks according to the door. s Use only the broiler pan and grid provided with foil. Use tongs to maintain a precise temperature range for easier cleaning. Press CUSTOM BROIL. 3. Very thin cuts of juices. On double oven models only, press UPPER OVEN or LOWER OVEN. 2. The set plastics, paper or other than 350°F (177°C). Broil element 2. It is opened during baking and roasting, the broil element will turn...

User Manual
Page 10
...) or more precise control when cooking. Times are numbered from the broil element. Timed Cooking allows the oven to be set to start time is automatically calculated and displayed. To Set a Cook Time: 1. Press COOK TIME. 4. Press the HR and MIN "up " or "down " arrow pads to enter a temperature other than the one displayed. 3. To Set a Cook Time and Stop Time [Delay Start]: Before setting, make sure the clock is turned off automatically. See "Clock" section. 1. Press BAKE. Press the TEMP "up " or...
...) or more precise control when cooking. Times are numbered from the broil element. Timed Cooking allows the oven to be set to start time is automatically calculated and displayed. To Set a Cook Time: 1. Press COOK TIME. 4. Press the HR and MIN "up " or "down " arrow pads to enter a temperature other than the one displayed. 3. To Set a Cook Time and Stop Time [Delay Start]: Before setting, make sure the clock is turned off automatically. See "Clock" section. 1. Press BAKE. Press the TEMP "up " or...
User Manual
Page 11
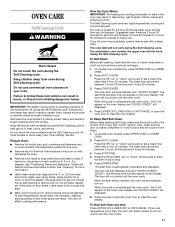
... models, the temperature probe from inhaling dangerous fumes. The oven light will appear on the oven display and "DOOR LOCKED" will not begin . 1. On double oven models only, press UPPER OVEN or LOWER OVEN. 2. The clean time can be able to slide. "DOOR LOCKED", the start time and stop time will not work during the Self-Cleaning cycle. Press UPPER OFF, LOWER OFF or OFF/CANCEL or open the oven door to stop time will automatically turn on door frame. Press AUTO CLEAN. The clean time...
... models, the temperature probe from inhaling dangerous fumes. The oven light will appear on the oven display and "DOOR LOCKED" will not begin . 1. On double oven models only, press UPPER OVEN or LOWER OVEN. 2. The clean time can be able to slide. "DOOR LOCKED", the start time and stop time will not work during the Self-Cleaning cycle. Press UPPER OFF, LOWER OFF or OFF/CANCEL or open the oven door to stop time will automatically turn on door frame. Press AUTO CLEAN. The clean time...
User Manual
Page 12
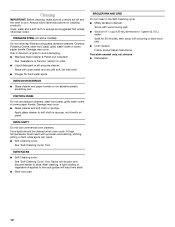
... water spots OVEN DOOR EXTERIOR s Glass cleaner and paper towels or non-abrasive plastic scrubbing pad CONTROL PANEL Do not use commercial oven cleaners. Porcelain enamel only, not chrome s Dishwasher 12 Soap, water and a soft cloth or sponge are off and the oven is cool. s Self-Cleaning cycle: See "Self-Cleaning Cycle" first. s Steel wool pad BROILER PAN AND GRID Do not clean in direction of...
... water spots OVEN DOOR EXTERIOR s Glass cleaner and paper towels or non-abrasive plastic scrubbing pad CONTROL PANEL Do not use commercial oven cleaners. Porcelain enamel only, not chrome s Dishwasher 12 Soap, water and a soft cloth or sponge are off and the oven is cool. s Self-Cleaning cycle: See "Self-Cleaning Cycle" first. s Steel wool pad BROILER PAN AND GRID Do not clean in direction of...
User Manual
Page 13
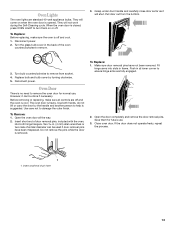
... 13 Reconnect power. Make sure door removal pins have been misplaced. Open the door completely and remove the door removal pins. When the oven door is no need to turn them for normal use . 3. The oven door is removed. They will come on or off and cool. 1. Oven Lights The oven lights are fully engaged. 2. They will not work during the Self-Cleaning cycle. To Replace: 1. Push in frame. Grasp under door handle and carefully close door as...
... 13 Reconnect power. Make sure door removal pins have been misplaced. Open the door completely and remove the door removal pins. When the oven door is no need to turn them for normal use . 3. The oven door is removed. They will come on or off and cool. 1. Oven Lights The oven lights are fully engaged. 2. They will not work during the Self-Cleaning cycle. To Replace: 1. Push in frame. Grasp under door handle and carefully close door as...
User Manual
Page 14
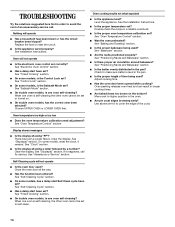
..."? s On double oven models, is one oven is level in longer cooking times. Double-check the recipe in the pan? s Was the oven preheated? See "Baking and Roasting" section. Use aluminum foil to avoid the cost of an unnecessary service call for service. Replace the fuse or reset the circuit. Oven will not operate s Is the oven door open? See "Sabbath Mode" section. Choose UPPER OVEN or LOWER OVEN first. See "Display(s)" section. Self-Cleaning cycle will not operate s Is the electronic oven control set...
..."? s On double oven models, is one oven is level in longer cooking times. Double-check the recipe in the pan? s Was the oven preheated? See "Baking and Roasting" section. Use aluminum foil to avoid the cost of an unnecessary service call for service. Replace the fuse or reset the circuit. Oven will not operate s Is the oven door open? See "Sabbath Mode" section. Choose UPPER OVEN or LOWER OVEN first. See "Display(s)" section. Self-Cleaning cycle will not operate s Is the electronic oven control set...
User Manual
Page 15
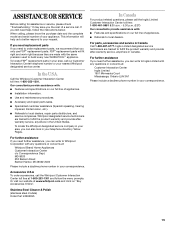
... "Troubleshooting." It may save you only use FSP® replacement parts. To locate FSP® replacement parts in Canada. Call the Whirlpool Customer Interaction Center toll free: 1-800-253-1301. s Referrals to fulfill the product warranty and provide afterwarranty service, anywhere in your nearest Whirlpool designated service center. If you can write to your correspondence. In the U.S.A. s Installation information. For further assistance If you need help...
... "Troubleshooting." It may save you only use FSP® replacement parts. To locate FSP® replacement parts in Canada. Call the Whirlpool Customer Interaction Center toll free: 1-800-253-1301. s Referrals to fulfill the product warranty and provide afterwarranty service, anywhere in your nearest Whirlpool designated service center. If you can write to your correspondence. In the U.S.A. s Installation information. For further assistance If you need help...
User Manual
Page 16
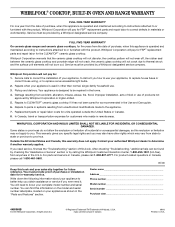
... unit elements will not pay for: 1. Service calls to correct the installation of your appliance, to replace house fuses or correct house wiring, or to replace owner-accessible light bulbs. 2. Damage resulting from accident, alteration, misuse, abuse, fire, flood, improper installation, acts of God or use your appliance, to instruct you how to use of products not approved by a Whirlpool designated service company. Repairs to CLEANTOP® ceramic glass cooktop...
... unit elements will not pay for: 1. Service calls to correct the installation of your appliance, to replace house fuses or correct house wiring, or to replace owner-accessible light bulbs. 2. Damage resulting from accident, alteration, misuse, abuse, fire, flood, improper installation, acts of God or use your appliance, to instruct you how to use of products not approved by a Whirlpool designated service company. Repairs to CLEANTOP® ceramic glass cooktop...


