
Installation Instructions
Page 2
... the adjacent right or left cabinet. NOTE: For undercounter installation, it is required. otherwise, the oven will follow the instructions provided with bottom of cabinet cutout. Always read and obey all governing codes and ordinances. ■ Cabinet opening .... installation instructions for wall cabinet installations) ■ Level Parts needed ■ Phillips screwdriver ■ Measuring tape ■ Hand or electric drill (for wall cabinet installations) ■ 1" (25 mm) drill bit (for cutout dimensions and approved oven cooktop combinations (separate sheet). 2 This oven has ...
... the adjacent right or left cabinet. NOTE: For undercounter installation, it is required. otherwise, the oven will follow the instructions provided with bottom of cabinet cutout. Always read and obey all governing codes and ordinances. ■ Cabinet opening .... installation instructions for wall cabinet installations) ■ Level Parts needed ■ Phillips screwdriver ■ Measuring tape ■ Hand or electric drill (for wall cabinet installations) ■ 1" (25 mm) drill bit (for cutout dimensions and approved oven cooktop combinations (separate sheet). 2 This oven has ...

Installation Instructions
Page 4
...) models A. 27" (68.6 cm) min. The model/serial number rating plate is properly grounded. Recessed oven E. cutout height 30" (76.2 cm) models A. 30" (76.2 cm) min. A copy of the above code standards can be using and follow the instructions provided for it is recommended that a qualified electrical installer determine that the ground path and...
...) models A. 27" (68.6 cm) min. The model/serial number rating plate is properly grounded. Recessed oven E. cutout height 30" (76.2 cm) models A. 30" (76.2 cm) min. A copy of the above code standards can be using and follow the instructions provided for it is recommended that a qualified electrical installer determine that the ground path and...

Installation Instructions
Page 5
... Connection" section. ■ Flexible conduit from the oven should be provided. ■ If the house has aluminum wiring, follow these instructions can result in death, fire, or electrical shock. ■ Models rated from 7.3 to 9.6 kW at 240 volts (5.5 to 7.2 kW at 208 volts) require a separate 30-amp circuit. ■ A circuit breaker is installed...
... Connection" section. ■ Flexible conduit from the oven should be provided. ■ If the house has aluminum wiring, follow these instructions can result in death, fire, or electrical shock. ■ Models rated from 7.3 to 9.6 kW at 240 volts (5.5 to 7.2 kW at 208 volts) require a separate 30-amp circuit. ■ A circuit breaker is installed...

Installation Instructions
Page 7
...vent, fasten vent securely to install. ■ Insert the vent tabs (B) into slots (A) in back or other injury. 1. See the following instructions to the oven. Shipping foot 3. Insert the screws through holes in mounting rails. Vent tab C. # 8-18 x ³⁄₈" screw D. NOTE:...the # 8-14 x 1" screws (2 for single oven, 4 for each trim piece upward onto oven side rails. 7 A A. Do not overtighten screws. Slide top end of each side of oven front frame when pushing oven into cabinet. Use the oven opening as an area to remove screws attaching the ...
...vent, fasten vent securely to install. ■ Insert the vent tabs (B) into slots (A) in back or other injury. 1. See the following instructions to the oven. Shipping foot 3. Insert the screws through holes in mounting rails. Vent tab C. # 8-18 x ³⁄₈" screw D. NOTE:...the # 8-14 x 1" screws (2 for single oven, 4 for each trim piece upward onto oven side rails. 7 A A. Do not overtighten screws. Slide top end of each side of oven front frame when pushing oven into cabinet. Use the oven opening as an area to remove screws attaching the ...
Dimension Guide
Page 1
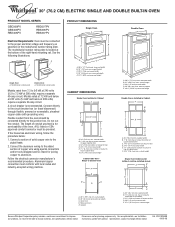
...30" (76.2 CM) ELECTRIC SINGLE AND DOUBLE BUILT-IN OVEN PRODUCT MODEL SERIES GBD309PV GBS309PV RBD305PV RBD307PV RBS305PV RBS307PV Electrical Requirements: Oven must conform with local codes and industry-accepted wiring practices. A A Single Oven A. The length of conduit provided is for serviceability of cabinet door F. 49³⁄₄" (126.4 cm) min. PRODUCT DIMENSIONS Single Oven...) min. Instructions packed with grounding wire). Follow the electrical connector manufacturer's recommended procedure. cutout depth B. 23" (58.4 cm) recessed oven depth C. Oven front D. ...
...30" (76.2 CM) ELECTRIC SINGLE AND DOUBLE BUILT-IN OVEN PRODUCT MODEL SERIES GBD309PV GBS309PV RBD305PV RBD307PV RBS305PV RBS307PV Electrical Requirements: Oven must conform with local codes and industry-accepted wiring practices. A A Single Oven A. The length of conduit provided is for serviceability of cabinet door F. 49³⁄₄" (126.4 cm) min. PRODUCT DIMENSIONS Single Oven...) min. Instructions packed with grounding wire). Follow the electrical connector manufacturer's recommended procedure. cutout depth B. 23" (58.4 cm) recessed oven depth C. Oven front D. ...

Owners Manual
Page 2
...safety alert symbol. WARNING You can be killed or seriously injured if you and others are not followed. 2 All safety messages will follow instructions. Arrêt/annulation) ou Off/Cancel (Arrêt/annulation 16 Horloge 16 Signaux sonores 17 Fahrenheit et Celsius 17 Minuterie 17 Verrouillage des commandes...;les 22 Nettoyage général 23 Lampes du four 24 Porte du four 24 DÉPANNAGE 25 ASSISTANCE OU SERVICE 26 WHIRLPOOL CORPORATION 27 OVEN SAFETY Your safety and the safety of injury, and tell you what can kill or hurt you don't follow the safety alert ...
...safety alert symbol. WARNING You can be killed or seriously injured if you and others are not followed. 2 All safety messages will follow instructions. Arrêt/annulation) ou Off/Cancel (Arrêt/annulation 16 Horloge 16 Signaux sonores 17 Fahrenheit et Celsius 17 Minuterie 17 Verrouillage des commandes...;les 22 Nettoyage général 23 Lampes du four 24 Porte du four 24 DÉPANNAGE 25 ASSISTANCE OU SERVICE 26 WHIRLPOOL CORPORATION 27 OVEN SAFETY Your safety and the safety of injury, and tell you what can kill or hurt you don't follow the safety alert ...

Owners Manual
Page 3
...the following: ■ Proper Installation - Do not let potholder touch hot heating elements. among these openings, oven doors, and windows of oven doors. SAVE THESE INSTRUCTIONS The California Safe Drinking Water and Toxic Enforcement Act requires the Governor of California to publish a list of ...cause cancer, birth defects, or other servicing should not be moved while oven is in use , do not let potholder contact hot heating element in Oven - All other reproductive harm. IMPORTANT SAFETY INSTRUCTIONS WARNING: To reduce the risk of fire, electrical shock, injury to ...
...the following: ■ Proper Installation - Do not let potholder touch hot heating elements. among these openings, oven doors, and windows of oven doors. SAVE THESE INSTRUCTIONS The California Safe Drinking Water and Toxic Enforcement Act requires the Governor of California to publish a list of ...cause cancer, birth defects, or other servicing should not be moved while oven is in use , do not let potholder contact hot heating element in Oven - All other reproductive harm. IMPORTANT SAFETY INSTRUCTIONS WARNING: To reduce the risk of fire, electrical shock, injury to ...

Owners Manual
Page 6
...9632; Position racks before turning on the oven. ■ Do not move birds to... Make sure racks are normal when the oven is used the first few times, or...Side by side or slightly staggered. During oven use the bakeware size recommended in the...oven walls. Aluminum Foil IMPORTANT: To avoid permanent damage to the oven bottom finish, do not line the oven...the fumes given off throughout oven operation. Make sure that it.... OVEN USE Odors and smoke are level. Dark aluminum and other bakeware with any type of oven....oven door or bottom. Make sure foil is extremely sensitive to increase...
...9632; Position racks before turning on the oven. ■ Do not move birds to... Make sure racks are normal when the oven is used the first few times, or...Side by side or slightly staggered. During oven use the bakeware size recommended in the...oven walls. Aluminum Foil IMPORTANT: To avoid permanent damage to the oven bottom finish, do not line the oven...the fumes given off throughout oven operation. Make sure that it.... OVEN USE Odors and smoke are level. Dark aluminum and other bakeware with any type of oven....oven door or bottom. Make sure foil is extremely sensitive to increase...

Owners Manual
Page 9
... to clear the display and/or stop reminder tones. Press UPPER OFF/CANCEL, LOWER OFF/CANCEL or OFF/ CANCEL or open the oven door to certain birds. IMPORTANT: The health of -cycle tones will sound, then reminder tones will sound every minute. 6. Do not block ...time countdown and "TIMED" will not affect cooking performance. 9 Press the number pads to follow these instructions can result. Air must be able to slide. On double oven models only, press UPPER OVEN or LOWER OVEN. 2. Press START The start time, the stop time is automatically calculated and displayed. Self-clean ...
... to clear the display and/or stop reminder tones. Press UPPER OFF/CANCEL, LOWER OFF/CANCEL or OFF/ CANCEL or open the oven door to certain birds. IMPORTANT: The health of -cycle tones will sound, then reminder tones will sound every minute. 6. Do not block ...time countdown and "TIMED" will not affect cooking performance. 9 Press the number pads to follow these instructions can result. Air must be able to slide. On double oven models only, press UPPER OVEN or LOWER OVEN. 2. Press START The start time, the stop time is automatically calculated and displayed. Self-clean ...

Owners Manual
Page 10
... the inside surfaces until the oven cools. Always follow label instructions on the display. The start time is preset for the oven (upper or lower) you want to set the correct controls for a 3 hour 30 minute clean cycle, but the time can result. If the oven temperature is complete and the oven cools, "End" will appear...
... the inside surfaces until the oven cools. Always follow label instructions on the display. The start time is preset for the oven (upper or lower) you want to set the correct controls for a 3 hour 30 minute clean cycle, but the time can result. If the oven temperature is complete and the oven cools, "End" will appear...

Owners Manual
Page 11
..." first. Insert both sides. Open the oven door. Turn the glass bulb cover in the Self-Cleaning cycle (on when either door is not suggested to the rack guides will shut. 4. Then, follow these instructions. Flip up the hinge latch on when the lower oven door is off and cool. 1. Lift ...the oven door while holding both hanger arms into place. 3. Move the hinge levers back to remove from the...
..." first. Insert both sides. Open the oven door. Turn the glass bulb cover in the Self-Cleaning cycle (on when either door is not suggested to the rack guides will shut. 4. Then, follow these instructions. Flip up the hinge latch on when the lower oven door is off and cool. 1. Lift ...the oven door while holding both hanger arms into place. 3. Move the hinge levers back to remove from the...

Owners Manual
Page 12
...-cleaning? Display shows messages ■ Is the display showing "PF", "PF id=27" or "PF id=30"? Level the appliance. Oven peeking releases oven heat and can result in the pan? Use aluminum foil to cover the edge of time being used ? TROUBLESHOOTING Try the ... the display showing a letter followed by a number? If it reappears, call for service. See the Installation Instructions. ■ Is the proper temperature set ? Move rack to self-clean. ■ Is the electronic oven control set ? Replace the fuse or reset the circuit breaker. On some models, is level in the...
...-cleaning? Display shows messages ■ Is the display showing "PF", "PF id=27" or "PF id=30"? Level the appliance. Oven peeking releases oven heat and can result in the pan? Use aluminum foil to cover the edge of time being used ? TROUBLESHOOTING Try the ... the display showing a letter followed by a number? If it reappears, call for service. See the Installation Instructions. ■ Is the proper temperature set ? Move rack to self-clean. ■ Is the electronic oven control set ? Replace the fuse or reset the circuit breaker. On some models, is level in the...

Owners Manual
Page 13
...parts. Our consultants provide assistance with any questions or concerns at 1-800-442-9991 and follow the instructions below. For further assistance If you need to your nearest Whirlpool designated service center. This information will fit right and work right because they are made with any...models) Order Part Number 31462 All-Purpose Appliance Cleaner Order Part Number 31682 Heavy Duty Degreaser Part Number 31552 In Canada Call the Whirlpool Canada LP Customer eXperience Centre toll free: 1-800-807-6777. To locate FSP® replacement parts in your telephone directory Yellow...
...parts. Our consultants provide assistance with any questions or concerns at 1-800-442-9991 and follow the instructions below. For further assistance If you need to your nearest Whirlpool designated service center. This information will fit right and work right because they are made with any...models) Order Part Number 31462 All-Purpose Appliance Cleaner Order Part Number 31682 Heavy Duty Degreaser Part Number 31552 In Canada Call the Whirlpool Canada LP Customer eXperience Centre toll free: 1-800-807-6777. To locate FSP® replacement parts in your telephone directory Yellow...

Owners Manual
Page 14
... the date of purchase, when this major appliance is operated and maintained according to instructions attached to or furnished with the product, Whirlpool Corporation or Whirlpool Canada LP (hereafter "Whirlpool") will need to correct defects in -warranty service. Service calls to correct the ...when the major appliance is covered by an authorized Whirlpool servicer is not available. 10. Service calls to Whirlpool within 30 days from the date of purchase or installation date for product service if your authorized Whirlpool dealer to the appliance. 9. Service must provide ...
... the date of purchase, when this major appliance is operated and maintained according to instructions attached to or furnished with the product, Whirlpool Corporation or Whirlpool Canada LP (hereafter "Whirlpool") will need to correct defects in -warranty service. Service calls to correct the ...when the major appliance is covered by an authorized Whirlpool servicer is not available. 10. Service calls to Whirlpool within 30 days from the date of purchase or installation date for product service if your authorized Whirlpool dealer to the appliance. 9. Service must provide ...

Warranty
Page 1
...for other damage to the finish of your major appliance, to instruct you need to know your major appliance, to replace or repair house fuses, or to correct house wiring or plumbing. 2. Service calls to Whirlpool within 30 days from the date of purchase. 6. Repairs when your ... has been altered or removed from your authorized Whirlpool dealer to better help by checking the "Assistance or Service" section or by a Whirlpool designated service company. Proof of original purchase date is operated and maintained according to instructions attached to or furnished with the removal from ...
...for other damage to the finish of your major appliance, to instruct you need to know your major appliance, to replace or repair house fuses, or to correct house wiring or plumbing. 2. Service calls to Whirlpool within 30 days from the date of purchase. 6. Repairs when your ... has been altered or removed from your authorized Whirlpool dealer to better help by checking the "Assistance or Service" section or by a Whirlpool designated service company. Proof of original purchase date is operated and maintained according to instructions attached to or furnished with the removal from ...

