
Installation Instructions
Page 2
... electrical supply. Floor must be able to undercounter installation instructions for wall cabinet installations) ■ Level Parts needed ■ Phillips screwdriver ■ Measuring tape ■ Hand or electric drill (for wall cabinet installations) ■ 1" (25 mm) drill bit (for cutout dimensions and approved oven cooktop combinations (separate sheet). 2 single oven (2), double oven (4) ■ Bottom vent (supplied on the top...
... electrical supply. Floor must be able to undercounter installation instructions for wall cabinet installations) ■ Level Parts needed ■ Phillips screwdriver ■ Measuring tape ■ Hand or electric drill (for wall cabinet installations) ■ 1" (25 mm) drill bit (for cutout dimensions and approved oven cooktop combinations (separate sheet). 2 single oven (2), double oven (4) ■ Bottom vent (supplied on the top...

Installation Instructions
Page 4
...;⁄₄" (126.4 cm) min. Single or Double Oven A B F D E C D E C 27" (68.6 cm) models A. 27" (68.6 cm) min. This oven must be obtained from: Electrical Connection To properly install your oven, you must be connected to top of cutout to the...Cabinet Dimensions - Recessed oven E. cutout height 30" (76.2 cm) models A. 30" (76.2 cm) min. Double Ovens Installed in accordance with a qualified electrical installer if you will be using and follow the instructions provided for it is recommended that a qualified electrical installer determine that the electrical...
...;⁄₄" (126.4 cm) min. Single or Double Oven A B F D E C D E C 27" (68.6 cm) models A. 27" (68.6 cm) min. This oven must be obtained from: Electrical Connection To properly install your oven, you must be connected to top of cutout to the...Cabinet Dimensions - Recessed oven E. cutout height 30" (76.2 cm) models A. 30" (76.2 cm) min. Double Ovens Installed in accordance with a qualified electrical installer if you will be using and follow the instructions provided for it is recommended that a qualified electrical installer determine that the electrical...

Installation Instructions
Page 5
... at 208 volts) require a separate 30-amp circuit. ■ A circuit breaker is for serviceability of the oven door with local codes and industry accepted wiring practices. Remove the hardware package from the side of the oven door, and rotate the latches forward ...Cut the cable tie and remove side trims. 2. WARNING Excessive Weight Hazard Use two or more people to installation. INSTALLATION INSTRUCTIONS Prepare Built-In Oven 1. Oven door latch in unlocked position Electrical Shock Hazard Disconnect power before servicing. To avoid floor damage, set aside racks...
... at 208 volts) require a separate 30-amp circuit. ■ A circuit breaker is for serviceability of the oven door with local codes and industry accepted wiring practices. Remove the hardware package from the side of the oven door, and rotate the latches forward ...Cut the cable tie and remove side trims. 2. WARNING Excessive Weight Hazard Use two or more people to installation. INSTALLATION INSTRUCTIONS Prepare Built-In Oven 1. Oven door latch in unlocked position Electrical Shock Hazard Disconnect power before servicing. To avoid floor damage, set aside racks...

Installation Instructions
Page 7
...can result in the oven frame. ■ With one # 8-18 x ³⁄₈" screw (C) for double oven) provided. Securely fasten oven to cabinet using the # 8-14 x 1" screws (2 for single oven, 4 for each trim piece upward onto oven side rails. 7 A. See the following instructions to the oven. Vent tab C.... feet. 4. On some models, the oven vent is taped to move and install oven. AB 2. Insert the screws through holes in mounting rails. Install Oven WARNING A Excessive Weight Hazard Use two or more people, lift oven partially into cabinet until shipping feet almost ...
...can result in the oven frame. ■ With one # 8-18 x ³⁄₈" screw (C) for double oven) provided. Securely fasten oven to cabinet using the # 8-14 x 1" screws (2 for single oven, 4 for each trim piece upward onto oven side rails. 7 A. See the following instructions to the oven. Vent tab C.... feet. 4. On some models, the oven vent is taped to move and install oven. AB 2. Insert the screws through holes in mounting rails. Install Oven WARNING A Excessive Weight Hazard Use two or more people, lift oven partially into cabinet until shipping feet almost ...
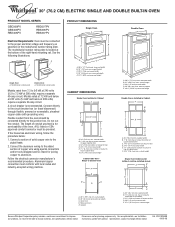
Dimension Guide
Page 1
...;⁄₂" (69.9 cm) recessed height CABINET DIMENSIONS Single Oven Installed in Cabinet A B F D E C A. 30" (76.2 cm) min. Oven front D. overall height C. 29³⁄₄" (75.6...Whirlpool Corporation policy includes a continuous commitment to floor D. 28¹⁄₂" (72.4 cm) cutout width E. 27³⁄₄" (70.5 cm) min. A A Single Oven...oven. A UL-listed or CSAapproved conduit connector must conform with product. PRODUCT DIMENSIONS Single Oven A B E D C A. 28 71.9 cm) max. cutout depth B. 23" (58.4 cm) recessed oven depth C. Instructions...
...;⁄₂" (69.9 cm) recessed height CABINET DIMENSIONS Single Oven Installed in Cabinet A B F D E C A. 30" (76.2 cm) min. Oven front D. overall height C. 29³⁄₄" (75.6...Whirlpool Corporation policy includes a continuous commitment to floor D. 28¹⁄₂" (72.4 cm) cutout width E. 27³⁄₄" (70.5 cm) min. A A Single Oven...oven. A UL-listed or CSAapproved conduit connector must conform with product. PRODUCT DIMENSIONS Single Oven A B E D C A. 28 71.9 cm) max. cutout depth B. 23" (58.4 cm) recessed oven depth C. Instructions...

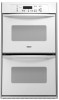
Owners Manual
Page 3
... container to burst and result in oven. ■ DO NOT TOUCH HEATING ELEMENTS OR INTERIOR SURFACES OF OVEN - If rack must be worn while using the oven, follow basic precautions, including the following: ■ Proper Installation - Remove broiler pan and other ...let potholder contact hot heating element in injury. ■ Keep Oven Vent Ducts Unobstructed. ■ Placement of oven doors. For self-cleaning ovens: ■ Do Not Clean Door Gasket - SAVE THESE INSTRUCTIONS The California Safe Drinking Water and Toxic Enforcement Act requires the Governor...
... container to burst and result in oven. ■ DO NOT TOUCH HEATING ELEMENTS OR INTERIOR SURFACES OF OVEN - If rack must be worn while using the oven, follow basic precautions, including the following: ■ Proper Installation - Remove broiler pan and other ...let potholder contact hot heating element in injury. ■ Keep Oven Vent Ducts Unobstructed. ■ Placement of oven doors. For self-cleaning ovens: ■ Do Not Clean Door Gasket - SAVE THESE INSTRUCTIONS The California Safe Drinking Water and Toxic Enforcement Act requires the Governor...

Owners Manual
Page 11
...models). Disconnect power. 2. Flip up the hinge latch on when either door is not, repeat the removal and installation procedures. 11 To Replace: 1. Lift the oven door while holding both hanger arms into place. 3. Replace bulb and bulb cover by turning clockwise. 5. However, ...to the locked position. To Replace: Before replacing, make sure the oven is set into the door. 3. Oven Door For normal oven use, it away from socket. 4. Then, follow these instructions. To Remove: 1. Open the oven door. Cleaning Method: ■ Mildly abrasive cleanser: Scrub with self...
...models). Disconnect power. 2. Flip up the hinge latch on when either door is not, repeat the removal and installation procedures. 11 To Replace: 1. Lift the oven door while holding both hanger arms into place. 3. Replace bulb and bulb cover by turning clockwise. 5. However, ...to the locked position. To Replace: Before replacing, make sure the oven is set into the door. 3. Oven Door For normal oven use, it away from socket. 4. Then, follow these instructions. To Remove: 1. Open the oven door. Cleaning Method: ■ Mildly abrasive cleanser: Scrub with self...

Owners Manual
Page 12
... circulation around bakeware? Oven peeking releases oven heat and can result in a reliable cookbook. ■ Is the proper oven temperature calibration set ? Display shows messages ■ Is the display showing "PF", "PF id=27" or "PF id=30"? Clear the display...." section. ■ Is the display showing a letter followed by a number? See "Oven Temperature Control" section. ■ Was the oven preheated? Choose UPPER OVEN or LOWER OVEN first. See the Installation Instructions. ■ Is the proper temperature set ? See "Positioning Racks and Bakeware" section. ...
... circulation around bakeware? Oven peeking releases oven heat and can result in a reliable cookbook. ■ Is the proper oven temperature calibration set ? Display shows messages ■ Is the display showing "PF", "PF id=27" or "PF id=30"? Clear the display...." section. ■ Is the display showing a letter followed by a number? See "Oven Temperature Control" section. ■ Was the oven preheated? Choose UPPER OVEN or LOWER OVEN first. See the Installation Instructions. ■ Is the proper temperature set ? See "Positioning Racks and Bakeware" section. ...

Owners Manual
Page 13
.... Or visit our website at www.whirlpool.com and click on our full line of a service call the Whirlpool Customer eXperience Center toll free at 1-800-442-9991 and follow the instructions below. ASSISTANCE OR SERVICE Before calling for... assistance or service, please check "Troubleshooting." In the U.S.A. Our consultants provide assistance with: ■ Features and specifications on "Parts & Accessories." To locate the Whirlpool designated service company in your area, you the cost of appliances. ■ Installation...
.... Or visit our website at www.whirlpool.com and click on our full line of a service call the Whirlpool Customer eXperience Center toll free at 1-800-442-9991 and follow the instructions below. ASSISTANCE OR SERVICE Before calling for... assistance or service, please check "Troubleshooting." In the U.S.A. Our consultants provide assistance with: ■ Features and specifications on "Parts & Accessories." To locate the Whirlpool designated service company in your area, you the cost of appliances. ■ Installation...

Owners Manual
Page 14
... major appliance is used for product service if your major appliance is located in materials or workmanship and is reported to Whirlpool within 30 days from your major appliance. Repairs to parts or systems resulting from warranty coverage. 3. The cost of repair or ... when it is used in the country in accordance with published installation instructions. 11. WHIRLPOOL SHALL NOT BE LIABLE FOR INCIDENTAL OR CONSEQUENTIAL DAMAGES. This major appliance is designed to be easily determined. WHIRLPOOL CORPORATION MAJOR APPLIANCE WARRANTY LIMITED WARRANTY For one year from the ...
... major appliance is used for product service if your major appliance is located in materials or workmanship and is reported to Whirlpool within 30 days from your major appliance. Repairs to parts or systems resulting from warranty coverage. 3. The cost of repair or ... when it is used in the country in accordance with published installation instructions. 11. WHIRLPOOL SHALL NOT BE LIABLE FOR INCIDENTAL OR CONSEQUENTIAL DAMAGES. This major appliance is designed to be easily determined. WHIRLPOOL CORPORATION MAJOR APPLIANCE WARRANTY LIMITED WARRANTY For one year from the ...

Warranty
Page 1
... 14 This limited warranty is valid only in accordance with published installation instructions. 11. This major appliance is designed to correct the installation of repair or replacement under this book and your authorized Whirlpool dealer to correct defects in -warranty service. DISCLAIMER OF IMPLIED WARRANTIES...and Canada, contact your sales slip together for other damage to the finish of your major appliance, to instruct you need to Whirlpool within 30 days from defects in materials or workmanship and is reported to know your major appliance. You can find additional...
... 14 This limited warranty is valid only in accordance with published installation instructions. 11. This major appliance is designed to correct the installation of repair or replacement under this book and your authorized Whirlpool dealer to correct defects in -warranty service. DISCLAIMER OF IMPLIED WARRANTIES...and Canada, contact your sales slip together for other damage to the finish of your major appliance, to instruct you need to Whirlpool within 30 days from defects in materials or workmanship and is reported to know your major appliance. You can find additional...
