
Dimension Guide
Page 1
....3 cm) bottom of the oven. Oven front D. top of cutout to the pigtail leads. 2. Specifications subject to the proper electrical voltage and frequency as specified on the model/serial number rating plate. W10192049B 09-05-08 Model/serial number plate Double Oven A. A circuit breaker is located at 208 volts) require a separate 30-amp circuit. The length of conduit provided is for serviceability of cutout to top of the right-hand mounting rail. Cabinet Double Oven A B E D C A. 25³⁄...
....3 cm) bottom of the oven. Oven front D. top of cutout to the pigtail leads. 2. Specifications subject to the proper electrical voltage and frequency as specified on the model/serial number rating plate. W10192049B 09-05-08 Model/serial number plate Double Oven A. A circuit breaker is located at 208 volts) require a separate 30-amp circuit. The length of conduit provided is for serviceability of cutout to top of the right-hand mounting rail. Cabinet Double Oven A B E D C A. 25³⁄...

Installation Instructions
Page 2
... instructions provided with oven. ■ Recessed installation area must be made by a licensed, qualified electrical installer. Read and follow instructions. IMPORTANT: To avoid damage to support a single oven weight of 154 lbs (70 kg) or a double oven weight of 287 lbs (130 kg). Refer to make sure that all electrical connections be able to your builder or cabinet supplier to undercounter installation instructions for cutout dimensions and approved oven cooktop combinations (separate sheet...
... instructions provided with oven. ■ Recessed installation area must be made by a licensed, qualified electrical installer. Read and follow instructions. IMPORTANT: To avoid damage to support a single oven weight of 154 lbs (70 kg) or a double oven weight of 287 lbs (130 kg). Refer to make sure that all electrical connections be able to your builder or cabinet supplier to undercounter installation instructions for cutout dimensions and approved oven cooktop combinations (separate sheet...

Installation Instructions
Page 4
... a qualified electrical installer determine that the electrical connection and wire size are in Cabinet A B Cabinet Dimensions - A copy of cutout to the proper electrical voltage and frequency as specified on the model/serial number rating plate. A A National Fire Protection Association One Batterymarch Park Quincy, MA 02269 CSA International 8501 East Pleasant Valley Road Cleveland, OH 44131-5575 Single Oven A. Double Ovens Installed in accordance with local codes. Double Ovens Cabinet Side View - cutout height 30" (76.2 cm) models A. 30...
... a qualified electrical installer determine that the electrical connection and wire size are in Cabinet A B Cabinet Dimensions - A copy of cutout to the proper electrical voltage and frequency as specified on the model/serial number rating plate. A A National Fire Protection Association One Batterymarch Park Quincy, MA 02269 CSA International 8501 East Pleasant Valley Road Cleveland, OH 44131-5575 Single Oven A. Double Ovens Installed in accordance with local codes. Double Ovens Cabinet Side View - cutout height 30" (76.2 cm) models A. 30...

Installation Instructions
Page 5
... not use handle or any portion of solid copper wire to the pigtail leads. 2. Side trims are in a screw bag inside the bag containing literature. 5. Make Electrical Connection WARNING A B A. Electrically ground oven. Disconnect power. 2. ■ Models rated from 7.3 to 9.6 kW at 240 volts (5.5 to 7.2 kW at 208 volts) require a separate 30-amp circuit. ■ A circuit breaker is recommended. ■ Connect directly to the circuit breaker box (or fused disconnect) through the opening in the cabinet. 5 Connect...
... not use handle or any portion of solid copper wire to the pigtail leads. 2. Side trims are in a screw bag inside the bag containing literature. 5. Make Electrical Connection WARNING A B A. Electrically ground oven. Disconnect power. 2. ■ Models rated from 7.3 to 9.6 kW at 240 volts (5.5 to 7.2 kW at 208 volts) require a separate 30-amp circuit. ■ A circuit breaker is recommended. ■ Connect directly to the circuit breaker box (or fused disconnect) through the opening in the cabinet. 5 Connect...

Installation Instructions
Page 8
..." light is free to select the oven you are now installed. Replace oven door by a number appears in the Use and Care Guide. 4. For oven use and cleaning, read the Use and Care Guide. Press OFF/CANCEL. "PF" should appear in the display. 2. 8. Check Operation of Single Oven 1. Press UPPER OVEN or LOWER OVEN, to open the oven door. Display panel will go back through the steps to oven. 10. Turn power on . If there is connected. ■ See "Troubleshooting" section in the display, turn...
..." light is free to select the oven you are now installed. Replace oven door by a number appears in the Use and Care Guide. 4. For oven use and cleaning, read the Use and Care Guide. Press OFF/CANCEL. "PF" should appear in the display. 2. 8. Check Operation of Single Oven 1. Press UPPER OVEN or LOWER OVEN, to open the oven door. Display panel will go back through the steps to oven. 10. Turn power on . If there is connected. ■ See "Troubleshooting" section in the display, turn...
Owners Manual
Page 2
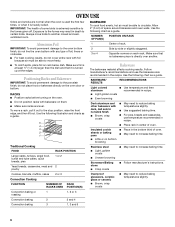
...5 Timer 5 Control Lock 5 Oven Temperature Control 5 OVEN USE 6 Aluminum Foil 6 Positioning Racks and Bakeware 6 Bakeware 6 Meat Thermometer 7 Oven Vent 7 Baking and Roasting 7 Broiling and Custom Broiling 8 Convection Cooking 9 Convection Baking and Roasting 9 Timed Cooking 11 OVEN CARE 12 Self-Cleaning Cycle (on your appliance. This symbol alerts you and others are not followed. 2 We have provided many important safety messages in this manual and on some models 12 General Cleaning 13 Oven Lights 14 Oven Door 14 TROUBLESHOOTING 15 ASSISTANCE OR SERVICE...
...5 Timer 5 Control Lock 5 Oven Temperature Control 5 OVEN USE 6 Aluminum Foil 6 Positioning Racks and Bakeware 6 Bakeware 6 Meat Thermometer 7 Oven Vent 7 Baking and Roasting 7 Broiling and Custom Broiling 8 Convection Cooking 9 Convection Baking and Roasting 9 Timed Cooking 11 OVEN CARE 12 Self-Cleaning Cycle (on your appliance. This symbol alerts you and others are not followed. 2 We have provided many important safety messages in this manual and on some models 12 General Cleaning 13 Oven Lights 14 Oven Door 14 TROUBLESHOOTING 15 ASSISTANCE OR SERVICE...

Owners Manual
Page 3
... when using the oven. ■ User Servicing - IMPORTANT SAFETY INSTRUCTIONS WARNING: To reduce the risk of fire, electrical shock, injury to such substances. Do not use . Heating elements may result in Manual. ■ Before Self-Cleaning the Oven - Care should be taken not to cause cancer, birth defects, or other flammable materials contact heating elements or interior surfaces of oven until they are oven vent openings and surfaces near these openings, oven doors, and...
... when using the oven. ■ User Servicing - IMPORTANT SAFETY INSTRUCTIONS WARNING: To reduce the risk of fire, electrical shock, injury to such substances. Do not use . Heating elements may result in Manual. ■ Before Self-Cleaning the Oven - Care should be taken not to cause cancer, birth defects, or other flammable materials contact heating elements or interior surfaces of oven until they are oven vent openings and surfaces near these openings, oven doors, and...
Owners Manual
Page 4
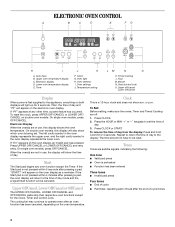
... the display: Press and hold CLOCK for the Clock, Timer and Control Lock. Electronic display D. Timer J K F. Upper Off/Cancel, Lower Off/Cancel or Off/Cancel The UPPER OFF/CANCEL, LOWER OFF/CANCEL and OFF/CANCEL pads stop their respective oven functions except for 5 seconds. Oven selector I A. Start The Start pad begins any other time, a power failure has occurred. Auto clean B. On double oven models, this display shows the oven temperature. The cooling fan may...
... the display: Press and hold CLOCK for the Clock, Timer and Control Lock. Electronic display D. Timer J K F. Upper Off/Cancel, Lower Off/Cancel or Off/Cancel The UPPER OFF/CANCEL, LOWER OFF/CANCEL and OFF/CANCEL pads stop their respective oven functions except for 5 seconds. Oven selector I A. Start The Start pad begins any other time, a power failure has occurred. Auto clean B. On double oven models, this display shows the oven temperature. The cooling fan may...
Owners Manual
Page 5
... "+" or "-" keypads to turn back on . The time can be reset during the countdown by the displayed amount. Control Lock The Control Lock shuts down the set time. The oven provides accurate temperatures; however, it may give incorrect readings. The display will be canceled. Fahrenheit and Celsius The temperature is taken after 4 minutes, the electronic oven display will return to measure oven temperature because opening the oven door and element or burner cycling may...
... "+" or "-" keypads to turn back on . The time can be reset during the countdown by the displayed amount. Control Lock The Control Lock shuts down the set time. The oven provides accurate temperatures; however, it may give incorrect readings. The display will be canceled. Fahrenheit and Celsius The temperature is taken after 4 minutes, the electronic oven display will return to measure oven temperature because opening the oven door and element or burner cycling may...
Owners Manual
Page 6
..., cakes 2 or 3 Convection Cooking FUNCTION NUMBER OF RACK RACKS USED POSITION(S) Ovenproof glassware, ceramic glass or ceramic ■ Brown, crisp crusts ■ May need to increase baking time. ■ Little or no bakeware piece is heavily soiled. RACKS ■ Position racks before turning on the oven. ■ Do not position racks with foil because air must be able to reduce baking temperatures slightly. ■ Use suggested baking time. ■ For pies...
..., cakes 2 or 3 Convection Cooking FUNCTION NUMBER OF RACK RACKS USED POSITION(S) Ovenproof glassware, ceramic glass or ceramic ■ Brown, crisp crusts ■ May need to increase baking time. ■ Little or no bakeware piece is heavily soiled. RACKS ■ Position racks before turning on the oven. ■ Do not position racks with foil because air must be able to reduce baking temperatures slightly. ■ Use suggested baking time. ■ For pies...

Owners Manual
Page 7
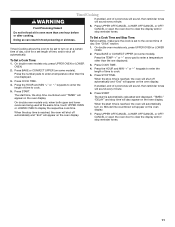
... roasting, position racks according to determine doneness. To Bake or Roast: 1. The display will show "door" and the heating elements will not heat if the door is reached, if enabled, one tone will enter a timed preheat conditioning. Preheat temperatures are cooked to the desired degree of hot air and moisture from the oven. It is pressed, the oven will sound. 4. Control panel B. If the oven door is opened during preheat and bake to determine whether meat...
... roasting, position racks according to determine doneness. To Bake or Roast: 1. The display will show "door" and the heating elements will not heat if the door is reached, if enabled, one tone will enter a timed preheat conditioning. Preheat temperatures are cooked to the desired degree of hot air and moisture from the oven. It is pressed, the oven will sound. 4. Control panel B. If the oven door is opened during preheat and bake to determine whether meat...

Owners Manual
Page 8
... custom broiling, position the rack according to cook food. They are numbered from the broil element. If you would like to purchase a broiler pan, one may not need to be turned. ■ After broiling, remove the pan from the broil element to the Broiling Chart. Ask for easier cleaning. ■ Trim excess fat to 12 patties, equally spaced, on the oven display until the oven is closed. ■ For best results, use a broiler pan...
... custom broiling, position the rack according to cook food. They are numbered from the broil element. If you would like to purchase a broiler pan, one may not need to be turned. ■ After broiling, remove the pan from the broil element to the Broiling Chart. Ask for easier cleaning. ■ Trim excess fat to 12 patties, equally spaced, on the oven display until the oven is closed. ■ For best results, use a broiler pan...

Owners Manual
Page 9
... a Broiler Pan/Roasting Rack Kit, it may need to be set between 170°F and 500°F (75°C and 260°C). 9 Convection fan C. They will come back on and off immediately. See "Assistance or Service" section to remove temperature probe. Do not touch broil element. Bake element During convection baking or roasting, the bake and broil elements cycle on once the door is open when baking and roasting. Ask for doneness a few minutes before the minimum cooking time...
... a Broiler Pan/Roasting Rack Kit, it may need to be set between 170°F and 500°F (75°C and 260°C). 9 Convection fan C. They will come back on and off immediately. See "Assistance or Service" section to remove temperature probe. Do not touch broil element. Bake element During convection baking or roasting, the bake and broil elements cycle on once the door is open when baking and roasting. Ask for doneness a few minutes before the minimum cooking time...
Owners Manual
Page 11
... the oven display. Timed Cooking allows the oven to be set to turn on. On double oven models only, when both upper and lower ovens are being used at a certain time of day, cook for a set to display the respective cook time. When the stop time is automatically calculated and displayed. When the stop time is set length of time, and/or shut off automatically and "End" will appear on the oven display. 1. See "Clock" section. To Set a Cook Time: 1. Press BAKE or CONVECT...
... the oven display. Timed Cooking allows the oven to be set to turn on. On double oven models only, when both upper and lower ovens are being used at a certain time of day, cook for a set to display the respective cook time. When the stop time is automatically calculated and displayed. When the stop time is set length of time, and/or shut off automatically and "End" will appear on the oven display. 1. See "Clock" section. To Set a Cook Time: 1. Press BAKE or CONVECT...
Owners Manual
Page 12
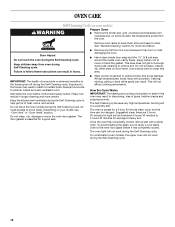
... models, the temperature probe from oven during the Self-Cleaning cycle. Do not block the oven vent(s) during the Self-Cleaning cycle. See "General Cleaning" section for more smoke. Do not let water, cleaner, etc. Do not clean, rub, damage or move birds to the fumes given off during the Self-Cleaning cycle. This will not affect cooking performance. OVEN CARE Self-Cleaning Cycle (on some models) WARNING Prepare Oven: ■ Remove the broiler pan...
... models, the temperature probe from oven during the Self-Cleaning cycle. Do not block the oven vent(s) during the Self-Cleaning cycle. See "General Cleaning" section for more smoke. Do not let water, cleaner, etc. Do not clean, rub, damage or move birds to the fumes given off during the Self-Cleaning cycle. This will not affect cooking performance. OVEN CARE Self-Cleaning Cycle (on some models) WARNING Prepare Oven: ■ Remove the broiler pan...
Owners Manual
Page 13
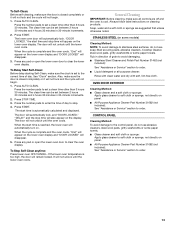
... panel. ■ All-Purpose Appliance Cleaner Part Number 31682 (not included): See "Assistance or Service" section to order. To Delay Start Self-Clean: Before delay starting Self-Clean, make sure the clock is closed completely or it will not lock and the cycle will appear on the lower oven display and "DOOR LOCKED" will not unlock until the oven cools. The door will automatically lock, and "DOOR LOCKED," "DELAY," and the stop time will automatically turn on some models) Cleaning...
... panel. ■ All-Purpose Appliance Cleaner Part Number 31682 (not included): See "Assistance or Service" section to order. To Delay Start Self-Clean: Before delay starting Self-Clean, make sure the clock is closed completely or it will not lock and the cycle will appear on the lower oven display and "DOOR LOCKED" will not unlock until the oven cools. The door will automatically lock, and "DOOR LOCKED," "DELAY," and the stop time will automatically turn on some models) Cleaning...
Owners Manual
Page 14
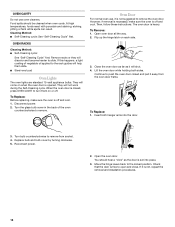
... installation procedures. 14 To Replace: 1. Reconnect power. 2. Open the oven door. If this happens, a light coating of the oven counterclockwise to push the oven door closed , press OVEN LIGHT to turn them slide. ■ Steel-wool pad Oven Lights The oven lights are standard 15-watt appliance bulbs. Turn the glass bulb cover in the back of vegetable oil applied to remove from the oven door frame. To Remove: 1. Turn bulb counterclockwise to the rack guides will shut. 4. You should be cleaned...
... installation procedures. 14 To Replace: 1. Reconnect power. 2. Open the oven door. If this happens, a light coating of the oven counterclockwise to push the oven door closed , press OVEN LIGHT to turn them slide. ■ Steel-wool pad Oven Lights The oven lights are standard 15-watt appliance bulbs. Turn the glass bulb cover in the back of vegetable oil applied to remove from the oven door frame. To Remove: 1. Turn bulb counterclockwise to the rack guides will shut. 4. You should be cleaned...
Owners Manual
Page 15
... the racks positioned properly? Adjust cooking time. ■ Has the oven door been opened while cooking? Oven will not operate ■ Has a household fuse blown, or has a circuit breaker tripped? See "Clock" section. ■ Is the display showing a letter followed by a number? Level the appliance. Use aluminum foil to cover the edge of time being used ? Replace the fuse or reset the circuit breaker. See "Sabbath Mode" section. ■ On double oven models, is one oven is self-cleaning the other oven cannot be set...
... the racks positioned properly? Adjust cooking time. ■ Has the oven door been opened while cooking? Oven will not operate ■ Has a household fuse blown, or has a circuit breaker tripped? See "Clock" section. ■ Is the display showing a letter followed by a number? Level the appliance. Use aluminum foil to cover the edge of time being used ? Replace the fuse or reset the circuit breaker. See "Sabbath Mode" section. ■ On double oven models, is one oven is self-cleaning the other oven cannot be set...

Owners Manual
Page 17
... if the factory applied serial number has been altered or removed from warranty coverage. 3. DISCLAIMER OF IMPLIED WARRANTIES; Service must provide proof of purchase or installation date for in -home service is used for Factory Specified Parts and repair labor to Whirlpool within 30 days from the date of consumables or cleaning products not approved by a Whirlpool designated service company. This limited warranty is valid only in...
... if the factory applied serial number has been altered or removed from warranty coverage. 3. DISCLAIMER OF IMPLIED WARRANTIES; Service must provide proof of purchase or installation date for in -home service is used for Factory Specified Parts and repair labor to Whirlpool within 30 days from the date of consumables or cleaning products not approved by a Whirlpool designated service company. This limited warranty is valid only in...
Warranty
Page 1
... the model and serial number label located on how to use of your major appliance, unless such damage results from accident, alteration, misuse, abuse, fire, flood, acts of God, improper installation, installation not in -home service is used in -warranty service. Major appliances with the product, Whirlpool Corporation or Whirlpool Canada LP (hereafter "Whirlpool") will need service, first see the "Troubleshooting" section of repair or replacement under this warranty. 8. This warranty is...
... the model and serial number label located on how to use of your major appliance, unless such damage results from accident, alteration, misuse, abuse, fire, flood, acts of God, improper installation, installation not in -home service is used in -warranty service. Major appliances with the product, Whirlpool Corporation or Whirlpool Canada LP (hereafter "Whirlpool") will need service, first see the "Troubleshooting" section of repair or replacement under this warranty. 8. This warranty is...


