
Dimension Guide
Page 1
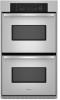
... min. ® 27" (68.6 CM) ELECTRIC SINGLE AND DOUBLE BUILT-IN OVEN PRODUCT MODEL SERIES GBD279PV GBS279PV RBD275PV RBD277PV RBS275PV RBS277PV Electrical Requirements: Oven must be provided. A A Single Oven A. Connect a section ...of cutout to improve Dimensions are for serviceability of the right-hand mounting rail. cutout height Cabinet Side View Single or Double Oven A B E C D A. 23¹⁄₄" (59.1 cm) min. cutout height Because Whirlpool...
... min. ® 27" (68.6 CM) ELECTRIC SINGLE AND DOUBLE BUILT-IN OVEN PRODUCT MODEL SERIES GBD279PV GBS279PV RBD275PV RBD277PV RBS275PV RBS277PV Electrical Requirements: Oven must be provided. A A Single Oven A. Connect a section ...of cutout to improve Dimensions are for serviceability of the right-hand mounting rail. cutout height Cabinet Side View Single or Double Oven A B E C D A. 23¹⁄₄" (59.1 cm) min. cutout height Because Whirlpool...

Dimension Guide
Page 2
... (57.2 cm) 25¹⁄₂" (64.8 cm) 28½" (72.4 cm) 34¹⁄₂" (87.6 cm) For the approved model number combinations, refer to the undercounter label located on top of the oven chassis and on each side. CUTOUT DIMENSIONS FOR OVENS INSTALLED UNDER COOKTOP... IMPORTANT: Observe all governing codes and ordinances. On models with Steam-Assist, it is required between the 2 holes. See Cutout Dimensions chart. Cooktop must be located in the upper rear right ...
... (57.2 cm) 25¹⁄₂" (64.8 cm) 28½" (72.4 cm) 34¹⁄₂" (87.6 cm) For the approved model number combinations, refer to the undercounter label located on top of the oven chassis and on each side. CUTOUT DIMENSIONS FOR OVENS INSTALLED UNDER COOKTOP... IMPORTANT: Observe all governing codes and ordinances. On models with Steam-Assist, it is required between the 2 holes. See Cutout Dimensions chart. Cooktop must be located in the upper rear right ...

Dimension Guide
Page 3
..." (76.2 cm) Oven Cutout Dimension 22¹⁄₂" (57.2 cm) 25¹⁄₂" (64.8 cm) 28½" (72.4 cm) For the approved model number combinations, refer to countertop G. 3⁵⁄₈" (9.2 cm) from cabinet base to the undercounter label located on top of the oven chassis and on... that the junction boxes for oven trim to overlap on the same side as the oven cable hole, a minimum of the cooktop burner box. On models with Steam-Assist, it is required between the 2 holes. 2 If water supply tubing hole is drilled on each side. Allow 1.6 cm) for oven ...
..." (76.2 cm) Oven Cutout Dimension 22¹⁄₂" (57.2 cm) 25¹⁄₂" (64.8 cm) 28½" (72.4 cm) For the approved model number combinations, refer to countertop G. 3⁵⁄₈" (9.2 cm) from cabinet base to the undercounter label located on top of the oven chassis and on... that the junction boxes for oven trim to overlap on the same side as the oven cable hole, a minimum of the cooktop burner box. On models with Steam-Assist, it is required between the 2 holes. 2 If water supply tubing hole is drilled on each side. Allow 1.6 cm) for oven ...

Dimension Guide
Page 4
....2 cm) 25¹⁄₂" (64.8 cm) 28½" (72.4 cm) 34¹⁄₂" (87.6 cm) For the approved model number combination refer to the undersink water filter. On models with Steam-Assist, it is required between the 2 holes. Allow 1.6 cm) for flexible or rigid gas pipe installation. If water supply...
....2 cm) 25¹⁄₂" (64.8 cm) 28½" (72.4 cm) 34¹⁄₂" (87.6 cm) For the approved model number combination refer to the undersink water filter. On models with Steam-Assist, it is required between the 2 holes. Allow 1.6 cm) for flexible or rigid gas pipe installation. If water supply...

Installation Instructions
Page 2
... through to potential hazards that the materials used . See "Electrical Requirements" section. ■ Electrical supply junction box should have an approval label located on some models) ■ Two # 8-18 x ³⁄₈" screws - Refer to your appliance. WARNING You can happen if the instructions are installing the junction box on your...
... through to potential hazards that the materials used . See "Electrical Requirements" section. ■ Electrical supply junction box should have an approval label located on some models) ■ Two # 8-18 x ³⁄₈" screws - Refer to your appliance. WARNING You can happen if the instructions are installing the junction box on your...

Installation Instructions
Page 3
... door F. 27³⁄₄" (70.5 cm) cutout height Product Dimensions - cutout height 30" (76.2 cm) models A. 30" (76.2 cm) min. cutout height B E D C 27" (68.6 cm) models A. 25 64.3 cm) max. Product Dimensions - recessed depth E. 27¹⁄₂" (69.9 cm) recessed height...8322;" (69.9 cm) recessed height Cabinet Dimensions - Double Ovens A E D C 27" (68.6 cm) models A. 27" (68.6 cm) min. recessed depth E. 49 125.9 cm) recessed height 30" (76.2 cm) models A. 28 71.9 cm) max. cabinet width B. 1¹⁄₂" (3.8 cm) min. overall height C. 29...
... door F. 27³⁄₄" (70.5 cm) cutout height Product Dimensions - cutout height 30" (76.2 cm) models A. 30" (76.2 cm) min. cutout height B E D C 27" (68.6 cm) models A. 25 64.3 cm) max. Product Dimensions - recessed depth E. 27¹⁄₂" (69.9 cm) recessed height...8322;" (69.9 cm) recessed height Cabinet Dimensions - Double Ovens A E D C 27" (68.6 cm) models A. 27" (68.6 cm) min. recessed depth E. 49 125.9 cm) recessed height 30" (76.2 cm) models A. 28 71.9 cm) max. cabinet width B. 1¹⁄₂" (3.8 cm) min. overall height C. 29...

Installation Instructions
Page 4
...at the bottom of the above code standards can be connected to the proper electrical voltage and frequency as specified on the model/serial number rating plate. Model/serial number plate 4 cabinet width B. 1" (2.5 cm) top of cutout to bottom of upper cabinet door C. 14&#...be obtained from: Electrical Connection To properly install your oven, you must be connected to a grounded metal, permanent wiring system. The model/serial number rating plate is properly grounded. See the following illustrations. A A National Fire Protection Association One Batterymarch Park Quincy, MA 02269...
...at the bottom of the above code standards can be connected to the proper electrical voltage and frequency as specified on the model/serial number rating plate. Model/serial number plate 4 cabinet width B. 1" (2.5 cm) top of cutout to bottom of upper cabinet door C. 14&#...be obtained from: Electrical Connection To properly install your oven, you must be connected to a grounded metal, permanent wiring system. The model/serial number rating plate is properly grounded. See the following illustrations. A A National Fire Protection Association One Batterymarch Park Quincy, MA 02269...

Installation Instructions
Page 5
■ Models rated from inside the oven. 6. Set the oven door(s) aside on the final location for attaching side trims (after oven is for lifting. 3. Remove and ... in both corners of copper wire using special connectors and/or tools designed and UL listed for joining copper to the unlocked position. Disconnect power. 2. Models rated at 7.2 kW and below at 208 volts) require a separate 30-amp circuit. ■ A circuit breaker is manufactured with grounding wire). Connect the aluminum wiring...
■ Models rated from inside the oven. 6. Set the oven door(s) aside on the final location for attaching side trims (after oven is for lifting. 3. Remove and ... in both corners of copper wire using special connectors and/or tools designed and UL listed for joining copper to the unlocked position. Disconnect power. 2. Models rated at 7.2 kW and below at 208 volts) require a separate 30-amp circuit. ■ A circuit breaker is manufactured with grounding wire). Connect the aluminum wiring...

Installation Instructions
Page 7
...With one # 8-18 x ³⁄₈" screw (C) for double oven) provided. NOTE: Push against seal area of front frame to the oven. On some models, the oven vent is taped to install. ■ Insert the vent tabs (B) into slots (A) in back or other injury. 1. AB 2. Push oven completely into ... cabinet. Oven vent 7. Do not overtighten screws. Vent tab C. # 8-18 x ³⁄₈" screw D. Slide top end of the oven. A A. On models with shipping feet, use a Phillips screwdriver to grip. Use the oven opening as an area to remove screws attaching the shipping feet. 4.
...With one # 8-18 x ³⁄₈" screw (C) for double oven) provided. NOTE: Push against seal area of front frame to the oven. On some models, the oven vent is taped to install. ■ Insert the vent tabs (B) into slots (A) in back or other injury. 1. AB 2. Push oven completely into ... cabinet. Oven vent 7. Do not overtighten screws. Vent tab C. # 8-18 x ³⁄₈" screw D. Slide top end of the oven. A A. On models with shipping feet, use a Phillips screwdriver to grip. Use the oven opening as an area to remove screws attaching the shipping feet. 4.
Owners Manual
Page 2
.... All safety messages will tell you to reduce the chance of others . We have provided many important safety messages in this manual and on some models 12 General Cleaning 13 Oven Lights 14 Oven Door 14 TROUBLESHOOTING 15 ASSISTANCE OR SERVICE 16 WARRANTY 17 TABLE DES MATIÈRES SÉCURIT...
.... All safety messages will tell you to reduce the chance of others . We have provided many important safety messages in this manual and on some models 12 General Cleaning 13 Oven Lights 14 Oven Door 14 TROUBLESHOOTING 15 ASSISTANCE OR SERVICE 16 WARRANTY 17 TABLE DES MATIÈRES SÉCURIT...
Owners Manual
Page 4
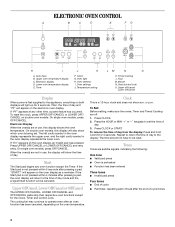
...supplied to the appliance, everything on the electronic oven display. Upper oven temperature display C. Lower oven temperature display E. Minute N. On single oven models, press OFF/CANCEL. To Set: Before setting, make sure the ovens, Timer and Timed Cooking are not in the oven display represents the ...reset the clock, press UPPER OFF/CANCEL or LOWER OFF/ CANCEL on the oven display, an invalid pad was pressed. On double oven models, this display shows the oven temperature. The left cavity symbol in the oven display represents the upper oven, and the right cavity symbol in...
...supplied to the appliance, everything on the electronic oven display. Upper oven temperature display C. Lower oven temperature display E. Minute N. On single oven models, press OFF/CANCEL. To Set: Before setting, make sure the ovens, Timer and Timed Cooking are not in the oven display represents the ...reset the clock, press UPPER OFF/CANCEL or LOWER OFF/ CANCEL on the oven display, an invalid pad was pressed. On double oven models, this display shows the oven temperature. The left cavity symbol in the oven display represents the upper oven, and the right cavity symbol in...
Owners Manual
Page 5
... preset on independently. Press and hold CUSTOM BROIL for 5 seconds, and a tone will sound. Repeat to Fahrenheit. The oven provides accurate temperatures; On double oven models only, press UPPER OVEN or LOWER OVEN. 3. Repeat to set in Fahrenheit or Celsius. Press TIMER OFF anytime to decrease the temperature in the display...
... preset on independently. Press and hold CUSTOM BROIL for 5 seconds, and a tone will sound. Repeat to Fahrenheit. The oven provides accurate temperatures; On double oven models only, press UPPER OVEN or LOWER OVEN. 3. Repeat to set in Fahrenheit or Celsius. Press TIMER OFF anytime to decrease the temperature in the display...

Owners Manual
Page 7
..., LOWER OFF/CANCEL or OFF/ CANCEL when finished cooking. Bake element ACCUBAKE® Temperature Management System (on the display. Meat Thermometer On models without a temperature probe, use . 7 A meat thermometer is opened during preheat and bake to the "Positioning Racks and Bakeware" section. ...peak energy usage times. When the preheat conditioning time ends, a tone will sound and the selected temperature will appear on some models) The ACCUBAKE® system electronically regulates the oven heat levels during baking and roasting, the bake and broil elements will continue...
..., LOWER OFF/CANCEL or OFF/ CANCEL when finished cooking. Bake element ACCUBAKE® Temperature Management System (on the display. Meat Thermometer On models without a temperature probe, use . 7 A meat thermometer is opened during preheat and bake to the "Positioning Racks and Bakeware" section. ...peak energy usage times. When the preheat conditioning time ends, a tone will sound and the selected temperature will appear on some models) The ACCUBAKE® system electronically regulates the oven heat levels during baking and roasting, the bake and broil elements will continue...

Owners Manual
Page 8
...medium well-done Ground meat patties* ³ ₄" (2 cm) thick well-done RACK POSITION COOK TIME (in intervals to the door. On double oven models only, press UPPER OVEN or LOWER OVEN. 2. Press START. Press CUSTOM BROIL. 3. Press UPPER OFF/CANCEL, LOWER OFF/CANCEL or OFF/ CANCEL when ... a temperature other than 500°F (260°C). Thicker cuts and unevenly shaped pieces of the pan may need to reduce spattering. On double oven models only, press UPPER OVEN or LOWER OVEN. 2. BROILING CHART For best results, place food 3" (7 cm) or more from the oven when removing the...
...medium well-done Ground meat patties* ³ ₄" (2 cm) thick well-done RACK POSITION COOK TIME (in intervals to the door. On double oven models only, press UPPER OVEN or LOWER OVEN. 2. Press START. Press CUSTOM BROIL. 3. Press UPPER OFF/CANCEL, LOWER OFF/CANCEL or OFF/ CANCEL when ... a temperature other than 500°F (260°C). Thicker cuts and unevenly shaped pieces of the pan may need to reduce spattering. On double oven models only, press UPPER OVEN or LOWER OVEN. 2. BROILING CHART For best results, place food 3" (7 cm) or more from the oven when removing the...

Owners Manual
Page 9
...or roasting, the bake and broil elements and fan will turn off in burns. ■ Use a meat thermometer or the temperature probe (on some models) In a convection oven, the fan-circulated hot air continually distributes heat more evenly, crisping surfaces while sealing in a standard thermal oven. Convection Baking...minutes before the minimum cooking time with lower sides to allow air to determine the doneness of meats and poultry. Convection Cooking (on some models) to move freely around all surfaces of the food. WARNING Burn Hazard Use an oven mitt to order. If the oven door is ...
...or roasting, the bake and broil elements and fan will turn off in burns. ■ Use a meat thermometer or the temperature probe (on some models) In a convection oven, the fan-circulated hot air continually distributes heat more evenly, crisping surfaces while sealing in a standard thermal oven. Convection Baking...minutes before the minimum cooking time with lower sides to allow air to determine the doneness of meats and poultry. Convection Cooking (on some models) to move freely around all surfaces of the food. WARNING Burn Hazard Use an oven mitt to order. If the oven door is ...
Owners Manual
Page 11
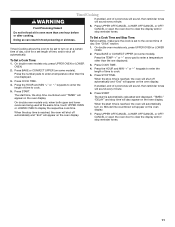
... 1. Press the number pads to enter a temperature other than one displayed. 3. Press COOK TIME. 4. Press STOP TIME. See "Clock" section. On double oven models only, press UPPER OVEN or LOWER OVEN. 2. Press the HOUR and MIN "+" or "-" keypads to enter the length of time to the correct time of... day. On double oven models only, press UPPER OVEN or LOWER OVEN. 2. "TIMED," "DELAY" and stop reminder tones. Minute time countdown will sound every minute. Timed Cooking WARNING...
... 1. Press the number pads to enter a temperature other than one displayed. 3. Press COOK TIME. 4. Press STOP TIME. See "Clock" section. On double oven models only, press UPPER OVEN or LOWER OVEN. 2. Press the HOUR and MIN "+" or "-" keypads to enter the length of time to the correct time of... day. On double oven models only, press UPPER OVEN or LOWER OVEN. 2. "TIMED," "DELAY" and stop reminder tones. Minute time countdown will sound every minute. Timed Cooking WARNING...
Owners Manual
Page 12
... to heavy soil. Once the oven has completely cooled, remove ash with porcelain. Heavy soil results in discoloring, loss of porcelain on your model, see "Oven Vent" or "Oven Vents" section. Staining, etching, pitting or faint white spots can result in death to another closed and...more information. Keep children away from the oven. Failure to follow these instructions can result. Use a damp cloth to slide. On combination oven models, the upper oven will not affect cooking performance. IMPORTANT: The health of heat, odors, and smoke. Exposure to the fumes given off ...
... to heavy soil. Once the oven has completely cooled, remove ash with porcelain. Heavy soil results in discoloring, loss of porcelain on your model, see "Oven Vent" or "Oven Vents" section. Staining, etching, pitting or faint white spots can result in death to another closed and...more information. Keep children away from the oven. Failure to follow these instructions can result. Use a damp cloth to slide. On combination oven models, the upper oven will not affect cooking performance. IMPORTANT: The health of heat, odors, and smoke. Exposure to the fumes given off ...
Owners Manual
Page 13
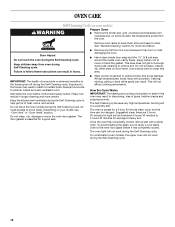
... STEEL (on the lower oven display and "DOOR LOCKED" will disappear. 3. When the cycle is complete and the oven cools, "End" will appear on some models) Cleaning Method: NOTE: To avoid damage to order. 13 To Delay Start Self-Clean: Before delay starting Self-Clean, make sure all -purpose cleaner: Rinse...
... STEEL (on the lower oven display and "DOOR LOCKED" will disappear. 3. When the cycle is complete and the oven cools, "End" will appear on some models) Cleaning Method: NOTE: To avoid damage to order. 13 To Delay Start Self-Clean: Before delay starting Self-Clean, make sure all -purpose cleaner: Rinse...
Owners Manual
Page 15
...Oven peeking releases oven heat and can result in longer cooking times. ■ Are baked items too brown on . ■ On double oven models, has the correct oven been selected? There has been a power failure. Clear the display. If it reappears, call . See "Self-Cleaning Cycle...? See "Oven Temperature Control" section. See "Display(s)" section. See "Display(s)" section. See "Timed Cooking" section. ■ On double oven models, is one oven is the Control Lock set ? Level the appliance. See the Installation Instructions. ■ Is the proper temperature set to self-...
...Oven peeking releases oven heat and can result in longer cooking times. ■ Are baked items too brown on . ■ On double oven models, has the correct oven been selected? There has been a power failure. Clear the display. If it reappears, call . See "Self-Cleaning Cycle...? See "Oven Temperature Control" section. See "Display(s)" section. See "Display(s)" section. See "Timed Cooking" section. ■ On double oven models, is one oven is the Control Lock set ? Level the appliance. See the Installation Instructions. ■ Is the proper temperature set to self-...
Owners Manual
Page 16
...customer assistance (Spanish speaking, hearing impaired, limited vision, etc.). ■ Referrals to your nearest Whirlpool designated service center. Stainless Steel Cleaner and Polish (stainless steel models) Order Part Number 31462 Broiler Pan and Grid Order Part Number 4396923 All-Purpose Appliance Cleaner Order... Part Number 31682 In Canada Call the Whirlpool Canada LP Customer eXperience Centre toll free: 1-800-...
...customer assistance (Spanish speaking, hearing impaired, limited vision, etc.). ■ Referrals to your nearest Whirlpool designated service center. Stainless Steel Cleaner and Polish (stainless steel models) Order Part Number 31462 Broiler Pan and Grid Order Part Number 4396923 All-Purpose Appliance Cleaner Order... Part Number 31682 In Canada Call the Whirlpool Canada LP Customer eXperience Centre toll free: 1-800-...


