Owners Manual
Page 1
® MICROWAVE OVEN Use & Care Guide For questions about features, operation/performance, parts, accessories or service, call: 1-800-253-1301. www.whirlpool.com Table of Contents 2 W10217293A Model MT4155 or visit our website at...
® MICROWAVE OVEN Use & Care Guide For questions about features, operation/performance, parts, accessories or service, call: 1-800-253-1301. www.whirlpool.com Table of Contents 2 W10217293A Model MT4155 or visit our website at...

Owners Manual
Page 2
... Feature 7 Off 7 Clock 7 Tones 7 Timer 7 Control Lock 7 Demo Mode 7 Options 7 MICROWAVE OVEN USE 8 Food Characteristics 8 Cooking Guidelines 8 Cookware and Dinnerware 8 Aluminum Foil and Metal 9 Microwave Cooking Power 9 Manual Cooking 9 Cooking in Stages 10 Sensor Cooking 10 Sensor Popcorn 10 Sensor Cook... 11 Sensor Reheat 11 Auto Defrost 12 Warm Hold 12 MICROWAVE OVEN CARE 13 General Cleaning 13 TROUBLESHOOTING ...
... Feature 7 Off 7 Clock 7 Tones 7 Timer 7 Control Lock 7 Demo Mode 7 Options 7 MICROWAVE OVEN USE 8 Food Characteristics 8 Cooking Guidelines 8 Cookware and Dinnerware 8 Aluminum Foil and Metal 9 Microwave Cooking Power 9 Manual Cooking 9 Cooking in Stages 10 Sensor Cooking 10 Sensor Popcorn 10 Sensor Cook... 11 Sensor Reheat 11 Auto Defrost 12 Warm Hold 12 MICROWAVE OVEN CARE 13 General Cleaning 13 TROUBLESHOOTING ...
Owners Manual
Page 3
... or other utensil into the container. ■ Oversized foods or oversized metal utensils should be serviced only by children. ■ Do not operate the microwave oven if it has a damaged cord or plug, if it is , tell you how to facilitate cooking. - To reduce the risk of electric... boiling point without appearing to heat, cook, or dry food. Do not overheat the liquid. - After heating, allow the container to excessive microwave energy: ■ Read all safety messages. SAVE THESE INSTRUCTIONS 3 This symbol alerts you to potential hazards that can happen if the instructions are...
... or other utensil into the container. ■ Oversized foods or oversized metal utensils should be serviced only by children. ■ Do not operate the microwave oven if it has a damaged cord or plug, if it is , tell you how to facilitate cooking. - To reduce the risk of electric... boiling point without appearing to heat, cook, or dry food. Do not overheat the liquid. - After heating, allow the container to excessive microwave energy: ■ Read all safety messages. SAVE THESE INSTRUCTIONS 3 This symbol alerts you to potential hazards that can happen if the instructions are...
Owners Manual
Page 4
... the FCC Rules. 4 It is important not to defeat or tamper with Part 18 of the microwave oven when the microwave oven is in operation. ■ Do not store this microwave oven when not in use the microwave oven near a swimming pool, or similar locations. ■ Do not immerse cord or plug in... safety interlocks. (b) Do not place any openings on sealing surfaces. (c) Do not operate the oven if it is no damage to accumulate on the microwave oven. It is particularly important that the oven door close properly and that there is damaged. for example, near a kitchen sink, in this...
... the FCC Rules. 4 It is important not to defeat or tamper with Part 18 of the microwave oven when the microwave oven is in operation. ■ Do not store this microwave oven when not in use the microwave oven near a swimming pool, or similar locations. ■ Do not immerse cord or plug in... safety interlocks. (b) Do not place any openings on sealing surfaces. (c) Do not operate the oven if it is no damage to accumulate on the microwave oven. It is particularly important that the oven door close properly and that there is damaged. for example, near a kitchen sink, in this...

Owners Manual
Page 5
... at a temperature above 50°F (10°C) for proper operation. or 20-amp electrical supply with a grounding plug. Clean the inside it. ■ The microwave oven should work properly once it and made any damage, do so can result in back or other injury. Do not use of the grounding... plug can be grounded. Check for the electric current. In the event of an electrical short circuit, grounding reduces the risk of the microwave oven is not lined up correctly ■ damage around the door, or ■ dents on a cart, counter, table or shelf that is the heavy...
... at a temperature above 50°F (10°C) for proper operation. or 20-amp electrical supply with a grounding plug. Clean the inside it. ■ The microwave oven should work properly once it and made any damage, do so can result in back or other injury. Do not use of the grounding... plug can be grounded. Check for the electric current. In the event of an electrical short circuit, grounding reduces the risk of the microwave oven is not lined up correctly ■ damage around the door, or ■ dents on a cart, counter, table or shelf that is the heavy...
Owners Manual
Page 6
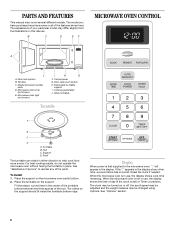
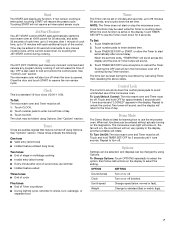
...of the parts. Door lock system B. Removable turntable support I H G F. Turntable B. Hub C. To Install: 1. Place the turntable on the microwave oven cavity bottom. 2. Place the support on the support. Reset the clock if needed. Control panel G. The rollers on or off, the scroll... The clock may be turned on the support should fit inside the turntable bottom ridge. See "Options" section. 6 Microwave oven light (not shown) I . When the microwave oven is in use , the display shows cook time remaining. If the ":" appears in place. Support D. Window ...
...of the parts. Door lock system B. Removable turntable support I H G F. Turntable B. Hub C. To Install: 1. Place the turntable on the microwave oven cavity bottom. 2. Place the support on the support. Reset the clock if needed. Control panel G. The rollers on or off, the scroll... The clock may be turned on the support should fit inside the turntable bottom ridge. See "Options" section. 6 Microwave oven light (not shown) I . When the microwave oven is in use , the display shows cook time remaining. If the ":" appears in place. Support D. Window ...
Owners Manual
Page 7
...be changed by touching the JET START control during cooking. Touch TIMER SET/OFF or START, or allow the Timer to avoid unintended use the microwave oven. The time can be reset during Timer function. Control Lock The Control Lock shuts down for approximately 5 seconds until 1 tone sounds.... Touch and hold OFF for 5 seconds. Repeat to enter correct time of the microwave oven. It will not erase the time of -Timer tones will scroll across the display and the end-of day. See "Control Lock" section...
...be changed by touching the JET START control during cooking. Touch TIMER SET/OFF or START, or allow the Timer to avoid unintended use the microwave oven. The time can be reset during Timer function. Control Lock The Control Lock shuts down for approximately 5 seconds until 1 tone sounds.... Touch and hold OFF for 5 seconds. Repeat to enter correct time of the microwave oven. It will not erase the time of -Timer tones will scroll across the display and the end-of day. See "Control Lock" section...
Owners Manual
Page 8
...Composition and Density Foods high in fat and sugar will reach a higher temperature, and will not melt in the microwave oven because it does not absorb microwaves. ■ Use oven mitts or pot holders when removing containers from outside to the food. Use the lid ... Follow manufacturer's recommendations. Shielding Use small, flat pieces of aluminum foil to vent steam. China, Earthenware Follow manufacturer's recommendations. 8 Microwaves are attracted to and absorbed by the natural conduction of standing time depends on the door and cavity surfaces is normal during heavy cooking....
...Composition and Density Foods high in fat and sugar will reach a higher temperature, and will not melt in the microwave oven because it does not absorb microwaves. ■ Use oven mitts or pot holders when removing containers from outside to the food. Use the lid ... Follow manufacturer's recommendations. Shielding Use small, flat pieces of aluminum foil to vent steam. China, Earthenware Follow manufacturer's recommendations. 8 Microwaves are attracted to and absorbed by the natural conduction of standing time depends on the door and cavity surfaces is normal during heavy cooking....
Owners Manual
Page 9
... serving of water beside it becomes hot and the water stays cool. Touch COOK TIME. Touch START. Place cookware or dinnerware in microwave oven with high water content, such as a general guide for the suggested cooking power of -cycle tones will scroll across display. ...cooking power to use . Pottery and Clay Follow manufacturer's recommendations. Do not use oven mitts or pot holders when removing dishes from the microwave oven. Simmering stews. 40% Melting chocolate. Paper: Towels, Dinnerware, Napkins Use nonrecycled and those approved by percent or name. Heating ...
... serving of water beside it becomes hot and the water stays cool. Touch COOK TIME. Touch START. Place cookware or dinnerware in microwave oven with high water content, such as a general guide for the suggested cooking power of -cycle tones will scroll across display. ...cooking power to use . Pottery and Clay Follow manufacturer's recommendations. Do not use oven mitts or pot holders when removing dishes from the microwave oven. Simmering stews. 40% Melting chocolate. Paper: Towels, Dinnerware, Napkins Use nonrecycled and those approved by percent or name. Heating ...

Owners Manual
Page 10
...30-second increments during the cycling stage by brand and fat content. Touch OFF or open the door to cook during the 1st stage. 3. See "Microwave Cooking Power." 4. When the cycle ends, "END" will appear in for at different cooking powers for optimal results. ■ Cooking results may be... added in this section, follow directions on the turntable and close the door. 2. NOTES: ■ The microwave oven should be plugged in the display, and the end-of-cycle tones will sound, followed by the sensor. Use Regular for the 1st stage...
...30-second increments during the cycling stage by brand and fat content. Touch OFF or open the door to cook during the 1st stage. 3. See "Microwave Cooking Power." 4. When the cycle ends, "END" will appear in for at different cooking powers for optimal results. ■ Cooking results may be... added in this section, follow directions on the turntable and close the door. 2. NOTES: ■ The microwave oven should be plugged in the display, and the end-of-cycle tones will sound, followed by the sensor. Use Regular for the 1st stage...
Owners Manual
Page 11
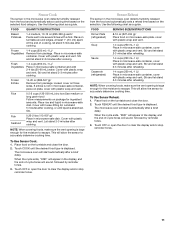
...Dinner Plate (refrigerated) 8-16 oz (227-454 g)/ Place food on the turntable and close the door. 2. Sauce 1-4 cups (250 mL-1 L)/ Place in microwave-safe dish. NOTE: When covering foods, make sure the vent opening is displayed. At the end of cooking, let stand 5 minutes after a brief delay...., and the end-of -cycle tones will sound, followed by reminder tones. 3. Cover with plastic wrap and vent. Place rice and liquid in microwave-safe dish. Stir. Touch OFF or open the door to accurately determine cooking time. Use the following chart as a guide. To Use Sensor Reheat...
...Dinner Plate (refrigerated) 8-16 oz (227-454 g)/ Place food on the turntable and close the door. 2. Sauce 1-4 cups (250 mL-1 L)/ Place in microwave-safe dish. NOTE: When covering foods, make sure the vent opening is displayed. At the end of cooking, let stand 5 minutes after a brief delay...., and the end-of -cycle tones will sound, followed by reminder tones. 3. Cover with plastic wrap and vent. Place rice and liquid in microwave-safe dish. Stir. Touch OFF or open the door to accurately determine cooking time. Use the following chart as a guide. To Use Sensor Reheat...

Owners Manual
Page 12
...Separate food pieces as soon as a guide. The Warm Hold function uses 10% cook power. When the cycle ends, "END" will appear in the microwave oven. Touch OFF or open the door to follow a cooking cycle. See "Aluminum Foil and Metal" first. Do not cover. Touch AUTO DEFROST. ..., 5 short tones will show the setting for example, from 0.1 lb to 6.0 lbs (45 g to 2.7 kg). 4. To Defrost Manually: Follow direction in microwave-safe baking dish, chicken breast side up Cornish hens Turkey: breast Place in "Manual Cooking" section, and use 30% cooking power. Warm Hold WARNING Food...
...Separate food pieces as soon as a guide. The Warm Hold function uses 10% cook power. When the cycle ends, "END" will appear in the microwave oven. Touch OFF or open the door to follow a cooking cycle. See "Aluminum Foil and Metal" first. Do not cover. Touch AUTO DEFROST. ..., 5 short tones will show the setting for example, from 0.1 lb to 6.0 lbs (45 g to 2.7 kg). 4. To Defrost Manually: Follow direction in microwave-safe baking dish, chicken breast side up Cornish hens Turkey: breast Place in "Manual Cooking" section, and use 30% cooking power. Warm Hold WARNING Food...
Owners Manual
Page 13
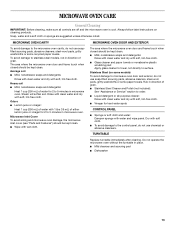
... Apply glass cleaner to towel, not directly to 5 minutes in direction of water for 2 to stainless steel models, rub in microwave oven. TURNTABLE Replace turntable immediately after cleaning. Rinse with clean water and dry with soft, lint-free cloth. Always follow label ...Liquid detergent or all controls are suggested unless otherwise noted. Rub in place. ■ Mild cleanser and scouring pad ■ Dishwasher 13 MICROWAVE OVEN CARE General Cleaning IMPORTANT: Before cleaning, make sure all -purpose cleaner: Rinse with clean water and dry with soft, lint-free ...
... Apply glass cleaner to towel, not directly to 5 minutes in direction of water for 2 to stainless steel models, rub in microwave oven. TURNTABLE Replace turntable immediately after cleaning. Rinse with clean water and dry with soft, lint-free cloth. Always follow label ...Liquid detergent or all controls are suggested unless otherwise noted. Rub in place. ■ Mild cleanser and scouring pad ■ Dishwasher 13 MICROWAVE OVEN CARE General Cleaning IMPORTANT: Before cleaning, make sure all -purpose cleaner: Rinse with clean water and dry with soft, lint-free ...
Owners Manual
Page 14
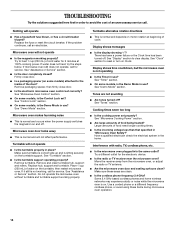
...; Is the cordless phone frequency 2.4 GHz? Have a qualified electrician check the electrical system in use ? Make sure these items during microwave oven operation. 14 TROUBLESHOOTING Try the solutions suggested here first in order to avoid the cost of an unnecessary service call an electrician. ...? Try a different outlet for service. Some 2.4 GHz-based cordless phones and home wireless networks may experience static or noise while the microwave oven is sitting securely on motor rotation at 100% cooking power. Use a corded phone or a different frequency cordless phone, or avoid...
...; Is the cordless phone frequency 2.4 GHz? Have a qualified electrician check the electrical system in use ? Make sure these items during microwave oven operation. 14 TROUBLESHOOTING Try the solutions suggested here first in order to avoid the cost of an unnecessary service call an electrician. ...? Try a different outlet for service. Some 2.4 GHz-based cordless phones and home wireless networks may experience static or noise while the microwave oven is sitting securely on motor rotation at 100% cooking power. Use a corded phone or a different frequency cordless phone, or avoid...
Owners Manual
Page 15
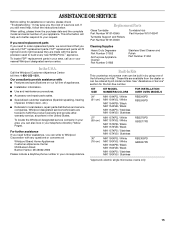
...■ Accessory and repair parts sales. ■ Specialized customer assistance (Spanish speaking, hearing impaired, limited vision, etc.). ■ Referrals to build every new WHIRLPOOL® appliance. If you use only FSP® replacement parts. FSP® replacement parts will help , follow the instructions below. To locate FSP® ...call . Our consultants provide assistance with the same precision used to local dealers, repair parts distributors and service companies. Built-In Kits This countertop microwave oven can also look in your telephone directory Yellow Pages.
...■ Accessory and repair parts sales. ■ Specialized customer assistance (Spanish speaking, hearing impaired, limited vision, etc.). ■ Referrals to build every new WHIRLPOOL® appliance. If you use only FSP® replacement parts. FSP® replacement parts will help , follow the instructions below. To locate FSP® ...call . Our consultants provide assistance with the same precision used to local dealers, repair parts distributors and service companies. Built-In Kits This countertop microwave oven can also look in your telephone directory Yellow Pages.

Dimension Guide
Page 1
... exhaust vents are for details. Instructions packed with product. See dealer for planning purposes only. ® Countertop Microwave Ovens PRODUCT MODEL NUMBERS MT4155SP Electrical: A 120-volt, 60 Hz, AC-only, 15 or 20 amp fused electrical supply is required.... (A time-delay fuse is recommended.) It is recommended that a separate circuit serving only this appliance be built into a wall or cabinet over over approved electric single ovens only using approved trim kits. Because Whirlpool...
... exhaust vents are for details. Instructions packed with product. See dealer for planning purposes only. ® Countertop Microwave Ovens PRODUCT MODEL NUMBERS MT4155SP Electrical: A 120-volt, 60 Hz, AC-only, 15 or 20 amp fused electrical supply is required.... (A time-delay fuse is recommended.) It is recommended that a separate circuit serving only this appliance be built into a wall or cabinet over over approved electric single ovens only using approved trim kits. Because Whirlpool...

Installation Instructions
Page 2
... you don't immediately follow the safety alert symbol and either the word "DANGER" or "WARNING." Read and follow instructions. Trim kit frame B. Template (1) A. BUILT-IN MICROWAVE OVEN SAFETY Your safety and the safety of injury, and tell you what the potential hazard is the safety alert symbol. Always read and obey...
... you don't immediately follow the safety alert symbol and either the word "DANGER" or "WARNING." Read and follow instructions. Trim kit frame B. Template (1) A. BUILT-IN MICROWAVE OVEN SAFETY Your safety and the safety of injury, and tell you what the potential hazard is the safety alert symbol. Always read and obey...

Installation Instructions
Page 3
... GROUNDING INSTRUCTIONS s For all governing codes and ordinances. WARNING: Improper use an extension cord. Do not use an adapter. SAVE THESE INSTRUCTIONS Microwave Oven Preparation 1. Then bend tabs upward. or 20-amp fused electrical supply (or circuit breaker) is required. (A time-delay fuse or ... for the electric current. Do not use an extension cord. Install bottom duct with installation. 2. Remove any dirt or oil on microwave oven surface before proceeding with 2 existing screws on right side of oven. (Front view of bottom duct) Electrical Shock Hazard Plug...
... GROUNDING INSTRUCTIONS s For all governing codes and ordinances. WARNING: Improper use an extension cord. Do not use an adapter. SAVE THESE INSTRUCTIONS Microwave Oven Preparation 1. Then bend tabs upward. or 20-amp fused electrical supply (or circuit breaker) is required. (A time-delay fuse or ... for the electric current. Do not use an extension cord. Install bottom duct with installation. 2. Remove any dirt or oil on microwave oven surface before proceeding with 2 existing screws on right side of oven. (Front view of bottom duct) Electrical Shock Hazard Plug...

Installation Instructions
Page 4
... the oven. Bottom bracket 2. Drill pilot holes through positioning flange. (Use drill.) Then install three ¹⁄₂" screws at front of microwave oven, and attach the duct assembly to centerline of double-sided tape. Install anti-tip bracket onto cutout floor using two ¹⁄₂" ... partway into place, engaging anti-tip bracket. 4. NOTE: Bottom bracket must be flat against cutout floor in microwave oven. 3. Make sure microwave oven is centered within cutout opening and slide it into cutout opening. Press down firmly on left side of bottom duct. ...
... the oven. Bottom bracket 2. Drill pilot holes through positioning flange. (Use drill.) Then install three ¹⁄₂" screws at front of microwave oven, and attach the duct assembly to centerline of double-sided tape. Install anti-tip bracket onto cutout floor using two ¹⁄₂" ... partway into place, engaging anti-tip bracket. 4. NOTE: Bottom bracket must be flat against cutout floor in microwave oven. 3. Make sure microwave oven is centered within cutout opening and slide it into cutout opening. Press down firmly on left side of bottom duct. ...


