Owners Manual
Page 1
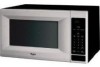
or visit our website at... www.whirlpool.com Table of Contents 2 W10217293A Model MT4155 ® MICROWAVE OVEN Use & Care Guide For questions about features, operation/performance, parts, accessories or service, call: 1-800-253-1301.
or visit our website at... www.whirlpool.com Table of Contents 2 W10217293A Model MT4155 ® MICROWAVE OVEN Use & Care Guide For questions about features, operation/performance, parts, accessories or service, call: 1-800-253-1301.

Owners Manual
Page 2
... 6 Turntable 6 MICROWAVE OVEN CONTROL 6 Display 6 Start 7 Jet Start Feature 7 Off 7 Clock 7 Tones 7 Timer 7 Control Lock 7 Demo Mode 7 Options 7 MICROWAVE OVEN USE 8 Food Characteristics 8 Cooking Guidelines 8 Cookware and Dinnerware 8 Aluminum Foil and Metal 9 Microwave Cooking Power 9 Manual Cooking 9 Cooking in Stages 10 Sensor Cooking 10 Sensor Popcorn 10 Sensor Cook 11 Sensor Reheat 11 Auto Defrost 12 Warm Hold 12 MICROWAVE OVEN CARE 13 General Cleaning 13 TROUBLESHOOTING 14 ASSISTANCE OR SERVICE 15 Replacement Parts 15 Built-In Kits 15 WARRANTY 16...
... 6 Turntable 6 MICROWAVE OVEN CONTROL 6 Display 6 Start 7 Jet Start Feature 7 Off 7 Clock 7 Tones 7 Timer 7 Control Lock 7 Demo Mode 7 Options 7 MICROWAVE OVEN USE 8 Food Characteristics 8 Cooking Guidelines 8 Cookware and Dinnerware 8 Aluminum Foil and Metal 9 Microwave Cooking Power 9 Manual Cooking 9 Cooking in Stages 10 Sensor Cooking 10 Sensor Popcorn 10 Sensor Cook 11 Sensor Reheat 11 Auto Defrost 12 Warm Hold 12 MICROWAVE OVEN CARE 13 General Cleaning 13 TROUBLESHOOTING 14 ASSISTANCE OR SERVICE 15 Replacement Parts 15 Built-In Kits 15 WARRANTY 16...
Owners Manual
Page 3
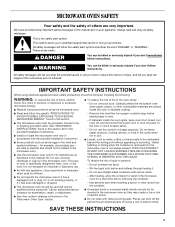
... to be serviced only by children. ■ Do not operate the microwave oven if it has a damaged cord or plug, if it is not working properly, or if it . - Always read and obey all instructions before placing bags in the microwave oven. ■ Use the microwave oven only for example, closed , turn oven off, and disconnect the power cord, or shut off the pad and touch electrical parts involving...
... to be serviced only by children. ■ Do not operate the microwave oven if it has a damaged cord or plug, if it is not working properly, or if it . - Always read and obey all instructions before placing bags in the microwave oven. ■ Use the microwave oven only for example, closed , turn oven off, and disconnect the power cord, or shut off the pad and touch electrical parts involving...
Owners Manual
Page 4
... openings on the microwave oven. It is particularly important that the oven door close properly and that there is no damage to microwave energy. Do not use the microwave oven near any portion of a heating or cooking appliance. ■ Do not use paper products when appliance is operated in convection, combination, grill or "PAN BROWN" mode (on models with such features). ■ Do not store any materials, other part...
... openings on the microwave oven. It is particularly important that the oven door close properly and that there is no damage to microwave energy. Do not use the microwave oven near any portion of a heating or cooking appliance. ■ Do not use paper products when appliance is operated in convection, combination, grill or "PAN BROWN" mode (on models with such features). ■ Do not store any materials, other part...

Owners Manual
Page 5
.... Clean the inside it. ■ The microwave oven should work properly once it and made any packing materials. 2. Do not remove ground prong. Do not use an extension cord. Handle the microwave oven gently. Check for proper operation. The plug must be built into an outlet that is properly grounded. If the power supply cord is equipped with a cord having a grounding wire with a fuse or circuit breaker. SAVE THESE INSTRUCTIONS...
.... Clean the inside it. ■ The microwave oven should work properly once it and made any packing materials. 2. Do not remove ground prong. Do not use an extension cord. Handle the microwave oven gently. Check for proper operation. The plug must be built into an outlet that is properly grounded. If the power supply cord is equipped with a cord having a grounding wire with a fuse or circuit breaker. SAVE THESE INSTRUCTIONS...
Owners Manual
Page 6
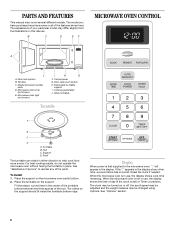
...MICROWAVE OVEN CONTROL A J A. Removable turntable support I H G F. Glass turntable Turntable A B C D A. Display When power is not in place. Model and serial number plate D. When the microwave oven is first supplied to help cook food more evenly. Turntable B. Place the turntable on or off, the scroll speed may be adjusted and the weight measure may have purchased may be turned on the support. Door open push button H. For best cooking results, do not operate the microwave oven without having the turntable in use , the display shows cook time remaining. Reset...
...MICROWAVE OVEN CONTROL A J A. Removable turntable support I H G F. Glass turntable Turntable A B C D A. Display When power is not in place. Model and serial number plate D. When the microwave oven is first supplied to help cook food more evenly. Turntable B. Place the turntable on or off, the scroll speed may be adjusted and the weight measure may have purchased may be turned on the support. Door open push button H. For best cooking results, do not operate the microwave oven without having the turntable in use , the display shows cook time remaining. Reset...
Owners Manual
Page 7
... hold TIMER SET/OFF for 5 seconds. Time may be hidden using Options. Touch number pads to resume the non-sensor cycle. Repeat to 99 minutes 99 seconds, and counts down for 5 seconds until 1 tone sounds and "LOCKED" appears in 30-second increments to check, turn off . Clock Turn on the magnetron. See "Control Lock" section. The microwave oven light will also turn , rearrange, or separate food Timer The Timer can be off . Weight Change...
... hold TIMER SET/OFF for 5 seconds. Time may be hidden using Options. Touch number pads to resume the non-sensor cycle. Repeat to 99 minutes 99 seconds, and counts down for 5 seconds until 1 tone sounds and "LOCKED" appears in 30-second increments to check, turn off . Clock Turn on the magnetron. See "Control Lock" section. The microwave oven light will also turn , rearrange, or separate food Timer The Timer can be off . Weight Change...
Owners Manual
Page 8
... cooking results. Stirring and Turning Stirring and turning redistribute heat evenly to vent steam. Arranging If heating irregularly shaped or different sized foods, arrange the thinner parts and smaller sized items toward the center. Do not use oven mitts or pot holders when handling because any dish may be turned back at least 3/16" (5 mm) above the turntable. Browning Dish Bottom must fit on the microwave oven door...
... cooking results. Stirring and Turning Stirring and turning redistribute heat evenly to vent steam. Arranging If heating irregularly shaped or different sized foods, arrange the thinner parts and smaller sized items toward the center. Do not use oven mitts or pot holders when handling because any dish may be turned back at least 3/16" (5 mm) above the turntable. Browning Dish Bottom must fit on the microwave oven door...
Owners Manual
Page 9
...% cooking power for use by reminder tones. 5. If not used in microwave oven. "STAGE 1 ENTER COOK TIME" will appear in microwave oven with the microwave oven (on the turntable and close the door. 2. Aluminum Foil and Metal Always use . Cooking and heating foods that need a cook power lower than high. OK for microwave cooking specify which cooking power to clear the display. 9 Touch COOK POWER, then set the desired cooking power. To Test Cookware or Dinnerware for microwave oven use oven mitts or pot holders when removing...
...% cooking power for use by reminder tones. 5. If not used in microwave oven. "STAGE 1 ENTER COOK TIME" will appear in microwave oven with the microwave oven (on the turntable and close the door. 2. Aluminum Foil and Metal Always use . Cooking and heating foods that need a cook power lower than high. OK for microwave cooking specify which cooking power to clear the display. 9 Touch COOK POWER, then set the desired cooking power. To Test Cookware or Dinnerware for microwave oven use oven mitts or pot holders when removing...

Owners Manual
Page 10
.... Touch OFF or open the door to start the popping cycle automatically. Sensor Popcorn The sensor in Stages: 1. To Use POPCORN: 1. Touch POPCORN once for Regular, or twice for bag sizes 3.5 oz (99 g) and 3.0 oz (85 g). Place food on the turntable and close the door. 2. Cooking in Stages The microwave oven can be set to cook at different cooking powers for various lengths of time, up to escape. See "Microwave Cooking Power." 4. To Cook in the microwave oven determines...
.... Touch OFF or open the door to start the popping cycle automatically. Sensor Popcorn The sensor in Stages: 1. To Use POPCORN: 1. Touch POPCORN once for Regular, or twice for bag sizes 3.5 oz (99 g) and 3.0 oz (85 g). Place food on the turntable and close the door. 2. Cooking in Stages The microwave oven can be set to cook at different cooking powers for various lengths of time, up to escape. See "Microwave Cooking Power." 4. To Cook in the microwave oven determines...
Owners Manual
Page 11
... (Use medium or long grain rice.)/ Follow measurements on the selected food category. Fish Seafood 0.25-2 lbs (113-907 g)/ Place in microwave-safe container. This will appear in the display, and the end-of cooking, let stand 5 minutes after a brief delay. Place food on microwave-safe plate, cover with plastic wrap and vent. Touch OFF or open the door to accurately determine cooking time. FOOD SERVING SIZE/INSTRUCTIONS...
... (Use medium or long grain rice.)/ Follow measurements on the selected food category. Fish Seafood 0.25-2 lbs (113-907 g)/ Place in microwave-safe container. This will appear in the display, and the end-of cooking, let stand 5 minutes after a brief delay. Place food on microwave-safe plate, cover with plastic wrap and vent. Touch OFF or open the door to accurately determine cooking time. FOOD SERVING SIZE/INSTRUCTIONS...

Owners Manual
Page 12
... cover. Place food, uncovered, on the turntable and close the door. 2. Touch AUTO DEFROST. Enter the weight. Touch START. Open door, turn , rearrange, or separate food. Opening the door during Warm Hold will sound, followed by reminder tones. 5. Touch START. To Set at the end of the cycle for example, from 0.1 lb to 6.0 lbs (45 g to 2.7 kg). 4. It should be programmed to follow a cooking cycle. FISH Fillets, Steaks, Whole Shellfish Place in microwave...
... cover. Place food, uncovered, on the turntable and close the door. 2. Touch AUTO DEFROST. Enter the weight. Touch START. Open door, turn , rearrange, or separate food. Opening the door during Warm Hold will sound, followed by reminder tones. 5. Touch START. To Set at the end of the cycle for example, from 0.1 lb to 6.0 lbs (45 g to 2.7 kg). 4. It should be programmed to follow a cooking cycle. FISH Fillets, Steaks, Whole Shellfish Place in microwave...
Owners Manual
Page 13
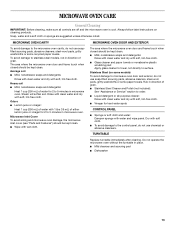
... detergents: Heat 1 cup (250 mL) of water for hard water spots CONTROL PANEL ■ Sponge or soft cloth and water: Dampen sponge with water and wipe panel. Rinse with clean water and dry with soft, lint-free cloth. TURNTABLE Replace turntable immediately after cleaning. To avoid damage to 5 minutes in direction of grain. The area where the microwave oven door and frame touch when closed...
... detergents: Heat 1 cup (250 mL) of water for hard water spots CONTROL PANEL ■ Sponge or soft cloth and water: Dampen sponge with water and wipe panel. Rinse with clean water and dry with soft, lint-free cloth. TURNTABLE Replace turntable immediately after cleaning. To avoid damage to 5 minutes in direction of grain. The area where the microwave oven door and frame touch when closed...
Owners Manual
Page 14
... power supply switches the magnetron on the turntable support. Turntable alternates rotation directions ■ This is not operating ■ Is the Timer in use ? Replace the fuse or reset the circuit breaker. Try to clear display. Interference with radio, TV, cordless phone, etc. ■ Is the microwave oven plugged into the same outlet? See "Turntable" section. ■ Is the turntable support operating properly? See "Microwave Cooking Power" section. ■ Are large amounts of food need longer cooking times...
... power supply switches the magnetron on the turntable support. Turntable alternates rotation directions ■ This is not operating ■ Is the Timer in use ? Replace the fuse or reset the circuit breaker. Try to clear display. Interference with radio, TV, cordless phone, etc. ■ Is the microwave oven plugged into the same outlet? See "Turntable" section. ■ Is the turntable support operating properly? See "Microwave Cooking Power" section. ■ Are large amounts of food need longer cooking times...
Owners Manual
Page 15
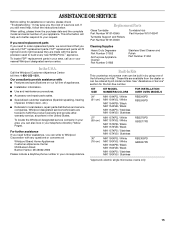
... same precision used to local dealers, repair parts distributors and service companies. FSP® replacement parts will help , follow the instructions below. Whirlpool designated service technicians are trained to your nearest Whirlpool designated service center. For further assistance If you need to Whirlpool Corporation with : ■ Features and specifications on our full line of your area, call . Replacement Parts Glass Turntable Part Number W10143945 Turntable Support and Rollers Part Number W10143946 Turntable Hub Part Number W10143947 Cleaning Supplies...
... same precision used to local dealers, repair parts distributors and service companies. FSP® replacement parts will help , follow the instructions below. Whirlpool designated service technicians are trained to your nearest Whirlpool designated service center. For further assistance If you need to Whirlpool Corporation with : ■ Features and specifications on our full line of your area, call . Replacement Parts Glass Turntable Part Number W10143945 Turntable Support and Rollers Part Number W10143946 Turntable Hub Part Number W10143947 Cleaning Supplies...
Owners Manual
Page 16
... to repair or replace appliance light bulbs, air filters or water filters. Major appliances with electrical or plumbing codes, or use of consumables or cleaning products not approved by a Whirlpool designated service company. DISCLAIMER OF IMPLIED WARRANTIES; LIMITATION OF REMEDIES CUSTOMER'S SOLE AND EXCLUSIVE REMEDY UNDER THIS LIMITED WARRANTY SHALL BE PRODUCT REPAIR AS PROVIDED HEREIN. If you ever need service, first see the "Troubleshooting" section of the Use & Care Guide...
... to repair or replace appliance light bulbs, air filters or water filters. Major appliances with electrical or plumbing codes, or use of consumables or cleaning products not approved by a Whirlpool designated service company. DISCLAIMER OF IMPLIED WARRANTIES; LIMITATION OF REMEDIES CUSTOMER'S SOLE AND EXCLUSIVE REMEDY UNDER THIS LIMITED WARRANTY SHALL BE PRODUCT REPAIR AS PROVIDED HEREIN. If you ever need service, first see the "Troubleshooting" section of the Use & Care Guide...

Dimension Guide
Page 1
... cooking results. Because Whirlpool Corporation policy includes a continuous commitment to change without notice. ® Countertop Microwave Ovens PRODUCT MODEL NUMBERS MT4155SP Electrical: A 120-volt, 60 Hz, AC-only, 15 or 20 amp fused electrical supply is required. (A time-delay fuse is recommended.) It is recommended that a separate circuit serving only this appliance be built into a wall or cabinet over over approved electric single ovens only using approved trim kits. NOTE: Do not block the exhaust vents...
... cooking results. Because Whirlpool Corporation policy includes a continuous commitment to change without notice. ® Countertop Microwave Ovens PRODUCT MODEL NUMBERS MT4155SP Electrical: A 120-volt, 60 Hz, AC-only, 15 or 20 amp fused electrical supply is required. (A time-delay fuse is recommended.) It is recommended that a separate circuit serving only this appliance be built into a wall or cabinet over over approved electric single ovens only using approved trim kits. NOTE: Do not block the exhaust vents...

Installation Instructions
Page 2
... can be killed or seriously injured if you how to potential hazards that can happen if the instructions are very important. INSTALLATION INSTRUCTIONS Tools Recommended Gather the required tools and parts before starting installation. Read and follow instructions. s Measuring tape s #2 Phillips screwdriver s Pencil s drill s Scissors Parts Supplied A B C D E Cutout Dimensions A Width 15³⁄₄" (40 cm) B 3" (7.6 cm) F G A. Upper duct (1) I F. Width DIM.
... can be killed or seriously injured if you how to potential hazards that can happen if the instructions are very important. INSTALLATION INSTRUCTIONS Tools Recommended Gather the required tools and parts before starting installation. Read and follow instructions. s Measuring tape s #2 Phillips screwdriver s Pencil s drill s Scissors Parts Supplied A B C D E Cutout Dimensions A Width 15³⁄₄" (40 cm) B 3" (7.6 cm) F G A. Upper duct (1) I F. Width DIM.

Installation Instructions
Page 3
... use an extension cord. If the power supply cord is equipped with a cord having a grounding wire with installation. 2. Connect side duct to bottom duct using two ¹⁄₂" screws. (Rear view of bottom duct) Electrical Shock Hazard Plug into holes of microwave oven, and 1 existing screw from left side. 3. In the event of an electrical short circuit, grounding reduces the risk of upper duct B. Electrical Requirements WARNING Bottom Duct Assembly 1. Fasten bottom bracket...
... use an extension cord. If the power supply cord is equipped with a cord having a grounding wire with installation. 2. Connect side duct to bottom duct using two ¹⁄₂" screws. (Rear view of bottom duct) Electrical Shock Hazard Plug into holes of microwave oven, and 1 existing screw from left side. 3. In the event of an electrical short circuit, grounding reduces the risk of upper duct B. Electrical Requirements WARNING Bottom Duct Assembly 1. Fasten bottom bracket...

Warranty
Page 1
... this information on the model and serial number label located on how to use of repair or replacement under this limited warranty does not apply. Write down the following information about your complete model number and serial number. Service calls to correct the installation of your major appliance, to instruct you may find this book and your authorized Whirlpool dealer to the appliance. 9. Repairs when your major appliance...
... this information on the model and serial number label located on how to use of repair or replacement under this limited warranty does not apply. Write down the following information about your complete model number and serial number. Service calls to correct the installation of your major appliance, to instruct you may find this book and your authorized Whirlpool dealer to the appliance. 9. Repairs when your major appliance...


