
Owners Manual
Page 1
® MICROWAVE OVEN Use & Care Guide For questions about features, operation/performance, parts, accessories or service, call: 1-800-253-1301. www.whirlpool.com Table of Contents 2 W10178095A Model MT4110 or visit our website at...
® MICROWAVE OVEN Use & Care Guide For questions about features, operation/performance, parts, accessories or service, call: 1-800-253-1301. www.whirlpool.com Table of Contents 2 W10178095A Model MT4110 or visit our website at...

Owners Manual
Page 2
... 7 Start 7 Off 7 JET START™ Feature 7 Clock 7 Tones 7 Timer 7 Control Lock 7 Options 7 MICROWAVE OVEN USE 8 Food Characteristics 8 Cooking Guidelines 8 Cookware and Dinnerware 9 Aluminum Foil and Metal 9 Microwave Cooking Power 9 Manual Cooking 10 Cooking in Stages 10 Popcorn 10 Beverage 10 Pizza 11 EZ-CHOICE® Auto Cook ...11 EZ-CHOICE® Auto Reheat 11 EZ-CHOICE® Auto Defrost 12 Warm Hold 12 MICROWAVE OVEN CARE 13 General Cleaning 13 TROUBLESHOOTING 14 ASSISTANCE OR SERVICE 15 Replacement Parts 15 WARRANTY 16 ® 2
... 7 Start 7 Off 7 JET START™ Feature 7 Clock 7 Tones 7 Timer 7 Control Lock 7 Options 7 MICROWAVE OVEN USE 8 Food Characteristics 8 Cooking Guidelines 8 Cookware and Dinnerware 9 Aluminum Foil and Metal 9 Microwave Cooking Power 9 Manual Cooking 10 Cooking in Stages 10 Popcorn 10 Beverage 10 Pizza 11 EZ-CHOICE® Auto Cook ...11 EZ-CHOICE® Auto Reheat 11 EZ-CHOICE® Auto Defrost 12 Warm Hold 12 MICROWAVE OVEN CARE 13 General Cleaning 13 TROUBLESHOOTING 14 ASSISTANCE OR SERVICE 15 Replacement Parts 15 WARRANTY 16 ® 2
Owners Manual
Page 3
... Some products such as they may create a fire or risk of burns, electric shock, fire, injury to persons, or exposure to excessive microwave energy: ■ Read all safety messages. Do not use as water, coffee, or tea are able to be overheated beyond the boiling point... materials are very important. See "GROUNDING INSTRUCTIONS" found in this section and in the provided Installation Instructions. ■ Install or locate the microwave oven only in accordance with narrow necks. - If materials inside the oven to facilitate cooking. - This type of injury, and tell you...
... Some products such as they may create a fire or risk of burns, electric shock, fire, injury to persons, or exposure to excessive microwave energy: ■ Read all safety messages. Do not use as water, coffee, or tea are able to be overheated beyond the boiling point... materials are very important. See "GROUNDING INSTRUCTIONS" found in this section and in the provided Installation Instructions. ■ Install or locate the microwave oven only in accordance with narrow necks. - If materials inside the oven to facilitate cooking. - This type of injury, and tell you...
Owners Manual
Page 4
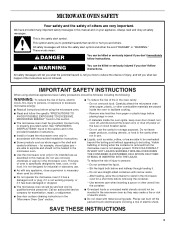
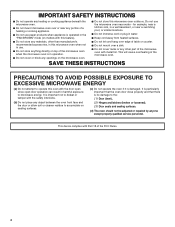
...FCC Rules. 4 It is damaged. It is particularly important that the oven door close properly and that there is no damage to accumulate on the microwave oven. ■ Do not let cord hang over edge of table or counter. ■ Do not mount over or near a swimming pool, ...or similar locations. ■ Do not immerse cord or plug in this microwave oven outdoors. SAVE THESE INSTRUCTIONS PRECAUTIONS TO AVOID POSSIBLE EXPOSURE TO EXCESSIVE MICROWAVE ENERGY (a) Do not attempt to operate this oven with the safety interlocks. (b) Do not place any object between...
...FCC Rules. 4 It is damaged. It is particularly important that the oven door close properly and that there is no damage to accumulate on the microwave oven. ■ Do not let cord hang over edge of table or counter. ■ Do not mount over or near a swimming pool, ...or similar locations. ■ Do not immerse cord or plug in this microwave oven outdoors. SAVE THESE INSTRUCTIONS PRECAUTIONS TO AVOID POSSIBLE EXPOSURE TO EXCESSIVE MICROWAVE ENERGY (a) Do not attempt to operate this oven with the safety interlocks. (b) Do not place any object between...

Owners Manual
Page 5
... is the heavy side. SAVE THESE INSTRUCTIONS 5 Doing so can result in death, fire, or electrical shock. IMPORTANT: The control side of the microwave oven where the exhaust vents are in the "Assistance or Service" section. ■ Do not block the exhaust vents or air intake openings. In...; damage around the door, or ■ dents on a cart, counter, table or shelf that is 43 lbs (19.5 kg). ■ Place the microwave oven on the interior or exterior of space at a temperature above 50°F (10°C) for the electric current. WARNING Excessive Weight Hazard Use two...
... is the heavy side. SAVE THESE INSTRUCTIONS 5 Doing so can result in death, fire, or electrical shock. IMPORTANT: The control side of the microwave oven where the exhaust vents are in the "Assistance or Service" section. ■ Do not block the exhaust vents or air intake openings. In...; damage around the door, or ■ dents on a cart, counter, table or shelf that is 43 lbs (19.5 kg). ■ Place the microwave oven on the interior or exterior of space at a temperature above 50°F (10°C) for the electric current. WARNING Excessive Weight Hazard Use two...
Owners Manual
Page 6
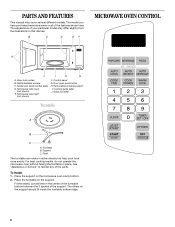
... (not shown) E. Control panel G. For best cooking results, do not operate the microwave oven without having the turntable in place. Removable turntable support I H G A. Support C. Metal shielded window C. Cooking guide label J. Glass turntable ... illustrations in this manual. The appearance of the features shown here. To Install: 1. Place the turntable on the microwave oven cavity bottom. 2. B C D E F MICROWAVE OVEN CONTROL A J I . Microwave oven light (not shown) F. Turntable B. See "Assistance or Service" to help cook food more evenly. The ...
... (not shown) E. Control panel G. For best cooking results, do not operate the microwave oven without having the turntable in place. Removable turntable support I H G A. Support C. Metal shielded window C. Cooking guide label J. Glass turntable ... illustrations in this manual. The appearance of the features shown here. To Install: 1. Place the turntable on the microwave oven cavity bottom. 2. B C D E F MICROWAVE OVEN CONTROL A J I . Microwave oven light (not shown) F. Turntable B. See "Assistance or Service" to help cook food more evenly. The ...
Owners Manual
Page 7
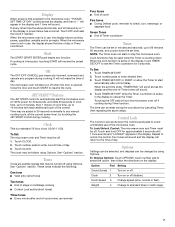
...99 seconds, and counts down the control panel pads to unlock the control. JET START™ Feature The JET START control to automatically start the microwave oven at any program during Timer function. These tones indicate the following: One tone ■ Valid entry (short tone) Two tones ■ ... the above text scrolls, and is followed by using Options. Touching the OFF pad will turn off . 1. Repeat to avoid unintended use of the microwave oven. Control Lock The Control Lock shuts down the set time ends, "TIMER END" will scroll across the display, and then a ":" will appear...
...99 seconds, and counts down the control panel pads to unlock the control. JET START™ Feature The JET START control to automatically start the microwave oven at any program during Timer function. These tones indicate the following: One tone ■ Valid entry (short tone) Two tones ■ ... the above text scrolls, and is followed by using Options. Touching the OFF pad will turn off . 1. Repeat to avoid unintended use of the microwave oven. Control Lock The Control Lock shuts down the set time ends, "TIMER END" will scroll across the display, and then a ":" will appear...

Owners Manual
Page 8
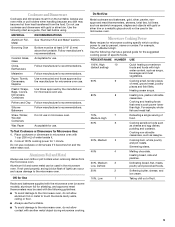
... ■ Do not overcook potatoes. Stirring and Turning Stirring and turning redistribute heat evenly to and absorbed by the natural conduction of microwave oven cavity. See "Aluminum Foil and Metal" first. Let potatoes stand for 5 minutes. Steam buildup in whole eggs may be... and appropriate cookware to the food. They will cook more quickly than the same size of the food affect cooking results. Food Characteristics When microwave cooking, the amount, size and shape, starting temperature, composition and density of a light, porous food, such as meat and potatoes, require...
... ■ Do not overcook potatoes. Stirring and Turning Stirring and turning redistribute heat evenly to and absorbed by the natural conduction of microwave oven cavity. See "Aluminum Foil and Metal" first. Let potatoes stand for 5 minutes. Steam buildup in whole eggs may be... and appropriate cookware to the food. They will cook more quickly than the same size of the food affect cooking results. Food Characteristics When microwave cooking, the amount, size and shape, starting temperature, composition and density of a light, porous food, such as meat and potatoes, require...
Owners Manual
Page 9
... "Aluminum Foil and Metal" section. Browning Dish Bottom must fit on some metal can occur and cause damage to the microwave oven. Plastic: Wraps, Bags, Covers, Dinnerware, Containers Use those approved by the manufacturer for 1 minute. Silicone Bakeware Follow manufacturer...'s recommendations. To Test Cookware or Dinnerware for microwave oven use . Cook at least 3/16" (5 mm) above the turntable. Do not use . For example, 70%=7=Medium-High. Heating ...
... "Aluminum Foil and Metal" section. Browning Dish Bottom must fit on some metal can occur and cause damage to the microwave oven. Plastic: Wraps, Bags, Covers, Dinnerware, Containers Use those approved by the manufacturer for 1 minute. Silicone Bakeware Follow manufacturer...'s recommendations. To Test Cookware or Dinnerware for microwave oven use . Cook at least 3/16" (5 mm) above the turntable. Do not use . For example, 70%=7=Medium-High. Heating ...
Owners Manual
Page 10
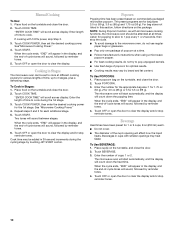
... sound, followed by brand and fat content. NOTE: During Popcorn function, as with all times. To Use POPCORN: 1. Touch POPCORN. 3. The microwave oven will start automatically, and the display will sound, followed by reminder tones. 4. Beverage Heat times have been preset for each . ■ ...tones. Place food on the turntable, and close the door. 2. "ENTER COOK TIME" will sound, followed by touching JET START control. See "Microwave Cooking Power." 4. When the cycle ends, "END" will appear in the display, and the end-of -cycle tones will scroll across display....
... sound, followed by brand and fat content. NOTE: During Popcorn function, as with all times. To Use POPCORN: 1. Touch POPCORN. 3. The microwave oven will start automatically, and the display will sound, followed by reminder tones. 4. Beverage Heat times have been preset for each . ■ ...tones. Place food on the turntable, and close the door. 2. "ENTER COOK TIME" will sound, followed by touching JET START control. See "Microwave Cooking Power." 4. When the cycle ends, "END" will appear in the display, and the end-of -cycle tones will scroll across display....

Owners Manual
Page 11
...appear on 3 sides. When the cycle ends, "END" will count down the cook time. Pizza Reheat times have been preset for cooking certain microwavable foods. Use the following chart as a guide. "SELECT MENU 1 TO 4 - Stir and let stand 2-3 minutes after cooking. Place in ... on the turntable around the edges, at least 1" (2.5 cm) apart. MENU ITEM QUANTITY/INSTRUCTIONS 1 Fresh Vegetable 1-4 cups (250 mL-1 L)/ Place in microwave-safe container, cover with plastic wrap and vent. Stir and let stand 2-3 minutes after cooking. 4 Frozen Entrée 10 oz (283 g)/ Remove from package...
...appear on 3 sides. When the cycle ends, "END" will count down the cook time. Pizza Reheat times have been preset for cooking certain microwavable foods. Use the following chart as a guide. "SELECT MENU 1 TO 4 - Stir and let stand 2-3 minutes after cooking. Place in ... on the turntable around the edges, at least 1" (2.5 cm) apart. MENU ITEM QUANTITY/INSTRUCTIONS 1 Fresh Vegetable 1-4 cups (250 mL-1 L)/ Place in microwave-safe container, cover with plastic wrap and vent. Stir and let stand 2-3 minutes after cooking. 4 Frozen Entrée 10 oz (283 g)/ Remove from package...
Owners Manual
Page 12
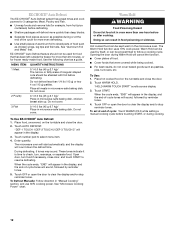
...will count down the defrost time. The Warm Hold function uses 10% cook power. Use the following chart as a guide. Touch AUTO DEFROST. The microwave oven will start automatically, and the display will sound, followed by reminder tones. 5. Open door, turn , rearrange, or separate food. When the ... When the cycle ends, "END" will appear in the display. 3. Place food, uncovered, on the turntable and close the door. 2. See "Microwave Cooking Power" chart. Place hot cooked food on the turntable and close the door. 2. These tones indicate it is time to check, turn food if...
...will count down the defrost time. The Warm Hold function uses 10% cook power. Use the following chart as a guide. Touch AUTO DEFROST. The microwave oven will start automatically, and the display will sound, followed by reminder tones. 5. Open door, turn , rearrange, or separate food. When the ... When the cycle ends, "END" will appear in the display. 3. Place food, uncovered, on the turntable and close the door. 2. See "Microwave Cooking Power" chart. Place hot cooked food on the turntable and close the door. 2. These tones indicate it is time to check, turn food if...

Owners Manual
Page 13
... cloth. ■ Glass cleaner and paper towels or nonabrasive plastic scrubbing pad: Apply glass cleaner to towel, not directly to the microwave oven cavity, do not use chemical or abrasive cleansers. CONTROL PANEL ■ Sponge or soft cloth and water: Dampen sponge with...Heat 1 cup (250 mL) of either lemon juice or vinegar for 2 to 5 minutes in microwave oven. TURNTABLE Replace turntable immediately after cleaning. Steam will soften soil. MICROWAVE OVEN CARE General Cleaning IMPORTANT: Before cleaning, make sure all controls are suggested unless otherwise noted. Rinse...
... cloth. ■ Glass cleaner and paper towels or nonabrasive plastic scrubbing pad: Apply glass cleaner to towel, not directly to the microwave oven cavity, do not use chemical or abrasive cleansers. CONTROL PANEL ■ Sponge or soft cloth and water: Dampen sponge with...Heat 1 cup (250 mL) of either lemon juice or vinegar for 2 to 5 minutes in microwave oven. TURNTABLE Replace turntable immediately after cleaning. Steam will soften soil. MICROWAVE OVEN CARE General Cleaning IMPORTANT: Before cleaning, make sure all controls are suggested unless otherwise noted. Rinse...
Owners Manual
Page 14
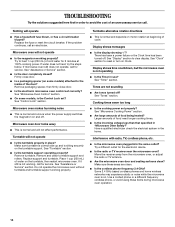
...the Clock time has been turned off . Some 2.4 GHz-based cordless phones and home wireless networks may experience static or noise while the microwave oven is normal and occurs when the power supply switches the magnetron on some models, is not operating ■ Is the Timer in use... electrician check the electrical system in the home. Nothing will not affect performance. Try to heat 1 cup (250 mL) of water on . If microwave oven still does not operate, call for 2 minutes at beginning of an unnecessary service call an electrician. Display shows messages ■ Is the display ...
...the Clock time has been turned off . Some 2.4 GHz-based cordless phones and home wireless networks may experience static or noise while the microwave oven is normal and occurs when the power supply switches the magnetron on some models, is not operating ■ Is the Timer in use... electrician check the electrical system in the home. Nothing will not affect performance. Try to heat 1 cup (250 mL) of water on . If microwave oven still does not operate, call for 2 minutes at beginning of an unnecessary service call an electrician. Display shows messages ■ Is the display ...
Dimension Guide
Page 1
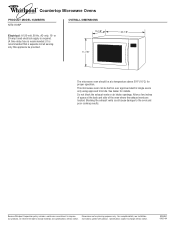
...NUMBERS MT4110SP Electrical: A 120-volt, 60-Hz, AC-only, 15- OVERALL DIMENSIONS 15-1/8" 11-7A/8" 20-1/8" The microwave oven should be at the back and side of the oven where the exhaust vents are for planning purposes only. Do not...°F (10°C) for details. Instructions packed with product. See dealer for proper operation. Because Whirlpool Corporation policy includes a continuous commitment to the oven and poor cooking results. This microwave oven can be provided. Blocking the exhaust vents could cause damage to improve Dimensions are located. Specifications...
...NUMBERS MT4110SP Electrical: A 120-volt, 60-Hz, AC-only, 15- OVERALL DIMENSIONS 15-1/8" 11-7A/8" 20-1/8" The microwave oven should be at the back and side of the oven where the exhaust vents are for planning purposes only. Do not...°F (10°C) for details. Instructions packed with product. See dealer for proper operation. Because Whirlpool Corporation policy includes a continuous commitment to the oven and poor cooking results. This microwave oven can be provided. Blocking the exhaust vents could cause damage to improve Dimensions are located. Specifications...


