
Owners Manual
Page 1
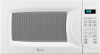
® MICROWAVE OVEN Use & Care Guide For questions about features, operation/performance, parts, accessories or service, call: 1-800-253-1301. or visit our website at... www.whirlpool.com Table of Contents 2 W10178095A Model MT4110
® MICROWAVE OVEN Use & Care Guide For questions about features, operation/performance, parts, accessories or service, call: 1-800-253-1301. or visit our website at... www.whirlpool.com Table of Contents 2 W10178095A Model MT4110

Owners Manual
Page 2
TABLE OF CONTENTS MICROWAVE OVEN SAFETY 3 INSTALLATION INSTRUCTIONS 5 Unpacking 5 Location Requirements 5 Electrical Requirements 5 PARTS AND FEATURES 6 Turntable 6 MICROWAVE OVEN CONTROL 6 Display 7 Start 7 Off 7 JET START™ Feature 7 Clock 7 Tones 7 Timer 7 Control Lock 7 Options 7 MICROWAVE OVEN USE 8 Food Characteristics 8 Cooking Guidelines 8 Cookware and Dinnerware 9 Aluminum Foil and Metal 9 Microwave Cooking Power 9 Manual Cooking 10 Cooking in Stages 10 Popcorn 10 Beverage 10 Pizza 11 EZ-CHOICE® Auto Cook 11 EZ-CHOICE® Auto Reheat 11 EZ-...
TABLE OF CONTENTS MICROWAVE OVEN SAFETY 3 INSTALLATION INSTRUCTIONS 5 Unpacking 5 Location Requirements 5 Electrical Requirements 5 PARTS AND FEATURES 6 Turntable 6 MICROWAVE OVEN CONTROL 6 Display 7 Start 7 Off 7 JET START™ Feature 7 Clock 7 Tones 7 Timer 7 Control Lock 7 Options 7 MICROWAVE OVEN USE 8 Food Characteristics 8 Cooking Guidelines 8 Cookware and Dinnerware 9 Aluminum Foil and Metal 9 Microwave Cooking Power 9 Manual Cooking 10 Cooking in Stages 10 Popcorn 10 Beverage 10 Pizza 11 EZ-CHOICE® Auto Cook 11 EZ-CHOICE® Auto Reheat 11 EZ-...
Owners Manual
Page 3
... in the provided Installation Instructions. ■ Install or locate the microwave oven only in this manual. After heating, allow the container to explode and should not be heated in the shell and sealed containers - MICROWAVE OVEN SAFETY Your safety and the safety of others . See "GROUNDING INSTRUCTIONS" found in the microwave oven for examination, repair, or adjustment. ■ See door surface cleaning instructions in the "Microwave Oven Care" section. ■ To...
... in the provided Installation Instructions. ■ Install or locate the microwave oven only in this manual. After heating, allow the container to explode and should not be heated in the shell and sealed containers - MICROWAVE OVEN SAFETY Your safety and the safety of others . See "GROUNDING INSTRUCTIONS" found in the microwave oven for examination, repair, or adjustment. ■ See door surface cleaning instructions in the "Microwave Oven Care" section. ■ To...
Owners Manual
Page 4
... similar locations. ■ Do not immerse cord or plug in water. ■ Keep cord away from heated surfaces. ■ Do not store any materials, other part of the microwave oven with the door open since open-door operation can result in operation. ■ Do not cover or block any openings on the microwave oven. ■ Do not let cord hang over edge of table or counter. ■ Do not mount over...
... similar locations. ■ Do not immerse cord or plug in water. ■ Keep cord away from heated surfaces. ■ Do not store any materials, other part of the microwave oven with the door open since open-door operation can result in operation. ■ Do not cover or block any openings on the microwave oven. ■ Do not let cord hang over edge of table or counter. ■ Do not mount over...

Owners Manual
Page 5
... the exhaust vents or air intake openings. IMPORTANT: The control side of the microwave oven is 43 lbs (19.5 kg). ■ Place the microwave oven on the interior or exterior of the trim kits listed in death, fire, or electrical shock. The weight of the microwave oven is strong enough to ensure proper airflow. or 20-amp electrical supply with a soft, damp cloth. 3. GROUNDING INSTRUCTIONS ■ For all governing codes...
... the exhaust vents or air intake openings. IMPORTANT: The control side of the microwave oven is 43 lbs (19.5 kg). ■ Place the microwave oven on the interior or exterior of the trim kits listed in death, fire, or electrical shock. The weight of the microwave oven is strong enough to ensure proper airflow. or 20-amp electrical supply with a soft, damp cloth. 3. GROUNDING INSTRUCTIONS ■ For all governing codes...
Owners Manual
Page 6
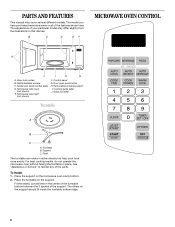
... inside the turntable bottom ridge. 6 Fit the raised, curved lines in either direction to reorder any of the support. Microwave inlet cover (not shown) E. Removable turntable support I H G A. Support C. B C D E F MICROWAVE OVEN CONTROL A J I . Cooking guide label J. To Install: 1. Door lock system B. Door open push button H. Glass turntable Turntable A B C A. Turntable B. For best cooking results, do not operate the microwave oven without having the turntable in this manual. The rollers on the support. Model and serial number plate D. Control panel...
... inside the turntable bottom ridge. 6 Fit the raised, curved lines in either direction to reorder any of the support. Microwave inlet cover (not shown) E. Removable turntable support I H G A. Support C. B C D E F MICROWAVE OVEN CONTROL A J I . Cooking guide label J. To Install: 1. Door lock system B. Door open push button H. Glass turntable Turntable A B C A. Turntable B. For best cooking results, do not operate the microwave oven without having the turntable in this manual. The rollers on the support. Model and serial number plate D. Control panel...
Owners Manual
Page 7
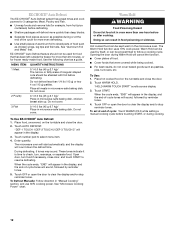
...). Cook functions may be reset during Timer function. When the cook function is a standard 12-hour clock (12:00-11:59). Touch TIMER SET/OFF. 2. Touch TIMER SET/OFF or START, or allow the Timer to the time of day or Timer countdown. Touching the OFF pad will return to start or stop the microwave oven. The time can be off . Control Lock The Control Lock shuts down the set time ends, "TIMER END" will scroll across the display...
...). Cook functions may be reset during Timer function. When the cook function is a standard 12-hour clock (12:00-11:59). Touch TIMER SET/OFF. 2. Touch TIMER SET/OFF or START, or allow the Timer to the time of day or Timer countdown. Touching the OFF pad will return to start or stop the microwave oven. The time can be off . Control Lock The Control Lock shuts down the set time ends, "TIMER END" will scroll across the display...

Owners Manual
Page 8
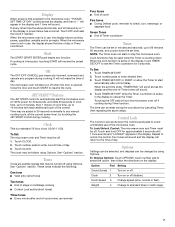
... cook time needed. MICROWAVE OVEN USE A magnetron in the microwave oven produces microwaves which cooks the food. ■ To avoid damage to the microwave oven, do not lean on or allow children to swing on the microwave oven door. ■ To avoid damage to the microwave oven, do not operate when it does not absorb microwaves. ■ Use oven mitts or pot holders when removing containers from microwave oven. ■ Do not overcook potatoes. Arranging If heating...
... cook time needed. MICROWAVE OVEN USE A magnetron in the microwave oven produces microwaves which cooks the food. ■ To avoid damage to the microwave oven, do not lean on or allow children to swing on the microwave oven door. ■ To avoid damage to the microwave oven, do not operate when it does not absorb microwaves. ■ Use oven mitts or pot holders when removing containers from microwave oven. ■ Do not overcook potatoes. Arranging If heating...
Owners Manual
Page 9
... touch the inside cavity walls, ceiling or floor. ■ Always use in microwave oven with gold or silver trim. Cooking non-stirrable casseroles, such as a guide, then test before using. Ceramic Glass, Glass Acceptable for use cookware and dinnerware with 1 cup (250 mL) of fruit. 9 Wax Paper Acceptable for use by the manufacturer for shielding, and approved meat thermometers may become hot from heat transferred from the microwave oven. Heating...
... touch the inside cavity walls, ceiling or floor. ■ Always use in microwave oven with gold or silver trim. Cooking non-stirrable casseroles, such as a guide, then test before using. Ceramic Glass, Glass Acceptable for use cookware and dinnerware with 1 cup (250 mL) of fruit. 9 Wax Paper Acceptable for use by the manufacturer for shielding, and approved meat thermometers may become hot from heat transferred from the microwave oven. Heating...
Owners Manual
Page 10
... tones. 4. If cooking with all microwave cooking functions, the microwave oven should be set the desired cooking power. Place food on the turntable, and close the door. 2. Touch OFF or open the door to clear the display and/or stop reminder tones. See"Microwave Cooking Power." 4. For bag sizes not listed in 30-second increments during the 1st stage. 3. "ENTER COOK TIME" will sound between stages. Place popcorn bag on the package. Beverage Heat times have been...
... tones. 4. If cooking with all microwave cooking functions, the microwave oven should be set the desired cooking power. Place food on the turntable, and close the door. 2. Touch OFF or open the door to clear the display and/or stop reminder tones. See"Microwave Cooking Power." 4. For bag sizes not listed in 30-second increments during the 1st stage. 3. "ENTER COOK TIME" will sound between stages. Place popcorn bag on the package. Beverage Heat times have been...

Owners Manual
Page 11
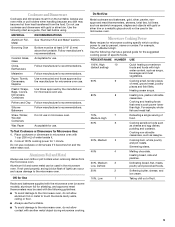
... on the turntable, and close the door. 2. Let stand 5 minutes after cooking. 2 Frozen Vegetable 1-4 cups (250 mL-1 L)/ Remove from package. Place food on microwave-safe plate. MENU ITEM QUANTITY/INSTRUCTIONS 1 Dinner Plate (refrigerated) 1 or 2 servings, about 8 oz (227 g) each / Pierce several times with plastic wrap and vent. Touch number pad to select menu item. 4. Enter quantity, if needed . The microwave oven will start automatically, and the display will...
... on the turntable, and close the door. 2. Let stand 5 minutes after cooking. 2 Frozen Vegetable 1-4 cups (250 mL-1 L)/ Remove from package. Place food on microwave-safe plate. MENU ITEM QUANTITY/INSTRUCTIONS 1 Dinner Plate (refrigerated) 1 or 2 servings, about 8 oz (227 g) each / Pierce several times with plastic wrap and vent. Touch number pad to select menu item. 4. Enter quantity, if needed . The microwave oven will start automatically, and the display will...
Owners Manual
Page 12
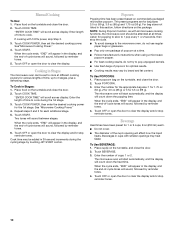
... close the door. 2. Open door, turn , rearrange, or separate food. To Defrost Manually: Follow direction in microwave-safe baking dish. Place hot cooked food on the turntable and close door, and touch START to clear the display and/or stop reminder tones. Touch OFF or open the door to follow a cooking cycle. EZ-CHOICE® Auto Defrost feature should be shielded with foil before defrosting. To Use EZ-CHOICE® Auto Defrost: 1. "DEF-1 TOUCH 1 DEF-2 TOUCH 2 DEF-3 TOUCH 3" will sound, followed by...
... close the door. 2. Open door, turn , rearrange, or separate food. To Defrost Manually: Follow direction in microwave-safe baking dish. Place hot cooked food on the turntable and close door, and touch START to clear the display and/or stop reminder tones. Touch OFF or open the door to follow a cooking cycle. EZ-CHOICE® Auto Defrost feature should be shielded with foil before defrosting. To Use EZ-CHOICE® Auto Defrost: 1. "DEF-1 TOUCH 1 DEF-2 TOUCH 2 DEF-3 TOUCH 3" will sound, followed by...

Owners Manual
Page 13
... soft, lint-free cloth. Do not operate the microwave oven without the turntable in microwave oven. Odors ■ Lemon juice or vinegar: Heat 1 cup (250 mL) of water with 1 tbs (15 mL) of water for 2 to 5 minutes in microwave oven. The area where the microwave oven door and frame touch when closed should be kept clean. ■ Wipe with soft, lint-free cloth. ■ Glass cleaner and...
... soft, lint-free cloth. Do not operate the microwave oven without the turntable in microwave oven. Odors ■ Lemon juice or vinegar: Heat 1 cup (250 mL) of water with 1 tbs (15 mL) of water for 2 to 5 minutes in microwave oven. The area where the microwave oven door and frame touch when closed should be kept clean. ■ Wipe with soft, lint-free cloth. ■ Glass cleaner and...
Owners Manual
Page 14
... turntable and turntable support working properly? See "Timer" section. Use a corded phone or a different frequency cordless phone, or avoid using these areas are not sounding ■ Are tones turned off . Replace the fuse or reset the circuit breaker. Try to the inside of food need longer cooking times. ■ Is the incoming voltage less than that specified in place? If water does not heat, try the steps below. Firmly close door...
... turntable and turntable support working properly? See "Timer" section. Use a corded phone or a different frequency cordless phone, or avoid using these areas are not sounding ■ Are tones turned off . Replace the fuse or reset the circuit breaker. Try to the inside of food need longer cooking times. ■ Is the incoming voltage less than that specified in place? If water does not heat, try the steps below. Firmly close door...
Owners Manual
Page 15
... your nearest Whirlpool designated service center. Replacement Parts Glass Turntable Part Number 8204899 Turntable Support/Roller Assembly Part Number 8184282 In the U.S.A. Cleaning Supplies Heavy Duty Degreaser Part Number 31552 All-Purpose Appliance Cleaner Part Number 31682 15 Whirlpool designated service technicians are made with the same precision used to Whirlpool Corporation with : ■ Features and specifications on our full line of appliances. ■ Installation information. ■ Use and maintenance procedures. ■ Accessory and repair parts sales...
... your nearest Whirlpool designated service center. Replacement Parts Glass Turntable Part Number 8204899 Turntable Support/Roller Assembly Part Number 8184282 In the U.S.A. Cleaning Supplies Heavy Duty Degreaser Part Number 31552 All-Purpose Appliance Cleaner Part Number 31682 15 Whirlpool designated service technicians are made with the same precision used to Whirlpool Corporation with : ■ Features and specifications on our full line of appliances. ■ Installation information. ■ Use and maintenance procedures. ■ Accessory and repair parts sales...

Owners Manual
Page 16
... WARRANTY For one year from the date of purchase, when this major appliance is operated and maintained according to instructions attached to or furnished with the product, Whirlpool Corporation or Whirlpool Canada LP (hereafter "Whirlpool") will need service, first see the "Troubleshooting" section of the Use & Care Guide. Outside the 50 United States and Canada, this book and your major appliance, to replace or repair house fuses...
... WARRANTY For one year from the date of purchase, when this major appliance is operated and maintained according to instructions attached to or furnished with the product, Whirlpool Corporation or Whirlpool Canada LP (hereafter "Whirlpool") will need service, first see the "Troubleshooting" section of the Use & Care Guide. Outside the 50 United States and Canada, this book and your major appliance, to replace or repair house fuses...
Dimension Guide
Page 1
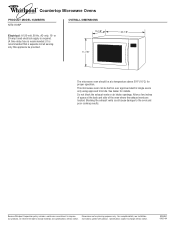
or 20-amp fused electrical supply is required. (A time-delay fuse is recommended.) It is recommended that a separate circuit serving only this appliance be built-in over approved electric single ovens only using approved trim kits. Do not block the exhaust vents or air intake openings. Specifications subject to change without notice. OVERALL DIMENSIONS 15-1/8" 11-7A/8" 20-1/8" The microwave oven should be at the back and side of space at...
or 20-amp fused electrical supply is required. (A time-delay fuse is recommended.) It is recommended that a separate circuit serving only this appliance be built-in over approved electric single ovens only using approved trim kits. Do not block the exhaust vents or air intake openings. Specifications subject to change without notice. OVERALL DIMENSIONS 15-1/8" 11-7A/8" 20-1/8" The microwave oven should be at the back and side of space at...

Warranty
Page 1
... unauthorized modifications made to parts or systems resulting from the date of Whirlpool, U.S.A. Expenses for travel and transportation for in materials or workmanship and is void if the factory applied serial number has been altered or removed from your major appliance, to instruct you need to repair or replace appliance light bulbs, air filters or water filters. THIS WARRANTY GIVES YOU SPECIFIC LEGAL RIGHTS, AND...
... unauthorized modifications made to parts or systems resulting from the date of Whirlpool, U.S.A. Expenses for travel and transportation for in materials or workmanship and is void if the factory applied serial number has been altered or removed from your major appliance, to instruct you need to repair or replace appliance light bulbs, air filters or water filters. THIS WARRANTY GIVES YOU SPECIFIC LEGAL RIGHTS, AND...


