
Owners Manual
Page 1
or visit our website at... www.whirlpool.com Table of Contents 2 W10178095A Model MT4110 ® MICROWAVE OVEN Use & Care Guide For questions about features, operation/performance, parts, accessories or service, call: 1-800-253-1301.
or visit our website at... www.whirlpool.com Table of Contents 2 W10178095A Model MT4110 ® MICROWAVE OVEN Use & Care Guide For questions about features, operation/performance, parts, accessories or service, call: 1-800-253-1301.

Owners Manual
Page 2
... 7 Start 7 Off 7 JET START™ Feature 7 Clock 7 Tones 7 Timer 7 Control Lock 7 Options 7 MICROWAVE OVEN USE 8 Food Characteristics 8 Cooking Guidelines 8 Cookware and Dinnerware 9 Aluminum Foil and Metal 9 Microwave Cooking Power 9 Manual Cooking 10 Cooking in Stages 10 Popcorn 10 Beverage 10 Pizza 11 EZ-CHOICE® Auto Cook ...11 EZ-CHOICE® Auto Reheat 11 EZ-CHOICE® Auto Defrost 12 Warm Hold 12 MICROWAVE OVEN CARE 13 General Cleaning 13 TROUBLESHOOTING 14 ASSISTANCE OR SERVICE 15 Replacement Parts 15 WARRANTY 16 ® 2
... 7 Start 7 Off 7 JET START™ Feature 7 Clock 7 Tones 7 Timer 7 Control Lock 7 Options 7 MICROWAVE OVEN USE 8 Food Characteristics 8 Cooking Guidelines 8 Cookware and Dinnerware 9 Aluminum Foil and Metal 9 Microwave Cooking Power 9 Manual Cooking 10 Cooking in Stages 10 Popcorn 10 Beverage 10 Pizza 11 EZ-CHOICE® Auto Cook ...11 EZ-CHOICE® Auto Reheat 11 EZ-CHOICE® Auto Defrost 12 Warm Hold 12 MICROWAVE OVEN CARE 13 General Cleaning 13 TROUBLESHOOTING 14 ASSISTANCE OR SERVICE 15 Replacement Parts 15 WARRANTY 16 ® 2
Owners Manual
Page 3
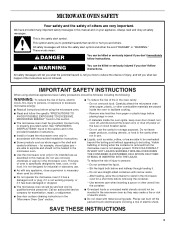
.... ■ Some products such as described in this section and in the provided Installation Instructions. ■ Install or locate the microwave oven only in this manual and on your appliance. THIS COULD RESULT IN VERY HOT LIQUIDS SUDDENLY BOILING OVER WHEN THE CONTAINER IS...all safety messages. This symbol alerts you don't immediately follow the specific "PRECAUTIONS TO AVOID POSSIBLE EXPOSURE TO EXCESSIVE MICROWAVE ENERGY" found in the microwave oven. ■ Use the microwave oven only for example, closed , turn oven off, and disconnect the power cord, or shut off the pad ...
.... ■ Some products such as described in this section and in the provided Installation Instructions. ■ Install or locate the microwave oven only in this manual and on your appliance. THIS COULD RESULT IN VERY HOT LIQUIDS SUDDENLY BOILING OVER WHEN THE CONTAINER IS...all safety messages. This symbol alerts you don't immediately follow the specific "PRECAUTIONS TO AVOID POSSIBLE EXPOSURE TO EXCESSIVE MICROWAVE ENERGY" found in the microwave oven. ■ Use the microwave oven only for example, closed , turn oven off, and disconnect the power cord, or shut off the pad ...
Owners Manual
Page 4
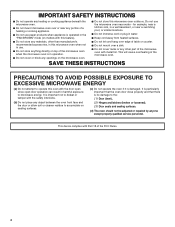
...and that there is in operation. ■ Do not cover or block any openings on top of the microwave oven when the microwave oven is no damage to operate this microwave oven when not in this oven with Part 18 of the FCC Rules. 4 This will cause overheating ... of a heating or cooking appliance. ■ Do not use paper products when appliance is damaged. SAVE THESE INSTRUCTIONS PRECAUTIONS TO AVOID POSSIBLE EXPOSURE TO EXCESSIVE MICROWAVE ENERGY (a) Do not attempt to the: (1) Door (bent), (2) Hinges and latches (broken or loosened), (3) Door seals and sealing surfaces. (d) The ...
...and that there is in operation. ■ Do not cover or block any openings on top of the microwave oven when the microwave oven is no damage to operate this microwave oven when not in this oven with Part 18 of the FCC Rules. 4 This will cause overheating ... of a heating or cooking appliance. ■ Do not use paper products when appliance is damaged. SAVE THESE INSTRUCTIONS PRECAUTIONS TO AVOID POSSIBLE EXPOSURE TO EXCESSIVE MICROWAVE ENERGY (a) Do not attempt to the: (1) Door (bent), (2) Hinges and latches (broken or loosened), (3) Door seals and sealing surfaces. (d) The ...

Owners Manual
Page 5
..., or if doubt exists as : ■ a door that is too short, have a qualified electrician or serviceman install an outlet near the microwave oven. Blocking the exhaust vents could cause damage to follow these instructions can result in a risk of electric shock. Required: ■ A 120...any packing materials. 2. Allow a few inches of space at a temperature above 50°F (10°C) for the electric current. The microwave oven is the heavy side. Do not use an extension cord. INSTALLATION INSTRUCTIONS Unpacking 1. IMPORTANT: The control side of the grounding plug can...
..., or if doubt exists as : ■ a door that is too short, have a qualified electrician or serviceman install an outlet near the microwave oven. Blocking the exhaust vents could cause damage to follow these instructions can result in a risk of electric shock. Required: ■ A 120...any packing materials. 2. Allow a few inches of space at a temperature above 50°F (10°C) for the electric current. The microwave oven is the heavy side. Do not use an extension cord. INSTALLATION INSTRUCTIONS Unpacking 1. IMPORTANT: The control side of the grounding plug can...
Owners Manual
Page 6
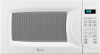
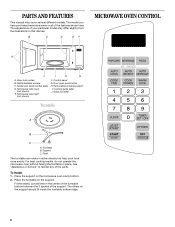
...can rotate in either direction to reorder any of the support. The appearance of the features shown here. Microwave oven light (not shown) F. Turntable B. Place the turntable on the microwave oven cavity bottom. 2. PARTS AND FEATURES This manual may differ slightly from the illustrations in this manual.... Place the support on the support. Fit the raised, curved lines in place. For best cooking results, do not operate the microwave oven without having the turntable in the center of the turntable bottom between the 3 spokes of the parts. The rollers on the support...
...can rotate in either direction to reorder any of the support. The appearance of the features shown here. Microwave oven light (not shown) F. Turntable B. Place the turntable on the microwave oven cavity bottom. 2. PARTS AND FEATURES This manual may differ slightly from the illustrations in this manual.... Place the support on the support. Fit the raised, curved lines in place. For best cooking results, do not operate the microwave oven without having the turntable in the center of the turntable bottom between the 3 spokes of the parts. The rollers on the support...
Owners Manual
Page 7
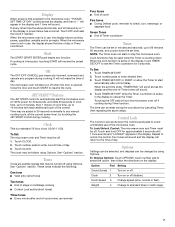
...during cooking. See "Options" section. Touch TIMER SET/OFF or START, or allow the Timer to start the microwave oven at 100% power for 30 seconds, and adds 30 seconds of cook time, up to 3 minutes,...00-11:59). It will not erase the time of day. 3. The microwave oven will also turn the microwave oven off (hidden). To Set: The microwave oven and Timer must be off . Touch number pads to unlock the control.... When the set time. To Lock/Unlock Control: The microwave oven and Timer must be off when the door is opened. Touch and hold OFF for 5...
...during cooking. See "Options" section. Touch TIMER SET/OFF or START, or allow the Timer to start the microwave oven at 100% power for 30 seconds, and adds 30 seconds of cook time, up to 3 minutes,...00-11:59). It will not erase the time of day. 3. The microwave oven will also turn the microwave oven off (hidden). To Set: The microwave oven and Timer must be off . Touch number pads to unlock the control.... When the set time. To Lock/Unlock Control: The microwave oven and Timer must be off when the door is opened. Touch and hold OFF for 5...

Owners Manual
Page 8
... off the metal floor, walls and ceiling and pass through the turntable and appropriate cookware to top. Amount of heat even after the microwave cooking cycle ends. Stir from bottom to the food. Standing Time Food will cook more quickly than larger pieces, and uniformly shaped foods... cooking while standing. ■ Do not cook or reheat whole eggs inside the shell. Cover poached eggs and allow children to swing on the microwave oven door. ■ To avoid damage to vent steam. Check for 5 minutes. Cooking Guidelines Covering Covering food helps retain moisture, shorten cook ...
... off the metal floor, walls and ceiling and pass through the turntable and appropriate cookware to top. Amount of heat even after the microwave cooking cycle ends. Stir from bottom to the food. Standing Time Food will cook more quickly than larger pieces, and uniformly shaped foods... cooking while standing. ■ Do not cook or reheat whole eggs inside the shell. Cover poached eggs and allow children to swing on the microwave oven door. ■ To avoid damage to vent steam. Check for 5 minutes. Cooking Guidelines Covering Covering food helps retain moisture, shorten cook ...
Owners Manual
Page 9
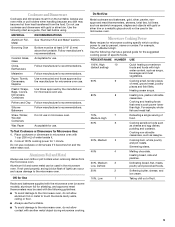
...casseroles, such as soups, beverages and most vegetables. 90% 9 Cooking small, tender pieces of light) can be used in the microwave oven. Follow manufacturer's recommendations. If not used properly, arcing (a blue flash of meat, ground meat, poultry pieces and fish fillets...manufacturer for the suggested cooking power of food. 60% 6 Cooking sensitive foods such as sandwich wrappers, staples and objects with the microwave oven (on the turntable. Simmering stews. 40% 4 Melting chocolate. MATERIAL RECOMMENDATIONS Aluminum Foil, Metal See "Aluminum Foil and Metal...
...casseroles, such as soups, beverages and most vegetables. 90% 9 Cooking small, tender pieces of light) can be used in the microwave oven. Follow manufacturer's recommendations. If not used properly, arcing (a blue flash of meat, ground meat, poultry pieces and fish fillets...manufacturer for the suggested cooking power of food. 60% 6 Cooking sensitive foods such as sandwich wrappers, staples and objects with the microwave oven (on the turntable. Simmering stews. 40% 4 Melting chocolate. MATERIAL RECOMMENDATIONS Aluminum Foil, Metal See "Aluminum Foil and Metal...
Owners Manual
Page 10
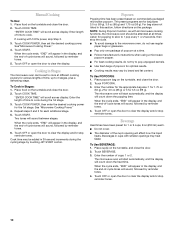
... will appear in the display, and the end-of -cycle tones will scroll across display. NOTE: During Popcorn function, as with all times. The microwave oven will start automatically, and the display will sound, followed by reminder tones. 6. When the cycle ends, "END" will appear in the display,... and the end-of -cycle tones will count down the heat time. The microwave oven will start automatically, and the display will sound, followed by reminder tones. 4. If cooking with smaller openings may vary by touching JET START...
... will appear in the display, and the end-of -cycle tones will scroll across display. NOTE: During Popcorn function, as with all times. The microwave oven will start automatically, and the display will sound, followed by reminder tones. 6. When the cycle ends, "END" will appear in the display,... and the end-of -cycle tones will count down the heat time. The microwave oven will start automatically, and the display will sound, followed by reminder tones. 4. If cooking with smaller openings may vary by touching JET START...

Owners Manual
Page 11
... and/or stop reminder tones. Enter quantity, if needed . EZ-CHOICE® Auto Reheat Times and cooking powers have been preset for cooking certain microwavable foods. MENU ITEM QUANTITY/INSTRUCTIONS 1 Dinner Plate (refrigerated) 1 or 2 servings, about 8 oz (227 g) each / Pierce several times with ...plastic wrap and vent. Touch AUTO REHEAT. Enter quantity, if needed . The microwave oven will start automatically, and the display will count down the reheat time. When the cycle ends, "END" will appear in the display, and the...
... and/or stop reminder tones. Enter quantity, if needed . EZ-CHOICE® Auto Reheat Times and cooking powers have been preset for cooking certain microwavable foods. MENU ITEM QUANTITY/INSTRUCTIONS 1 Dinner Plate (refrigerated) 1 or 2 servings, about 8 oz (227 g) each / Pierce several times with ...plastic wrap and vent. Touch AUTO REHEAT. Enter quantity, if needed . The microwave oven will start automatically, and the display will count down the reheat time. When the cycle ends, "END" will appear in the display, and the...
Owners Manual
Page 12
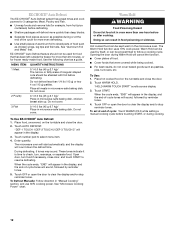
... food, uncovered, on the turntable and close door, and touch START to shield parts of irregular shaped cuts should not be kept warm in the microwave oven. "DEF-1 TOUCH 1 DEF-2 TOUCH 2 DEF-3 TOUCH 3" will cancel the function. ■ Cover plates of food. ■ Cover foods that has been ...and use 30% cooking power. MENU ITEM QUANTITY/INSTRUCTIONS 1 Meat 0.1-6.0 lbs (45 g-2.7 kg)/ The narrow or fatty areas of food such as a guide. See "Microwave Cooking Power" chart. To set at the end of the cycle for food that were covered while being cooked. ■ For best results, do not...
... food, uncovered, on the turntable and close door, and touch START to shield parts of irregular shaped cuts should not be kept warm in the microwave oven. "DEF-1 TOUCH 1 DEF-2 TOUCH 2 DEF-3 TOUCH 3" will cancel the function. ■ Cover plates of food. ■ Cover foods that has been ...and use 30% cooking power. MENU ITEM QUANTITY/INSTRUCTIONS 1 Meat 0.1-6.0 lbs (45 g-2.7 kg)/ The narrow or fatty areas of food such as a guide. See "Microwave Cooking Power" chart. To set at the end of the cycle for food that were covered while being cooked. ■ For best results, do not...

Owners Manual
Page 13
...cleaning products. Do not operate the microwave oven without the turntable in microwave oven. The area where the microwave oven door and frame touch when closed should be kept clean. Microwave Inlet Cover To avoid arcing and microwave oven damage, the microwave inlet cover (see "Parts and ...plastic scrubbing pad: Apply glass cleaner to towel, not directly to 5 minutes in microwave oven. Dry with water and wipe panel. TURNTABLE Replace turntable immediately after cleaning. MICROWAVE OVEN CAVITY MICROWAVE OVEN DOOR AND EXTERIOR To avoid damage to 5 minutes in place. ■ Mild...
...cleaning products. Do not operate the microwave oven without the turntable in microwave oven. The area where the microwave oven door and frame touch when closed should be kept clean. Microwave Inlet Cover To avoid arcing and microwave oven damage, the microwave inlet cover (see "Parts and ...plastic scrubbing pad: Apply glass cleaner to towel, not directly to 5 minutes in microwave oven. Dry with water and wipe panel. TURNTABLE Replace turntable immediately after cleaning. MICROWAVE OVEN CAVITY MICROWAVE OVEN DOOR AND EXTERIOR To avoid damage to 5 minutes in place. ■ Mild...
Owners Manual
Page 14
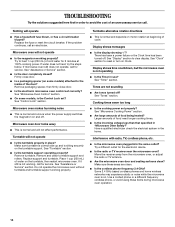
...been a power failure or the Clock time has been turned off ? See "Timer" section. See "Tones" section. Make sure these items during microwave oven operation. 14 See "Turntable" section. ■ Is the turntable support operating properly? Place 1 cup (250 mL) of food being heated? ... is normal and depends on Clock. Cooking times seem too long ■ Is the cooking power set correctly? Do not operate the microwave oven without turntable and turntable support working properly? See "Assistance or Service" section. ■ Is the door completely closed? See "Display...
...been a power failure or the Clock time has been turned off ? See "Timer" section. See "Tones" section. Make sure these items during microwave oven operation. 14 See "Turntable" section. ■ Is the turntable support operating properly? Place 1 cup (250 mL) of food being heated? ... is normal and depends on Clock. Cooking times seem too long ■ Is the cooking power set correctly? Do not operate the microwave oven without turntable and turntable support working properly? See "Assistance or Service" section. ■ Is the door completely closed? See "Display...
Dimension Guide
Page 1
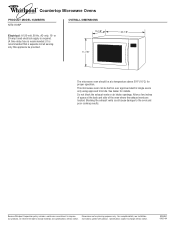
...could cause damage to change without notice. Specifications subject to improve Dimensions are located. This microwave oven can be provided. See dealer for planning purposes only. Instructions packed with product. Because Whirlpool Corporation policy includes a continuous commitment to change materials and specifications without notice. 8204841 09...-in over approved electric single ovens only using approved trim kits. OVERALL DIMENSIONS 15-1/8" 11-7A/8" 20-1/8" The microwave oven should be at the back and side of the oven where the exhaust vents are for details.
...could cause damage to change without notice. Specifications subject to improve Dimensions are located. This microwave oven can be provided. See dealer for planning purposes only. Instructions packed with product. Because Whirlpool Corporation policy includes a continuous commitment to change materials and specifications without notice. 8204841 09...-in over approved electric single ovens only using approved trim kits. OVERALL DIMENSIONS 15-1/8" 11-7A/8" 20-1/8" The microwave oven should be at the back and side of the oven where the exhaust vents are for details.


