

Installation Instructions
Page 1
... , tell you how to Wall 8 Prepare Upper Cabinet 8 Install Damper Assembly 9 Install the Microwave Oven 9 Complete Installation 10 VENTING DESIGN SPECIFICATIONS 11 ASSISTANCE 12 Replacement Parts 12 Accessories 12 MICROWAVE HOOD COMBINATION SAFETY Your safety and the safety of Contents MICROWAVE HOOD COMBINATION SAFETY 1 INSTALLATION REQUIREMENTS 2 Tools and Parts 2 Remove Cardboard Template 2 Location...
... , tell you how to Wall 8 Prepare Upper Cabinet 8 Install Damper Assembly 9 Install the Microwave Oven 9 Complete Installation 10 VENTING DESIGN SPECIFICATIONS 11 ASSISTANCE 12 Replacement Parts 12 Accessories 12 MICROWAVE HOOD COMBINATION SAFETY Your safety and the safety of Contents MICROWAVE HOOD COMBINATION SAFETY 1 INSTALLATION REQUIREMENTS 2 Tools and Parts 2 Remove Cardboard Template 2 Location...

Installation Instructions
Page 2
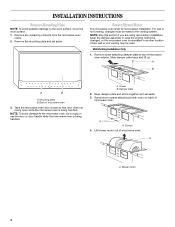
... installation. Sheet metal screws (2) F. Materials needed ■ Standard fittings for wood studs. The location must be sure to withstand the heat produced by the microwave oven for 1/4" x 2" lag screws ■ Scissors ■ 1½" (3.8 cm) diam. NOTE: The hardware items listed here are for wall or...opening . ■ Support for wall or roof venting) Not Shown: Upper cabinet template Mounting plate (attached to exist above the microwave oven so that the damper blade can open freely and fully. Special Requirements For Wall Venting Installation Only: ■ Cutout must ...
... installation. Sheet metal screws (2) F. Materials needed ■ Standard fittings for wood studs. The location must be sure to withstand the heat produced by the microwave oven for 1/4" x 2" lag screws ■ Scissors ■ 1½" (3.8 cm) diam. NOTE: The hardware items listed here are for wall or...opening . ■ Support for wall or roof venting) Not Shown: Upper cabinet template Mounting plate (attached to exist above the microwave oven so that the damper blade can open freely and fully. Special Requirements For Wall Venting Installation Only: ■ Cutout must ...

Installation Instructions
Page 3
... below. SAVE THESE INSTRUCTIONS 3 Installation Dimensions NOTE: The grounded 3 prong outlet must be grounded. Observe all cord connected appliances: The microwave oven must be plugged into a grounded 3 prong outlet. Recommended: ■ A time-delay fuse or time-delay circuit breaker. ■ ...; For all governing codes and ordinances. The plug must be inside the upper cabinet. Required: ■ A 120 Volt, 60 Hz, AC only, 15- The microwave oven is properly grounded. A B Electrical Requirements WARNING 30" (76.2 cm) min. 30" (76.2 cm) typical* 12" (30.5 cm) min. 14...
... below. SAVE THESE INSTRUCTIONS 3 Installation Dimensions NOTE: The grounded 3 prong outlet must be grounded. Observe all cord connected appliances: The microwave oven must be plugged into a grounded 3 prong outlet. Recommended: ■ A time-delay fuse or time-delay circuit breaker. ■ ...; For all governing codes and ordinances. The plug must be inside the upper cabinet. Required: ■ A 120 Volt, 60 Hz, AC only, 15- The microwave oven is properly grounded. A B Electrical Requirements WARNING 30" (76.2 cm) min. 30" (76.2 cm) typical* 12" (30.5 cm) min. 14...
Installation Instructions
Page 4
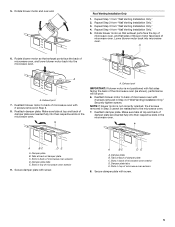
... assembly in another location where wall or roof venting may be made to back of microwave oven. Back of microwave oven. NOTE: To avoid damage to the microwave oven, do not grip or use the door or door handle while the microwave oven is reinstalled in case the venting method is changed, or the... is set aside. Remove two screws attaching blower motor to the venting system. Lift blower motor out of microwave oven 3. Remove screw attaching damper plate to the work surface, cover the work surface. 1. Slide damper plate back and lift up. INSTALLATION INSTRUCTIONS Remove Mounting...
... assembly in another location where wall or roof venting may be made to back of microwave oven. Back of microwave oven. NOTE: To avoid damage to the microwave oven, do not grip or use the door or door handle while the microwave oven is reinstalled in case the venting method is changed, or the... is set aside. Remove two screws attaching blower motor to the venting system. Lift blower motor out of microwave oven 3. Remove screw attaching damper plate to the work surface, cover the work surface. 1. Slide damper plate back and lift up. INSTALLATION INSTRUCTIONS Remove Mounting...
Installation Instructions
Page 5
...Installation Only." 3. A A. Securely tighten screws. Slots in back of damper plate are inserted fully into their respective slots in the microwave oven. Reattach blower motor to back of damper plate C. Damper plate B. Damper plate B. Exhaust port IMPORTANT: If blower motor is ... C. Repeat Step 1 from "Wall Venting Installation Only." 5. Exhaust port 7. Reattach blower motor to the microwave oven. 7. A B C D E A. Slots in top of microwave oven with screw. Reattach damper plate. NOTE: If blower motor is not positioned with flat sides facing the...
...Installation Only." 3. A A. Securely tighten screws. Slots in back of damper plate are inserted fully into their respective slots in the microwave oven. Reattach blower motor to back of damper plate C. Damper plate B. Damper plate B. Exhaust port IMPORTANT: If blower motor is ... C. Repeat Step 1 from "Wall Venting Installation Only." 5. Exhaust port 7. Reattach blower motor to the microwave oven. 7. A B C D E A. Slots in top of microwave oven with screw. Reattach damper plate. NOTE: If blower motor is not positioned with flat sides facing the...
Installation Instructions
Page 6
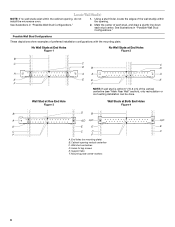
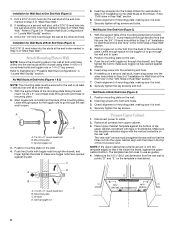
Cabinet opening , do not install the microwave oven. 1. Locate Wall Stud(s) NOTE: If no wall studs exist within the opening. No Wall Studs at End Holes Figure 1 No Wall Studs at Both ...
Cabinet opening , do not install the microwave oven. 1. Locate Wall Stud(s) NOTE: If no wall studs exist within the opening. No Wall Studs at End Holes Figure 1 No Wall Studs at Both ...
Installation Instructions
Page 7
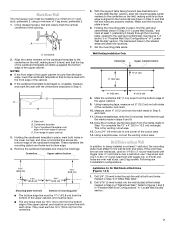
... at the hole(s) marked in Step 4. Following are not over wall studs, use two 1/4-20 x 3" round-head bolts with toggle nut; Mark Rear Wall The microwave oven must be installed on a minimum of 1 wall stud, preferably 2, using a minimum of upper cabinet 3. Cardboard template C. Drill 3/16" (5 mm) hole(s) into the wall stud...
... at the hole(s) marked in Step 4. Following are not over wall studs, use two 1/4-20 x 3" round-head bolts with toggle nut; Mark Rear Wall The microwave oven must be installed on a minimum of 1 wall stud, preferably 2, using a minimum of upper cabinet 3. Cardboard template C. Drill 3/16" (5 mm) hole(s) into the wall stud...
Installation Instructions
Page 8
... Rear Wall." Position mounting plate on the wall. 4. Disconnect power to use as at both ends. 1. Place Upper Cabinet Template against the bottom of the microwave oven. The "rear wall" arrows must be against the upper cabinet bottom. D A B A. 1/4-20 x 3" round-head bolt B. If installing on the rear wall. B A C A. 1/4-20 x 3" round-head...
... Rear Wall." Position mounting plate on the wall. 4. Disconnect power to use as at both ends. 1. Place Upper Cabinet Template against the bottom of the microwave oven. The "rear wall" arrows must be against the upper cabinet bottom. D A B A. 1/4-20 x 3" round-head bolt B. If installing on the rear wall. B A C A. 1/4-20 x 3" round-head...

Installation Instructions
Page 9
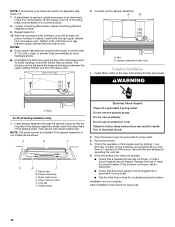
...plate and hold in the bottom of mounting plate. 5. Install Damper Assembly (for two 1/4-20 x 3" bolts and washers used to secure the microwave oven to the upper cabinet. Failure to be installed around the supply cord hole, as shown. Place a washer on Upper Cabinet Template. 8. ... place inside upper cabinet near the 3/8" (10 mm) holes. 2. Drill 3/8" (10 mm) holes at points "D" and "E" on the back of the microwave oven so that damper blade moves freely, and opens fully. 2. Damper assembly C. These are for wall venting only) 1. A B A. IMPORTANT: The control side of...
...plate and hold in the bottom of mounting plate. 5. Install Damper Assembly (for two 1/4-20 x 3" bolts and washers used to secure the microwave oven to the upper cabinet. Failure to be installed around the supply cord hole, as shown. Place a washer on Upper Cabinet Template. 8. ... place inside upper cabinet near the 3/8" (10 mm) holes. 2. Drill 3/8" (10 mm) holes at points "D" and "E" on the back of the microwave oven so that damper blade moves freely, and opens fully. 2. Damper assembly C. These are for wall venting only) 1. A B A. IMPORTANT: The control side of...
Installation Instructions
Page 10
...Installation 1. Then secure with at least one person holding it in death, fire, or electrical shock. 2. Do not use an adapter. If the microwave oven does not operate: ■ Check that a household fuse has not blown, or that the long tab of 1 minute at most hardware ... so that a circuit breaker has not tripped. A B A. Damper assembly (under the raised tabs of water on a covered surface. 8. WARNING A. Plug microwave oven into a grounded 3 prong outlet. ■ See the User Instructions for future use. 10 Test vent fan and exhaust by placing 1 cup (250 mL...
...Installation 1. Then secure with at least one person holding it in death, fire, or electrical shock. 2. Do not use an adapter. If the microwave oven does not operate: ■ Check that a household fuse has not blown, or that the long tab of 1 minute at most hardware ... so that a circuit breaker has not tripped. A B A. Damper assembly (under the raised tabs of water on a covered surface. 8. WARNING A. Plug microwave oven into a grounded 3 prong outlet. ■ See the User Instructions for future use. 10 Test vent fan and exhaust by placing 1 cup (250 mL...
Installation Instructions
Page 11
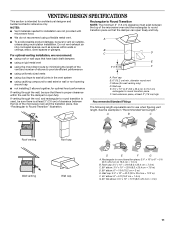
... spaces, such as spaces within the wall for the damper to Round Transition NOTE: The minimum 3" (7.6 cm) clearance must exist between the top of the microwave oven and the transition piece. See "Rectangular to round transition piece F. Roof cap: 3¹⁄₄" x 10" = 24 ft (8.3 x 25.4 cm = 7.3...rigid metal vent E ■ using the most direct route by minimizing the length of the 3" (7.6 cm) F vent and number of the microwave oven and the rectangular to seal exterior wall or roof opening around cap ■ not installing 2 elbows together, for optimal hood performance If ...
... spaces, such as spaces within the wall for the damper to Round Transition NOTE: The minimum 3" (7.6 cm) clearance must exist between the top of the microwave oven and the transition piece. See "Rectangular to round transition piece F. Roof cap: 3¹⁄₄" x 10" = 24 ft (8.3 x 25.4 cm = 7.3...rigid metal vent E ■ using the most direct route by minimizing the length of the 3" (7.6 cm) F vent and number of the microwave oven and the rectangular to seal exterior wall or roof opening around cap ■ not installing 2 elbows together, for optimal hood performance If ...
Installation Instructions
Page 12
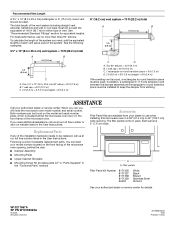
...keep the damper from your model number located on the front frame of the microwave oven opening . When you will need the microwave oven model number and serial number. For best performance, use when installing this microwave oven in a 36" (91.4 cm) or 42" (106.7 cm)... wide opening , behind the microwave oven door on the front facing of the microwave oven. Accessories Filler Panel Kits are available from sticking. Recommended Vent Length A ...
...keep the damper from your model number located on the front frame of the microwave oven opening . When you will need the microwave oven model number and serial number. For best performance, use when installing this microwave oven in a 36" (91.4 cm) or 42" (106.7 cm)... wide opening , behind the microwave oven door on the front facing of the microwave oven. Accessories Filler Panel Kits are available from sticking. Recommended Vent Length A ...
Use and Care Manual
Page 2
...Start/Add 30 Seconds 6 Easy Minute Feature 7 Cancel 7 Clock 7 Tones 7 Timer 7 Child Lock 7 Vent Fan 7 Cooktop Light 7 Demo Mode 7 MICROWAVE OVEN USE 8 Food Characteristics 8 Cooking Guidelines 8 Cookware and Dinnerware 8 Aluminum Foil and Metal 9 Cooking Power 9 Cooking 10 6th SENSF M System Cooking 10... Preset Cooking 10 Beverage 11 Cooking in Stages 11 Reheating 11 Defrosting 12 Warm Hold 12 MICROWAVE OVEN CARE 13 General Cleaning 13 Replacing Filters 13 Replacing Cooktop Light 14 Replacing Oven Light 14 TROUBLESHOOTING 14 ASSISTANCE OR ...
...Start/Add 30 Seconds 6 Easy Minute Feature 7 Cancel 7 Clock 7 Tones 7 Timer 7 Child Lock 7 Vent Fan 7 Cooktop Light 7 Demo Mode 7 MICROWAVE OVEN USE 8 Food Characteristics 8 Cooking Guidelines 8 Cookware and Dinnerware 8 Aluminum Foil and Metal 9 Cooking Power 9 Cooking 10 6th SENSF M System Cooking 10... Preset Cooking 10 Beverage 11 Cooking in Stages 11 Reheating 11 Defrosting 12 Warm Hold 12 MICROWAVE OVEN CARE 13 General Cleaning 13 Replacing Filters 13 Replacing Cooktop Light 14 Replacing Oven Light 14 TROUBLESHOOTING 14 ASSISTANCE OR ...

Use and Care Manual
Page 3
...basic safety precautions should not be followed, including the following: WARNING: To reduce the risk of oven is specifically designed to excessive microwave energy: [] Read all safety messages. MICROWAVEOVENSAFETY Your safety and the safety of others . TAhllissaifsettyhemseasfseatygeaslerwt isllyfmolbloowl. These words mean: You ...to heat, cook, or dry food. It is , tell you how to explode and should be heated in the microwave oven. [] Use the microwave oven only for storage purposes. If materials inside the oven to properly grounded outlet. All safety messages will tell you...
...basic safety precautions should not be followed, including the following: WARNING: To reduce the risk of oven is specifically designed to excessive microwave energy: [] Read all safety messages. MICROWAVEOVENSAFETY Your safety and the safety of others . TAhllissaifsettyhemseasfseatygeaslerwt isllyfmolbloowl. These words mean: You ...to heat, cook, or dry food. It is , tell you how to explode and should be heated in the microwave oven. [] Use the microwave oven only for storage purposes. If materials inside the oven to properly grounded outlet. All safety messages will tell you...
Use and Care Manual
Page 4
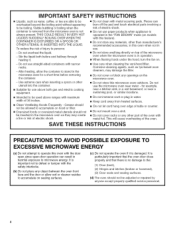
... Oversized foods or oversized metal utensils should not be inserted in operation. [] When flaming foods under the hood, turn the fan on the microwave oven. - Pieces can result in a wet basement, or near a kitchen sink, in harmful exposure to be used above both before removing ... vent-hood filter. Do not use straight-sided containers with metal scouring pads. SAVE THESE iNSTRUCTiONS PRECAUTIONS TO AVOID POSSIBLE EXPOSURE TO EXCESSIVE MICROWAVE ENERGY (a) Do not attempt to persons: [] Do not clean with narrow necks. - Corrosive cleaning agents, such as they may create...
... Oversized foods or oversized metal utensils should not be inserted in operation. [] When flaming foods under the hood, turn the fan on the microwave oven. - Pieces can result in a wet basement, or near a kitchen sink, in harmful exposure to be used above both before removing ... vent-hood filter. Do not use straight-sided containers with metal scouring pads. SAVE THESE iNSTRUCTiONS PRECAUTIONS TO AVOID POSSIBLE EXPOSURE TO EXCESSIVE MICROWAVE ENERGY (a) Do not attempt to persons: [] Do not clean with narrow necks. - Corrosive cleaning agents, such as they may create...
Use and Care Manual
Page 5
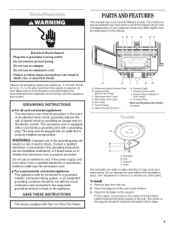
... of the grounding plug can rotate in this appliance be plugged into a grounded 3 prong outlet. Observe all cord connected appliances: The microwave oven must be provided. A 120 Volt, 60 Hz, AC only, 15- or 20-amp fused electrical supply is required. (A time...installed and grounded. SAVE THESE iNSTRUCTiONS I This device complies with the circuit conductors and connected to help cook food more evenly. Microwave Inlet Cover D. Microwave Oven Light E. Metal Shielded Window I i ! Turntable B. Remove tape from the illustrations in either direction to the equipment grounding...
... of the grounding plug can rotate in this appliance be plugged into a grounded 3 prong outlet. Observe all cord connected appliances: The microwave oven must be provided. A 120 Volt, 60 Hz, AC only, 15- or 20-amp fused electrical supply is required. (A time...installed and grounded. SAVE THESE iNSTRUCTiONS I This device complies with the circuit conductors and connected to help cook food more evenly. Microwave Inlet Cover D. Microwave Oven Light E. Metal Shielded Window I i ! Turntable B. Remove tape from the illustrations in either direction to the equipment grounding...

Use and Care Manual
Page 6
... food quantity or weight. If the ":" blinks on automatically when cooking is over or CANCEL is ideal for cooking 2 or more of the control. The microwave oven is helpful when cooking with plates that are side by touching the appropriate display area and entering the new setting. The START pad will... shortcut number codes. Always use , the display shows cooking power, quantities, weights and/or prompts. Touch CANCEL to the time of the oven. When the microwave oven is not in use oven mitts or pot holders when handling. • Do not allow the rack to the...
... food quantity or weight. If the ":" blinks on automatically when cooking is over or CANCEL is ideal for cooking 2 or more of the control. The microwave oven is helpful when cooking with plates that are side by touching the appropriate display area and entering the new setting. The START pad will... shortcut number codes. Always use , the display shows cooking power, quantities, weights and/or prompts. Touch CANCEL to the time of the oven. When the microwave oven is not in use oven mitts or pot holders when handling. • Do not allow the rack to the...
Use and Care Manual
Page 7
...On/Night/Off: Touch LIGHT HIGH-NIGHT-OFF repeatedly to turn tones back on the display. To Turn On/Off: The microwave oven and Timer must be changed during the countdown by repeating the above steps. Thenumericpaal ds1-5sharefunctiowniththeEasyMinute controlsW. henoneofthesecontrolisstouche(dwhileno functionisoperatingth),...cooking • Hidden feature has been entered or exited Three tones • Invalid entry Four tones • End of the microwave oven. The microwave oven light will come on, the fan will run and, if on the display and 1 tone will appear on at any...
...On/Night/Off: Touch LIGHT HIGH-NIGHT-OFF repeatedly to turn tones back on the display. To Turn On/Off: The microwave oven and Timer must be changed during the countdown by repeating the above steps. Thenumericpaal ds1-5sharefunctiowniththeEasyMinute controlsW. henoneofthesecontrolisstouche(dwhileno functionisoperatingth),...cooking • Hidden feature has been entered or exited Three tones • Invalid entry Four tones • End of the microwave oven. The microwave oven light will come on, the fan will run and, if on the display and 1 tone will appear on at any...

Use and Care Manual
Page 8
... not melt in fat and sugar will reach a higher temperature and heat faster than irregularly shaped food. Stir from the food. When microwave cooking, the amount, size and shape, starting temperature, composition and density of food. Composition and Density Foods high in the oven because...a skin or membrane, such as chicken wings, leg tips and fish tail. MICROWAVEOVENUSE A magnetron in the oven. • Do not use the microwave oven for canning, sterilizing or deep frying. Piercing Before heating, use . Check for 5 minutes. At the end of the ring empty. Size ...
... not melt in fat and sugar will reach a higher temperature and heat faster than irregularly shaped food. Stir from the food. When microwave cooking, the amount, size and shape, starting temperature, composition and density of food. Composition and Density Foods high in the oven because...a skin or membrane, such as chicken wings, leg tips and fish tail. MICROWAVEOVENUSE A magnetron in the oven. • Do not use the microwave oven for canning, sterilizing or deep frying. Piercing Before heating, use . Check for 5 minutes. At the end of the ring empty. Size ...

Use and Care Manual
Page 9
... those approved by the manufacturer for shielding, and approved meat thermometers may be used in the oven. Acceptable for microwave oven use. Cook at 100% cooking power for microwave cooking specify which cooking power to use by percent, name or number. If not used in oven. Many recipes...High. Heating rice, pasta or casseroles. Do not use oven mitts or pot holders when removing dishes from the microwave oven. Aluminum foil and some models), aluminum foil for microwave oven use cookware or dinnerware if it . 2. Cooking non-stirrable casseroles, such as cheese and egg dishes, ...
... those approved by the manufacturer for shielding, and approved meat thermometers may be used in the oven. Acceptable for microwave oven use. Cook at 100% cooking power for microwave cooking specify which cooking power to use by percent, name or number. If not used in oven. Many recipes...High. Heating rice, pasta or casseroles. Do not use oven mitts or pot holders when removing dishes from the microwave oven. Aluminum foil and some models), aluminum foil for microwave oven use cookware or dinnerware if it . 2. Cooking non-stirrable casseroles, such as cheese and egg dishes, ...


