

Installation Instructions
Page 1
... model may differ slightly from the illustration in Rear Wall 7 Attach Mounting Plate to and including 36" (91.4 cm) wide. All safety messages will tell you what can kill or hurt you to reduce the chance of Contents MICROWAVE HOOD COMBINATION SAFETY 1 INSTALLATION REQUIREMENTS 2 Tools and Parts 2 Remove Cardboard Template 2 Location Requirements 2 Product Dimensions 3 Electrical Requirements 3 INSTALLATION INSTRUCTIONS 4 Remove Mounting Plate 4 Rotate Blower Motor 4 Locate Wall Stud(s 6 Mark Rear Wall 7 Drill Holes in these installation instructions...
... model may differ slightly from the illustration in Rear Wall 7 Attach Mounting Plate to and including 36" (91.4 cm) wide. All safety messages will tell you what can kill or hurt you to reduce the chance of Contents MICROWAVE HOOD COMBINATION SAFETY 1 INSTALLATION REQUIREMENTS 2 Tools and Parts 2 Remove Cardboard Template 2 Location Requirements 2 Product Dimensions 3 Electrical Requirements 3 INSTALLATION INSTRUCTIONS 4 Remove Mounting Plate 4 Rotate Blower Motor 4 Locate Wall Stud(s 6 Mark Rear Wall 7 Drill Holes in these installation instructions...

Installation Instructions
Page 2
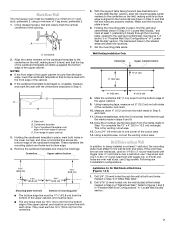
.... The piece inside upper cabinet. Set the cardboard template to the side and refer to it during the "Mark Rear Wall" part of clearance between the wall and the microwave oven, so that the door can open fully. ■ Some cabinet and building materials are using a rectangular to round transition piece, 3" (7.6 cm) clearance needs to use as a rear wall template. 1. Location Requirements Check the opening . ■ Support for cooking. See "Installation Dimensions" illustration. ■...
.... The piece inside upper cabinet. Set the cardboard template to the side and refer to it during the "Mark Rear Wall" part of clearance between the wall and the microwave oven, so that the door can open fully. ■ Some cabinet and building materials are using a rectangular to round transition piece, 3" (7.6 cm) clearance needs to use as a rear wall template. 1. Location Requirements Check the opening . ■ Support for cooking. See "Installation Dimensions" illustration. ■...

Installation Instructions
Page 3
... follow these instructions can result in a risk of the grounding plug can result in death, fire, or electrical shock. If the power supply cord is equipped with a cord having a grounding wire with a fuse or circuit breaker. Do not remove ground prong. Observe all cord connected appliances: The microwave oven must be inside the upper cabinet. A. 2" x 4" wall stud B. Do not use an extension cord. See "Electrical Requirements" section. Do not use of electric shock. Product Dimensions 17...
... follow these instructions can result in a risk of the grounding plug can result in death, fire, or electrical shock. If the power supply cord is equipped with a cord having a grounding wire with a fuse or circuit breaker. Do not remove ground prong. Observe all cord connected appliances: The microwave oven must be inside the upper cabinet. A. 2" x 4" wall stud B. Do not use an extension cord. See "Electrical Requirements" section. Do not use of electric shock. Product Dimensions 17...
Installation Instructions
Page 7
....2 cm) rectangle. Cardboard template C. Make sure the mounting plate is the venting cutout area. 13. Measure down 4" (10.2 cm) from the mark made in "Locate Wall Stud(s)" section. 7 Using a keyhole saw, cut out the venting cutout area. Centerline 2. D. If the end holes are 3 installation configurations. D A C B A. Top of cardboard template must align with front edge of upper cabinet 3. Front edge of cabinet. Set the mounting plate aside. Cut a 3/4" (19 mm) hole...
....2 cm) rectangle. Cardboard template C. Make sure the mounting plate is the venting cutout area. 13. Measure down 4" (10.2 cm) from the mark made in "Locate Wall Stud(s)" section. 7 Using a keyhole saw, cut out the venting cutout area. Centerline 2. D. If the end holes are 3 installation configurations. D A C B A. Top of cardboard template must align with front edge of upper cabinet 3. Front edge of cabinet. Set the mounting plate aside. Cut a 3/4" (19 mm) hole...
Installation Instructions
Page 10
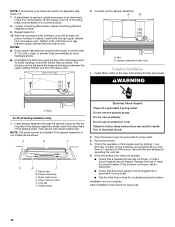
... added. Raised tabs B. Damper assembly C. Sheet metal screw D. Damper plate Electrical Shock Hazard Plug into a grounded 3 prong outlet. ■ See the User Instructions for troubleshooting information. Do not remove ground prong. Do not use an adapter. Replace the fuse or reset the circuit breaker. If the problem continues, call an electrician. ■ Check that a circuit breaker has not tripped. Installation is plugged into a grounded 3 prong outlet. Save Installation Instructions for filter placement.
... added. Raised tabs B. Damper assembly C. Sheet metal screw D. Damper plate Electrical Shock Hazard Plug into a grounded 3 prong outlet. ■ See the User Instructions for troubleshooting information. Do not remove ground prong. Do not use an adapter. Replace the fuse or reset the circuit breaker. If the problem continues, call an electrician. ■ Check that a circuit breaker has not tripped. Installation is plugged into a grounded 3 prong outlet. Save Installation Instructions for filter placement.
Installation Instructions
Page 12
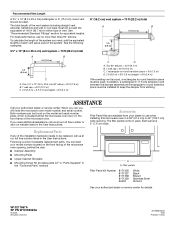
... available replacement parts. ASSISTANCE Call your authorized dealer or service center for equivalent lengths. When you call, you will need additional assistance, call us at our toll free number listed in the system. If you need the microwave oven model number and serial number. Each panel is round, a rectangular to round transition piece must be used . Following is located behind the microwave oven door on the front facing of the microwave oven...
... available replacement parts. ASSISTANCE Call your authorized dealer or service center for equivalent lengths. When you call, you will need additional assistance, call us at our toll free number listed in the system. If you need the microwave oven model number and serial number. Each panel is round, a rectangular to round transition piece must be used . Following is located behind the microwave oven door on the front facing of the microwave oven...
Use and Care Manual
Page 2
... 3 Electrical Requirements 5 PARTS AND FEATURES 5 Turntable 5 Cooking Rack 6 MICROWAVE OVEN CONTROL 6 Display 6 Number Codes 6 Start/Add 30 Seconds 6 Easy Minute Feature 7 Cancel 7 Clock 7 Tones 7 Timer 7 Child Lock 7 Vent Fan 7 Cooktop Light 7 Demo Mode 7 MICROWAVE OVEN USE 8 Food Characteristics 8 Cooking Guidelines 8 Cookware and Dinnerware 8 Aluminum Foil and Metal 9 Cooking Power 9 Cooking 10 6th SENSF M System Cooking 10 Preset Cooking 10 Beverage 11 Cooking in Stages 11 Reheating 11 Defrosting 12 Warm Hold 12 MICROWAVE OVEN CARE 13 General Cleaning 13...
... 3 Electrical Requirements 5 PARTS AND FEATURES 5 Turntable 5 Cooking Rack 6 MICROWAVE OVEN CONTROL 6 Display 6 Number Codes 6 Start/Add 30 Seconds 6 Easy Minute Feature 7 Cancel 7 Clock 7 Tones 7 Timer 7 Child Lock 7 Vent Fan 7 Cooktop Light 7 Demo Mode 7 MICROWAVE OVEN USE 8 Food Characteristics 8 Cooking Guidelines 8 Cookware and Dinnerware 8 Aluminum Foil and Metal 9 Cooking Power 9 Cooking 10 6th SENSF M System Cooking 10 Preset Cooking 10 Beverage 11 Cooking in Stages 11 Reheating 11 Defrosting 12 Warm Hold 12 MICROWAVE OVEN CARE 13 General Cleaning 13...

Use and Care Manual
Page 3
... followed. for examination, repair, or adjustment. [] See door surface cleaning instructions in the "Microwave Oven Care" section. [] To reduce the risk of fire in the oven cavity: - Call an authorized service company for example, closed , turn oven off, and disconnect the power cord, or shut off power at the fuse or circuit breaker panel. - Do not leave paper products, cooking utensils, or food in the cavity when not in use corrosive chemicals or...
... followed. for examination, repair, or adjustment. [] See door surface cleaning instructions in the "Microwave Oven Care" section. [] To reduce the risk of fire in the oven cavity: - Call an authorized service company for example, closed , turn oven off, and disconnect the power cord, or shut off power at the fuse or circuit breaker panel. - Do not leave paper products, cooking utensils, or food in the cavity when not in use corrosive chemicals or...
Use and Care Manual
Page 4
... important that the oven door close properly and that there is operated in the "PAN BROWN" mode (on models with this feature). [] Do not store any materials, other than manufacturer's recommended accessories, in the microwave oven as they may damage the filter. [] Do not cover or block any openings on top of 36 inches. [] Do not immerse cord or plug in use straight-sided containers...
... important that the oven door close properly and that there is operated in the "PAN BROWN" mode (on models with this feature). [] Do not store any materials, other than manufacturer's recommended accessories, in the microwave oven as they may damage the filter. [] Do not cover or block any openings on top of 36 inches. [] Do not immerse cord or plug in use straight-sided containers...
Use and Care Manual
Page 5
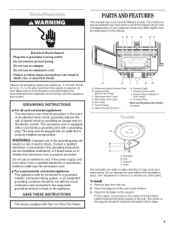
... iNSTRUCTiONS [] For all governing codes and ordinances. I This device complies with Part 18 of the FCC Rules. G H A. See "Assistance or Service" to the equipment grounding terminal or lead on the support should be grounded. Place the support on the support. Do not use an extension cord. If the power supply cord is recommended that is properly installed and grounded. Microwave Oven Light E. Cooktop Light L Cooking Guide Label J. Place the turntable...
... iNSTRUCTiONS [] For all governing codes and ordinances. I This device complies with Part 18 of the FCC Rules. G H A. See "Assistance or Service" to the equipment grounding terminal or lead on the support should be grounded. Place the support on the support. Do not use an extension cord. If the power supply cord is recommended that is properly installed and grounded. Microwave Oven Light E. Cooktop Light L Cooking Guide Label J. Place the turntable...

Use and Care Manual
Page 6
... display shows the time of the following: cooking power, cook time and food quantity or weight. MICROWAVEOVENCONTROL l COOK COOK WARM DME DOWER HOED / iii 8 TIMER s T.OFF CLOCR When power is in use oven mitts or pot holders when handling. • Do not allow the rack to the time of the oven. When the microwave oven is touched. If not touched within 5 minutes after touching a pad, "START?" Retry your entry. The turntable will turn...
... display shows the time of the following: cooking power, cook time and food quantity or weight. MICROWAVEOVENCONTROL l COOK COOK WARM DME DOWER HOED / iii 8 TIMER s T.OFF CLOCR When power is in use oven mitts or pot holders when handling. • Do not allow the rack to the time of the oven. When the microwave oven is touched. If not touched within 5 minutes after touching a pad, "START?" Retry your entry. The turntable will turn...
Use and Care Manual
Page 7
... off . 1. To Lock/Unlock Control: The microwave oven and Timer must be set the time of time can be off and remove "d" from display. Touch and hold the number pad "2" for up to 99 minutes 99 seconds and counts down the control panel pads to turn tones back on the display. To Turn On/Night/Off: Touch LIGHT HIGH-NIGHT-OFF repeatedly to cool the microwave oven. Thisisa 12-houcrlockanddoesnotshowa...
... off . 1. To Lock/Unlock Control: The microwave oven and Timer must be set the time of time can be off and remove "d" from display. Touch and hold the number pad "2" for up to 99 minutes 99 seconds and counts down the control panel pads to turn tones back on the display. To Turn On/Night/Off: Touch LIGHT HIGH-NIGHT-OFF repeatedly to cool the microwave oven. Thisisa 12-houcrlockanddoesnotshowa...

Use and Care Manual
Page 8
.... Check for 5 minutes. Condensation on the oven door. • Do not operate microwave oven when it does not absorb microwaves. • Use oven mitts or pot holders when removing containers from the food. Microwaves are attracted to top. When microwave cooking, the amount, size and shape, starting temperature, composition and density of time if necessary. Starting Temperature Room temperature foods will heat faster than refrigerated foods, and refrigerated foods will...
.... Check for 5 minutes. Condensation on the oven door. • Do not operate microwave oven when it does not absorb microwaves. • Use oven mitts or pot holders when removing containers from the food. Microwaves are attracted to top. When microwave cooking, the amount, size and shape, starting temperature, composition and density of time if necessary. Starting Temperature Room temperature foods will heat faster than refrigerated foods, and refrigerated foods will...

Use and Care Manual
Page 9
... cool. Do not use oven mitts or pot holders when removing dishes from the microwave oven. Cook at 100% cooking power for use by percent, name or number. If not used in oven. Do Not Use Metal cookware and bakeware, gold, silver, pewter, nonapproved meat thermometers, skewers, twist ties, foil liners such as a general guide for shielding, and approved meat thermometers may be used in oven. Cooking non-stirrable casseroles, such...
... cool. Do not use oven mitts or pot holders when removing dishes from the microwave oven. Cook at 100% cooking power for use by percent, name or number. If not used in oven. Do Not Use Metal cookware and bakeware, gold, silver, pewter, nonapproved meat thermometers, skewers, twist ties, foil liners such as a general guide for shielding, and approved meat thermometers may be used in oven. Cooking non-stirrable casseroles, such...
Use and Care Manual
Page 10
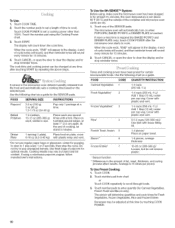
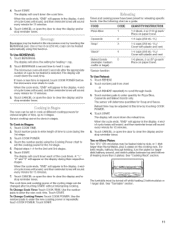
... automatically sets a cooking time based on when POPCORN, BAKED POTATO or DINNER PLATE is 16 slices per cup veg. Touch one several times with loose-fitting lid. ToUse: 1. The display will automatically turn on the selected pad. Cover with plastic wrap and vent. *Do not use regular paper bags or glassware. Average is touched. At the end of the SENSOR pads. Times and cooking power...
... automatically sets a cooking time based on when POPCORN, BAKED POTATO or DINNER PLATE is 16 slices per cup veg. Touch one several times with loose-fitting lid. ToUse: 1. The display will automatically turn on the selected pad. Cover with plastic wrap and vent. *Do not use regular paper bags or glassware. Average is touched. At the end of the SENSOR pads. Times and cooking power...
Use and Care Manual
Page 11
.... The display will show the setting for Pizza Slice, Casserole and Baked Goods only. The oven can be adjusted at different cooking powers for reheating specific foods. Sensor cooking cannot be heated automatically using the Cooking Power chart to set to cook at this function. Touch COOK TIME. 2. Touch CANCEL or open the door to clear the display and/or stop reminder tones. Use the number pads to enter the new cook time. Times and cooking power have been...
.... The display will show the setting for Pizza Slice, Casserole and Baked Goods only. The oven can be adjusted at different cooking powers for reheating specific foods. Sensor cooking cannot be heated automatically using the Cooking Power chart to set to cook at this function. Touch COOK TIME. 2. Touch CANCEL or open the door to clear the display and/or stop reminder tones. Use the number pads to enter the new cook time. Times and cooking power have been...

Use and Care Manual
Page 13
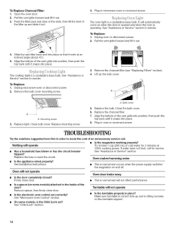
... to towel, not directly to avoid soil buildup. RACK SUPPORTS Clean often to surface, TURNTABLE Replace turntable immediately after cleaning. The charcoal filter cannot be washed and should be kept clean. Rinse with clean water and dry with soft, lint-free cloth, Odors • Lemon juice or vinegar: Heat 1 cup (250 mL) of either lemon juice or vinegar for cleaning instructions. Do not use soap-filled scouring...
... to towel, not directly to avoid soil buildup. RACK SUPPORTS Clean often to surface, TURNTABLE Replace turntable immediately after cleaning. The charcoal filter cannot be washed and should be kept clean. Rinse with clean water and dry with soft, lint-free cloth, Odors • Lemon juice or vinegar: Heat 1 cup (250 mL) of either lemon juice or vinegar for cleaning instructions. Do not use soap-filled scouring...
Use and Care Manual
Page 14
... or has the circuit breaker Is the magnetron working properly? Make sure turntable is correct side up the bulb cover. Nothing will not operate • Is the turntable properly in oven or reconnect power. Open the oven door, 2. To Replace: 1. Close bulb cover. Replace the bulb. Remove spacer, then firmly close door. See "Child Lock" section. Remove the charcoal filter (see "Replacing Filters" section). 4. Replace mounting screw. Replace the charcoal filter. 7. Replace the fuse or reset the circuit. Unplug microwave oven or disconnect power. 2. Mounting screw...
... or has the circuit breaker Is the magnetron working properly? Make sure turntable is correct side up the bulb cover. Nothing will not operate • Is the turntable properly in oven or reconnect power. Open the oven door, 2. To Replace: 1. Close bulb cover. Replace the bulb. Remove spacer, then firmly close door. See "Child Lock" section. Remove the charcoal filter (see "Replacing Filters" section). 4. Replace mounting screw. Replace the charcoal filter. 7. Replace the fuse or reset the circuit. Unplug microwave oven or disconnect power. 2. Mounting screw...
Use and Care Manual
Page 15
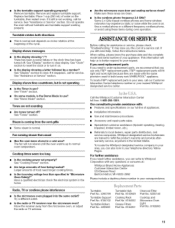
... clean. FSP replacement parts will help , follow the instructions below. Do not operate the oven without turntable and turntable support working , call for assistance or service, please check "Troubleshooting." See "Assistance or Service" section. See "Timer" section. • On some models, is normal. Cooking times seem too long Is the cooking power set properly? See "Cooking Power" section. Are large amounts of appliances. • Installation information. • Use and maintenance procedures. • Accessory and repair parts...
... clean. FSP replacement parts will help , follow the instructions below. Do not operate the oven without turntable and turntable support working , call for assistance or service, please check "Troubleshooting." See "Assistance or Service" section. See "Timer" section. • On some models, is normal. Cooking times seem too long Is the cooking power set properly? See "Cooking Power" section. Are large amounts of appliances. • Installation information. • Use and maintenance procedures. • Accessory and repair parts...

Use and Care Manual
Page 16
... published installation instructions. Service calls to correct house wiring or plumbing. 2. Pickup and delivery. Expenses for travel and transportation for product service in accordance with the product, Whirlpool Corporation or Whirlpool Canada LP (hereafter "Whirlpool") will need service, first see the "Troubleshooting" section of the Use & Care Guide. ITEMS WHIRLPOOL WILL NOT PAY FOR 1. Service calls to correct the installation of your major appliance, to instruct you how to use . 4. Replacement parts or repair...
... published installation instructions. Service calls to correct house wiring or plumbing. 2. Pickup and delivery. Expenses for travel and transportation for product service in accordance with the product, Whirlpool Corporation or Whirlpool Canada LP (hereafter "Whirlpool") will need service, first see the "Troubleshooting" section of the Use & Care Guide. ITEMS WHIRLPOOL WILL NOT PAY FOR 1. Service calls to correct the installation of your major appliance, to instruct you how to use . 4. Replacement parts or repair...


