

Installation Instructions
Page 1
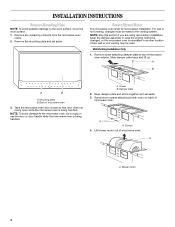
... follow the safety alert symbol and either the word "DANGER" or "WARNING." These installation instructions cover different models. Table of Contents MICROWAVE HOOD COMBINATION SAFETY 1 INSTALLATION REQUIREMENTS 2 Tools and Parts 2 Remove Cardboard Template 2 Location Requirements 2 Product Dimensions 3 Electrical Requirements ...tell you what the potential hazard is, tell you how to and including 36" (91.4 cm) wide. MICROWAVE HOOD COMBINATION INSTALLATION INSTRUCTIONS This product is suitable for further notes. See "Installation Requirements" section for use above ...
... follow the safety alert symbol and either the word "DANGER" or "WARNING." These installation instructions cover different models. Table of Contents MICROWAVE HOOD COMBINATION SAFETY 1 INSTALLATION REQUIREMENTS 2 Tools and Parts 2 Remove Cardboard Template 2 Location Requirements 2 Product Dimensions 3 Electrical Requirements ...tell you what the potential hazard is, tell you how to and including 36" (91.4 cm) wide. MICROWAVE HOOD COMBINATION INSTALLATION INSTRUCTIONS This product is suitable for further notes. See "Installation Requirements" section for use above ...

Installation Instructions
Page 2
...one 2" x 4" (50.8 x 101.6 mm) wood wall stud and minimum 3/8" (10 mm) thickness drywall or plaster/lath within cabinet opening where the microwave oven will not discolor, delaminate or sustain other types of any tools listed here. ■ Measuring tape ■ Stud finder ■ Pencil ■ ... rectangular to round transition piece, 3" (7.6 cm) clearance needs to it during the "Mark Rear Wall" part of clearance between the wall and the microwave oven, so that the materials used will be sure to make sure there is perforated. Toggle nuts (2) D. 1/4" x 2" lag screws (2) E. ...
...one 2" x 4" (50.8 x 101.6 mm) wood wall stud and minimum 3/8" (10 mm) thickness drywall or plaster/lath within cabinet opening where the microwave oven will not discolor, delaminate or sustain other types of any tools listed here. ■ Measuring tape ■ Stud finder ■ Pencil ■ ... rectangular to round transition piece, 3" (7.6 cm) clearance needs to it during the "Mark Rear Wall" part of clearance between the wall and the microwave oven, so that the materials used will be sure to make sure there is perforated. Toggle nuts (2) D. 1/4" x 2" lag screws (2) E. ...

Installation Instructions
Page 3
...a grounding plug. SAVE THESE INSTRUCTIONS 3 Recommended: ■ A time-delay fuse or time-delay circuit breaker. ■ A separate circuit serving only this microwave oven. A. 2" x 4" wall stud B. Grounded 3 prong outlet *30" (76.2 cm) is properly installed and grounded. WARNING: Improper use an extension...;₈" (76.0 cm) GROUNDING INSTRUCTIONS ■ For all governing codes and ordinances. Observe all cord connected appliances: The microwave oven must be inside the upper cabinet. Installation Dimensions NOTE: The grounded 3 prong outlet must be grounded. Do not use...
...a grounding plug. SAVE THESE INSTRUCTIONS 3 Recommended: ■ A time-delay fuse or time-delay circuit breaker. ■ A separate circuit serving only this microwave oven. A. 2" x 4" wall stud B. Grounded 3 prong outlet *30" (76.2 cm) is properly installed and grounded. WARNING: Improper use an extension...;₈" (76.0 cm) GROUNDING INSTRUCTIONS ■ For all governing codes and ordinances. Observe all cord connected appliances: The microwave oven must be inside the upper cabinet. Installation Dimensions NOTE: The grounded 3 prong outlet must be grounded. Do not use...
Installation Instructions
Page 4
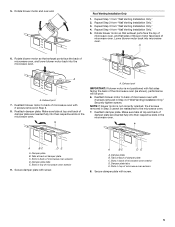
...and screw together and set aside. For wall or roof venting, changes must be used. A B A B A. Back of microwave oven. Lift blower motor out of microwave oven 3. A A. Blower motor 4 Remove screw attaching damper plate to the work surface, cover the work surface. 1. Damper plate... Remove Mounting Plate NOTE: To avoid possible damage to top of microwave oven exterior. Rotate Blower Motor The microwave oven is reinstalled in case the venting method is changed, or the microwave oven is set for recirculation installation. Remove two screws attaching blower motor...
...and screw together and set aside. For wall or roof venting, changes must be used. A B A B A. Back of microwave oven. Lift blower motor out of microwave oven 3. A A. Blower motor 4 Remove screw attaching damper plate to the work surface, cover the work surface. 1. Damper plate... Remove Mounting Plate NOTE: To avoid possible damage to top of microwave oven exterior. Rotate Blower Motor The microwave oven is reinstalled in case the venting method is changed, or the microwave oven is set for recirculation installation. Remove two screws attaching blower motor...
Installation Instructions
Page 5
... NOTE: If blower motor is not positioned with flat sides facing the back of the microwave oven (as shown), performance will be reattached to back of microwave oven with 2 screws removed in top of microwave oven exterior 9. A B C D E A. Tabs at back of damper plate C. ... Installation Only." 4. Repeat Step 4 from "Wall Venting Installation Only." 3. A. Damper plate B. A B C D E A. Reattach blower motor to the microwave oven. 7. Exhaust port IMPORTANT: If blower motor is not correctly oriented, the 2 screws removed in Step 3 cannot be poor. 6. Tabs at back of...
... NOTE: If blower motor is not positioned with flat sides facing the back of the microwave oven (as shown), performance will be reattached to back of microwave oven with 2 screws removed in top of microwave oven exterior 9. A B C D E A. Tabs at back of damper plate C. ... Installation Only." 4. Repeat Step 4 from "Wall Venting Installation Only." 3. A. Damper plate B. A B C D E A. Reattach blower motor to the microwave oven. 7. Exhaust port IMPORTANT: If blower motor is not correctly oriented, the 2 screws removed in Step 3 cannot be poor. 6. Tabs at back of...
Installation Instructions
Page 6
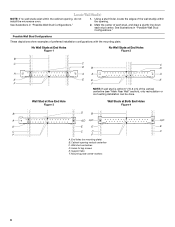
... Figure 3 Wall Studs at End Holes Figure 2 B C C C D B D A A A A E E E E F F NOTE: If wall stud is within the opening. Holes for lag screws E. Cabinet opening , do not install the microwave oven. 1. Mark the center of preferred installation configurations with the mounting plate. See illustrations in "Possible Wall Stud Configurations." 2. No Wall Studs at End Holes...
... Figure 3 Wall Studs at End Holes Figure 2 B C C C D B D A A A A E E E E F F NOTE: If wall stud is within the opening. Holes for lag screws E. Cabinet opening , do not install the microwave oven. 1. Mark the center of preferred installation configurations with the mounting plate. See illustrations in "Possible Wall Stud Configurations." 2. No Wall Studs at End Holes...
Installation Instructions
Page 7
... "Mark Rear Wall." 2. Refer to figures 1 and 2 in "Possible Wall Stud Configurations" in one 1/4-20 x 3" round-head bolt with toggle nut; Mark Rear Wall The microwave oven must be 14¹⁄₈" (35.9 cm) from the marks made in Step 7 to complete the 12" x 4" (30.5 x 10.2 cm) rectangle.
... "Mark Rear Wall." 2. Refer to figures 1 and 2 in "Possible Wall Stud Configurations" in one 1/4-20 x 3" round-head bolt with toggle nut; Mark Rear Wall The microwave oven must be 14¹⁄₈" (35.9 cm) from the marks made in Step 7 to complete the 12" x 4" (30.5 x 10.2 cm) rectangle.
Installation Instructions
Page 8
... for Wall Studs at Both End Holes (Figure 4) Drill 3/16" (5 mm) holes into the upper cabinet align with the holes in the top of the microwave oven. Refer to Figure 3 in "Possible Wall Stud Configurations" in "Locate Wall Stud(s)" section. 3. No Wall Studs at End Holes (Figures 1 & 2) NOTE: The mounting plate...
... for Wall Studs at Both End Holes (Figure 4) Drill 3/16" (5 mm) holes into the upper cabinet align with the holes in the top of the microwave oven. Refer to Figure 3 in "Possible Wall Stud Configurations" in "Locate Wall Stud(s)" section. 3. No Wall Studs at End Holes (Figures 1 & 2) NOTE: The mounting plate...

Installation Instructions
Page 9
...assembly with 2 sheet metal screws. This hole is the heavy side. Mounting plate B. Drill 3/8" (10 mm) holes at the bottom of the microwave oven so that damper blade moves freely, and opens fully. 2. Using a keyhole saw, cut out the rectangular area. Position the damper assembly on...power supply cord hole in place. 9 Sheet metal screws 3. Support tabs 4. Cut the 1¹⁄₂" (3.8 cm) diameter hole at one corner of microwave oven B. Power supply cord bushing 6. Cut 3/4" (19 mm) hole at the circular shaded area "G" on each 1/4-20 x 3" bolt and place inside ...
...assembly with 2 sheet metal screws. This hole is the heavy side. Mounting plate B. Drill 3/8" (10 mm) holes at the bottom of the microwave oven so that damper blade moves freely, and opens fully. 2. Using a keyhole saw, cut out the rectangular area. Position the damper assembly on...power supply cord hole in place. 9 Sheet metal screws 3. Support tabs 4. Cut the 1¹⁄₂" (3.8 cm) diameter hole at one corner of microwave oven B. Power supply cord bushing 6. Cut 3/4" (19 mm) hole at the circular shaded area "G" on each 1/4-20 x 3" bolt and place inside ...
Installation Instructions
Page 10
...secure with at least one person holding it in death, fire, or electrical shock. 2. A B C D E F A. Failure to damper assembly. Plug microwave oven into a grounded 3 prong outlet. ■ See the User Instructions for troubleshooting information. Check the operation of the damper assembly slides under vent) Complete... cm). NOTES: ■ Some upper cabinets may warp the top of the damper plate. Damper assembly (under the raised tabs of the microwave oven. Test vent fan and exhaust by placing 1 cup (250 mL) of water on the turntable, and programming a cook time of ...
...secure with at least one person holding it in death, fire, or electrical shock. 2. A B C D E F A. Failure to damper assembly. Plug microwave oven into a grounded 3 prong outlet. ■ See the User Instructions for troubleshooting information. Check the operation of the damper assembly slides under vent) Complete... cm). NOTES: ■ Some upper cabinets may warp the top of the damper plate. Damper assembly (under the raised tabs of the microwave oven. Test vent fan and exhaust by placing 1 cup (250 mL) of water on the turntable, and programming a cook time of ...
Installation Instructions
Page 11
...performance If venting through the roof, and rectangular to Round Transition NOTE: The minimum 3" (7.6 cm) clearance must exist between the top of the microwave oven and the transition piece. B For optimal venting installation, we recommend: C D ■ using roof or wall caps that have back draft...metal vent E ■ using the most direct route by minimizing the length of the 3" (7.6 cm) F vent and number of the microwave oven and the rectangular to round transition piece so that there is proper clearance within walls or ceilings, attics, crawl spaces or garages. diameter...
...performance If venting through the roof, and rectangular to Round Transition NOTE: The minimum 3" (7.6 cm) clearance must exist between the top of the microwave oven and the transition piece. B For optimal venting installation, we recommend: C D ■ using roof or wall caps that have back draft...metal vent E ■ using the most direct route by minimizing the length of the 3" (7.6 cm) F vent and number of the microwave oven and the rectangular to round transition piece so that there is proper clearance within walls or ceilings, attics, crawl spaces or garages. diameter...
Installation Instructions
Page 12
... transition piece = 5 ft (1.5 m) D. 2 ft (0.6 m) + 6 ft (1.8 m) straight = 8 ft (2.4 m) If the existing vent is located behind the microwave oven door on the front facing of the vent system including straight vent, elbow(s), transitions and wall or roof caps must be used . When you... or 6" (15.2 cm) round vent should be replaced, call us at our toll free number listed in the User Instructions. The total length of the microwave oven opening . See the following examples: 3¹⁄₄" x 10" (8.3 x 25.4 cm) vent system = 73 ft (22.2 m) total A B 6 ft (1.8 m) 2 ft (0.6...
... transition piece = 5 ft (1.5 m) D. 2 ft (0.6 m) + 6 ft (1.8 m) straight = 8 ft (2.4 m) If the existing vent is located behind the microwave oven door on the front facing of the vent system including straight vent, elbow(s), transitions and wall or roof caps must be used . When you... or 6" (15.2 cm) round vent should be replaced, call us at our toll free number listed in the User Instructions. The total length of the microwave oven opening . See the following examples: 3¹⁄₄" x 10" (8.3 x 25.4 cm) vent system = 73 ft (22.2 m) total A B 6 ft (1.8 m) 2 ft (0.6...
Use and Care Manual
Page 2
...Start/Add 30 Seconds 6 Easy Minute Feature 7 Cancel 7 Clock 7 Tones 7 Timer 7 Child Lock 7 Vent Fan 7 Cooktop Light 7 Demo Mode 7 MICROWAVE OVEN USE 8 Food Characteristics 8 Cooking Guidelines 8 Cookware and Dinnerware 8 Aluminum Foil and Metal 9 Cooking Power 9 Cooking 10 6th SENSF M System Cooking 10... Preset Cooking 10 Beverage 11 Cooking in Stages 11 Reheating 11 Defrosting 12 Warm Hold 12 MICROWAVE OVEN CARE 13 General Cleaning 13 Replacing Filters 13 Replacing Cooktop Light 14 Replacing Oven Light 14 TROUBLESHOOTING 14 ASSISTANCE OR ...
...Start/Add 30 Seconds 6 Easy Minute Feature 7 Cancel 7 Clock 7 Tones 7 Timer 7 Child Lock 7 Vent Fan 7 Cooktop Light 7 Demo Mode 7 MICROWAVE OVEN USE 8 Food Characteristics 8 Cooking Guidelines 8 Cookware and Dinnerware 8 Aluminum Foil and Metal 9 Cooking Power 9 Cooking 10 6th SENSF M System Cooking 10... Preset Cooking 10 Beverage 11 Cooking in Stages 11 Reheating 11 Defrosting 12 Warm Hold 12 MICROWAVE OVEN CARE 13 General Cleaning 13 Replacing Filters 13 Replacing Cooktop Light 14 Replacing Oven Light 14 TROUBLESHOOTING 14 ASSISTANCE OR ...

Use and Care Manual
Page 3
...Installation Instructions. [] Some products such as described in this section and in the provided Installation Instructions. [] Install or locate the microwave oven only in accordance with any appliance, close supervision is not working properly, or if it has been damaged or dropped.... Always read and obey all instructions before placing bags in the shell and sealed containers - IMPORTANT SAFETY INSTRUCTIONS When using the microwave oven. [] Read and follow instructions. We have provided many important safety messages in the oven cavity: - SAVE THESE INSTRUCTIONS...
...Installation Instructions. [] Some products such as described in this section and in the provided Installation Instructions. [] Install or locate the microwave oven only in accordance with any appliance, close supervision is not working properly, or if it has been damaged or dropped.... Always read and obey all instructions before placing bags in the shell and sealed containers - IMPORTANT SAFETY INSTRUCTIONS When using the microwave oven. [] Read and follow instructions. We have provided many important safety messages in the oven cavity: - SAVE THESE INSTRUCTIONS...
Use and Care Manual
Page 4
...-sided containers with maximum width of the oven. This will cause overheating of 36 inches. [] Do not immerse cord or plug in the microwave oven as they may damage the filter. [] Do not cover or block any openings on hood or filter. [] Oversized foods or oversized ... accessories, in this oven when not in operation. [] When flaming foods under the hood, turn the fan on top of injury to operate this microwave oven outdoors. It is removed from heated surfaces. [] Clean Ventilating Hoods Frequently - After heating, allow soil or cleaner residue to accumulate on sealing ...
...-sided containers with maximum width of the oven. This will cause overheating of 36 inches. [] Do not immerse cord or plug in the microwave oven as they may damage the filter. [] Do not cover or block any openings on hood or filter. [] Oversized foods or oversized ... accessories, in this oven when not in operation. [] When flaming foods under the hood, turn the fan on top of injury to operate this microwave oven outdoors. It is removed from heated surfaces. [] Clean Ventilating Hoods Frequently - After heating, allow soil or cleaner residue to accumulate on sealing ...
Use and Care Manual
Page 5
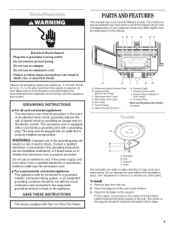
...18 of the features shown here. Remove tape from the illustrations in place. The rollers on the oven cavity bottom. 3. The microwave oven is properly grounded. Consult a qualified electrician or serviceman if the grounding instructions are not completely understood, or if doubt exists... use an extension cord. AB C 1-) EF ElectricaSl hock Hazard Plug into an outlet that a separate circuit serving only this manual. Microwave Inlet Cover D. PARTSANDFEATURES This manual may differ slightly from the hub. 2. Failure to follow these instructions can result in either direction to...
...18 of the features shown here. Remove tape from the illustrations in place. The rollers on the oven cavity bottom. 3. The microwave oven is properly grounded. Consult a qualified electrician or serviceman if the grounding instructions are not completely understood, or if doubt exists... use an extension cord. AB C 1-) EF ElectricaSl hock Hazard Plug into an outlet that a separate circuit serving only this manual. Microwave Inlet Cover D. PARTSANDFEATURES This manual may differ slightly from the hub. 2. Failure to follow these instructions can result in either direction to...

Use and Care Manual
Page 6
.... If the ":" blinks on two levels. • Do not use , the display shows the time of the control. Retry your entry. When the microwave oven is touched. control starts the oven at the same time. The cooking rack is in use oven mitts or pot holders when handling. •...the appropriate display area and entering the new setting. Always use , the display shows cooking power, quantities, weights and/or prompts. Damage to use a microwave-safe container. • The rack is interrupted, touching the START will appear on the side walls of the oven. • Do not place popcorn bags...
.... If the ":" blinks on two levels. • Do not use , the display shows the time of the control. Retry your entry. When the microwave oven is touched. control starts the oven at the same time. The cooking rack is in use oven mitts or pot holders when handling. •...the appropriate display area and entering the new setting. Always use , the display shows cooking power, quantities, weights and/or prompts. Damage to use a microwave-safe container. • The rack is interrupted, touching the START will appear on the side walls of the oven. • Do not place popcorn bags...
Use and Care Manual
Page 7
... controlsW. Touch the number pads to use , touch TIMER SET-OFR To Set: 1. NOTE: The Timer does not start or stop the microwave oven. If not touched within 5 seconds, "START?" Touch and hold the number pad "2" for 5 seconds until 2 tones sound and ... for 1-5minutesd,ependinognwhichpadistouchedA.fter cookinbgeginsth, eEasyMinutecontrolrseturntotheirnormal numericpaal dfunction. Touch TIMER SET-OFR If no action is off . The length of the microwave oven. Zero (0) is taken after the end-of-cycle tones • End of stage in multistage cooking • Hidden feature ...
... controlsW. Touch the number pads to use , touch TIMER SET-OFR To Set: 1. NOTE: The Timer does not start or stop the microwave oven. If not touched within 5 seconds, "START?" Touch and hold the number pad "2" for 5 seconds until 2 tones sound and ... for 1-5minutesd,ependinognwhichpadistouchedA.fter cookinbgeginsth, eEasyMinutecontrolrseturntotheirnormal numericpaal dfunction. Touch TIMER SET-OFR If no action is off . The length of the microwave oven. Zero (0) is taken after the end-of-cycle tones • End of stage in multistage cooking • Hidden feature ...

Use and Care Manual
Page 8
... helps retain moisture, shorten cook time and reduce spattering. If a lid is not available, wax paper, paper towels or plastic wrap approved for microwave ovens may be turned back at one corner to provide an opening to vent steam. Stirring and Turning Stirring and turning redistributes heat evenly to... cooks the food. • Do not lean on or allow children to swing on the oven door. • Do not operate microwave oven when it does not absorb microwaves. • Use oven mitts or pot holders when removing containers from oven. • Do not overcook potatoes. The oven cannot maintain...
... helps retain moisture, shorten cook time and reduce spattering. If a lid is not available, wax paper, paper towels or plastic wrap approved for microwave ovens may be turned back at one corner to provide an opening to vent steam. Stirring and Turning Stirring and turning redistributes heat evenly to... cooks the food. • Do not lean on or allow children to swing on the oven door. • Do not operate microwave oven when it does not absorb microwaves. • Use oven mitts or pot holders when removing containers from oven. • Do not overcook potatoes. The oven cannot maintain...

Use and Care Manual
Page 9
..., Containers Pottery and Clay Styrofoam* Straw, Wicker, Wooden Containers Wax Paper RECOMMENDATIONS Use nonrecycled and those approved by the manufacturer for microwave oven use. Do Not Use Metal cookware and bakeware, gold, silver, pewter, nonapproved meat thermometers, skewers, twist ties, foil liners... such as cheese and egg dishes, pudding and custards. Many recipes for microwave cooking specify which cooking power to touch the inside cavity walls, ceiling or floor. • Always use the turntable. • ...
..., Containers Pottery and Clay Styrofoam* Straw, Wicker, Wooden Containers Wax Paper RECOMMENDATIONS Use nonrecycled and those approved by the manufacturer for microwave oven use. Do Not Use Metal cookware and bakeware, gold, silver, pewter, nonapproved meat thermometers, skewers, twist ties, foil liners... such as cheese and egg dishes, pudding and custards. Many recipes for microwave cooking specify which cooking power to touch the inside cavity walls, ceiling or floor. • Always use the turntable. • ...


