

Installation Instructions
Page 1
... if the instructions are very important. All safety messages will follow instructions. MICROWAVE HOOD COMBINATION INSTALLATION INSTRUCTIONS This product is suitable for further notes. Table of Contents MICROWAVE HOOD COMBINATION SAFETY 1 INSTALLATION REQUIREMENTS 2 Tools and Parts 2 Remove Cardboard Template... Prepare Upper Cabinet 8 Install Damper Assembly 9 Install the Microwave Oven 9 Complete Installation 10 VENTING DESIGN SPECIFICATIONS 11 ASSISTANCE 12 Replacement Parts 12 Accessories 12 MICROWAVE HOOD COMBINATION SAFETY Your safety and the safety of your appliance...
... if the instructions are very important. All safety messages will follow instructions. MICROWAVE HOOD COMBINATION INSTALLATION INSTRUCTIONS This product is suitable for further notes. Table of Contents MICROWAVE HOOD COMBINATION SAFETY 1 INSTALLATION REQUIREMENTS 2 Tools and Parts 2 Remove Cardboard Template... Prepare Upper Cabinet 8 Install Damper Assembly 9 Install the Microwave Oven 9 Complete Installation 10 VENTING DESIGN SPECIFICATIONS 11 ASSISTANCE 12 Replacement Parts 12 Accessories 12 MICROWAVE HOOD COMBINATION SAFETY Your safety and the safety of your appliance...

Installation Instructions
Page 2
...■ Grounded electrical outlet inside the perforation is perforated. Set the cardboard template to the side and refer to exist above the microwave oven so that the vent fits properly, and the damper blade opens freely and fully. Special Requirements For Wall Venting Installation Only:... x 4" (50.8 x 101.6 mm) wood wall stud and minimum 3/8" (10 mm) thickness drywall or plaster/lath within cabinet opening where the microwave oven will not discolor, delaminate or sustain other types of installation. Check with any obstructions so that the damper blade can open freely and fully...
...■ Grounded electrical outlet inside the perforation is perforated. Set the cardboard template to the side and refer to exist above the microwave oven so that the vent fits properly, and the damper blade opens freely and fully. Special Requirements For Wall Venting Installation Only:... x 4" (50.8 x 101.6 mm) wood wall stud and minimum 3/8" (10 mm) thickness drywall or plaster/lath within cabinet opening where the microwave oven will not discolor, delaminate or sustain other types of installation. Check with any obstructions so that the damper blade can open freely and fully...

Installation Instructions
Page 3
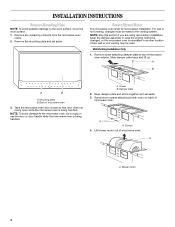
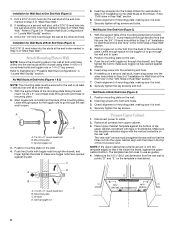
... and grounded. Recommended: ■ A time-delay fuse or time-delay circuit breaker. ■ A separate circuit serving only this microwave oven. The plug must be grounded. WARNING: Improper use an extension cord. Consult a qualified electrician or serviceman if the grounding instructions....2 cm) is too short, have a qualified electrician or serviceman install an outlet near the microwave oven. Do not use an adapter. Do not use an extension cord. Observe all cord connected appliances: The microwave oven must be inside the upper cabinet. A. 2" x 4" wall stud B. If the ...
... and grounded. Recommended: ■ A time-delay fuse or time-delay circuit breaker. ■ A separate circuit serving only this microwave oven. The plug must be grounded. WARNING: Improper use an extension cord. Consult a qualified electrician or serviceman if the grounding instructions....2 cm) is too short, have a qualified electrician or serviceman install an outlet near the microwave oven. Do not use an adapter. Do not use an extension cord. Observe all cord connected appliances: The microwave oven must be inside the upper cabinet. A. 2" x 4" wall stud B. If the ...
Installation Instructions
Page 4
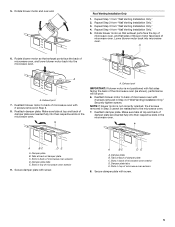
.... 3. Wall Venting Installation Only 1. Mounting plate B. Back of microwave oven. Tape the microwave oven door closed so that door does not swing open while the microwave oven is being handled. Remove any remaining contents from the microwave oven cavity. 2. For wall or roof venting, changes must be... screw attaching damper plate to the venting system. Screws 4. NOTE: To avoid damage to the microwave oven, do not grip or use the door or door handle while the microwave oven is being handled. A Screw B. Keep the damper assembly in another location where wall or...
.... 3. Wall Venting Installation Only 1. Mounting plate B. Back of microwave oven. Tape the microwave oven door closed so that door does not swing open while the microwave oven is being handled. Remove any remaining contents from the microwave oven cavity. 2. For wall or roof venting, changes must be... screw attaching damper plate to the venting system. Screws 4. NOTE: To avoid damage to the microwave oven, do not grip or use the door or door handle while the microwave oven is being handled. A Screw B. Keep the damper assembly in another location where wall or...
Installation Instructions
Page 5
...inserted fully into their respective slots in Step 3 cannot be poor. 6. Make sure tabs at top and back of microwave oven with screw. A B C D E A. Damper plate tabs E. Damper plate tabs E. Repeat Step 4 from "Wall Venting Installation Only."... 3. A 6. Reattach blower motor to the microwave oven. 7. Slots in top of microwave oven, and lower blower motor back into microwave oven. A B C D E A. Damper plate B. Rotate blower motor end over end. Rotate blower motor so that exhaust...
...inserted fully into their respective slots in Step 3 cannot be poor. 6. Make sure tabs at top and back of microwave oven with screw. A B C D E A. Damper plate tabs E. Damper plate tabs E. Repeat Step 4 from "Wall Venting Installation Only."... 3. A 6. Reattach blower motor to the microwave oven. 7. Slots in top of microwave oven, and lower blower motor back into microwave oven. A B C D E A. Damper plate B. Rotate blower motor end over end. Rotate blower motor so that exhaust...
Installation Instructions
Page 6
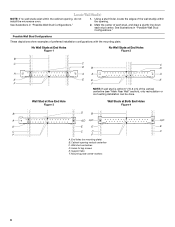
... Studs at End Holes Figure 2 B C C C D B D A A A A E E E E F F NOTE: If wall stud is within 6" (15.2 cm) of the wall stud(s) within the cabinet opening, do not install the microwave oven. 1.
... Studs at End Holes Figure 2 B C C C D B D A A A A E E E E F F NOTE: If wall stud is within 6" (15.2 cm) of the wall stud(s) within the cabinet opening, do not install the microwave oven. 1.
Installation Instructions
Page 7
Mark Rear Wall The microwave oven must be installed on a minimum of 1 wall stud, preferably 2, using a minimum of the upper cabinet. A A. Align the center markers on the cardboard template to ...
Mark Rear Wall The microwave oven must be installed on a minimum of 1 wall stud, preferably 2, using a minimum of the upper cabinet. A A. Align the center markers on the cardboard template to ...
Installation Instructions
Page 8
Drill a 3/16" (5 mm) hole into the wall stud at the end hole marked in Step 3 of the microwave oven. Installation for the toggle nut to go through the wall at Both End Holes (Figure 4) 1. Refer to points "D" and "E" on the template is level. 7. ...
Drill a 3/16" (5 mm) hole into the wall stud at the end hole marked in Step 3 of the microwave oven. Installation for the toggle nut to go through the wall at Both End Holes (Figure 4) 1. Refer to points "D" and "E" on the template is level. 7. ...

Installation Instructions
Page 9
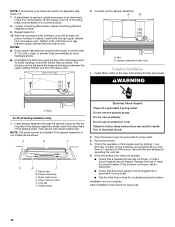
...damper assembly fits easily into the vent in back or other injury. Power supply cord bushing 6. Cut 3/4" (19 mm) hole at the bottom of the microwave oven is for the power supply cord. Check that the damper blade hinge is being handled. IMPORTANT: The control side of mounting plate. Handle the... microwave oven gently. 1. Using 2 or more people to move and install microwave oven. NOTE: To avoid damage to do not grip or use the door or door handle while the...
...damper assembly fits easily into the vent in back or other injury. Power supply cord bushing 6. Cut 3/4" (19 mm) hole at the bottom of the microwave oven is for the power supply cord. Check that the damper blade hinge is being handled. IMPORTANT: The control side of mounting plate. Handle the... microwave oven gently. 1. Using 2 or more people to move and install microwave oven. NOTE: To avoid damage to do not grip or use the door or door handle while the...
Installation Instructions
Page 10
...on the turntable, and programming a cook time of the damper plate. A B C D E F A. Reconnect power. 4. Check the operation of microwave oven by operating the vent fan. 5. Repeat steps 3-6. 10. Vent B. Sheet metal screw D. Upper cabinet cutout E. Failure to be installed if ...bolts may require bolts longer or shorter than 3" (7.6 cm). Then secure with at 100% power. If adjustment is plugged into microwave oven. A 2. Bolts For Roof Venting Installation Only 1. Do not use an adapter. Save Installation Instructions for filter placement. Connect ...
...on the turntable, and programming a cook time of the damper plate. A B C D E F A. Reconnect power. 4. Check the operation of microwave oven by operating the vent fan. 5. Repeat steps 3-6. 10. Vent B. Sheet metal screw D. Upper cabinet cutout E. Failure to be installed if ...bolts may require bolts longer or shorter than 3" (7.6 cm). Then secure with at 100% power. If adjustment is plugged into microwave oven. A 2. Bolts For Roof Venting Installation Only 1. Do not use an adapter. Save Installation Instructions for filter placement. Connect ...
Installation Instructions
Page 11
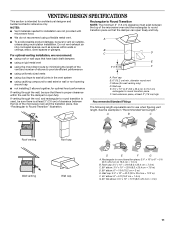
...rectangular to round transition is used, be sure there is at least 3" (7.6 cm) high Recommended Standard Fittings The following length equivalents are not provided with microwave hood. See the examples in the vent system ■ using a flexible metal vent. Roof cap: 3¹⁄₄" x 10" = 24 ...unless using recirculation installation. Rectangular to Round Transition NOTE: The minimum 3" (7.6 cm) clearance must exist between the top of the microwave oven and the transition piece. A ■ To avoid possible product damage, be sure that there is proper clearance within walls ...
...rectangular to round transition is used, be sure there is at least 3" (7.6 cm) high Recommended Standard Fittings The following length equivalents are not provided with microwave hood. See the examples in the vent system ■ using a flexible metal vent. Roof cap: 3¹⁄₄" x 10" = 24 ...unless using recirculation installation. Rectangular to Round Transition NOTE: The minimum 3" (7.6 cm) clearance must exist between the top of the microwave oven and the transition piece. A ■ To avoid possible product damage, be sure that there is proper clearance within walls ...
Installation Instructions
Page 12
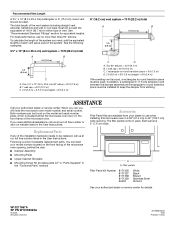
... (7.6 cm) extension vent between the damper assembly and rectangular to keep the damper from your model number located on the front frame of the microwave oven. Following is 3" (7.6 cm) wide. Filler panels Filler Panel Kit Number 8171336 8171337 8171338 8171339 99403 White Black Biscuit Stainless Steel Almond See... your authorized dealer or service center. If you need the microwave oven model number and serial number. W10217687A SP PN W10189322A © 2008. For best performance, use when installing this...
... (7.6 cm) extension vent between the damper assembly and rectangular to keep the damper from your model number located on the front frame of the microwave oven. Following is 3" (7.6 cm) wide. Filler panels Filler Panel Kit Number 8171336 8171337 8171338 8171339 99403 White Black Biscuit Stainless Steel Almond See... your authorized dealer or service center. If you need the microwave oven model number and serial number. W10217687A SP PN W10189322A © 2008. For best performance, use when installing this...
Use and Care Manual
Page 2
...Start/Add 30 Seconds 6 Easy Minute Feature 7 Cancel 7 Clock 7 Tones 7 Timer 7 Child Lock 7 Vent Fan 7 Cooktop Light 7 Demo Mode 7 MICROWAVE OVEN USE 8 Food Characteristics 8 Cooking Guidelines 8 Cookware and Dinnerware 8 Aluminum Foil and Metal 9 Cooking Power 9 Cooking 10 6th SENSF M System Cooking 10... Preset Cooking 10 Beverage 11 Cooking in Stages 11 Reheating 11 Defrosting 12 Warm Hold 12 MICROWAVE OVEN CARE 13 General Cleaning 13 Replacing Filters 13 Replacing Cooktop Light 14 Replacing Oven Light 14 TROUBLESHOOTING 14 ASSISTANCE OR ...
...Start/Add 30 Seconds 6 Easy Minute Feature 7 Cancel 7 Clock 7 Tones 7 Timer 7 Child Lock 7 Vent Fan 7 Cooktop Light 7 Demo Mode 7 MICROWAVE OVEN USE 8 Food Characteristics 8 Cooking Guidelines 8 Cookware and Dinnerware 8 Aluminum Foil and Metal 9 Cooking Power 9 Cooking 10 6th SENSF M System Cooking 10... Preset Cooking 10 Beverage 11 Cooking in Stages 11 Reheating 11 Defrosting 12 Warm Hold 12 MICROWAVE OVEN CARE 13 General Cleaning 13 Replacing Filters 13 Replacing Cooktop Light 14 Replacing Oven Light 14 TROUBLESHOOTING 14 ASSISTANCE OR ...

Use and Care Manual
Page 3
... and sealed containers - This type of burns, electric shock, fire, injury to persons, or exposure to properly grounded outlet. The microwave oven should not be followed, including the following: WARNING: To reduce the risk of oven is necessary when used by qualified service ... either the word "DANGER" or "WARNING." This symbol alerts you to reduce the chance of fire in this section. [] The microwave oven must be serviced only by children. TAhllissaifsettyhemseasfseatygeaslerwt isllyfmolbloowl. These words mean: You can be killed or seriously injured if you what ...
... and sealed containers - This type of burns, electric shock, fire, injury to persons, or exposure to properly grounded outlet. The microwave oven should not be followed, including the following: WARNING: To reduce the risk of oven is necessary when used by qualified service ... either the word "DANGER" or "WARNING." This symbol alerts you to reduce the chance of fire in this section. [] The microwave oven must be serviced only by children. TAhllissaifsettyhemseasfseatygeaslerwt isllyfmolbloowl. These words mean: You can be killed or seriously injured if you what ...
Use and Care Manual
Page 4
...residue to accumulate on sealing surfaces. (c) Do not operate the oven if it . [] Do not store anything directly on top of the microwave oven when the microwave oven is operated in the "PAN BROWN" mode (on . - Use extreme care when inserting a spoon or other utensil into the container....immerse cord or plug in a wet basement, or near water - be boiling. SAVE THESE iNSTRUCTiONS PRECAUTIONS TO AVOID POSSIBLE EXPOSURE TO EXCESSIVE MICROWAVE ENERGY (a) Do not attempt to operate this oven when not in harmful exposure to be adjusted or repaired by anyone except properly qualified service ...
...residue to accumulate on sealing surfaces. (c) Do not operate the oven if it . [] Do not store anything directly on top of the microwave oven when the microwave oven is operated in the "PAN BROWN" mode (on . - Use extreme care when inserting a spoon or other utensil into the container....immerse cord or plug in a wet basement, or near water - be boiling. SAVE THESE iNSTRUCTiONS PRECAUTIONS TO AVOID POSSIBLE EXPOSURE TO EXCESSIVE MICROWAVE ENERGY (a) Do not attempt to operate this oven when not in harmful exposure to be adjusted or repaired by anyone except properly qualified service ...
Use and Care Manual
Page 5
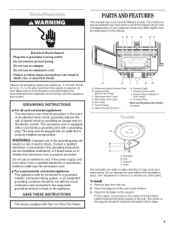
... permanent wiring system, or an equipment grounding conductor should fit inside the turntable bottom ridge. I This device complies with a grounding plug. Microwave Inlet Cover D. Cooktop Light L Cooking Guide Label J. Support D. Do not operate the oven without the turntable in oven cavity) K....outlet that a separate circuit serving only this manual. The model you have a qualified electrician or serviceman install an outlet near the microwave oven. [] For a permanently connected appliance: This appliance must be provided. Do not use of the hub. GROUNDING iNSTRUCTiONS []...
... permanent wiring system, or an equipment grounding conductor should fit inside the turntable bottom ridge. I This device complies with a grounding plug. Microwave Inlet Cover D. Cooktop Light L Cooking Guide Label J. Support D. Do not operate the oven without the turntable in oven cavity) K....outlet that a separate circuit serving only this manual. The model you have a qualified electrician or serviceman install an outlet near the microwave oven. [] For a permanently connected appliance: This appliance must be provided. Do not use of the hub. GROUNDING iNSTRUCTiONS []...

Use and Care Manual
Page 6
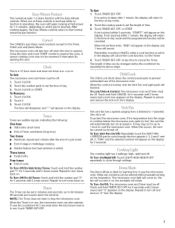
...Seconds feature. See "Assistance or Service" section to the time of day or Timer countdown. Touch CANCEL and reset the clock if needed. The microwave oven is interrupted, touching the START will appear in use , the display shows cooking power, quantities, weights and/or prompts. A number code ... when cooking with plates that are side by touching the appropriate display area and entering the new setting. Retry your entry. When the microwave oven is designed specifically for 30 seconds, and adds 30 seconds of cook time with each additional touch of the following: cooking power,...
...Seconds feature. See "Assistance or Service" section to the time of day or Timer countdown. Touch CANCEL and reset the clock if needed. The microwave oven is interrupted, touching the START will appear in use , the display shows cooking power, quantities, weights and/or prompts. A number code ... when cooking with plates that are side by touching the appropriate display area and entering the new setting. Retry your entry. When the microwave oven is designed specifically for 30 seconds, and adds 30 seconds of cook time with each additional touch of the following: cooking power,...
Use and Care Manual
Page 7
...number pad "2" for 5 seconds until 2 tones sound and a lock icon appears on the magnetron. Repeat to cancel the Timer. To protect the microwave oven, if the temperature from the display. "FAN" and the selected number will rotate. The cooktop light has 3 settings: high, night and off...of stage in multistage cooking • Hidden feature has been entered or exited Three tones • Invalid entry Four tones • End of the microwave oven. If not touched within 1 minute, the display will automatically turn tones back on . Remember, touching CANCEL while a cook function is ideal for...
...number pad "2" for 5 seconds until 2 tones sound and a lock icon appears on the magnetron. Repeat to cancel the Timer. To protect the microwave oven, if the temperature from the display. "FAN" and the selected number will rotate. The cooktop light has 3 settings: high, night and off...of stage in multistage cooking • Hidden feature has been entered or exited Three tones • Invalid entry Four tones • End of the microwave oven. If not touched within 1 minute, the display will automatically turn tones back on . Remember, touching CANCEL while a cook function is ideal for...

Use and Care Manual
Page 8
... Prick in several items of irregularly shaped foods, bones and foods such as potatoes, egg yolks, chicken livers, hot dogs, and sausage. When microwave cooking, the amount, size and shape, starting temperature, composition and density of the recommended cook time, potatoes should be dried in the oven. &#... dinnerware must be in place and correct side up when oven is not available, wax paper, paper towels or plastic wrap approved for microwave ovens may be slightly firm. The length of the food. Composition and Density Foods high in fat and sugar will finish cooking while ...
... Prick in several items of irregularly shaped foods, bones and foods such as potatoes, egg yolks, chicken livers, hot dogs, and sausage. When microwave cooking, the amount, size and shape, starting temperature, composition and density of the recommended cook time, potatoes should be dried in the oven. &#... dinnerware must be in place and correct side up when oven is not available, wax paper, paper towels or plastic wrap approved for microwave ovens may be slightly firm. The length of the food. Composition and Density Foods high in fat and sugar will finish cooking while ...

Use and Care Manual
Page 9
...glaze should not be used in oven with the oven (on some metal can occur and cause damage to the oven. Many recipes for microwave oven use. MATERIAL Paper Towels, Dinnerware, Napkins Plastic Wraps, Bags, Covers, Dinnerware, Containers Pottery and Clay Styrofoam* Straw, Wicker, ...Wooden Containers Wax Paper RECOMMENDATIONS Use nonrecycled and those approved by percent, name or number. Use those approved by the manufacturer for microwave cooking specify which cooking power to touch the inside cavity walls, ceiling or floor. • Always use the turntable. • Never...
...glaze should not be used in oven with the oven (on some metal can occur and cause damage to the oven. Many recipes for microwave oven use. MATERIAL Paper Towels, Dinnerware, Napkins Plastic Wraps, Bags, Covers, Dinnerware, Containers Pottery and Clay Styrofoam* Straw, Wicker, ...Wooden Containers Wax Paper RECOMMENDATIONS Use nonrecycled and those approved by percent, name or number. Use those approved by the manufacturer for microwave cooking specify which cooking power to touch the inside cavity walls, ceiling or floor. • Always use the turntable. • Never...


