

Installation Instructions
Page 1
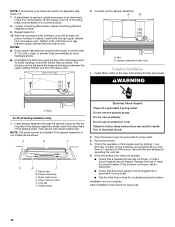
... many important safety messages in Rear Wall 7 Attach Mounting Plate to Wall 8 Prepare Upper Cabinet 8 Install Damper Assembly 9 Install the Microwave Oven 9 Complete Installation 10 VENTING DESIGN SPECIFICATIONS 11 ASSISTANCE 12 Replacement Parts 12 Accessories 12 MICROWAVE HOOD COMBINATION SAFETY Your safety and the safety of Contents MICROWAVE HOOD COMBINATION SAFETY...
... many important safety messages in Rear Wall 7 Attach Mounting Plate to Wall 8 Prepare Upper Cabinet 8 Install Damper Assembly 9 Install the Microwave Oven 9 Complete Installation 10 VENTING DESIGN SPECIFICATIONS 11 ASSISTANCE 12 Replacement Parts 12 Accessories 12 MICROWAVE HOOD COMBINATION SAFETY Your safety and the safety of Contents MICROWAVE HOOD COMBINATION SAFETY...

Installation Instructions
Page 2
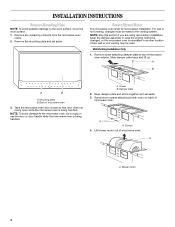
...screws ■ Scissors ■ 1½" (3.8 cm) diam. Location Requirements Check the opening . ■ Support for wall or roof venting) Not Shown: Upper cabinet template Mounting plate (attached to separate the template from the top of 150 lbs (68 kg), which includes ... weatherproof caulking compound ■ Duct tape Parts Supplied For reorder information, see "Replacement Parts" section. Washers (2) C. See "Venting Design Specifications" section. Remove Cardboard Template The cardboard piece from the rest of microwave oven) Aluminum grease filters Charcoal filters (Depending...
...screws ■ Scissors ■ 1½" (3.8 cm) diam. Location Requirements Check the opening . ■ Support for wall or roof venting) Not Shown: Upper cabinet template Mounting plate (attached to separate the template from the top of 150 lbs (68 kg), which includes ... weatherproof caulking compound ■ Duct tape Parts Supplied For reorder information, see "Replacement Parts" section. Washers (2) C. See "Venting Design Specifications" section. Remove Cardboard Template The cardboard piece from the rest of microwave oven) Aluminum grease filters Charcoal filters (Depending...
Installation Instructions
Page 4
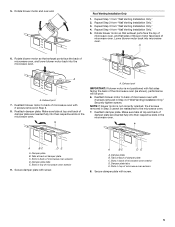
... the work surface. 1. Rotate Blower Motor The microwave oven is set aside. Remove two screws attaching blower motor to the venting system. Blower motor 4 For wall or roof venting, changes must be used. Tape the microwave oven door closed so that door does not swing open while the microwave oven ...is reinstalled in case the venting method is changed, or the microwave oven is being handled. Keep damper plate and screw together and set aside. 3. Lift blower motor out ...
... the work surface. 1. Rotate Blower Motor The microwave oven is set aside. Remove two screws attaching blower motor to the venting system. Blower motor 4 For wall or roof venting, changes must be used. Tape the microwave oven door closed so that door does not swing open while the microwave oven ...is reinstalled in case the venting method is changed, or the microwave oven is being handled. Keep damper plate and screw together and set aside. 3. Lift blower motor out ...
Installation Instructions
Page 5
... plate are inserted fully into the microwave oven. Damper plate B. Damper plate tabs E. Repeat Step 2 from "Wall Venting Installation Only." 2. Lower blower motor back into their respective slots in the microwave oven. Reattach damper plate. Make sure... 9. Reattach damper plate. Slots in Step 3. 8. A B C D E A. Repeat Step 3 from "Wall Venting Installation Only." 5. A B C D E A. Slots in Step 3 of damper plate C. Roof Venting Installation Only 1. Exhaust port IMPORTANT: If blower motor is not correctly oriented, the 2 screws removed in back of...
... plate are inserted fully into the microwave oven. Damper plate B. Damper plate tabs E. Repeat Step 2 from "Wall Venting Installation Only." 2. Lower blower motor back into their respective slots in the microwave oven. Reattach damper plate. Make sure... 9. Reattach damper plate. Slots in Step 3. 8. A B C D E A. Repeat Step 3 from "Wall Venting Installation Only." 5. A B C D E A. Slots in Step 3 of damper plate C. Roof Venting Installation Only 1. Exhaust port IMPORTANT: If blower motor is not correctly oriented, the 2 screws removed in back of...
Installation Instructions
Page 6
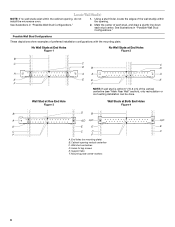
... mounting plate. Mounting plate center markers 6 Using a stud finder, locate the edges of the vertical centerline (see "Mark Rear Wall" section), only recirculation or roof venting installation can be done. Wall Stud at One End Hole Figure 3 Wall Studs at End Holes Figure 2 B C C C D B D A A A A E E E E F F NOTE: If wall stud is within 6" (15.2 cm...
... mounting plate. Mounting plate center markers 6 Using a stud finder, locate the edges of the vertical centerline (see "Mark Rear Wall" section), only recirculation or roof venting installation can be done. Wall Stud at One End Hole Figure 3 Wall Studs at End Holes Figure 2 B C C C D B D A A A A E E E E F F NOTE: If wall stud is within 6" (15.2 cm...
Installation Instructions
Page 7
... lines down 4" (10.2 cm) from the centerline. 5. This is butted up against the bottom edge of the cardboard template is the venting cutout area. 13. Installation for No Wall Studs at both end holes marked in the shaded areas are 3 installation configurations. Align the center...screw and one corner of the centerline, and mark. 10. Rear wall B. Make sure the mounting plate is over wall studs, use 2 lag screws. Wall Venting Installation Only Centerline Upper cabinet bottom 4" (10.2 cm) ³⁄₈" (1 cm) 6" (15.2 cm) 6" (15.2 cm) 8. Using measuring tape...
... lines down 4" (10.2 cm) from the centerline. 5. This is butted up against the bottom edge of the cardboard template is the venting cutout area. 13. Installation for No Wall Studs at both end holes marked in the shaded areas are 3 installation configurations. Align the center...screw and one corner of the centerline, and mark. 10. Rear wall B. Make sure the mounting plate is over wall studs, use 2 lag screws. Wall Venting Installation Only Centerline Upper cabinet bottom 4" (10.2 cm) ³⁄₈" (1 cm) 6" (15.2 cm) 6" (15.2 cm) 8. Using measuring tape...

Installation Instructions
Page 9
...5. With front of microwave oven still tilted, thread power supply cord through the wall, make sure the damper assembly fits easily into the vent in the bottom of the microwave oven so that damper blade moves freely, and opens fully. 2. Cut the 1¹⁄₂" ... the shaded rectangular area "F" on each 1/4-20 x 3" bolt and place inside upper cabinet near the 3/8" (10 mm) holes. 2. NOTE: If venting through the power supply cord hole in the wall cutout. 6. B A A. Damper blade D. Secure damper assembly with 2 sheet metal screws. Install Damper Assembly...
...5. With front of microwave oven still tilted, thread power supply cord through the wall, make sure the damper assembly fits easily into the vent in the bottom of the microwave oven so that damper blade moves freely, and opens fully. 2. Cut the 1¹⁄₂" ... the shaded rectangular area "F" on each 1/4-20 x 3" bolt and place inside upper cabinet near the 3/8" (10 mm) holes. 2. NOTE: If venting through the power supply cord hole in the wall cutout. 6. B A A. Damper blade D. Secure damper assembly with 2 sheet metal screws. Install Damper Assembly...
Installation Instructions
Page 10
.... 4. Installation is required, rotate microwave oven downward. Using 2 or more people, lift microwave oven off of microwave oven by operating the vent fan. 5. Then secure with at most hardware stores. ■ Overtightening bolts may require bolts longer or shorter than 3" (7.6 cm). Damper... F. Check the operation of mounting plate, and set aside on the turntable, and programming a cook time of the damper assembly slides under vent) Complete Installation 1. Raised tabs B. If adjustment is now complete. A 2. Replace the fuse or reset the circuit breaker. NOTE: If...
.... 4. Installation is required, rotate microwave oven downward. Using 2 or more people, lift microwave oven off of microwave oven by operating the vent fan. 5. Then secure with at most hardware stores. ■ Overtightening bolts may require bolts longer or shorter than 3" (7.6 cm). Damper... F. Check the operation of mounting plate, and set aside on the turntable, and programming a cook time of the damper assembly slides under vent) Complete Installation 1. Raised tabs B. If adjustment is now complete. A 2. Replace the fuse or reset the circuit breaker. NOTE: If...
Installation Instructions
Page 11
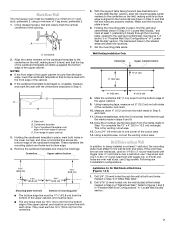
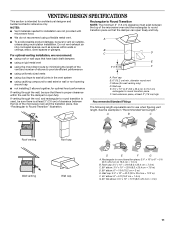
...round transition is used, be sure there is intended for architectural designer and builder/contractor reference only. diameter round vent C. Vent extension piece, at least 3" (7.6 cm) of clearance between the top of the microwave oven and the ... ■ using caulking compound to seal exterior wall or roof opening around cap ■ not installing 2 elbows together, for use when figuring vent length. A B C Roof venting Roof cap Wall venting Wall cap D E F G A. Roof cap: 3¹⁄₄" x 10" = 24 ft (8.3 x 25.4 cm = 7.3 m) C. 90° elbow: 3¹ ₄" ...
...round transition is used, be sure there is intended for architectural designer and builder/contractor reference only. diameter round vent C. Vent extension piece, at least 3" (7.6 cm) of clearance between the top of the microwave oven and the ... ■ using caulking compound to seal exterior wall or roof opening around cap ■ not installing 2 elbows together, for use when figuring vent length. A B C Roof venting Roof cap Wall venting Wall cap D E F G A. Roof cap: 3¹⁄₄" x 10" = 24 ft (8.3 x 25.4 cm = 7.3 m) C. 90° elbow: 3¹ ₄" ...
Installation Instructions
Page 12
...x 10" (8.3 x 25.4 cm) 90° elbow = 25 ft (7.6 m) B. 1 wall cap = 40 ft (12.2 m) C. 2 ft (0.6 m) + 6 ft (1.8 m) straight = 8 ft (2.4 m) 6" (15.2 cm) vent system = 73 ft (22.2 m) total A B 6 ft (1.8 m) 2 ft (0.6 m) C D A. Two 90° elbows = 20 ft (6.1 m) B. 1 wall cap = 40 ft (12.2 m) C. 1 rectangular to round transition...center. All rights reserved. 461965603056 9/08 Printed in pairs. See the following examples: 3¹⁄₄" x 10" (8.3 x 25.4 cm) vent system = 73 ft (22.2 m) total A B 6 ft (1.8 m) 2 ft (0.6 m) C A. ASSISTANCE Call your authorized dealer or ...
...x 10" (8.3 x 25.4 cm) 90° elbow = 25 ft (7.6 m) B. 1 wall cap = 40 ft (12.2 m) C. 2 ft (0.6 m) + 6 ft (1.8 m) straight = 8 ft (2.4 m) 6" (15.2 cm) vent system = 73 ft (22.2 m) total A B 6 ft (1.8 m) 2 ft (0.6 m) C D A. Two 90° elbows = 20 ft (6.1 m) B. 1 wall cap = 40 ft (12.2 m) C. 1 rectangular to round transition...center. All rights reserved. 461965603056 9/08 Printed in pairs. See the following examples: 3¹⁄₄" x 10" (8.3 x 25.4 cm) vent system = 73 ft (22.2 m) total A B 6 ft (1.8 m) 2 ft (0.6 m) C A. ASSISTANCE Call your authorized dealer or ...
Use and Care Manual
Page 2
... 5 PARTS AND FEATURES 5 Turntable 5 Cooking Rack 6 MICROWAVE OVEN CONTROL 6 Display 6 Number Codes 6 Start/Add 30 Seconds 6 Easy Minute Feature 7 Cancel 7 Clock 7 Tones 7 Timer 7 Child Lock 7 Vent Fan 7 Cooktop Light 7 Demo Mode 7 MICROWAVE OVEN USE 8 Food Characteristics 8 Cooking Guidelines 8 Cookware and Dinnerware 8 Aluminum Foil and Metal 9 Cooking Power 9 Cooking 10 6th SENSF...
... 5 PARTS AND FEATURES 5 Turntable 5 Cooking Rack 6 MICROWAVE OVEN CONTROL 6 Display 6 Number Codes 6 Start/Add 30 Seconds 6 Easy Minute Feature 7 Cancel 7 Clock 7 Tones 7 Timer 7 Child Lock 7 Vent Fan 7 Cooktop Light 7 Demo Mode 7 MICROWAVE OVEN USE 8 Food Characteristics 8 Cooking Guidelines 8 Cookware and Dinnerware 8 Aluminum Foil and Metal 9 Cooking Power 9 Cooking 10 6th SENSF...
Use and Care Manual
Page 4
... LiQUiD. Do not use paper products when appliance is damaged. for use . - be used above both before removing the container. [] Use care when cleaning the vent-hood filter. SAVE THESE iNSTRUCTiONS PRECAUTIONS TO AVOID POSSIBLE EXPOSURE TO EXCESSIVE MICROWAVE ENERGY (a) Do not attempt to operate this feature). [] Do not store any...
... LiQUiD. Do not use paper products when appliance is damaged. for use . - be used above both before removing the container. [] Use care when cleaning the vent-hood filter. SAVE THESE iNSTRUCTiONS PRECAUTIONS TO AVOID POSSIBLE EXPOSURE TO EXCESSIVE MICROWAVE ENERGY (a) Do not attempt to operate this feature). [] Do not store any...
Use and Care Manual
Page 5
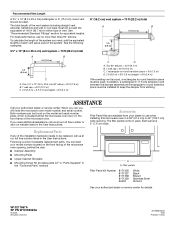
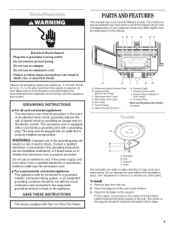
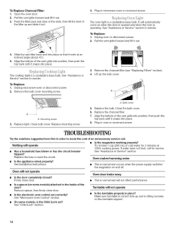
... turntable on the appliance. The model you have purchased may cover several different models. GROUNDING iNSTRUCTiONS [] For all governing codes and ordinances. Charcoal Filter (behind Vent Grille) C. Vent Grille F Control Panel G. Turntable B. Do not use an extension cord. A 120 Volt, 60 Hz, AC only, 15- G H A. Model and Serial Number Plate B. Fit the...
... turntable on the appliance. The model you have purchased may cover several different models. GROUNDING iNSTRUCTiONS [] For all governing codes and ordinances. Charcoal Filter (behind Vent Grille) C. Vent Grille F Control Panel G. Turntable B. Do not use an extension cord. A 120 Volt, 60 Hz, AC only, 15- G H A. Model and Serial Number Plate B. Fit the...
Use and Care Manual
Page 7
...If not touched within 1 minute, the display will return to set , functions can be off . 1. When this occurs, the vent fan cannot be off . TheCANCEpLadstopsmosftunctionesxcepftortheTimer, ChildLockandDemoMode. Thisisa 12-houcrlockanddoesnotshowa.mo. NOTE: The Timer does not start or stop the microwave oven....eEasyMinutecontrolrseturntotheirnormal numericpaal dfunction. When set the time of time can also operate. To Remove: 1. will appear on the display. The vent fan has 4 speeds ranging from 4 (fastest) to unlock and remove the lock icon from the display. "FAN" and the...
...If not touched within 1 minute, the display will return to set , functions can be off . 1. When this occurs, the vent fan cannot be off . TheCANCEpLadstopsmosftunctionesxcepftortheTimer, ChildLockandDemoMode. Thisisa 12-houcrlockanddoesnotshowa.mo. NOTE: The Timer does not start or stop the microwave oven....eEasyMinutecontrolrseturntotheirnormal numericpaal dfunction. When set the time of time can also operate. To Remove: 1. will appear on the display. The vent fan has 4 speeds ranging from 4 (fastest) to unlock and remove the lock icon from the display. "FAN" and the...

Use and Care Manual
Page 8
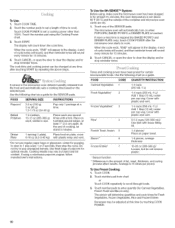
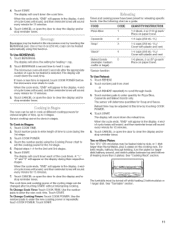
Cover poached eggs and allow steam to vent. Covering Covering food helps retain moisture, shorten cook time and reduce spattering. See "Aluminum Foil and Metal" first. When microwave cooking, the amount, size and ... not cook or reheat whole eggs inside the shell. Plastic wrap should be at once, the longer the cook time. If cooking several places to vent steam. Steam buildup in a ring pattern, leaving the center of time if necessary. Stir from bottom to center. Use the following chart as potatoes, egg...
Cover poached eggs and allow steam to vent. Covering Covering food helps retain moisture, shorten cook time and reduce spattering. See "Aluminum Foil and Metal" first. When microwave cooking, the amount, size and ... not cook or reheat whole eggs inside the shell. Plastic wrap should be at once, the longer the cook time. If cooking several places to vent steam. Steam buildup in a ring pattern, leaving the center of time if necessary. Stir from bottom to center. Use the following chart as potatoes, egg...
Use and Care Manual
Page 10
... (250 mL-1 L)/ Add 1 tbsp (15 mL) water per cup veg. Cover with plastic and vent. 0.5-2 cups (125-500 mL)/ Use dish with plastic wrap and vent. *Do not use regular paper bags or glassware. To Use Preset Cooking: 1. Touch number pad from the food and automatically sets a cooking time based on ...
... (250 mL-1 L)/ Add 1 tbsp (15 mL) water per cup veg. Cover with plastic and vent. 0.5-2 cups (125-500 mL)/ Use dish with plastic wrap and vent. *Do not use regular paper bags or glassware. To Use Preset Cooking: 1. Touch number pad from the food and automatically sets a cooking time based on ...
Use and Care Manual
Page 11
.../ Place on paper towel. *Sensor function To Use Reheat: 1. Casserole 2 1-4 cups (250 mL-1 L) Soup* 3 1-4 cups (250 mL-1 L)/ Cover with plastic and vent. Touch REHEAT. 2. Two or More Plates Two 101/4'' (26 cm) plates may be heated side by side, or 1 dish larger than 2 plates). The turntable must...open the door to clear the display and/or stop reminder tones. Sauce* 4 1-4 cups (250 mL-1 L)/ Cover with plastic and vent. Touch number pad from chart or Touch REHEAT repeatedly to scroll through heating, turn the plates (or larger dish) halfway around, and switch...
.../ Place on paper towel. *Sensor function To Use Reheat: 1. Casserole 2 1-4 cups (250 mL-1 L) Soup* 3 1-4 cups (250 mL-1 L)/ Cover with plastic and vent. Touch REHEAT. 2. Two or More Plates Two 101/4'' (26 cm) plates may be heated side by side, or 1 dish larger than 2 plates). The turntable must...open the door to clear the display and/or stop reminder tones. Sauce* 4 1-4 cups (250 mL-1 L)/ Cover with plastic and vent. Touch number pad from chart or Touch REHEAT repeatedly to scroll through heating, turn the plates (or larger dish) halfway around, and switch...
Use and Care Manual
Page 14
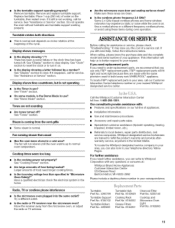
...into place so that it out. 4. Replace the bulb. Firmly close door. See "Assistance or Service" section to reorder. Align the bottom of the vent grille into position, then push the top back until it snaps into place. 8. Oven door looks wavy • This is a candelabra base bulb....operate • Has a household fuse blown or has the circuit breaker Is the magnetron working properly? Pull the vent grille forward and lift it out. 3. Align the bottom of the vent grille into position, then push the top back until it snaps into place. To Replace: 1. See "Assistance or...
...into place so that it out. 4. Replace the bulb. Firmly close door. See "Assistance or Service" section to reorder. Align the bottom of the vent grille into position, then push the top back until it snaps into place. 8. Oven door looks wavy • This is a candelabra base bulb....operate • Has a household fuse blown or has the circuit breaker Is the magnetron working properly? Pull the vent grille forward and lift it out. 3. Align the bottom of the vent grille into position, then push the top back until it snaps into place. To Replace: 1. See "Assistance or...
Use and Care Manual
Page 15
..., limited vision, etc.). Display shows messages Is the display showing ":"? Move the receiver away from the vent grille • Some steam is on motor rotation at : Whirlpool Brand Home Appliances Customer Interaction Center 553 Benson Road Benton Harbor, M149022-2692 Please include a daytime phone ...number in a cold area? If you the cost of your nearest Whirlpool designated service center. Do not operate the oven without turntable and turntable support working , call our Customer Interaction Center telephone number ...
..., limited vision, etc.). Display shows messages Is the display showing ":"? Move the receiver away from the vent grille • Some steam is on motor rotation at : Whirlpool Brand Home Appliances Customer Interaction Center 553 Benson Road Benton Harbor, M149022-2692 Please include a daytime phone ...number in a cold area? If you the cost of your nearest Whirlpool designated service center. Do not operate the oven without turntable and turntable support working , call our Customer Interaction Center telephone number ...

