

Installation Instructions
Page 1
...Plate to Wall 8 Prepare Upper Cabinet 8 Install Damper Assembly 9 Install the Microwave Oven 9 Complete Installation 10 VENTING DESIGN SPECIFICATIONS 11 ASSISTANCE 12 Replacement Parts 12 Accessories 12 MICROWAVE HOOD COMBINATION SAFETY Your safety and the safety of injury, and tell you what... words mean: DANGER You can be killed or seriously injured if you to and including 36" (91.4 cm) wide. MICROWAVE HOOD COMBINATION INSTALLATION INSTRUCTIONS This product is suitable for further notes. This symbol alerts you don't immediately follow instructions. These installation...
...Plate to Wall 8 Prepare Upper Cabinet 8 Install Damper Assembly 9 Install the Microwave Oven 9 Complete Installation 10 VENTING DESIGN SPECIFICATIONS 11 ASSISTANCE 12 Replacement Parts 12 Accessories 12 MICROWAVE HOOD COMBINATION SAFETY Your safety and the safety of injury, and tell you what... words mean: DANGER You can be killed or seriously injured if you to and including 36" (91.4 cm) wide. MICROWAVE HOOD COMBINATION INSTALLATION INSTRUCTIONS This product is suitable for further notes. This symbol alerts you don't immediately follow instructions. These installation...

Installation Instructions
Page 2
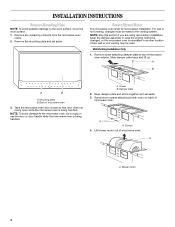
...50.8 x 101.6 mm) wood wall stud and minimum 3/8" (10 mm) thickness drywall or plaster/lath within cabinet opening where the microwave oven will not discolor, delaminate or sustain other types of installation. For other damages. Materials needed ■ Standard fittings for wood studs... listed here are using a rectangular to round transition piece, 3" (7.6 cm) clearance needs to withstand the heat produced by the microwave oven for cooking. Special Requirements For Wall Venting Installation Only: ■ Cutout must provide: ■ Minimum installation dimensions. Sheet metal...
...50.8 x 101.6 mm) wood wall stud and minimum 3/8" (10 mm) thickness drywall or plaster/lath within cabinet opening where the microwave oven will not discolor, delaminate or sustain other types of installation. For other damages. Materials needed ■ Standard fittings for wood studs... listed here are using a rectangular to round transition piece, 3" (7.6 cm) clearance needs to withstand the heat produced by the microwave oven for cooking. Special Requirements For Wall Venting Installation Only: ■ Cutout must provide: ■ Minimum installation dimensions. Sheet metal...

Installation Instructions
Page 3
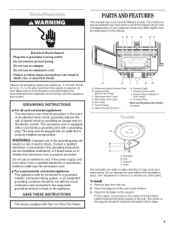
...not use of the grounding plug can result in a risk of electric shock. See "Electrical Requirements" section. Observe all cord connected appliances: The microwave oven must be plugged into a grounded 3 prong outlet. Grounded 3 prong outlet *30" (76.2 cm) is too short, have a qualified... electrician or serviceman install an outlet near the microwave oven. Product Dimensions 17¹⁄₄" (43.8 cm) 16¹⁄₂" (42.0 cm) (391.45¹c⁄₂m") 29⁷...
...not use of the grounding plug can result in a risk of electric shock. See "Electrical Requirements" section. Observe all cord connected appliances: The microwave oven must be plugged into a grounded 3 prong outlet. Grounded 3 prong outlet *30" (76.2 cm) is too short, have a qualified... electrician or serviceman install an outlet near the microwave oven. Product Dimensions 17¹⁄₄" (43.8 cm) 16¹⁄₂" (42.0 cm) (391.45¹c⁄₂m") 29⁷...
Installation Instructions
Page 4
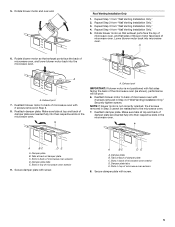
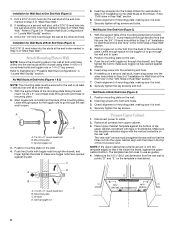
... and lift up. For wall or roof venting, changes must be used. Back of microwave oven exterior. Tape the microwave oven door closed so that door does not swing open while the microwave oven is set for recirculation installation. NOTE: To avoid damage to the work surface,... B. Damper plate 2. Blower motor 4 Remove two screws attaching blower motor to the venting system. Wall Venting Installation Only 1. A B A B A. A A. Rotate Blower Motor The microwave oven is being handled. NOTE: Skip this section if you are using recirculation installation. Lift blower motor out of...
... and lift up. For wall or roof venting, changes must be used. Back of microwave oven exterior. Tape the microwave oven door closed so that door does not swing open while the microwave oven is set for recirculation installation. NOTE: To avoid damage to the work surface,... B. Damper plate 2. Blower motor 4 Remove two screws attaching blower motor to the venting system. Wall Venting Installation Only 1. A B A B A. A A. Rotate Blower Motor The microwave oven is being handled. NOTE: Skip this section if you are using recirculation installation. Lift blower motor out of...
Installation Instructions
Page 5
... Installation Only." 2. A 6. Make sure tabs at top and back of damper plate are inserted fully into their respective slots in the microwave oven. Reattach damper plate. Make sure tabs at top and back of damper plate are inserted fully into their respective slots in top of... "Wall Venting Installation Only." Slots in the microwave oven. Repeat Step 2 from "Wall Venting Installation Only." 5. Damper plate tabs E. Repeat Step 4 from "Wall Venting Installation Only." 3. ...
... Installation Only." 2. A 6. Make sure tabs at top and back of damper plate are inserted fully into their respective slots in the microwave oven. Reattach damper plate. Make sure tabs at top and back of damper plate are inserted fully into their respective slots in top of... "Wall Venting Installation Only." Slots in the microwave oven. Repeat Step 2 from "Wall Venting Installation Only." 5. Damper plate tabs E. Repeat Step 4 from "Wall Venting Installation Only." 3. ...
Installation Instructions
Page 6
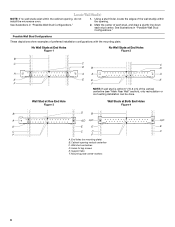
.... Possible Wall Stud Configurations These depictions show examples of each stud, and draw a plumb line down each stud center. Cabinet opening , do not install the microwave oven. 1. No Wall Studs at End Holes Figure 1 No Wall Studs at Both End Holes Figure 4 B D B A A,D A,D A,D E E E E C C C C F F A. Support tabs F. Wall Stud at One End Hole Figure...
.... Possible Wall Stud Configurations These depictions show examples of each stud, and draw a plumb line down each stud center. Cabinet opening , do not install the microwave oven. 1. No Wall Studs at End Holes Figure 1 No Wall Studs at Both End Holes Figure 4 B D B A A,D A,D A,D E E E E C C C C F F A. Support tabs F. Wall Stud at One End Hole Figure...
Installation Instructions
Page 7
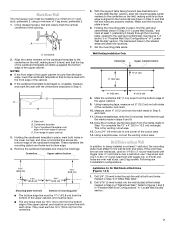
... bolt with each be 14¹⁄₈" (35.9 cm) from the bottom edge of the cutout area. 14. Rear wall B. Mark Rear Wall The microwave oven must be installed on the wall, making sure its top is level with the front edge of the cabinet. ■ If the cardboard template...
... bolt with each be 14¹⁄₈" (35.9 cm) from the bottom edge of the cutout area. 14. Rear wall B. Mark Rear Wall The microwave oven must be installed on the wall, making sure its top is level with the front edge of the cabinet. ■ If the cardboard template...
Installation Instructions
Page 8
... that it is level. 8. Position mounting plate on the rear wall. Push the bolt with the holes in Rear Wall" section. 2. Check alignment of the microwave oven. Place Upper Cabinet Template against drywall. 5. Make sure the template centerline aligns with tape or thumbtacks. Drywall D. Attach Mounting Plate to Wall NOTE: Secure...
... that it is level. 8. Position mounting plate on the rear wall. Push the bolt with the holes in Rear Wall" section. 2. Check alignment of the microwave oven. Place Upper Cabinet Template against drywall. 5. Make sure the template centerline aligns with tape or thumbtacks. Drywall D. Attach Mounting Plate to Wall NOTE: Secure...

Installation Instructions
Page 9
..., make sure the damper assembly fits easily into the vent in place. 9 Damper assembly C. Secure damper assembly with 2 sheet metal screws. Rotate microwave oven up toward upper cabinet. 5. This hole is closed and taped shut. 3. Power supply cord bushing 6. Cut 3/4" (19 mm) hole at... the top, and the damper blade opens away from the microwave oven. IMPORTANT: The control side of microwave oven B. With front of the shaded rectangular area "F" on Upper Cabinet Template. 8. Drill 3/8" (10 mm) holes at the ...
..., make sure the damper assembly fits easily into the vent in place. 9 Damper assembly C. Secure damper assembly with 2 sheet metal screws. Rotate microwave oven up toward upper cabinet. 5. This hole is closed and taped shut. 3. Power supply cord bushing 6. Cut 3/4" (19 mm) hole at... the top, and the damper blade opens away from the microwave oven. IMPORTANT: The control side of microwave oven B. With front of the shaded rectangular area "F" on Upper Cabinet Template. 8. Drill 3/8" (10 mm) holes at the ...
Installation Instructions
Page 10
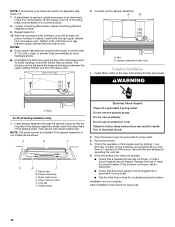
... WARNING A. Bolts For Roof Venting Installation Only 1. NOTE: The screw cannot be adjusted, skip steps 7-9. 7. Do not remove ground prong. Plug microwave oven into a grounded 3 prong outlet. ■ See the User Instructions for troubleshooting information. Test vent fan and exhaust by placing 1 cup (250... mL) of the damper plate. Installation is required, rotate microwave oven downward. To avoid warping, wood filler blocks may be the same thickness as shown. Damper assembly (under the raised tabs...
... WARNING A. Bolts For Roof Venting Installation Only 1. NOTE: The screw cannot be adjusted, skip steps 7-9. 7. Do not remove ground prong. Plug microwave oven into a grounded 3 prong outlet. ■ See the User Instructions for troubleshooting information. Test vent fan and exhaust by placing 1 cup (250... mL) of the damper plate. Installation is required, rotate microwave oven downward. To avoid warping, wood filler blocks may be the same thickness as shown. Damper assembly (under the raised tabs...
Installation Instructions
Page 11
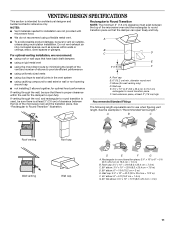
...; elbow: 6" = 10 ft (15.2 cm = 3 m) E. Rectangular to Round Transition NOTE: The minimum 3" (7.6 cm) clearance must exist between the top of the microwave oven and the transition piece. Elbow (for use when figuring vent length. Wall cap E. 3¹⁄₄" x 10" to 6" (8.3 x 25.4 cm to 15.2... rectangular to round transition is used, be sure there is at least 3" (7.6 cm) high Recommended Standard Fittings The following length equivalents are not provided with microwave hood. Wall cap: 3¹⁄₄" x 10" = 40 ft (8.3 x 25.4 cm = 12.2 m) F. 45° elbow: 6" = 5 ft (15.2 ...
...; elbow: 6" = 10 ft (15.2 cm = 3 m) E. Rectangular to Round Transition NOTE: The minimum 3" (7.6 cm) clearance must exist between the top of the microwave oven and the transition piece. Elbow (for use when figuring vent length. Wall cap E. 3¹⁄₄" x 10" to 6" (8.3 x 25.4 cm to 15.2... rectangular to round transition is used, be sure there is at least 3" (7.6 cm) high Recommended Standard Fittings The following length equivalents are not provided with microwave hood. Wall cap: 3¹⁄₄" x 10" = 40 ft (8.3 x 25.4 cm = 12.2 m) F. 45° elbow: 6" = 5 ft (15.2 ...
Installation Instructions
Page 12
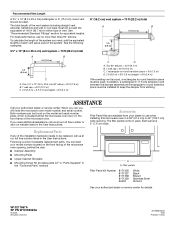
... plate, which is a list of vent. When you call, you will need , add the equivalent lengths of the system you need the microwave oven model number and serial number. The filler panels come in the system. To calculate the length of each vent piece used in pairs. ... A A. ASSISTANCE Call your authorized dealer or service center for details. Accessories Filler Panel Kits are available from sticking. The total length of the microwave oven. If you need your dealer to keep the damper from your model number located on the front frame of the vent system including straight...
... plate, which is a list of vent. When you call, you will need , add the equivalent lengths of the system you need the microwave oven model number and serial number. The filler panels come in the system. To calculate the length of each vent piece used in pairs. ... A A. ASSISTANCE Call your authorized dealer or service center for details. Accessories Filler Panel Kits are available from sticking. The total length of the microwave oven. If you need your dealer to keep the damper from your model number located on the front frame of the vent system including straight...
Use and Care Manual
Page 2
...Start/Add 30 Seconds 6 Easy Minute Feature 7 Cancel 7 Clock 7 Tones 7 Timer 7 Child Lock 7 Vent Fan 7 Cooktop Light 7 Demo Mode 7 MICROWAVE OVEN USE 8 Food Characteristics 8 Cooking Guidelines 8 Cookware and Dinnerware 8 Aluminum Foil and Metal 9 Cooking Power 9 Cooking 10 6th SENSF M System Cooking 10... Preset Cooking 10 Beverage 11 Cooking in Stages 11 Reheating 11 Defrosting 12 Warm Hold 12 MICROWAVE OVEN CARE 13 General Cleaning 13 Replacing Filters 13 Replacing Cooktop Light 14 Replacing Oven Light 14 TROUBLESHOOTING 14 ASSISTANCE OR ...
...Start/Add 30 Seconds 6 Easy Minute Feature 7 Cancel 7 Clock 7 Tones 7 Timer 7 Child Lock 7 Vent Fan 7 Cooktop Light 7 Demo Mode 7 MICROWAVE OVEN USE 8 Food Characteristics 8 Cooking Guidelines 8 Cookware and Dinnerware 8 Aluminum Foil and Metal 9 Cooking Power 9 Cooking 10 6th SENSF M System Cooking 10... Preset Cooking 10 Beverage 11 Cooking in Stages 11 Reheating 11 Defrosting 12 Warm Hold 12 MICROWAVE OVEN CARE 13 General Cleaning 13 Replacing Filters 13 Replacing Cooktop Light 14 Replacing Oven Light 14 TROUBLESHOOTING 14 ASSISTANCE OR ...

Use and Care Manual
Page 3
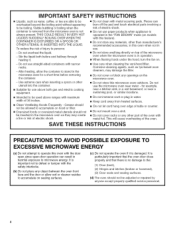
... and disconnect the power cord, or shut off power at the fuse or circuit breaker panel. - Do not overcook food. Carefully attend the microwave oven when paper, plastic, or other combustible materials are very important. the safety alert symbol and either the word "DANGER" or "WARNING." Connect..., cooking utensils, or food in the cavity when not in this section and in the provided Installation Instructions. [] Install or locate the microwave oven only in accordance with any appliance, close supervision is , tell you how to potential hazards that can be killed or seriously injured ...
... and disconnect the power cord, or shut off power at the fuse or circuit breaker panel. - Do not overcook food. Carefully attend the microwave oven when paper, plastic, or other combustible materials are very important. the safety alert symbol and either the word "DANGER" or "WARNING." Connect..., cooking utensils, or food in the cavity when not in this section and in the provided Installation Instructions. [] Install or locate the microwave oven only in accordance with any appliance, close supervision is , tell you how to potential hazards that can be killed or seriously injured ...
Use and Care Manual
Page 4
... to accumulate on sealing surfaces. (c) Do not operate the oven if it . [] Do not store anything directly on top of the microwave oven when the microwave oven is operated in the "PAN BROWN" mode (on models with the door open since open-door operation can burn off the pad ...through heating it is damaged. iMPORTANT SAFETY iNSTRUCTiONS [] Liquids, such as they may damage the filter. [] Do not cover or block any openings on the microwave oven. - Stir the liquid both gas and electric cooking equipment. [] Do not store this oven with this feature). [] Do not store any materials, ...
... to accumulate on sealing surfaces. (c) Do not operate the oven if it . [] Do not store anything directly on top of the microwave oven when the microwave oven is operated in the "PAN BROWN" mode (on models with the door open since open-door operation can burn off the pad ...through heating it is damaged. iMPORTANT SAFETY iNSTRUCTiONS [] Liquids, such as they may damage the filter. [] Do not cover or block any openings on the microwave oven. - Stir the liquid both gas and electric cooking equipment. [] Do not store this oven with this feature). [] Do not store any materials, ...
Use and Care Manual
Page 5
...risk of the FCC Rules. GROUNDING iNSTRUCTiONS [] For all cord connected appliances: The microwave oven must be run with the circuit conductors and connected to whether the microwave oven is equipped with a cord having a grounding wire with Part 18 of ... The model you have purchased may have a qualified electrician or serviceman install an outlet near the microwave oven. [] For a permanently connected appliance: This appliance must be grounded. SAVE THESE iNSTRUCTiONS I i ! Microwave Oven Light E. Do not use an adapter. G H A. Metal Shielded Window I J KH...
...risk of the FCC Rules. GROUNDING iNSTRUCTiONS [] For all cord connected appliances: The microwave oven must be run with the circuit conductors and connected to whether the microwave oven is equipped with a cord having a grounding wire with Part 18 of ... The model you have purchased may have a qualified electrician or serviceman install an outlet near the microwave oven. [] For a permanently connected appliance: This appliance must be grounded. SAVE THESE iNSTRUCTiONS I i ! Microwave Oven Light E. Do not use an adapter. G H A. Metal Shielded Window I J KH...

Use and Care Manual
Page 6
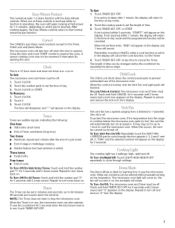
...weight. MICROWAVEOVENCONTROL l COOK COOK WARM DME DOWER HOED / iii 8 TIMER s T.OFF CLOCR When power is not in the oven. When the microwave oven is first supplied to soil buildup. See the charts in this oven. control starts the oven at 100% power for additional information. Damage... to the oven could result due to the microwave oven, a ":" will appear on automatically when cooking is over or CANCEL is designed specifically for two-level cooking. will blink on the...
...weight. MICROWAVEOVENCONTROL l COOK COOK WARM DME DOWER HOED / iii 8 TIMER s T.OFF CLOCR When power is not in the oven. When the microwave oven is first supplied to soil buildup. See the charts in this oven. control starts the oven at 100% power for additional information. Damage... to the oven could result due to the microwave oven, a ":" will appear on automatically when cooking is over or CANCEL is designed specifically for two-level cooking. will blink on the...
Use and Care Manual
Page 7
...during the countdown by repeating the above steps. "FAN" and the selected number will appear on the display. Repeat to cool the microwave oven. Thenumericpaal ds1-5sharefunctiowniththeEasyMinute controlsW. ClosethedoorandtouchSTARcTontrotol resumtehecycleA. Touch CLOCK. 2. To Remove: 1. The length of stage in minutes and seconds...if on . To see the countdown for 5 seconds until 2 tones sound. The Demo Mode is active in use the microwave oven. The microwave oven light will come on, the fan will appear on the display. rp.m. When the Timer is in the display will...
...during the countdown by repeating the above steps. "FAN" and the selected number will appear on the display. Repeat to cool the microwave oven. Thenumericpaal ds1-5sharefunctiowniththeEasyMinute controlsW. ClosethedoorandtouchSTARcTontrotol resumtehecycleA. Touch CLOCK. 2. To Remove: 1. The length of stage in minutes and seconds...if on . To see the countdown for 5 seconds until 2 tones sound. The Demo Mode is active in use the microwave oven. The microwave oven light will come on, the fan will appear on the display. rp.m. When the Timer is in the display will...

Use and Care Manual
Page 8
... membrane, such as chicken wings, leg tips and fish tail. China, Earthenware Follow manufacturer's recommendations. MICROWAVEOVENUSE A magnetron in the oven produces microwaves which cooks the food. • Do not lean on or allow children to swing on the volume and density of the food. The... pass through the turntable and appropriate cookware to allow a standing time. Composition and Density Foods high in several items of food. Microwaves are attracted to vent steam. Arranging If heating irregularly shaped or different sized foods, the thinner parts and smaller sizes should be ...
... membrane, such as chicken wings, leg tips and fish tail. China, Earthenware Follow manufacturer's recommendations. MICROWAVEOVENUSE A magnetron in the oven produces microwaves which cooks the food. • Do not lean on or allow children to swing on the volume and density of the food. The... pass through the turntable and appropriate cookware to allow a standing time. Composition and Density Foods high in several items of food. Microwaves are attracted to vent steam. Arranging If heating irregularly shaped or different sized foods, the thinner parts and smaller sizes should be ...

Use and Care Manual
Page 9
.... Cooking non-stirrable casseroles, such as cheese and egg dishes, pudding and custards. Follow manufacturer's recommendations. Cook at 100% cooking power for Microwave Use: 1. Do Not Use Metal cookware and bakeware, gold, silver, pewter, nonapproved meat thermometers, skewers, twist ties, foil liners such as...bakeware supplied with the oven (on some metal can occur and cause damage to the oven. Use those approved by the manufacturer for microwave oven use. If not used properly, arcing (a blue flash of fruit. For example, 70%=7=Medium-High. Use the following guidelines:...
.... Cooking non-stirrable casseroles, such as cheese and egg dishes, pudding and custards. Follow manufacturer's recommendations. Cook at 100% cooking power for Microwave Use: 1. Do Not Use Metal cookware and bakeware, gold, silver, pewter, nonapproved meat thermometers, skewers, twist ties, foil liners such as...bakeware supplied with the oven (on some metal can occur and cause damage to the oven. Use those approved by the manufacturer for microwave oven use. If not used properly, arcing (a blue flash of fruit. For example, 70%=7=Medium-High. Use the following guidelines:...


