Use and Care Manual
Page 2
TABLEOF CONTENTS MICROWAVE HOOD COMBINATION SAFETY 3 Electrical Requirements 4 PARTS AND FEATURES 5 Turntable 5 Cooking Rack 5 MICROWAVE OVEN CONTROL 6 Display 6 Start 6 Cancel Off 6 Add 30 Seconds 6 Clock 6 Tones 7 Timer 7 Control Lock 7 Vent Fan 7 Cooktop Light 7 Demo Mode 7 MICROWAVE OVEN ...
TABLEOF CONTENTS MICROWAVE HOOD COMBINATION SAFETY 3 Electrical Requirements 4 PARTS AND FEATURES 5 Turntable 5 Cooking Rack 5 MICROWAVE OVEN CONTROL 6 Display 6 Start 6 Cancel Off 6 Add 30 Seconds 6 Clock 6 Tones 7 Timer 7 Control Lock 7 Vent Fan 7 Cooktop Light 7 Demo Mode 7 MICROWAVE OVEN ...
Use and Care Manual
Page 5
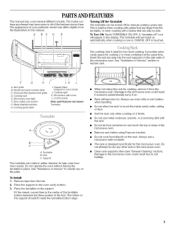
... The model you have purchased may have some or all of your particular model may cover several different models. To Turn Off: Touch TURNTABLE ON-OFE A "turntable off for manual cooking cycles only. F G HI JK L A. Cooking rack E. Microwave oven light F. Metal shielded window H. Remove... slightly from the illustrations in this manual. To Install: 1. Microwave inlet cover L. Do not operate the oven without having the turntable in oven cavity) J. Place the support on . Always use oven mitts or pot holders when handling. Damage to the microwave ...
... The model you have purchased may have some or all of your particular model may cover several different models. To Turn Off: Touch TURNTABLE ON-OFE A "turntable off for manual cooking cycles only. F G HI JK L A. Cooking rack E. Microwave oven light F. Metal shielded window H. Remove... slightly from the illustrations in this manual. To Install: 1. Microwave inlet cover L. Do not operate the oven without having the turntable in oven cavity) J. Place the support on . Always use oven mitts or pot holders when handling. Damage to the microwave ...
Use and Care Manual
Page 6
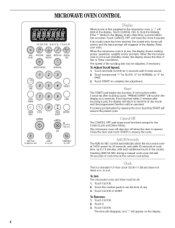
... Adjust Scroll Speed: I . Touch number pad "1" for SLOW, "2" for NORMAL or "3" for 3 seconds until 2 tones sound. 2. VENTFAN Hi'Med.Lo.Off LIGHT Hi.Lo.Off TURNTABLE On'Off The ADD 30 SEC control automatically starts the microwave oven at 100% power for the Control Lock and Demo Mode. Touch CLOCK. 2. When...
... Adjust Scroll Speed: I . Touch number pad "1" for SLOW, "2" for NORMAL or "3" for 3 seconds until 2 tones sound. 2. VENTFAN Hi'Med.Lo.Off LIGHT Hi.Lo.Off TURNTABLE On'Off The ADD 30 SEC control automatically starts the microwave oven at 100% power for the Control Lock and Demo Mode. Touch CLOCK. 2. When...
Use and Care Manual
Page 7
... The TIMER icon will rotate (if set in minutes and seconds, up to 1 hour to turn tones back on , the fan will run, and the turntable will appear in the display. Touch and hold number pad "1" to unlock and remove the padlock icon from the range or cooktop below the microwave...
... The TIMER icon will rotate (if set in minutes and seconds, up to 1 hour to turn tones back on , the fan will run, and the turntable will appear in the display. Touch and hold number pad "1" to unlock and remove the padlock icon from the range or cooktop below the microwave...
Use and Care Manual
Page 8
... volume and density of food will not melt in the microwave oven because it is empty. • The turntable must be dried in microwave oven. • Do not use if turntable is not available, wax paper, paper towels or plastic wrap approved for canning, sterilizing or deep frying. Check... same size and shape, place them to move, producing friction and heat which reflect off the metal floor, walls and ceiling and pass through the turntable and appropriate cookware to reorder. • Baby bottles and baby food jars should not be heated in microwave oven. • Clothes, flowers, fruit,...
... volume and density of food will not melt in the microwave oven because it is empty. • The turntable must be dried in microwave oven. • Do not use if turntable is not available, wax paper, paper towels or plastic wrap approved for canning, sterilizing or deep frying. Check... same size and shape, place them to move, producing friction and heat which reflect off the metal floor, walls and ceiling and pass through the turntable and appropriate cookware to reorder. • Baby bottles and baby food jars should not be heated in microwave oven. • Clothes, flowers, fruit,...

Use and Care Manual
Page 9
... meat thermometers, skewers, twist ties, foil liners such as a general guide for microwave oven use the turntable. • Do not allow contact with 1 cup (250 mL) of specific foods. Heating cream soups...holders when removing dishes from the microwave oven. Cook at least 3/16" (5 mm) above the turntable. i._.__s_--.__:I J_ CookwaarenddinnerwamreusftitontheturntableA.lwayusse ovenmittsorpotholderws henhandlinbgecausaenydishmay becomheotfromheatransferrefrdomthefood.Donotuse cookwaraenddinnerwawreithgoldorsilvetrrim.Usethe followincgharat saguidet,hentestbeforuesing. Melamine Follow...
... meat thermometers, skewers, twist ties, foil liners such as a general guide for microwave oven use the turntable. • Do not allow contact with 1 cup (250 mL) of specific foods. Heating cream soups...holders when removing dishes from the microwave oven. Cook at least 3/16" (5 mm) above the turntable. i._.__s_--.__:I J_ CookwaarenddinnerwamreusftitontheturntableA.lwayusse ovenmittsorpotholderws henhandlinbgecausaenydishmay becomheotfromheatransferrefrdomthefood.Donotuse cookwaraenddinnerwawreithgoldorsilvetrrim.Usethe followincgharat saguidet,hentestbeforuesing. Melamine Follow...
Use and Care Manual
Page 10
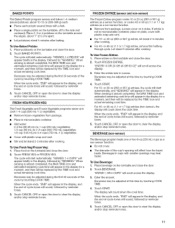
... at a time. • Do not use regular paper bags or glassware. • Do not try placing a microwavable dish upside down on the turntable, placing a fresh popcorn bag on package. • Pop only one package at different cooking powers for the countdown to clear the display and/or ...1. Touch COOK TIME, then enter length of -cycle tones will start automatically. If cooking with 100% power, skip Step 3. 3. Place popcorn bag on the turntable and close the door. 2. NOTE: The Popcorn times are dry. When the cycle ends, "END" will appear in the display, and the end-of ...
... at a time. • Do not use regular paper bags or glassware. • Do not try placing a microwavable dish upside down on the turntable, placing a fresh popcorn bag on package. • Pop only one package at different cooking powers for the countdown to clear the display and/or ...1. Touch COOK TIME, then enter length of -cycle tones will start automatically. If cooking with 100% power, skip Step 3. 3. Place popcorn bag on the turntable and close the door. 2. NOTE: The Popcorn times are dry. When the cycle ends, "END" will appear in the display, and the end-of ...
Use and Care Manual
Page 11
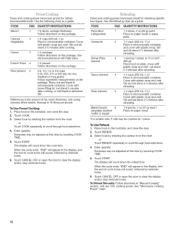
... estimated remaining cook time will appear briefly in microwavable container, place on plate, cover with a fork. • Place a single potato on the turntable, off to 3-4 cups (750 mL-1 L) vegetables. • Cover with smaller openings may be replaced by the TIME icon and actual remaining cook... Frozen Vegetable programs sense and cook 1-4 cups (250 mL-1 L) vegetables. • Remove frozen vegetables from package. Place food on the turntable and close the door. 2. When sensing is almost completed, the MAX TIME icon and estimated remaining cook time will appear in the display,...
... estimated remaining cook time will appear briefly in microwavable container, place on plate, cover with a fork. • Place a single potato on the turntable, off to 3-4 cups (750 mL-1 L) vegetables. • Cover with smaller openings may be replaced by the TIME icon and actual remaining cook... Frozen Vegetable programs sense and cook 1-4 cups (250 mL-1 L) vegetables. • Remove frozen vegetables from package. Place food on the turntable and close the door. 2. When sensing is almost completed, the MAX TIME icon and estimated remaining cook time will appear in the display,...
Use and Care Manual
Page 12
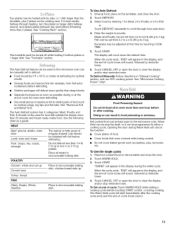
...and vent. To Use Reheat: 1. Place food on the package. Doneness may be counted as 1 piece. Cereal 3 1-4 servings/ Follow directions on the turntable, and close the door. 2. French Toast 4 1-4 pieces/ Follow directions on the package. Rice (sensor) 5 0.5, 1.0, 1.5 or 2.0 cups (..." will appear in microwavable container. Stir and let stand 2-3 minutes after reheating. 1-6 pieces, 2 oz (57 g) each / Place on the turntable, and close the door. 2. Place rice and liquid in microwavable container. Average is absorbed. Stir and let stand 2-3 minutes after reheating. 1-4 ...
...and vent. To Use Reheat: 1. Place food on the package. Doneness may be counted as 1 piece. Cereal 3 1-4 servings/ Follow directions on the turntable, and close the door. 2. French Toast 4 1-4 pieces/ Follow directions on the package. Rice (sensor) 5 0.5, 1.0, 1.5 or 2.0 cups (..." will appear in microwavable container. Stir and let stand 2-3 minutes after reheating. 1-6 pieces, 2 oz (57 g) each / Place on the turntable, and close the door. 2. Place rice and liquid in microwavable container. Average is absorbed. Stir and let stand 2-3 minutes after reheating. 1-4 ...
Use and Care Manual
Page 13
... the end-of irregular shaped cuts should be set to defrost. • Food should not be used for optimal results. Unwrap food, place on the turntable and close the door. 2. To Use (for example, from 0.2 to 6.6 Ib (90 g to 3 kg). Touch START. For best results, halfway through food ... 1. Hot cooked food can be 0°F (-18°C) or colder at defrosting for food left outside the freezer more quickly than 2 plates). See "Turntable" section. Use the following chart as chicken wings, leg tips and fish tails. Select food by side, or 1 dish larger than 1/4 Ib (113 g)...
... the end-of irregular shaped cuts should be set to defrost. • Food should not be used for optimal results. Unwrap food, place on the turntable and close the door. 2. To Use (for example, from 0.2 to 6.6 Ib (90 g to 3 kg). Touch START. For best results, halfway through food ... 1. Hot cooked food can be 0°F (-18°C) or colder at defrosting for food left outside the freezer more quickly than 2 plates). See "Turntable" section. Use the following chart as chicken wings, leg tips and fish tails. Select food by side, or 1 dish larger than 1/4 Ib (113 g)...
Use and Care Manual
Page 14
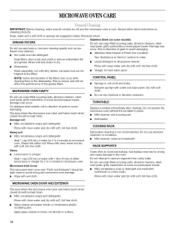
Rinse well and shake to remove supports from cavity walls. TURNTABLE On stainless steel models, rub in direction of the filters may occur. • Do not use abrasive RACK SUPPORTS Odors • Lemon juice or ... soap-filled scouring pads, abrasive cleaners, steelwool pads, gritty washcloths or some recycled paper towels. Average soil Replace turntable immediately after cleaning them in the dishwasher. Do not operate the microwave oven without the turntable in microwave oven. COOKING RACK Heavy soil • Mild, nonabrasive soaps and detergents: Heat 1 cup (250...
Rinse well and shake to remove supports from cavity walls. TURNTABLE On stainless steel models, rub in direction of the filters may occur. • Do not use abrasive RACK SUPPORTS Odors • Lemon juice or ... soap-filled scouring pads, abrasive cleaners, steelwool pads, gritty washcloths or some recycled paper towels. Average soil Replace turntable immediately after cleaning them in the dishwasher. Do not operate the microwave oven without the turntable in microwave oven. COOKING RACK Heavy soil • Mild, nonabrasive soaps and detergents: Heat 1 cup (250...
Use and Care Manual
Page 16
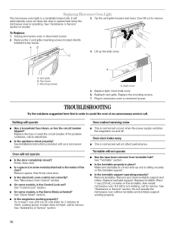
... power. If the problem continues, call . See "Control Lock" section. See "Assistance or Service" section. Is the turntable support operating properly? Replace turntable. It will automatically come on when the door is opened and when the microwave oven is not working, call for service.... Control" section. Is the magnetron working properly. 16 If it still is operating. Do not operate the microwave oven without turntable and turntable support working properly? Replace the fuse or reset the circuit breaker. Remove spacer, then firmly close door. Oven door looks ...
... power. If the problem continues, call . See "Control Lock" section. See "Assistance or Service" section. Is the turntable support operating properly? Replace turntable. It will automatically come on when the door is opened and when the microwave oven is not working, call for service.... Control" section. Is the magnetron working properly. 16 If it still is operating. Do not operate the microwave oven without turntable and turntable support working properly? Replace the fuse or reset the circuit breaker. Remove spacer, then firmly close door. Oven door looks ...
Use and Care Manual
Page 17
...? Make sure these items during cooktop usage • This is normal. See "Timer" section. • On some models, is the Demo Mode in the home. Turntable alternates rotation directions • This is normal and depends on during oven operation. 17 Radio, TV or cordless phone interference • Is the microwave oven...
...? Make sure these items during cooktop usage • This is normal. See "Timer" section. • On some models, is the Demo Mode in the home. Turntable alternates rotation directions • This is normal and depends on during oven operation. 17 Radio, TV or cordless phone interference • Is the microwave oven...
Use and Care Manual
Page 18
...our full line of your correspondence. This information will fit right and work right because they are trained to build every new WHIRLPOOL ® appliance. For further assistance If you use only FSP® replacement parts. When calling, please know the purchase... repair parts sales. • Specialized customer assistance (Spanish speaking, hearing impaired, limited vision, etc.). Turntable Part Number 8206226 Turntable Support and Rollers Part Number 8206227 Turntable Hub Part Number 8206228 Cooking Rack Part Number 8205042 Rack Corner Clip Part Number 8205039 Rack Support Part ...
...our full line of your correspondence. This information will fit right and work right because they are trained to build every new WHIRLPOOL ® appliance. For further assistance If you use only FSP® replacement parts. When calling, please know the purchase... repair parts sales. • Specialized customer assistance (Spanish speaking, hearing impaired, limited vision, etc.). Turntable Part Number 8206226 Turntable Support and Rollers Part Number 8206227 Turntable Hub Part Number 8206228 Cooking Rack Part Number 8205042 Rack Corner Clip Part Number 8205039 Rack Support Part ...
Installation Instructions
Page 10
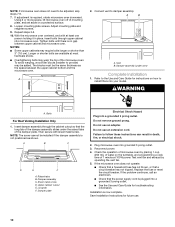
... and the microwave oven. NOTES: ■ Some upper cabinets may be adjusted, skip steps 7-9. 7. A 2. Refer to the Use and Care Guide for instructions on the turntable, and programming a cook time of the damper plate. NOTE: The screw cannot be the same thickness as shown. Do not use an extension cord. Test...
... and the microwave oven. NOTES: ■ Some upper cabinets may be adjusted, skip steps 7-9. 7. A 2. Refer to the Use and Care Guide for instructions on the turntable, and programming a cook time of the damper plate. NOTE: The screw cannot be the same thickness as shown. Do not use an extension cord. Test...
Parts Guide
Page 6
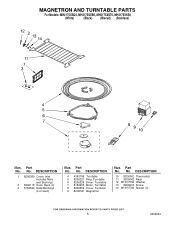
... Illus. No. No. No. DESCRIPTION 10 8206342 Thermostat 11 8205042 Rack 12 W10107790 Washer 13 8206618 Screw 14 W10107780 Spacer (4) 6 8206634 Part No. MAGNETRON AND TURNTABLE PARTS For Models: MH2175XSQ0, MH2175SXB0, MH2175XST0, MH2175XSS0 (White) (Black) (Biscuit) (Stainless) Illus. DESCRIPTION 1 8206389 Cover, Inlet Includes Nails and Bushings 2 8206118 Hook, Rack (4) 3 8184549 Nails...
... Illus. No. No. No. DESCRIPTION 10 8206342 Thermostat 11 8205042 Rack 12 W10107790 Washer 13 8206618 Screw 14 W10107780 Spacer (4) 6 8206634 Part No. MAGNETRON AND TURNTABLE PARTS For Models: MH2175XSQ0, MH2175SXB0, MH2175XST0, MH2175XSS0 (White) (Black) (Biscuit) (Stainless) Illus. DESCRIPTION 1 8206389 Cover, Inlet Includes Nails and Bushings 2 8206118 Hook, Rack (4) 3 8184549 Nails...


