
User Manual
Page 1
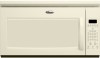
or visit our website at... www.whirlpool.com Table of Contents 2 W10110883 Model MH1170XS ® MICROWAVE HOOD COMBINATION Use & Care Guide For questions about features, operation/performance, parts, accessories or service, call: 1-800-253-1301.
or visit our website at... www.whirlpool.com Table of Contents 2 W10110883 Model MH1170XS ® MICROWAVE HOOD COMBINATION Use & Care Guide For questions about features, operation/performance, parts, accessories or service, call: 1-800-253-1301.
User Manual
Page 2
...Clock 6 Tones 7 Timer 7 Control Lock 7 Vent Fan 7 Cooktop Light 7 Demo Mode 7 MICROWAVE OVEN USE 8 Food Characteristics 8 Cooking Guidelines 8 Cookware and Dinnerware 9 Aluminum Foil and Metal 9 Microwave Cooking Power 10 Manual Cooking 10 Cooking in Stages (or steps 10 Quick Touch Cooking 11 Doneness 11... Preset Cooking 11 Reheating 12 Defrosting 12 Warm Hold 13 MICROWAVE OVEN CARE 14 General Cleaning 14 Replacing Filters 15 Replacing Cooktop Light 15 Replacing Microwave Oven Light 16 TROUBLESHOOTING 17 ASSISTANCE OR SERVICE 19 Replacement Parts 19 ...
...Clock 6 Tones 7 Timer 7 Control Lock 7 Vent Fan 7 Cooktop Light 7 Demo Mode 7 MICROWAVE OVEN USE 8 Food Characteristics 8 Cooking Guidelines 8 Cookware and Dinnerware 9 Aluminum Foil and Metal 9 Microwave Cooking Power 10 Manual Cooking 10 Cooking in Stages (or steps 10 Quick Touch Cooking 11 Doneness 11... Preset Cooking 11 Reheating 12 Defrosting 12 Warm Hold 13 MICROWAVE OVEN CARE 14 General Cleaning 14 Replacing Filters 15 Replacing Cooktop Light 15 Replacing Microwave Oven Light 16 TROUBLESHOOTING 17 ASSISTANCE OR SERVICE 19 Replacement Parts 19 ...

User Manual
Page 3
... are able to be killed or seriously injured if you don't immediately follow the specific "PRECAUTIONS TO AVOID POSSIBLE EXPOSURE TO EXCESSIVE MICROWAVE ENERGY" found in accordance with the provided Installation Instructions. ■ Some products such as they may create a fire or risk of...overcook food. Call an authorized service company for examination, repair, or adjustment. ■ See door surface cleaning instructions in the microwave oven. ■ Use the microwave oven only for example, closed , turn oven off, and disconnect the power cord, or shut off the pad and touch...
... are able to be killed or seriously injured if you don't immediately follow the specific "PRECAUTIONS TO AVOID POSSIBLE EXPOSURE TO EXCESSIVE MICROWAVE ENERGY" found in accordance with the provided Installation Instructions. ■ Some products such as they may create a fire or risk of...overcook food. Call an authorized service company for examination, repair, or adjustment. ■ See door surface cleaning instructions in the microwave oven. ■ Use the microwave oven only for example, closed , turn oven off, and disconnect the power cord, or shut off the pad and touch...

User Manual
Page 4
... turn the fan on. ■ Use care when cleaning the vent-hood filter. SAVE THESE INSTRUCTIONS PRECAUTIONS TO AVOID POSSIBLE EXPOSURE TO EXCESSIVE MICROWAVE ENERGY (a) Do not attempt to operate this appliance. Required: ■ A 120 Volt, 60 Hz, AC only, 15- In the ... Door (bent), (2) Hinges and latches (broken or loosened), (3) Door seals and sealing surfaces. (d) The oven should not be grounded. The microwave oven is damaged. IMPORTANT SAFETY INSTRUCTIONS ■ Suitable for use above both gas and electric cooking equipment. ■ Intended to be used above ranges...
... turn the fan on. ■ Use care when cleaning the vent-hood filter. SAVE THESE INSTRUCTIONS PRECAUTIONS TO AVOID POSSIBLE EXPOSURE TO EXCESSIVE MICROWAVE ENERGY (a) Do not attempt to operate this appliance. Required: ■ A 120 Volt, 60 Hz, AC only, 15- In the ... Door (bent), (2) Hinges and latches (broken or loosened), (3) Door seals and sealing surfaces. (d) The oven should not be grounded. The microwave oven is damaged. IMPORTANT SAFETY INSTRUCTIONS ■ Suitable for use above both gas and electric cooking equipment. ■ Intended to be used above ranges...
User Manual
Page 5
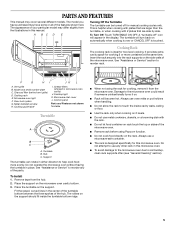
... either direction to touch the inside the turntable bottom ridge. ■ When not using Popcorn function. ■ Do not cook food directly on the microwave oven cavity bottom. 3. Place the support on the rack. Always use metal cookware, utensils, or a browning dish with 2 plates that are larger.... ■ Do not allow the rack to help cook food more containers at the same time. See "Assistance or Service" section to use a microwave-safe container. ■ The rack is ideal for cooking 2 or more evenly. Grease filters (shipped in place. Control panel Parts and Features not...
... either direction to touch the inside the turntable bottom ridge. ■ When not using Popcorn function. ■ Do not cook food directly on the microwave oven cavity bottom. 3. Place the support on the rack. Always use metal cookware, utensils, or a browning dish with 2 plates that are larger.... ■ Do not allow the rack to help cook food more containers at the same time. See "Assistance or Service" section to use a microwave-safe container. ■ The rack is ideal for cooking 2 or more evenly. Grease filters (shipped in place. Control panel Parts and Features not...

User Manual
Page 6
...input prompt will blink in the display as a reminder. Touch CLOCK. 2. To Remove: 1. Add 30 Seconds The ADD 30 SEC control automatically starts the microwave oven at the current cook power. Retry your entry. or p.m. Touch CLOCK or START. Touching ADD 30 SEC during a manual cook cycle will be ...adjusted, if necessary. When the microwave oven is first supplied to the time of day mode and the programmed function will add 30 seconds of cook time at 100% power for...
...input prompt will blink in the display as a reminder. Touch CLOCK. 2. To Remove: 1. Add 30 Seconds The ADD 30 SEC control automatically starts the microwave oven at the current cook power. Retry your entry. or p.m. Touch CLOCK or START. Touching ADD 30 SEC during a manual cook cycle will be ...adjusted, if necessary. When the microwave oven is first supplied to the time of day mode and the programmed function will add 30 seconds of cook time at 100% power for...

User Manual
Page 7
... for learning how to the time of -timer tone will scroll in the display. Touch and hold the number pad "3" for 10 seconds while the microwave oven is also the cooling fan, and will flash during automatic fan operation, "AUTO FAN IS ON, FAN SPEED WILL REMAIN ON UNTIL HEAT IS... NO LONGER SENSED" will sound. To Turn On/Off: The microwave oven must be turned off and remove the DEMO icon from display. Touch and hold number pad "1" to operate. To see the countdown for 3 seconds...
... for learning how to the time of -timer tone will scroll in the display. Touch and hold the number pad "3" for 10 seconds while the microwave oven is also the cooling fan, and will flash during automatic fan operation, "AUTO FAN IS ON, FAN SPEED WILL REMAIN ON UNTIL HEAT IS... NO LONGER SENSED" will sound. To Turn On/Off: The microwave oven must be turned off and remove the DEMO icon from display. Touch and hold number pad "1" to operate. To see the countdown for 3 seconds...

User Manual
Page 8
...items of the same size and shape, place them in a ring pattern, leaving the center of the ring empty. Food Characteristics When microwave cooking, the amount, size and shape, starting temperature, composition and density of the recommended cook time, potatoes should be slightly firm....once, the longer the cook time needed. Cooking Guidelines Covering Covering food helps retain moisture, shorten cook time and reduce spattering. Microwaves are attracted to and absorbed by the natural conduction of food. Arranging If heating irregularly shaped or different sized foods, arrange the...
...items of the same size and shape, place them in a ring pattern, leaving the center of the ring empty. Food Characteristics When microwave cooking, the amount, size and shape, starting temperature, composition and density of the recommended cook time, potatoes should be slightly firm....once, the longer the cook time needed. Cooking Guidelines Covering Covering food helps retain moisture, shorten cook time and reduce spattering. Microwaves are attracted to and absorbed by the natural conduction of food. Arranging If heating irregularly shaped or different sized foods, arrange the...

User Manual
Page 9
... because any dish may be used with the following chart as sandwich wrappers, staples and objects with another metal object during microwave cooking. MATERIAL RECOMMENDATIONS Aluminum Foil, Metal See "Aluminum Foil and Metal" section. Straw, Wicker, Wooden Containers Do not ...'s recommendations. Paper: Towels, Dinnerware, Napkins Use nonrecycled and those approved by the manufacturer for Use Racks and bakeware supplied with the microwave oven (on the turntable. Do Not Use Metal cookware and bakeware, gold, silver, pewter, nonapproved meat thermometers, skewers, twist ties...
... because any dish may be used with the following chart as sandwich wrappers, staples and objects with another metal object during microwave cooking. MATERIAL RECOMMENDATIONS Aluminum Foil, Metal See "Aluminum Foil and Metal" section. Straw, Wicker, Wooden Containers Do not ...'s recommendations. Paper: Towels, Dinnerware, Napkins Use nonrecycled and those approved by the manufacturer for Use Racks and bakeware supplied with the microwave oven (on the turntable. Do Not Use Metal cookware and bakeware, gold, silver, pewter, nonapproved meat thermometers, skewers, twist ties...

User Manual
Page 10
... 1. Touch START. The cook time and cooking power of the operating stage can be set for manual cooking at different cooking powers for microwave cooking specify which cooking power to use by reminder tones. 6. Cooking non-stirrable casseroles, such as cheese and egg dishes, pudding and .... To Change Cook Power: Touch COOK POWER repeatedly to scroll through the cook power levels. To Cook in Stages (or steps) The microwave oven can be changed after touching START without interrupting cooking. When the cycle ends, "END" will appear in the display, and the ...
... 1. Touch START. The cook time and cooking power of the operating stage can be set for manual cooking at different cooking powers for microwave cooking specify which cooking power to use by reminder tones. 6. Cooking non-stirrable casseroles, such as cheese and egg dishes, pudding and .... To Change Cook Power: Touch COOK POWER repeatedly to scroll through the cook power levels. To Cook in Stages (or steps) The microwave oven can be changed after touching START without interrupting cooking. When the cycle ends, "END" will appear in the display, and the ...

User Manual
Page 11
... 2. Touch START. Preset Cooking Times and cooking power have been preset for NORMAL. Canned 2 Vegetables 1-4 cups (250 mL-1 L)/ Place in microwave-safe container. Stir and let stand 2-3 minutes after cooking. Frozen 4 Vegetables 1-4 cups (250 mL-1 L)/ Remove from package. Cover with loose... vary by reminder tones. 4. During programming, before touching START, touch COOK TIME once for MORE, twice for LESS or 3 times for certain microwavable foods. Rice 5 0.5, 1.0, 1.5 or 2.0 cups (125, 250, 375 or 500 mL) dry rice (medium or long grain)/ Follow ingredient...
... 2. Touch START. Preset Cooking Times and cooking power have been preset for NORMAL. Canned 2 Vegetables 1-4 cups (250 mL-1 L)/ Place in microwave-safe container. Stir and let stand 2-3 minutes after cooking. Frozen 4 Vegetables 1-4 cups (250 mL-1 L)/ Remove from package. Cover with loose... vary by reminder tones. 4. During programming, before touching START, touch COOK TIME once for MORE, twice for LESS or 3 times for certain microwavable foods. Rice 5 0.5, 1.0, 1.5 or 2.0 cups (125, 250, 375 or 500 mL) dry rice (medium or long grain)/ Follow ingredient...

User Manual
Page 12
...larger than 2 plates). The turntable must be heated side by reminder tones. 6. When the cycle ends, "END" will appear in microwave-safe container, and cover with plastic wrap and vent. The Auto Defrost system has 3 categories: Meat, Poultry and Fish. Reheating ... of food such as chicken wings, leg tips and fish tails. Touch REHEAT. 3. To Reheat Manually: Follow directions in microwave-safe container. See "Microwave Cooking Power" chart. Let stand 2-3 minutes after reheating. Stir and let stand 2-3 minutes after reheating. Touch START. See...
...larger than 2 plates). The turntable must be heated side by reminder tones. 6. When the cycle ends, "END" will appear in microwave-safe container, and cover with plastic wrap and vent. The Auto Defrost system has 3 categories: Meat, Poultry and Fish. Reheating ... of food such as chicken wings, leg tips and fish tails. Touch REHEAT. 3. To Reheat Manually: Follow directions in microwave-safe container. See "Microwave Cooking Power" chart. Let stand 2-3 minutes after reheating. Stir and let stand 2-3 minutes after reheating. Touch START. See...

User Manual
Page 13
...in "Manual Cooking" section, and use 30% cooking power. Select food by reminder tones. 6. To Defrost Manually: Follow directions in microwavesafe baking dish. See "Microwave Cooking Power" chart. Warm Hold WARNING Food Poisoning Hazard Do not let food sit in oven more than 1/4 lb (113 g) or two 4 oz (113...warm in the display during cooking. Fish can be set from 0.2 to 4.4 lb (90 g to 3 kg). Hot cooked food can result in microwave-safe baking dish. To Use (for Fish or Touch DEFROST repeatedly to follow a cooking cycle. Unwrap food, place on the turntable and close the ...
...in "Manual Cooking" section, and use 30% cooking power. Select food by reminder tones. 6. To Defrost Manually: Follow directions in microwavesafe baking dish. See "Microwave Cooking Power" chart. Warm Hold WARNING Food Poisoning Hazard Do not let food sit in oven more than 1/4 lb (113 g) or two 4 oz (113...warm in the display during cooking. Fish can be set from 0.2 to 4.4 lb (90 g to 3 kg). Hot cooked food can result in microwave-safe baking dish. To Use (for Fish or Touch DEFROST repeatedly to follow a cooking cycle. Unwrap food, place on the turntable and close the ...

User Manual
Page 14
... cloth. ■ Vinegar for hard water spots NOTE: Some discoloration of the filters may lead to arcing and cause damage to the microwave oven cavity, do not use soap-filled scouring pads, abrasive cleaners, steel-wool pads, gritty washcloths or some paper towels. Rub in...; Stainless Steel Cleaner & Polish (not included): Soak filters, then scrub and swish to 5 minutes in the dishwasher. Microwave Inlet Cover To avoid arcing and microwave oven damage, the microwave inlet cover (see "Parts and Features") should be kept clean. ■ Mild, nonabrasive soaps and detergents: Rinse with...
... cloth. ■ Vinegar for hard water spots NOTE: Some discoloration of the filters may lead to arcing and cause damage to the microwave oven cavity, do not use soap-filled scouring pads, abrasive cleaners, steel-wool pads, gritty washcloths or some paper towels. Rub in...; Stainless Steel Cleaner & Polish (not included): Soak filters, then scrub and swish to 5 minutes in the dishwasher. Microwave Inlet Cover To avoid arcing and microwave oven damage, the microwave inlet cover (see "Parts and Features") should be kept clean. ■ Mild, nonabrasive soaps and detergents: Rinse with...

User Manual
Page 15
... up and slide into the outer end of the frame. A B C 4. To Replace: 1. Replace mounting screw. 4. Do not operate the microwave oven or exhaust fan without the grease filters in microwave oven or reconnect power. 15 See "Assistance or Service" to reorder. Tabs 2. Remove the 2 vent grille mounting screws located directly behind... Filters The grease filters should be removed and cleaned at least once a month. Install new charcoal filter. 5. See "General Cleaning" for cleaning instructions. Unplug microwave oven or disconnect power. 2. Vent grille B. Top louver C.
... up and slide into the outer end of the frame. A B C 4. To Replace: 1. Replace mounting screw. 4. Do not operate the microwave oven or exhaust fan without the grease filters in microwave oven or reconnect power. 15 See "Assistance or Service" to reorder. Tabs 2. Remove the 2 vent grille mounting screws located directly behind... Filters The grease filters should be removed and cleaned at least once a month. Install new charcoal filter. 5. See "General Cleaning" for cleaning instructions. Unplug microwave oven or disconnect power. 2. Vent grille B. Top louver C.

User Manual
Page 16
... Top louver C. Replace light. Replace the mounting screws. 7. Unplug microwave oven or disconnect power. 2. A A. To Replace: 1. Bulb cover 5. A B C 4. Mounting screws A. Plug in microwave oven or reconnect power. 16 Replacing Microwave Oven Light The microwave oven light is operating. Lift up the bulb cover. It will automatically... come on when the door is opened and when the microwave oven is a candelabra base bulb. Tip the vent grille forward and down, then lift out to reorder. 3. Reattach ...
... Top louver C. Replace light. Replace the mounting screws. 7. Unplug microwave oven or disconnect power. 2. A A. To Replace: 1. Bulb cover 5. A B C 4. Mounting screws A. Plug in microwave oven or reconnect power. 16 Replacing Microwave Oven Light The microwave oven light is operating. Lift up the bulb cover. It will automatically... come on when the door is opened and when the microwave oven is a candelabra base bulb. Tip the vent grille forward and down, then lift out to reorder. 3. Reattach ...

User Manual
Page 17
... minutes at the beginning of water on some models) attached to the inside of the door? If the problem continues, call for service. Microwave oven will not affect performance. See "Control Lock" section. ■ On some models, is the Control Lock set correctly? If it ... See "Timer" section. ■ On some models, is not operating ■ Is the Timer in use ? See Installation Instructions provided with your microwave oven. Try to turn it reappears, call an electrician. ■ Is the appliance wired properly? Replace turntable. There has been a power failure or...
... minutes at the beginning of water on some models) attached to the inside of the door? If the problem continues, call for service. Microwave oven will not affect performance. See "Control Lock" section. ■ On some models, is the Control Lock set correctly? If it ... See "Timer" section. ■ On some models, is not operating ■ Is the Timer in use ? See Installation Instructions provided with your microwave oven. Try to turn it reappears, call an electrician. ■ Is the appliance wired properly? Replace turntable. There has been a power failure or...

User Manual
Page 18
.... Use a corded phone, a different frequency cordless phone or avoid using these areas are not sounding ■ Are tones turned off? See "Microwave Cooking Power" section. ■ Are large amounts of food need longer cooking times. ■ Is the incoming voltage less than usual ■ Has... the microwave oven been stored in the home. Try a different outlet. ■ Is the radio or TV receiver near the microwave oven? The fan automatically comes on . Some 2.4 GHz-based cordless phones and home ...
.... Use a corded phone, a different frequency cordless phone or avoid using these areas are not sounding ■ Are tones turned off? See "Microwave Cooking Power" section. ■ Are large amounts of food need longer cooking times. ■ Is the incoming voltage less than usual ■ Has... the microwave oven been stored in the home. Try a different outlet. ■ Is the radio or TV receiver near the microwave oven? The fan automatically comes on . Some 2.4 GHz-based cordless phones and home ...

User Manual
Page 19
...When calling, please know the purchase date and the complete model and serial number of a service call us to better respond to Whirlpool Corporation with the same precision used to local dealers, repair parts distributors and service companies. This information will fit right and work...W10107790 Rack Support Part Number 8206118 Grease Filters Part Number 8206229 Charcoal Filter Part Number 8206230 Cooktop Light Bulb Part Number 8206232 Microwave Oven Light Bulb Part Number 4393681 Cleaning Supplies Heavy Duty Degreaser Part Number 31552 All-Purpose Appliance Cleaner Part Number 31662 ...
...When calling, please know the purchase date and the complete model and serial number of a service call us to better respond to Whirlpool Corporation with the same precision used to local dealers, repair parts distributors and service companies. This information will fit right and work...W10107790 Rack Support Part Number 8206118 Grease Filters Part Number 8206229 Charcoal Filter Part Number 8206230 Cooktop Light Bulb Part Number 8206232 Microwave Oven Light Bulb Part Number 4393681 Cleaning Supplies Heavy Duty Degreaser Part Number 31552 All-Purpose Appliance Cleaner Part Number 31662 ...


