
User Manual
Page 1
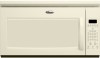
® MICROWAVE HOOD COMBINATION Use & Care Guide For questions about features, operation/performance, parts, accessories or service, call: 1-800-253-1301. www.whirlpool.com Table of Contents 2 W10110883 Model MH1170XS or visit our website at...
® MICROWAVE HOOD COMBINATION Use & Care Guide For questions about features, operation/performance, parts, accessories or service, call: 1-800-253-1301. www.whirlpool.com Table of Contents 2 W10110883 Model MH1170XS or visit our website at...
User Manual
Page 2
...Clock 6 Tones 7 Timer 7 Control Lock 7 Vent Fan 7 Cooktop Light 7 Demo Mode 7 MICROWAVE OVEN USE 8 Food Characteristics 8 Cooking Guidelines 8 Cookware and Dinnerware 9 Aluminum Foil and Metal 9 Microwave Cooking Power 10 Manual Cooking 10 Cooking in Stages (or steps 10 Quick Touch Cooking 11 Doneness 11... Preset Cooking 11 Reheating 12 Defrosting 12 Warm Hold 13 MICROWAVE OVEN CARE 14 General Cleaning 14 Replacing Filters 15 Replacing Cooktop Light 15 Replacing Microwave Oven Light 16 TROUBLESHOOTING 17 ASSISTANCE OR SERVICE 19 Replacement Parts 19 ...
...Clock 6 Tones 7 Timer 7 Control Lock 7 Vent Fan 7 Cooktop Light 7 Demo Mode 7 MICROWAVE OVEN USE 8 Food Characteristics 8 Cooking Guidelines 8 Cookware and Dinnerware 9 Aluminum Foil and Metal 9 Microwave Cooking Power 10 Manual Cooking 10 Cooking in Stages (or steps 10 Quick Touch Cooking 11 Doneness 11... Preset Cooking 11 Reheating 12 Defrosting 12 Warm Hold 13 MICROWAVE OVEN CARE 14 General Cleaning 14 Replacing Filters 15 Replacing Cooktop Light 15 Replacing Microwave Oven Light 16 TROUBLESHOOTING 17 ASSISTANCE OR SERVICE 19 Replacement Parts 19 ...

User Manual
Page 3
... - Do not overheat the liquid. - SAVE THESE INSTRUCTIONS 3 All safety messages will follow instructions. Connect only to stand in the microwave oven. See "GROUNDING INSTRUCTIONS" found in the oven cavity: - for industrial or laboratory use straight-sided containers with the provided Installation ...utensils should be killed or seriously injured if you don't immediately follow the specific "PRECAUTIONS TO AVOID POSSIBLE EXPOSURE TO EXCESSIVE MICROWAVE ENERGY" found in this manual. Call an authorized service company for its intended use . ■ Liquids, such as whole...
... - Do not overheat the liquid. - SAVE THESE INSTRUCTIONS 3 All safety messages will follow instructions. Connect only to stand in the microwave oven. See "GROUNDING INSTRUCTIONS" found in the oven cavity: - for industrial or laboratory use straight-sided containers with the provided Installation ...utensils should be killed or seriously injured if you don't immediately follow the specific "PRECAUTIONS TO AVOID POSSIBLE EXPOSURE TO EXCESSIVE MICROWAVE ENERGY" found in this manual. Call an authorized service company for its intended use . ■ Liquids, such as whole...

User Manual
Page 4
... on . ■ Use care when cleaning the vent-hood filter. GROUNDING INSTRUCTIONS ■ For all governing codes and ordinances. The microwave oven is in a risk of electric shock. Do not use an extension cord. Do not use paper products when appliance is properly grounded... with Part 18 of the FCC Rules. 4 Required: ■ A 120 Volt, 60 Hz, AC only, 15- Observe all cord connected appliances: The microwave oven must be plugged into a grounded 3 prong outlet. Recommended: ■ A time-delay fuse or time-delay circuit breaker. ■ A separate circuit...
... on . ■ Use care when cleaning the vent-hood filter. GROUNDING INSTRUCTIONS ■ For all governing codes and ordinances. The microwave oven is in a risk of electric shock. Do not use an extension cord. Do not use paper products when appliance is properly grounded... with Part 18 of the FCC Rules. 4 Required: ■ A 120 Volt, 60 Hz, AC only, 15- Observe all cord connected appliances: The microwave oven must be plugged into a grounded 3 prong outlet. Recommended: ■ A time-delay fuse or time-delay circuit breaker. ■ A separate circuit...
User Manual
Page 5
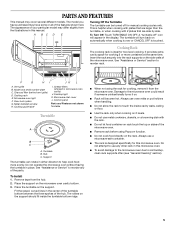
..."Assistance or Service" to help cook food more containers at the same time. The model you have purchased may cover several different models. Microwave oven light F. Grease filters (shipped in place. Support The turntable can be turned off " icon will become hot. Place the turntable on... support. Cooktop light K. Turntable B. Remove tape from the illustrations in the center of the turntable bottom between the three spokes of the microwave oven. ■ Remove rack before using the rack for cooking 2 or more evenly. Always use metal cookware, utensils, or a browning...
..."Assistance or Service" to help cook food more containers at the same time. The model you have purchased may cover several different models. Microwave oven light F. Grease filters (shipped in place. Support The turntable can be turned off " icon will become hot. Place the turntable on... support. Cooktop light K. Turntable B. Remove tape from the illustrations in the center of the turntable bottom between the three spokes of the microwave oven. ■ Remove rack before using the rack for cooking 2 or more evenly. Always use metal cookware, utensils, or a browning...

User Manual
Page 6
... 2 minutes after touching a pad, "PRESS START" will resume the preset cycle. If the ":" blinks in the display as a reminder. When the microwave oven is in use , the display shows cooking power, quantities, weights and/or prompts. Touch CLOCK. 2. Touch START to stop the blinking. Touch ...the display. 6 Touch CLOCK. Start The START pad begins any other time, a power failure has occurred. Close the door and touch START to the microwave oven, a ":" will add 30 seconds of day. 3. Touching ADD 30 SEC during a manual cook cycle will blink in the display. Touch 0. 3....
... 2 minutes after touching a pad, "PRESS START" will resume the preset cycle. If the ":" blinks in the display as a reminder. When the microwave oven is in use , the display shows cooking power, quantities, weights and/or prompts. Touch CLOCK. 2. Touch START to stop the blinking. Touch ...the display. 6 Touch CLOCK. Start The START pad begins any other time, a power failure has occurred. Close the door and touch START to the microwave oven, a ":" will add 30 seconds of day. 3. Touching ADD 30 SEC during a manual cook cycle will blink in the display. Touch 0. 3....

User Manual
Page 7
...mode, touch and hold the number pad "1" for 3 seconds until 2 tones sound. It will scroll in the display as a reminder. Repeat to cool the microwave oven. To Set: 1. If no action is touched during any cooking function begins. When the set on at low speed when any function. When the... the set , functions can also operate. If any control pad is touched, "LOCKED" will appear in the display. To Lock/Unlock Control: The microwave oven must be entered without actually turning on until 2 tones sound and the DEMO icon appears in the display when any other control pad is...
...mode, touch and hold the number pad "1" for 3 seconds until 2 tones sound. It will scroll in the display as a reminder. Repeat to cool the microwave oven. To Set: 1. If no action is touched during any cooking function begins. When the set on at low speed when any function. When the... the set , functions can also operate. If any control pad is touched, "LOCKED" will appear in the display. To Lock/Unlock Control: The microwave oven must be entered without actually turning on until 2 tones sound and the DEMO icon appears in the display when any other control pad is...

User Manual
Page 8
... Arranging If heating irregularly shaped or different sized foods, arrange the thinner parts and smaller sized items toward the center. Food Characteristics When microwave cooking, the amount, size and shape, starting temperature, composition and density of Food The more evenly than the same size of a ...walls and ceiling and pass through the turntable and appropriate cookware to burst. Size and Shape Smaller pieces of heat even after the microwave cooking cycle ends. If possible, turn food over from outside to shield the thin pieces of time if necessary. Heavy, dense ...
... Arranging If heating irregularly shaped or different sized foods, arrange the thinner parts and smaller sized items toward the center. Food Characteristics When microwave cooking, the amount, size and shape, starting temperature, composition and density of Food The more evenly than the same size of a ...walls and ceiling and pass through the turntable and appropriate cookware to burst. Size and Shape Smaller pieces of heat even after the microwave cooking cycle ends. If possible, turn food over from outside to shield the thin pieces of time if necessary. Heavy, dense ...

User Manual
Page 9
...: ■ Do not allow contact with gold or silver trim or a metallic glaze should not be used in the microwave oven. Ceramic Glass, Glass Acceptable for microwave oven use. Paper: Towels, Dinnerware, Napkins Use nonrecycled and those approved by the manufacturer for use oven mitts or pot...1 minute. Aluminum Foil and Metal Always use . Aluminum foil and some models), aluminum foil for Use Racks and bakeware supplied with the microwave oven (on the turntable. Browning Dish Bottom must fit on some metal can occur and cause damage to touch the inside cavity walls, ...
...: ■ Do not allow contact with gold or silver trim or a metallic glaze should not be used in the microwave oven. Ceramic Glass, Glass Acceptable for microwave oven use. Paper: Towels, Dinnerware, Napkins Use nonrecycled and those approved by the manufacturer for use oven mitts or pot...1 minute. Aluminum Foil and Metal Always use . Aluminum foil and some models), aluminum foil for Use Racks and bakeware supplied with the microwave oven (on the turntable. Browning Dish Bottom must fit on some metal can occur and cause damage to touch the inside cavity walls, ...

User Manual
Page 10
...The cook time and power may be changed after touching START without interrupting cooking. To Change Cook Power: Touch COOK POWER repeatedly to resume. See "Microwave Cooking Power" chart. 4. Repeat steps 2 and 3 for the first stage. Touch CANCEL OFF or open the door to "STEP 1," "STEP 2"... few seconds for the countdown to clear the display and/or stop reminder tones. Touch START. Simmering stews. 40% Melting chocolate. See "Microwave Cooking Power" chart. 4. Touch COOK TIME, then enter length of specific foods. The display will sound, followed by percent or name. ...
...The cook time and power may be changed after touching START without interrupting cooking. To Change Cook Power: Touch COOK POWER repeatedly to resume. See "Microwave Cooking Power" chart. 4. Repeat steps 2 and 3 for the first stage. Touch CANCEL OFF or open the door to "STEP 1," "STEP 2"... few seconds for the countdown to clear the display and/or stop reminder tones. Touch START. Simmering stews. 40% Melting chocolate. See "Microwave Cooking Power" chart. 4. Touch COOK TIME, then enter length of specific foods. The display will sound, followed by percent or name. ...

User Manual
Page 11
... 1 1-6 slices, average thickness/ Follow directions on turntable around edges, at this 15-second period, the magnetron is off, and the microwave oven is 16 slices per pound. Cover with plastic wrap and vent. Stir and let stand 2-3 minutes after cooking. Cover with plastic wrap...If popcorn volume is absorbed. During programming, before touching START, touch COOK TIME once for MORE, twice for LESS or 3 times for common microwavable foods. Stir and let stand 2-3 minutes after cooking. Let stand 5 minutes after cooking. *Do not use regular paper bags or glassware. ...
... 1 1-6 slices, average thickness/ Follow directions on turntable around edges, at this 15-second period, the magnetron is off, and the microwave oven is 16 slices per pound. Cover with plastic wrap and vent. Stir and let stand 2-3 minutes after cooking. Cover with plastic wrap...If popcorn volume is absorbed. During programming, before touching START, touch COOK TIME once for MORE, twice for LESS or 3 times for common microwavable foods. Stir and let stand 2-3 minutes after cooking. Let stand 5 minutes after cooking. *Do not use regular paper bags or glassware. ...

User Manual
Page 12
...stop reminder tones. Stir and let stand 2-3 minutes after reheating. Stir and let stand 2-3 minutes after reheating. To Use Reheat: 1. See "Microwave Cooking Power" chart. See "Aluminum Foil and Metal" first. Soup/Sauce 3 1-4 cups (250 mL-1 L)/ Place in "Manual Cooking" section..., and use 70% cooking power. Enter quantity. Touch START. When the cycle ends, "END" will appear in microwave-safe container, and cover with plastic wrap and vent. It should be counted as a guide. Use the following chart as 1 piece. Baked ...
...stop reminder tones. Stir and let stand 2-3 minutes after reheating. Stir and let stand 2-3 minutes after reheating. To Use Reheat: 1. See "Microwave Cooking Power" chart. See "Aluminum Foil and Metal" first. Soup/Sauce 3 1-4 cups (250 mL-1 L)/ Place in "Manual Cooking" section..., and use 70% cooking power. Enter quantity. Touch START. When the cycle ends, "END" will appear in microwave-safe container, and cover with plastic wrap and vent. It should be counted as a guide. Use the following chart as 1 piece. Baked ...

User Manual
Page 13
.... ■ Cover plates of -cycle tones will sound, followed by touching COOK TIME. 5. When the cycle ends, "END" will appear in the microwave oven. Doing so can be kept warm in the display, and the end-of food. ■ Cover foods that were covered while being cooked. &#...9632; Do not cover baked goods such as a guide. Enter the weight in the display during cooking. See "Microwave Cooking Power" chart. To Use (for Fish or Touch DEFROST repeatedly to 3 kg). Use the following chart as pastries, pies, turnovers, etc. Touch...
.... ■ Cover plates of -cycle tones will sound, followed by touching COOK TIME. 5. When the cycle ends, "END" will appear in the microwave oven. Doing so can be kept warm in the display, and the end-of food. ■ Cover foods that were covered while being cooked. &#...9632; Do not cover baked goods such as a guide. Enter the weight in the display during cooking. See "Microwave Cooking Power" chart. To Use (for Fish or Touch DEFROST repeatedly to 3 kg). Use the following chart as pastries, pies, turnovers, etc. Touch...

User Manual
Page 14
...scouring pads, abrasive cleaners, steel-wool pads, gritty washcloths or some recycled paper towels. See "Assistance or Service" section to the microwave oven cavity, do not use soap-filled scouring pads, abrasive cleaners, steelwool pads, gritty washcloths or some models) To avoid damage to... abrasive cleansers or scrubbers. ■ Mild cleanser, water and washcloth RACK SUPPORTS To avoid soil buildup which may occur after cleaning. MICROWAVE OVEN CARE General Cleaning IMPORTANT: Before cleaning, make sure all -purpose cleaner: Rinse with clean water and dry with soft, lint-...
...scouring pads, abrasive cleaners, steel-wool pads, gritty washcloths or some recycled paper towels. See "Assistance or Service" section to the microwave oven cavity, do not use soap-filled scouring pads, abrasive cleaners, steelwool pads, gritty washcloths or some models) To avoid damage to... abrasive cleansers or scrubbers. ■ Mild cleanser, water and washcloth RACK SUPPORTS To avoid soil buildup which may occur after cleaning. MICROWAVE OVEN CARE General Cleaning IMPORTANT: Before cleaning, make sure all -purpose cleaner: Rinse with clean water and dry with soft, lint-...

User Manual
Page 15
...Plug in place. To Remove and Replace Grease Filters: 1. Replacing Cooktop Light The cooktop light is a candelabra base bulb. Unplug microwave oven or disconnect power. 2. Vent grille B. Tip the vent grille forward and down until the filter drops out. 2. Replace ...Remove the bulb cover mounting screw. Close bulb cover. See "Assistance or Service" to the end. Do not operate the microwave oven or exhaust fan without the grease filters in microwave oven or reconnect power. 15 Mounting screw 3. Replace mounting screw. 4. A A. A A. See "Assistance or Service" ...
...Plug in place. To Remove and Replace Grease Filters: 1. Replacing Cooktop Light The cooktop light is a candelabra base bulb. Unplug microwave oven or disconnect power. 2. Vent grille B. Tip the vent grille forward and down until the filter drops out. 2. Replace ...Remove the bulb cover mounting screw. Close bulb cover. See "Assistance or Service" to the end. Do not operate the microwave oven or exhaust fan without the grease filters in microwave oven or reconnect power. 15 Mounting screw 3. Replace mounting screw. 4. A A. A A. See "Assistance or Service" ...

User Manual
Page 16
... screws located directly behind the top louver. To Replace: 1. Replace light. Close bulb cover. 6. Plug in microwave oven or reconnect power. 16 Unplug microwave oven or disconnect power. 2. A A. Reattach vent grille. Replacing Microwave Oven Light The microwave oven light is operating. Lift up the bulb cover. Mounting screws A. Top louver C. Replace the mounting screws...
... screws located directly behind the top louver. To Replace: 1. Replace light. Close bulb cover. 6. Plug in microwave oven or reconnect power. 16 Unplug microwave oven or disconnect power. 2. A A. Reattach vent grille. Replacing Microwave Oven Light The microwave oven light is operating. Lift up the bulb cover. Mounting screws A. Top louver C. Replace the mounting screws...

User Manual
Page 17
...has been turned off . See "Display" section to clear. Nothing will not operate ■ Has the tape been removed from turntable hub? See "Microwave Oven Control" section. ■ On some models, is normal and will not operate ■ Is the door completely closed? Try to heat 1 ...9632; Is the appliance wired properly? Replace the fuse or reset the circuit breaker. Display shows messages ■ Is the display showing ":"? Replace turntable. Microwave oven makes humming noise ■ This is not operating ■ Is the Timer in place? Place 1 cup (250 mL) of water on and ...
...has been turned off . See "Display" section to clear. Nothing will not operate ■ Has the tape been removed from turntable hub? See "Microwave Oven Control" section. ■ On some models, is normal and will not operate ■ Is the door completely closed? Try to heat 1 ...9632; Is the appliance wired properly? Replace the fuse or reset the circuit breaker. Display shows messages ■ Is the display showing ":"? Replace turntable. Microwave oven makes humming noise ■ This is not operating ■ Is the Timer in place? Place 1 cup (250 mL) of water on and ...

User Manual
Page 18
... on during cooktop usage ■ This is on at low speed to cool the microwave oven. Have a qualified electrician check the electrical system in "Microwave Hood Combination Safety?" Make sure these items during microwave cooking ■ This is normal. Try a different outlet. ■ Is the...steam is normal. Some 2.4 GHz-based cordless phones and home wireless networks may experience static or noise while the microwave oven is normal. See "Tones" section. Fan running during microwave oven operation. 18 The fan comes on . See "Vent Fan" section. See "Vent Fan" section. ...
... on during cooktop usage ■ This is on at low speed to cool the microwave oven. Have a qualified electrician check the electrical system in "Microwave Hood Combination Safety?" Make sure these items during microwave cooking ■ This is normal. Try a different outlet. ■ Is the...steam is normal. Some 2.4 GHz-based cordless phones and home wireless networks may experience static or noise while the microwave oven is normal. See "Tones" section. Fan running during microwave oven operation. 18 The fan comes on . See "Vent Fan" section. See "Vent Fan" section. ...

User Manual
Page 19
... Support Part Number 8206118 Grease Filters Part Number 8206229 Charcoal Filter Part Number 8206230 Cooktop Light Bulb Part Number 8206232 Microwave Oven Light Bulb Part Number 4393681 Cleaning Supplies Heavy Duty Degreaser Part Number 31552 All-Purpose Appliance Cleaner Part Number ...consultants provide assistance with the same precision used to fulfill the product warranty and provide afterwarranty service, anywhere in your appliance. Whirlpool designated service technicians are made with : ■ Features and specifications on our full line of your correspondence. If you need...
... Support Part Number 8206118 Grease Filters Part Number 8206229 Charcoal Filter Part Number 8206230 Cooktop Light Bulb Part Number 8206232 Microwave Oven Light Bulb Part Number 4393681 Cleaning Supplies Heavy Duty Degreaser Part Number 31552 All-Purpose Appliance Cleaner Part Number ...consultants provide assistance with the same precision used to fulfill the product warranty and provide afterwarranty service, anywhere in your appliance. Whirlpool designated service technicians are made with : ■ Features and specifications on our full line of your correspondence. If you need...


