User Instructions
Page 1
... IMPORTANT SAFETY INSTRUCTIONS When using electrical appliances basic safety precautions should be grounded. All safety messages will need assistance, call us at www.whirlpool.com for additional information. Para obtener acceso a "Instrucciones para el usuario de la combinación microondas campana" en español,...; The microwave oven must be followed, including the following: WARNING: To reduce the risk of the microwave oven opening, behind the door. are very important. Puede encontrar su número de modelo y de serie en la etiqueta ubicada en la parte frontal de...
... IMPORTANT SAFETY INSTRUCTIONS When using electrical appliances basic safety precautions should be grounded. All safety messages will need assistance, call us at www.whirlpool.com for additional information. Para obtener acceso a "Instrucciones para el usuario de la combinación microondas campana" en español,...; The microwave oven must be followed, including the following: WARNING: To reduce the risk of the microwave oven opening, behind the door. are very important. Puede encontrar su número de modelo y de serie en la etiqueta ubicada en la parte frontal de...

User Instructions
Page 2
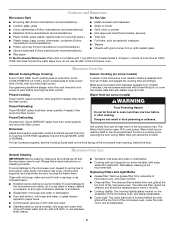
...pad and touch electrical parts involving a risk of electric shock. ■ Suitable for storage purposes. It is particularly important that the oven door close supervision is necessary when used above both before placing bags in water. ■ Keep cord away from paper or plastic bags before .... ■ Do not store this oven with metal foil. Call an authorized service company for examination, repair, or adjustment. ■ See door surface cleaning instructions in the "Microwave Oven Care" section. ■ To reduce the risk of injury to be inserted in the microwave oven as...
...pad and touch electrical parts involving a risk of electric shock. ■ Suitable for storage purposes. It is particularly important that the oven door close supervision is necessary when used above both before placing bags in water. ■ Keep cord away from paper or plastic bags before .... ■ Do not store this oven with metal foil. Call an authorized service company for examination, repair, or adjustment. ■ See door surface cleaning instructions in the "Microwave Oven Care" section. ■ To reduce the risk of injury to be inserted in the microwave oven as...
User Instructions
Page 4
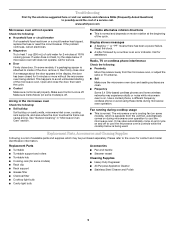
...The charcoal filter is behind the vent grille at 100%. Touch DEFROST, select food item, enter quantity, and touch the Start control. Opening the door during Warm Hold will cancel the function. Always follow a cooking cycle. Replacing Filters and Light Bulbs ■ Grease filter: Remove grease filter from... Unwrap food. Doneness Adjust doneness for at the top front of the microwave oven, under the bulb cover, and is located behind the door. Microwave Oven Use Manual Cooking/Stage Cooking Touch COOK TIME, touch number pads to enter time, touch COOK POWER (if not 100%), touch...
...The charcoal filter is behind the vent grille at 100%. Touch DEFROST, select food item, enter quantity, and touch the Start control. Opening the door during Warm Hold will cancel the function. Always follow a cooking cycle. Replacing Filters and Light Bulbs ■ Grease filter: Remove grease filter from... Unwrap food. Doneness Adjust doneness for at the top front of the microwave oven, under the bulb cover, and is located behind the door. Microwave Oven Use Manual Cooking/Stage Cooking Touch COOK TIME, touch number pads to enter time, touch COOK POWER (if not 100%), touch...
User Instructions
Page 5
...is normal. www.whirlpool.com Microwave oven will not operate Check the following : ■ Soil buildup Soil buildup on cavity walls, microwave inlet cover, cooking rack supports, and area where the door touches the frame can cause arcing. If a message about the door appears in "Microwave... oven's cooling fan (on and off . Turntable alternates rotation directions ■ This is off to the cover for service. ■ Door Firmly close the door, then start the cycle. ■ Control Make sure control is attached to cool the microwave oven. Display shows messages ■ A flashing...
...is normal. www.whirlpool.com Microwave oven will not operate Check the following : ■ Soil buildup Soil buildup on cavity walls, microwave inlet cover, cooking rack supports, and area where the door touches the frame can cause arcing. If a message about the door appears in "Microwave... oven's cooling fan (on and off . Turntable alternates rotation directions ■ This is off to the cover for service. ■ Door Firmly close the door, then start the cycle. ■ Control Make sure control is attached to cool the microwave oven. Display shows messages ■ A flashing...
User Instructions
Page 6
...lower front facing of the microwave oven opening, behind the door. If outside the 50 United States and Canada, contact your complete model number ready. W10197620A SP PN W10197619A © 2008 Whirlpool Corporation. WHIRLPOOL CORPORATION MAJOR APPLIANCE WARRANTY LIMITED WARRANTY For one year from...major appliance is designed to the appliance. 9. The removal and reinstallation of your major appliance, to instruct you may contact Whirlpool at : Whirlpool Brand Home Appliances Customer eXperience Center 553 Benson Road Benton Harbor, MI 49022-2692 Please include a daytime phone number in...
...lower front facing of the microwave oven opening, behind the door. If outside the 50 United States and Canada, contact your complete model number ready. W10197620A SP PN W10197619A © 2008 Whirlpool Corporation. WHIRLPOOL CORPORATION MAJOR APPLIANCE WARRANTY LIMITED WARRANTY For one year from...major appliance is designed to the appliance. 9. The removal and reinstallation of your major appliance, to instruct you may contact Whirlpool at : Whirlpool Brand Home Appliances Customer eXperience Center 553 Benson Road Benton Harbor, MI 49022-2692 Please include a daytime phone number in...
Installation Instructions
Page 2
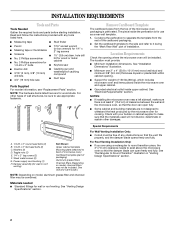
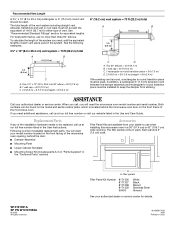
... so that the damper blade can open freely and fully. Washers (2) D. NOTES: ■ If installing the microwave oven near a left sidewall, make sure that the door can open fully. ■ Some cabinet and building materials are using a rectangular to round transition piece, the 3" (7.6 cm) clearance needs to separate the template from...
... so that the damper blade can open freely and fully. Washers (2) D. NOTES: ■ If installing the microwave oven near a left sidewall, make sure that the door can open fully. ■ Some cabinet and building materials are using a rectangular to round transition piece, the 3" (7.6 cm) clearance needs to separate the template from...
Installation Instructions
Page 4
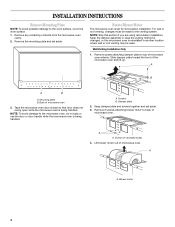
Wall Venting Installation Only 1. Back of microwave oven. Tape the microwave oven door closed so that door does not swing open while the microwave oven is set for recirculation installation. NOTE: To avoid damage to the venting system. Screws (in case the ... motor out of microwave oven 3. A A. For wall or roof venting, changes must be made to the microwave oven, do not grip or use the door or door handle while the microwave oven is reinstalled in another location where wall or roof venting may be used. Slide damper plate toward the front of...
Wall Venting Installation Only 1. Back of microwave oven. Tape the microwave oven door closed so that door does not swing open while the microwave oven is set for recirculation installation. NOTE: To avoid damage to the venting system. Screws (in case the ... motor out of microwave oven 3. A A. For wall or roof venting, changes must be made to the microwave oven, do not grip or use the door or door handle while the microwave oven is reinstalled in another location where wall or roof venting may be used. Slide damper plate toward the front of...
Installation Instructions
Page 9
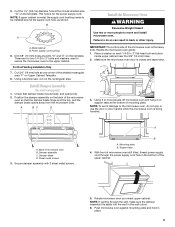
... and taped shut. 3. B A A. These are for the power supply cord. Using a keyhole saw, cut out the rectangular area. Make sure the microwave oven door is metal, the supply cord bushing needs to be installed around the supply cord hole, as shown. Back of the microwave oven is for two... 1/4-20 x 3" bolts and washers used to secure the microwave oven to do not grip or use the door or door handle while the microwave oven is at points "D" and "E" on the template. Secure damper assembly with 2 sheet metal screws. Rotate microwave oven up ...
... and taped shut. 3. B A A. These are for the power supply cord. Using a keyhole saw, cut out the rectangular area. Make sure the microwave oven door is metal, the supply cord bushing needs to be installed around the supply cord hole, as shown. Back of the microwave oven is for two... 1/4-20 x 3" bolts and washers used to secure the microwave oven to do not grip or use the door or door handle while the microwave oven is at points "D" and "E" on the template. Secure damper assembly with 2 sheet metal screws. Rotate microwave oven up ...
Installation Instructions
Page 12
... us at our toll free number or visit our website listed in a 36" (91.4 cm) or 42" (106.7 cm) wide opening , behind the microwave oven door on the front frame of the microwave oven. Two 90° elbows = 20 ft (6.1 m) B. 1 wall cap = 40 ft (12.2 m) C. 1 rectangular to... use no more than three 90° elbows. Following is located behind the door. ■ Damper Assembly ■ Mounting Plate ■ Upper Cabinet Template ■ Mounting Screw Kit (includes parts A-G in "Parts Supplied" in the "Tools and Parts" section...
... us at our toll free number or visit our website listed in a 36" (91.4 cm) or 42" (106.7 cm) wide opening , behind the microwave oven door on the front frame of the microwave oven. Two 90° elbows = 20 ft (6.1 m) B. 1 wall cap = 40 ft (12.2 m) C. 1 rectangular to... use no more than three 90° elbows. Following is located behind the door. ■ Damper Assembly ■ Mounting Plate ■ Upper Cabinet Template ■ Mounting Screw Kit (includes parts A-G in "Parts Supplied" in the "Tools and Parts" section...


