
Use and Care Guide
Page 2
...6 Clock 6 Tones 6 Timer 6 Control Lock 6 Vent Fan 6 Cooktop Light 7 Demo Mode 7 MICROWAVE OVEN USE 7 Food Characteristics 7 Cooking Guidelines 7 Cookware and Dinnerware 8 Aluminum Foil and Metal 8 Microwave Cooking Power 8 Manual Cooking 9 Cooking in Stages (or steps 9 Popcorn 9 Baked Potato 10 Pizza ...10 Doneness 10 Preset Cooking 10 Reheating 11 Defrosting 11 MICROWAVE OVEN CARE 12 General Cleaning 12 Replacing Filters 12 Replacing Cooktop Light 13 Replacing Microwave Oven Light 13 TROUBLESHOOTING 14 ASSISTANCE OR SERVICE 15 Replacement Parts 15...
...6 Clock 6 Tones 6 Timer 6 Control Lock 6 Vent Fan 6 Cooktop Light 7 Demo Mode 7 MICROWAVE OVEN USE 7 Food Characteristics 7 Cooking Guidelines 7 Cookware and Dinnerware 8 Aluminum Foil and Metal 8 Microwave Cooking Power 8 Manual Cooking 9 Cooking in Stages (or steps 9 Popcorn 9 Baked Potato 10 Pizza ...10 Doneness 10 Preset Cooking 10 Reheating 11 Defrosting 11 MICROWAVE OVEN CARE 12 General Cleaning 12 Replacing Filters 12 Replacing Cooktop Light 13 Replacing Microwave Oven Light 13 TROUBLESHOOTING 14 ASSISTANCE OR SERVICE 15 Replacement Parts 15...

Use and Care Guide
Page 3
..., including the following: WARNING: To reduce the risk of fire in oven. - Do not overcook food. IMPORTANT SAFETY INSTRUCTIONS When using the microwave oven. [] Read and follow instructions. Do not leave paper products, cooking utensils, or food in the cavity when not in this manual. See... "GROUNDING INSTRUCTIONS" found in the microwave oven. [] Use the microwave oven only for storage purposes. It is not working properly, or if it . - Always read and obey all instructions before placing...
..., including the following: WARNING: To reduce the risk of fire in oven. - Do not overcook food. IMPORTANT SAFETY INSTRUCTIONS When using the microwave oven. [] Read and follow instructions. Do not leave paper products, cooking utensils, or food in the cavity when not in this manual. See... "GROUNDING INSTRUCTIONS" found in the microwave oven. [] Use the microwave oven only for storage purposes. It is not working properly, or if it . - Always read and obey all instructions before placing...

Use and Care Guide
Page 4
...36" (91.44 cm). [] Clean Ventilating Hoods Frequently - Grease should not be used above both gas and electric cooking equipment. [] Intended to whether the microwave oven is too short, have a qualified electrician or serviceman install an outlet near water - for example, near a kitchen sink, in a wet basement, ...table or counter. [] Do not mount over a sink. [] Do not cover racks or any materials, other part of electric shock. The microwave oven is damaged. Corrosive cleaning agents, such as to be adjusted or repaired by providing an escape wire for use of the grounding plug ...
...36" (91.44 cm). [] Clean Ventilating Hoods Frequently - Grease should not be used above both gas and electric cooking equipment. [] Intended to whether the microwave oven is too short, have a qualified electrician or serviceman install an outlet near water - for example, near a kitchen sink, in a wet basement, ...table or counter. [] Do not mount over a sink. [] Do not cover racks or any materials, other part of electric shock. The microwave oven is damaged. Corrosive cleaning agents, such as to be adjusted or repaired by providing an escape wire for use of the grounding plug ...

Use and Care Guide
Page 5
...TOUCH POPCORN PIZZA ® RAKED POTATO ADD30 SEC E F GH JK A. Door lock system F. Place the support on the microwave oven cavity bottom. 3. Microwave oven light E. Microwave inlet cover K. When power is in either direction to stop the blinking. If an invalid value has been entered, the invalid ...use (standby mode), the display shows the time of the scrolling text may cover several different models. Remove tape from the illustrations in microwave oven cavity) L Cooktop light J. Touch and hold CLOCK for FAST. 3. Touch CANCEL OFF and reset the clock if needed. To ...
...TOUCH POPCORN PIZZA ® RAKED POTATO ADD30 SEC E F GH JK A. Door lock system F. Place the support on the microwave oven cavity bottom. 3. Microwave oven light E. Microwave inlet cover K. When power is in either direction to stop the blinking. If an invalid value has been entered, the invalid ...use (standby mode), the display shows the time of the scrolling text may cover several different models. Remove tape from the illustrations in microwave oven cavity) L Cooktop light J. Touch and hold CLOCK for FAST. 3. Touch CANCEL OFF and reset the clock if needed. To ...
Use and Care Guide
Page 6
...at100%powefror30secondsa,ndadds30secondosf cook timeu, pto10minutesw,itheachadditiontaoluchofthecontrol. Thisisastandar1d2-houcrlock(12:00-11:5a9n)ddoesnot showa.mo. ToSet: The microwave oven and timer must be off. 1. Touch CLOCK or START. Tones are audible signals, indicating the following: ...sftunctionesxcepftorthe Themicrowavoevenwillalsoturnoffwhenthedoorisopened. Touch the number pads to set the time of cycle To Turn Off/On Valid Entry Tones: With the microwave oven in multistage cooking • Control Lock active • Hidden feature has been entered or exited • Reminder, ...
...at100%powefror30secondsa,ndadds30secondosf cook timeu, pto10minutesw,itheachadditiontaoluchofthecontrol. Thisisastandar1d2-houcrlock(12:00-11:5a9n)ddoesnot showa.mo. ToSet: The microwave oven and timer must be off. 1. Touch CLOCK or START. Tones are audible signals, indicating the following: ...sftunctionesxcepftorthe Themicrowavoevenwillalsoturnoffwhenthedoorisopened. Touch the number pads to set the time of cycle To Turn Off/On Valid Entry Tones: With the microwave oven in multistage cooking • Control Lock active • Hidden feature has been entered or exited • Reminder, ...

Use and Care Guide
Page 7
... or deep frying. • Paraffin wax will heat faster than irregularly shaped food. Plastic wrap should be in microwave oven. • Clothes, flowers, fruit, herbs, wood, gourds, paper, including brown paper bags and newspaper,... leg tips and fish tail. hensetf,unctioncsanbeenterewdithouatctualtlyurning onthemicrowavgeenerato(mr agnetroTnh).emicrowavoeven lightwillcomeon,thefanwillrun,andtheturntablweillrotate(if seton). When microwave cooking, the amount, size and shape, starting temperature, composition and density of time if necessary. TheDemoModeisideaflorlearninhgowto ...
... or deep frying. • Paraffin wax will heat faster than irregularly shaped food. Plastic wrap should be in microwave oven. • Clothes, flowers, fruit, herbs, wood, gourds, paper, including brown paper bags and newspaper,... leg tips and fish tail. hensetf,unctioncsanbeenterewdithouatctualtlyurning onthemicrowavgeenerato(mr agnetroTnh).emicrowavoeven lightwillcomeon,thefanwillrun,andtheturntablweillrotate(if seton). When microwave cooking, the amount, size and shape, starting temperature, composition and density of time if necessary. TheDemoModeisideaflorlearninhgowto ...

Use and Care Guide
Page 8
... USE 100%, High (default setting) Quick heating convenience foods and foods with 1 cup (250 mL) of light) can be used in microwave oven. Heating cream soups. 80% Heating rice, pasta or casseroles. Cooking and heating foods that need a cook power lower than high. Follow... of specific foods. China, Earthenware Follow manufacturer's recommendations. Straw, Wicker, Wooden Containers Do not use in the microwave oven. Styrofoam _ Do not use in the microwave oven. Aluminum foil and some models), aluminum foil for Use Racks and bakeware supplied with gold or silver trim ...
... USE 100%, High (default setting) Quick heating convenience foods and foods with 1 cup (250 mL) of light) can be used in microwave oven. Heating cream soups. 80% Heating rice, pasta or casseroles. Cooking and heating foods that need a cook power lower than high. Follow... of specific foods. China, Earthenware Follow manufacturer's recommendations. Straw, Wicker, Wooden Containers Do not use in the microwave oven. Styrofoam _ Do not use in the microwave oven. Aluminum foil and some models), aluminum foil for Use Racks and bakeware supplied with gold or silver trim ...

Use and Care Guide
Page 9
... Touch START. To Change Cook Power: Touch COOK POWER repeatedly to scroll through the cook power levels. Place popcorn bag on commercially packaged microwave popcorn. Touch CANCEL OFF or open the door to resume. Touch COOK TIME, then enter a length of -cycle tones will freeze for... • Follow manufacturer's instructions when using the appropriate number pad or Touch COOK POWER repeatedly to resume. Touch START. This allows the microwave oven to 2 stages. To Use POPCORN: 1. Bag size selections will freeze for various lengths of time, up to pop another bag of...
... Touch START. To Change Cook Power: Touch COOK POWER repeatedly to scroll through the cook power levels. Place popcorn bag on commercially packaged microwave popcorn. Touch CANCEL OFF or open the door to resume. Touch COOK TIME, then enter a length of -cycle tones will freeze for... • Follow manufacturer's instructions when using the appropriate number pad or Touch COOK POWER repeatedly to resume. Touch START. This allows the microwave oven to 2 stages. To Use POPCORN: 1. Bag size selections will freeze for various lengths of time, up to pop another bag of...
Use and Care Guide
Page 10
...Loosen cover on the turntable and close the door. 2. Stir and let stand 2-3 minutes after cooking. Cover with plastic wrap and vent. Place in microwave-safe container. Stir and let stand 2-3 minutes after cooking. 1-4 cups (250 mL-1 L)/ Place in the display, and the end-of -cyctloeneswillsoundfo... CANCEL OFF or open the door to scroll through cycle. Whenthecycleends",ENDw" illappeainr thedisplaya,nd theend-of -cycle tones will appear in microwave-safe container. Doneness may be adjusted at this time by entering the number from package. or 20-oz entree, let stand 2-3 ...
...Loosen cover on the turntable and close the door. 2. Stir and let stand 2-3 minutes after cooking. Cover with plastic wrap and vent. Place in microwave-safe container. Stir and let stand 2-3 minutes after cooking. 1-4 cups (250 mL-1 L)/ Place in the display, and the end-of -cyctloeneswillsoundfo... CANCEL OFF or open the door to scroll through cycle. Whenthecycleends",ENDw" illappeainr thedisplaya,nd theend-of -cycle tones will appear in microwave-safe container. Doneness may be adjusted at this time by entering the number from package. or 20-oz entree, let stand 2-3 ...
Use and Care Guide
Page 11
...), 8-10 oz (227283 g)/ Place food on paper towel. *For smaller rolls, 2 rolls may heat faster. 1-4 cups (250 mL-1 L)/ Place in microwave-safe container. Use small pieces of aluminum foil to shield parts of the cup's opening will count down the reheat time. The Auto Defrost system... should be manually set from fruit juice containers) before defrosting. Stir and let stand 2-3 minutes after reheating. 1-4 cups (250 mL-1 L)/ Place in microwave-safe container, and cover with plastic wrap and vent. Times and cooking power have been preset for example, from 0.2 to 6.6 Ib (90 g to...
...), 8-10 oz (227283 g)/ Place food on paper towel. *For smaller rolls, 2 rolls may heat faster. 1-4 cups (250 mL-1 L)/ Place in microwave-safe container. Use small pieces of aluminum foil to shield parts of the cup's opening will count down the reheat time. The Auto Defrost system... should be manually set from fruit juice containers) before defrosting. Stir and let stand 2-3 minutes after reheating. 1-4 cups (250 mL-1 L)/ Place in microwave-safe container, and cover with plastic wrap and vent. Times and cooking power have been preset for example, from 0.2 to 6.6 Ib (90 g to...

Use and Care Guide
Page 12
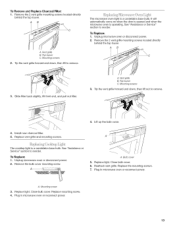
... will not affect the performance of water for cleaning instructions. TURNTABLE Replace turntable immediately after cleaning them in place. Do not operate the microwave oven without the grease filters in the dishwasher. See "General Cleaning" for 2 to order. • Liquid detergent or all controls are... should be replaced every 6 to surface. 12 The charcoal filters cannot be washed and should be kept clean. The area where the microwave oven door and frame touch when closed should be kept clean. • Mild, nonabrasive soaps and detergents: Rinse with clean water and...
... will not affect the performance of water for cleaning instructions. TURNTABLE Replace turntable immediately after cleaning them in place. Do not operate the microwave oven without the grease filters in the dishwasher. See "General Cleaning" for 2 to order. • Liquid detergent or all controls are... should be replaced every 6 to surface. 12 The charcoal filters cannot be washed and should be kept clean. The area where the microwave oven door and frame touch when closed should be kept clean. • Mild, nonabrasive soaps and detergents: Rinse with clean water and...
Use and Care Guide
Page 13
... will automatically come on when the door is opened and when the microwave oven is a candelabra base bulb. Unplug microwave oven or disconnect power. 2. Mounting screws 3. Replace vent grille and mounting screws. 4. Unplug microwave oven or disconnect power. 2. A ¸- A. Replace light. AB...grille forward and down , then lift to remove. 4. Reattach vent grille. Mounting screw 3. Plug in microwave oven or reconnect power. Vent grille B. The microwave oven light is operating. Top louver C. Remove the bulb cover mounting screw. A. See "Assistance or...
... will automatically come on when the door is opened and when the microwave oven is a candelabra base bulb. Unplug microwave oven or disconnect power. 2. Mounting screws 3. Replace vent grille and mounting screws. 4. Unplug microwave oven or disconnect power. 2. A ¸- A. Replace light. AB...grille forward and down , then lift to remove. 4. Reattach vent grille. Mounting screw 3. Plug in microwave oven or reconnect power. Vent grille B. The microwave oven light is operating. Top louver C. Remove the bulb cover mounting screw. A. See "Assistance or...

Use and Care Guide
Page 14
.... Turntable will not operate • Is the door completely closed? See "Display" section to clear. Fan running slower than usual • Has the microwave oven been stored in a cold area? If the problem continues, call for 2 minutes at 100% cooking power. Try to normal room temperature. If water...call for service. Place 1 cup (250 mL) of the cycle. See "Tones" section. TROUBLESHOOTING Try the solutions suggested here first in use ? Microwave oven will not operate • Has the tape been removed from the vent grille • Some steam is the Demo Mode in order to cool...
.... Turntable will not operate • Is the door completely closed? See "Display" section to clear. Fan running slower than usual • Has the microwave oven been stored in a cold area? If the problem continues, call for 2 minutes at 100% cooking power. Try to normal room temperature. If water...call for service. Place 1 cup (250 mL) of the cycle. See "Tones" section. TROUBLESHOOTING Try the solutions suggested here first in use ? Microwave oven will not operate • Has the tape been removed from the vent grille • Some steam is the Demo Mode in order to cool...

Use and Care Guide
Page 15
...Have a qualified electrician check the electrical system in your appliance. Make sure these items during microwave oven operation. Is the cordless phone frequency 2.4 GHz? Call the Whirlpool Customer eXperience Center toll free: 1-800-253-1301. Cooking times seem too long •...help , follow the instructions below gets too hot. Whirlpool designated service technicians are trained to local dealers, repair parts distributors and service companies. See "Vent Fan" section. To locate FSP_ replacement parts in "Microwave Hood Combination Safety?" Use a corded phone, a ...
...Have a qualified electrician check the electrical system in your appliance. Make sure these items during microwave oven operation. Is the cordless phone frequency 2.4 GHz? Call the Whirlpool Customer eXperience Center toll free: 1-800-253-1301. Cooking times seem too long •...help , follow the instructions below gets too hot. Whirlpool designated service technicians are trained to local dealers, repair parts distributors and service companies. See "Vent Fan" section. To locate FSP_ replacement parts in "Microwave Hood Combination Safety?" Use a corded phone, a ...
Installation Instructions
Page 1
... don't immediately follow instructions. Table of others . Prepare Upper Cabinet 8.. Complete Installation 1.0 VENTING DESIGN SPECIFICATIONS 11 ASSISTANCE 1..2 Replacement Par_s 1..2 Accessories 1..2 MICROWAVE HOOD COMBINATION SAFETY Your safety and the safety of Contents MICROWAVE HOOD COMBINATION SAFETY J INSTALLATIONREQUIREMENTS 2. Save Installation Instructions for use . 8206587 NOTES: • Proper installation is the responsibility of the installer...
... don't immediately follow instructions. Table of others . Prepare Upper Cabinet 8.. Complete Installation 1.0 VENTING DESIGN SPECIFICATIONS 11 ASSISTANCE 1..2 Replacement Par_s 1..2 Accessories 1..2 MICROWAVE HOOD COMBINATION SAFETY Your safety and the safety of Contents MICROWAVE HOOD COMBINATION SAFETY J INSTALLATIONREQUIREMENTS 2. Save Installation Instructions for use . 8206587 NOTES: • Proper installation is the responsibility of the installer...

Installation Instructions
Page 2
...may not be combined. Read and follow the instructions provided with your builder or cabinet supplier to back of clearance between the wall and the microwave oven, so that the damper blade can open freely and fully. Toggle nuts (2) E. 1/4" x 2" lag screws (2) F. Power supply cord...one 2" x 4" (50.8 x 101.6 mm) wood wall stud and minimum 3/8" (9.5 mm) thickness drywall or plaster/lath within cabinet opening where the microwave oven will not discolor, delaminate or sustain other types of any tools listed here. • Measuring tape • Stud finder • Pencil • ...
...may not be combined. Read and follow the instructions provided with your builder or cabinet supplier to back of clearance between the wall and the microwave oven, so that the damper blade can open freely and fully. Toggle nuts (2) E. 1/4" x 2" lag screws (2) F. Power supply cord...one 2" x 4" (50.8 x 101.6 mm) wood wall stud and minimum 3/8" (9.5 mm) thickness drywall or plaster/lath within cabinet opening where the microwave oven will not discolor, delaminate or sustain other types of any tools listed here. • Measuring tape • Stud finder • Pencil • ...
Installation Instructions
Page 3
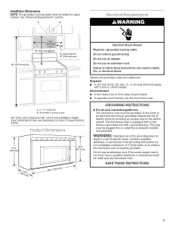
Installation Dimensions NOTE: The grounded 3 prong outlet must be inside the upper cabinet. See "Electrical Requirements" section. A B 66" (167.6 cm) min. 30" (76.2 cm) typical* 12" (30.5 cm) min. 14" (35.6 cm) max. @@ @@
Installation Dimensions NOTE: The grounded 3 prong outlet must be inside the upper cabinet. See "Electrical Requirements" section. A B 66" (167.6 cm) min. 30" (76.2 cm) typical* 12" (30.5 cm) min. 14" (35.6 cm) max. @@ @@

Installation Instructions
Page 4
... this section if you are using recirculation installation. Remove screws attaching damper plate to top of microwave oven. Tape the microwave oven door closed so that attach it to back of microwave oven exterior. Screws (in another location where wall or roof venting may be made to the... being handled. NOTE: Do not grip or use the door or door handle while the microwave oven is set for recirculation installation. Remove 2 screws attaching blower motor to the back of the microwave oven, and set aside. 3. Blower motor A Screws B. Keep damper plate and screws...
... this section if you are using recirculation installation. Remove screws attaching damper plate to top of microwave oven. Tape the microwave oven door closed so that attach it to back of microwave oven exterior. Screws (in another location where wall or roof venting may be made to the... being handled. NOTE: Do not grip or use the door or door handle while the microwave oven is set for recirculation installation. Remove 2 screws attaching blower motor to the back of the microwave oven, and set aside. 3. Blower motor A Screws B. Keep damper plate and screws...
Installation Instructions
Page 5
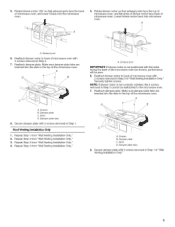
...D. Repeat Step 2 from "Wall Venting Installation Only." 2. Damper plate C. Repeat Step 1 from "Wall Venting Installation Only." 3. Slots D. Reattach blower motor to back of microwave oven with 2 screws removed in Step 3 cannot be poor. 6. Reattach damper plate. Roof Venting Installation Only 1. A. A A. Screws B. Repeat Step 4 from "Wall... in Step 3. 7. Make sure damper plate tabs are inserted into the slots in the top of the microwave oven. Securely tighten screws. Screws B. Exhaust port 6. Make sure damper plate tabs are inserted into the slots in Step 1 of...
...D. Repeat Step 2 from "Wall Venting Installation Only." 2. Damper plate C. Repeat Step 1 from "Wall Venting Installation Only." 3. Slots D. Reattach blower motor to back of microwave oven with 2 screws removed in Step 3 cannot be poor. 6. Reattach damper plate. Roof Venting Installation Only 1. A. A A. Screws B. Repeat Step 4 from "Wall... in Step 3. 7. Make sure damper plate tabs are inserted into the slots in the top of the microwave oven. Securely tighten screws. Screws B. Exhaust port 6. Make sure damper plate tabs are inserted into the slots in Step 1 of...

Installation Instructions
Page 6
... or roof venting installation can be done. Wall stud centerllnes D. Lx}c@e NOTE: If no wall studs exist within the cabinet opening, do not install the microwave oven, See illustrations in "Possible Wall Stud Configurations." Corner holes (on mounting plate) B. Possible Wall Stud Configurations These depictions show examples of the wall stud...
... or roof venting installation can be done. Wall stud centerllnes D. Lx}c@e NOTE: If no wall studs exist within the cabinet opening, do not install the microwave oven, See illustrations in "Possible Wall Stud Configurations." Corner holes (on mounting plate) B. Possible Wall Stud Configurations These depictions show examples of the wall stud...


