
Installation Instructions
Page 2
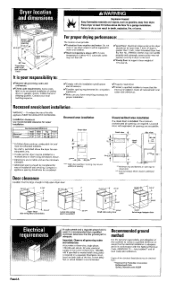
... sed Recommended/Minim Back 55""//40"" Sides 11""//00"" um Top 1188""//1188"" Front 1"-/-1" Recessed area installation front view I inch, install Extended Dryer Feet Kit, Part No. 279810.) Clothes may not tumble properly and automatic sensor cycles may require additional spacing. No shelf is recommended. I /Properly install dryer. latest edition** and...
... sed Recommended/Minim Back 55""//40"" Sides 11""//00"" um Top 1188""//1188"" Front 1"-/-1" Recessed area installation front view I inch, install Extended Dryer Feet Kit, Part No. 279810.) Clothes may not tumble properly and automatic sensor cycles may require additional spacing. No shelf is recommended. I /Properly install dryer. latest edition** and...
Installation Instructions
Page 3
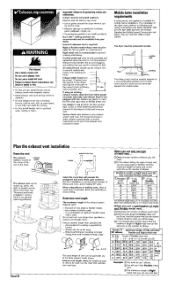
...vent must be at outlet the center of the _. _ rear of vent can de fuel for Mobile Homes Construction and Safety, title 24, HUD Part 280) or latest edition. Remove excess flexible vent to what you are available from entire length of elbows used . be exhausted outside. Mobile home ... be used , Do not use duct tape, screws or other vent used must conform to Manufactured Home Construction and Safety Standard, Title 24 CFR, Part 3280 (formerly the Federal Standard for a fire. • Moisture damage to gather around the dryer where it can be fully extended and supported when...
...vent must be at outlet the center of the _. _ rear of vent can de fuel for Mobile Homes Construction and Safety, title 24, HUD Part 280) or latest edition. Remove excess flexible vent to what you are available from entire length of elbows used . be exhausted outside. Mobile home ... be used , Do not use duct tape, screws or other vent used must conform to Manufactured Home Construction and Safety Standard, Title 24 CFR, Part 3280 (formerly the Federal Standard for a fire. • Moisture damage to gather around the dryer where it can be fully extended and supported when...
Installation Instructions
Page 7
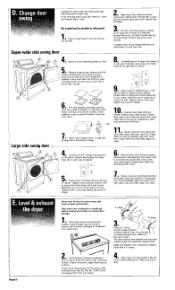
... hinge slot is over the dryer exhaust outlet and inside the exhaust hood. Remove door strike plug (E). Panel F • Insert screws in large part of dryer. Check levelness of dryer by placing a level on top of cabinet. The dryer exhaust vent must be level to existing exhaust vent, ... Carefully remove 4 hinge hole plugs (C) on left side of dryer, first side to side, then front to level dryer, order Extended Dryer Feet Kit, Part No. 279810 (sold two legs per kit), from inner door• Do NOT pry apart with door catch (It). Remove cardboard or hardboard from cabinet...
... hinge slot is over the dryer exhaust outlet and inside the exhaust hood. Remove door strike plug (E). Panel F • Insert screws in large part of dryer. Check levelness of dryer by placing a level on top of cabinet. The dryer exhaust vent must be level to existing exhaust vent, ... Carefully remove 4 hinge hole plugs (C) on left side of dryer, first side to side, then front to level dryer, order Extended Dryer Feet Kit, Part No. 279810 (sold two legs per kit), from inner door• Do NOT pry apart with door catch (It). Remove cardboard or hardboard from cabinet...
Installation Instructions
Page 8
..." or 29"- 50" periscopes include one male cJlap-lockfitting, one extra long draw-band collar and one clamp e'.18-: Part #439m_7 le'.29.: part #4398011 2_'-50" : Part #439_014 0"-18" Periscope r,4 . • Use when vent outlets overlap or are set in a running or "On"... of dryer, then push dryer to power supply. Kits Make Installation Easy clearance between dryer and wall • Total kit length 8 ]eet Part#4396025 eAdditional vent can be snapped between sections for longer runs Kit Contains: 2- 4' ventsectionswith attached close clearanceinstallations 2- 4" clamps %s easy as ...
..." or 29"- 50" periscopes include one male cJlap-lockfitting, one extra long draw-band collar and one clamp e'.18-: Part #439m_7 le'.29.: part #4398011 2_'-50" : Part #439_014 0"-18" Periscope r,4 . • Use when vent outlets overlap or are set in a running or "On"... of dryer, then push dryer to power supply. Kits Make Installation Easy clearance between dryer and wall • Total kit length 8 ]eet Part#4396025 eAdditional vent can be snapped between sections for longer runs Kit Contains: 2- 4' ventsectionswith attached close clearanceinstallations 2- 4" clamps %s easy as ...
Installation Instructions
Page 9
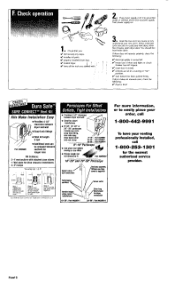
... purchasefrom your appliance. These words mean: You can happen if the instructions are not followed. Part No. 3978844 © 2000 Whirlpool Corporation Electrical If using a power supply cord: Dryer power supply cord must end in death ...169; 3-wirereceptacle (10-30R) _ ___-_%_ 4-wire powersupplycordwith ringor spadeterminalsand U.L.Jistedstrainrelief 3-wirepowersupplycordwith ringor spadeterminalsand U.L-listedstrainrelief If connecting by calling Whirlpool Parts & Accessories 1-800-442-9991, Mon-Fri: 8am to 9pm (CST), Sat: 9am to the dryer must be killed or seriouslyinjured...
... purchasefrom your appliance. These words mean: You can happen if the instructions are not followed. Part No. 3978844 © 2000 Whirlpool Corporation Electrical If using a power supply cord: Dryer power supply cord must end in death ...169; 3-wirereceptacle (10-30R) _ ___-_%_ 4-wire powersupplycordwith ringor spadeterminalsand U.L.Jistedstrainrelief 3-wirepowersupplycordwith ringor spadeterminalsand U.L-listedstrainrelief If connecting by calling Whirlpool Parts & Accessories 1-800-442-9991, Mon-Fri: 8am to 9pm (CST), Sat: 9am to the dryer must be killed or seriouslyinjured...


