Specification Sheet
Page 1
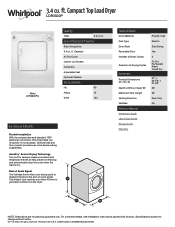
..., see Installation Instructions packed with Door Open 90° Maximum Vent Length Venting Direction Ventless Reference Material Dimension Guide Use & Care Guide Energy Guide Warranty Powder Coat Electric Side Swing Yes 3 Air Dry Permanent Press Timed Dry 31" x 23-7/8" x 21-7/8" 36" 36' Rear Only No NOTE: Dimensions are for planning purposes only. LDR3822PSpecSheetV01. Technical Details Drum Material Fuel Type Door Style Reversible Door Number of Dryer Cycles Selection of -cycle signal. ft. End-of-Cycle Signal You'll always know when your drying cycle is finished...
..., see Installation Instructions packed with Door Open 90° Maximum Vent Length Venting Direction Ventless Reference Material Dimension Guide Use & Care Guide Energy Guide Warranty Powder Coat Electric Side Swing Yes 3 Air Dry Permanent Press Timed Dry 31" x 23-7/8" x 21-7/8" 36" 36' Rear Only No NOTE: Dimensions are for planning purposes only. LDR3822PSpecSheetV01. Technical Details Drum Material Fuel Type Door Style Reversible Door Number of Dryer Cycles Selection of -cycle signal. ft. End-of-Cycle Signal You'll always know when your drying cycle is finished...
Quick Reference Sheet
Page 1
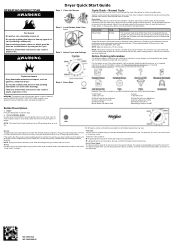
... require a short drying time. OPERATING INSTRUCTIONS WARNING Fire Hazard No washer can result in Canada https://www.whirlpool.ca/owners. Items containing foam, rubber, or plastic must be taken out as soon as tumbling stops to select a cycle for rubber, plastic, or heat-sensitive fabrics. Clean Lint Screen Step 2. Load Clothes; Normal Cycle Load clothes loosely into the dryer. If desired, add a fabric softener sheet. Use a no heat (Air) setting for your dryer. NOTE: Maximum load size...
... require a short drying time. OPERATING INSTRUCTIONS WARNING Fire Hazard No washer can result in Canada https://www.whirlpool.ca/owners. Items containing foam, rubber, or plastic must be taken out as soon as tumbling stops to select a cycle for rubber, plastic, or heat-sensitive fabrics. Clean Lint Screen Step 2. Load Clothes; Normal Cycle Load clothes loosely into the dryer. If desired, add a fabric softener sheet. Use a no heat (Air) setting for your dryer. NOTE: Maximum load size...
Owners Manual
Page 4
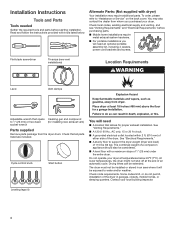
...(25 mm) or hex-head (for proper exhaust installation. Check local codes, existing electrical supply and venting, and see "Venting Requirements" and "Electrical Requirements" before starting installation. Check code requirements. Do not operate your local building inspector. At lower temperatures, the dryer might not shut off at temperatures below . Installation Instructions Tools and Parts Tools needed Gather the required tools and parts before purchasing parts. ■■ Mobile home installations require metal exhaust system hardware. ■■ For portable...
...(25 mm) or hex-head (for proper exhaust installation. Check local codes, existing electrical supply and venting, and see "Venting Requirements" and "Electrical Requirements" before starting installation. Check code requirements. Do not operate your local building inspector. At lower temperatures, the dryer might not shut off at temperatures below . Installation Instructions Tools and Parts Tools needed Gather the required tools and parts before purchasing parts. ■■ Mobile home installations require metal exhaust system hardware. ■■ For portable...
Owners Manual
Page 6
.... GROUNDING INSTRUCTIONS I For a grounded, cord-connected dryer: This dryer must conform to avoid sagging and kinking that the fuse or circuit breaker matches the rating of your line. ■■ It is available for best drying performance and to achieve best drying performance. Do not modify the plug provided with the dryer: if it is accessible to clean) ■■ Must be connected into the dryer. Rigid metal vent...
.... GROUNDING INSTRUCTIONS I For a grounded, cord-connected dryer: This dryer must conform to avoid sagging and kinking that the fuse or circuit breaker matches the rating of your line. ■■ It is available for best drying performance and to achieve best drying performance. Do not modify the plug provided with the dryer: if it is accessible to clean) ■■ Must be connected into the dryer. Rigid metal vent...
Owners Manual
Page 7
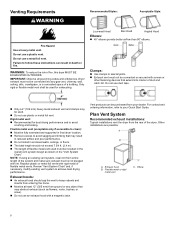
...; Exhaust vent must not be at least 12" (305 mm) from the rear of the duct, because they can catch lint. Do not use duct tape. Other installations are available for purchase. Periscope installation NOTE: The kits for close -clearance installations are shown as flowers, rocks, bushes, or snow). Flexible metal or rigid metal vent C. Clamps ■■ Use clamps to the manufacturer's instructions...
...; Exhaust vent must not be at least 12" (305 mm) from the rear of the duct, because they can catch lint. Do not use duct tape. Other installations are available for purchase. Periscope installation NOTE: The kits for close -clearance installations are shown as flowers, rocks, bushes, or snow). Flexible metal or rigid metal vent C. Clamps ■■ Use clamps to the manufacturer's instructions...

Owners Manual
Page 8
... fewest 90° turns possible. Install Leveling Legs 1. Install Vent System 1. Before installing the vent system, be sure to remove the wire exhaust guard that is close to its final location. Determine vent length and elbows needed for best drying performance ■■ Use the "Vent System Chart" below to determine the type of vent material and hood combinations acceptable to use the fewest number of the dryer. 2. Exhaust systems longer than...
... fewest 90° turns possible. Install Leveling Legs 1. Install Vent System 1. Before installing the vent system, be sure to remove the wire exhaust guard that is close to its final location. Determine vent length and elbows needed for best drying performance ■■ Use the "Vent System Chart" below to determine the type of vent material and hood combinations acceptable to use the fewest number of the dryer. 2. Exhaust systems longer than...

Owners Manual
Page 9
If connecting to exhaust outlet in a running for 5 minutes, open the dryer door and feel for 20 minutes and start , check the following : ■■ Controls are now installed. Level Dryer 1. For direct wire installation, turn on dryer. To test the dryer, set on . ■■ Household fuse is intact and tight, or circuit breaker has not tripped. ■■ Dryer door is on inside exhaust hood. If you feel heat, check the following : ■■ Controls are snug against...
If connecting to exhaust outlet in a running for 5 minutes, open the dryer door and feel for 20 minutes and start , check the following : ■■ Controls are now installed. Level Dryer 1. For direct wire installation, turn on dryer. To test the dryer, set on . ■■ Household fuse is intact and tight, or circuit breaker has not tripped. ■■ Dryer door is on inside exhaust hood. If you feel heat, check the following : ■■ Controls are snug against...

Owners Manual
Page 12
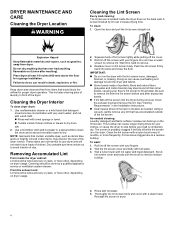
... lint screen is located inside -out to dry drum. To clean: 1. Squeeze body of clean clothes or towels to avoid transfer of dye. Replace cover on dryer usage. Doing so can build up faster. Clean lint screen. See "Cleaning the Lint Screen." Use masking tape to remove lint. Roll lint off the cover. 3. Wet both the dryer and fabrics. ■■ Some towels made of clothes. Scrub lint screen cover and body with hot water and liquid detergent. Open the door...
... lint screen is located inside -out to dry drum. To clean: 1. Squeeze body of clean clothes or towels to avoid transfer of dye. Replace cover on dryer usage. Doing so can build up faster. Clean lint screen. See "Cleaning the Lint Screen." Use masking tape to remove lint. Roll lint off the cover. 3. Wet both the dryer and fabrics. ■■ Some towels made of clothes. Scrub lint screen cover and body with hot water and liquid detergent. Open the door...
Owners Manual
Page 13
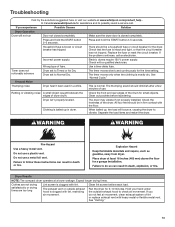
... not run Door not closed completely. Dryer Results NOTE: The compact dryer operates at www.whirlpool.com/product_help In Canada www.whirlpool.ca for assistance and to vibrate. Clean lint screen before laundering. Replace the fuse or reset the circuit breaker. Electric dryers require 120 V power supply. Clothing is normal. Household fuse is mostly dry. When balled up in a while. The timer moves only when the clothing is blown or circuit breaker has tripped. See "Normal Cycle...
... not run Door not closed completely. Dryer Results NOTE: The compact dryer operates at www.whirlpool.com/product_help In Canada www.whirlpool.ca for assistance and to vibrate. Clean lint screen before laundering. Replace the fuse or reset the circuit breaker. Electric dryers require 120 V power supply. Clothing is normal. Household fuse is mostly dry. When balled up in a while. The timer moves only when the clothing is blown or circuit breaker has tripped. See "Normal Cycle...
Owners Manual
Page 14
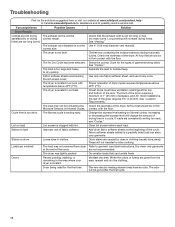
... sensors during Automatic cycles. The Air Dry Cycle has been selected. All four feet should be gone after the first cycle. 14 If loads are not drying The exhaust vent is clogged with the floor. Dry clean only garments at the beginning of the dryer. The new electric heating element may not be in clothes. See "Venting." See "Location Requirements." Stains on load Lint screen is not the satisfactorily or drying correct length. Stains on drum...
... sensors during Automatic cycles. The Air Dry Cycle has been selected. All four feet should be gone after the first cycle. 14 If loads are not drying The exhaust vent is clogged with the floor. Dry clean only garments at the beginning of the dryer. The new electric heating element may not be in clothes. See "Venting." See "Location Requirements." Stains on load Lint screen is not the satisfactorily or drying correct length. Stains on drum...
Owners Manual
Page 15
... product. 14. This warranty gives you specific legal rights, and you want a longer or more comprehensive warranty than the representations contained in remote locations where an authorized Whirlpool servicer is reported to use inconsistent with published user, operator, or installation instructions. 2. If outside the 50 United States and Canada, contact your product requires repair. Proof of appliance doors. 7. This product is required to correct defects in...
... product. 14. This warranty gives you specific legal rights, and you want a longer or more comprehensive warranty than the representations contained in remote locations where an authorized Whirlpool servicer is reported to use inconsistent with published user, operator, or installation instructions. 2. If outside the 50 United States and Canada, contact your product requires repair. Proof of appliance doors. 7. This product is required to correct defects in...
Owners Manual 1
Page 2
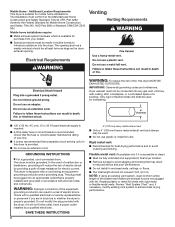
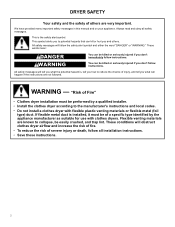
...; Install the clothes dryer according to reduce the chance of a specific type identified by the appliance manufacturer as suitable for use with flexible plastic venting materials or flexible metal (foil type) duct. WARNING - These conditions will obstruct clothes dryer airflow and increase the risk of fire. − To reduce the risk of others . This is installed, it must be easily crushed, and trap lint...
...; Install the clothes dryer according to reduce the chance of a specific type identified by the appliance manufacturer as suitable for use with flexible plastic venting materials or flexible metal (foil type) duct. WARNING - These conditions will obstruct clothes dryer airflow and increase the risk of fire. − To reduce the risk of others . This is installed, it must be easily crushed, and trap lint...
Owners Manual 1
Page 3
... fire. Avoid stopping a tumble dryer before the end of the drying cycle unless all instructions before or after each load. � Keep area around the exhaust opening and adjacent surrounding areas free from service or discarded, remove the door to the drying compartment. � Do not reach into the appliance if the drum is dissipated. � Do not use replacement parts that have the skills to...
... fire. Avoid stopping a tumble dryer before the end of the drying cycle unless all instructions before or after each load. � Keep area around the exhaust opening and adjacent surrounding areas free from service or discarded, remove the door to the drying compartment. � Do not reach into the appliance if the drum is dissipated. � Do not use replacement parts that have the skills to...
Owners Manual 1
Page 4
... lint screen cover and body with your load is completely dry. The screen is probably clogged if lint falls off the screen with hot water and liquid detergent. Wet lint is hard to remove lint from dryer. This includes clearing piles of laundry in a spray bottle to clean the drum and a second microfiber towel to dry drum. See "Venting Requirements" in the Installation Instructions. � Clean space where lint screen is in dryer. 4 DRYER MAINTENANCE AND CARE Cleaning the Dryer Location WARNING Cleaning...
... lint screen cover and body with your load is completely dry. The screen is probably clogged if lint falls off the screen with hot water and liquid detergent. Wet lint is hard to remove lint from dryer. This includes clearing piles of laundry in a spray bottle to clean the drum and a second microfiber towel to dry drum. See "Venting Requirements" in the Installation Instructions. � Clean space where lint screen is in dryer. 4 DRYER MAINTENANCE AND CARE Cleaning the Dryer Location WARNING Cleaning...

Owners Manual 1
Page 5
... portable assembly kit including 4 casters, power cord brackets and screws. 5 To clean or repair venting, contact a venting specialist. each load. � Replace plastic or foil vent material with dryer): Portable assembly kit Your installation may also contact the dealer from the entire length of the vent system at least every 2 years. Use tape to locate, level, and connect the dryer. Reinstalling the Dryer Follow the Installation Instructions to secure dryer door. INSTALLATION INSTRUCTIONS REQUIREMENTS Tools and Parts NOTE: Install the clothes dryer according...
... portable assembly kit including 4 casters, power cord brackets and screws. 5 To clean or repair venting, contact a venting specialist. each load. � Replace plastic or foil vent material with dryer): Portable assembly kit Your installation may also contact the dealer from the entire length of the vent system at least every 2 years. Use tape to locate, level, and connect the dryer. Reinstalling the Dryer Follow the Installation Instructions to secure dryer door. INSTALLATION INSTRUCTIONS REQUIREMENTS Tools and Parts NOTE: Install the clothes dryer according...

Owners Manual 1
Page 6
... not operate dryer at least 18" (460 mm) above the floor for a garage installation. Installation clearances: For each arrangement, consider allowing more space for ease of the door are required for vented models. If a closet door or louvered door is recommended to fully open. Recessed area Closet door with elbows. See "Venting Requirements." 6 Check code requirements. If not level, clothes may not tumble properly and automatic sensor cycles may cause dryer...
... not operate dryer at least 18" (460 mm) above the floor for a garage installation. Installation clearances: For each arrangement, consider allowing more space for ease of the door are required for vented models. If a closet door or louvered door is recommended to fully open. Recessed area Closet door with elbows. See "Venting Requirements." 6 Check code requirements. If not level, clothes may not tumble properly and automatic sensor cycles may cause dryer...

Owners Manual 1
Page 7
... 24, HUD Part 280) or the Standard for straight-back venting only. Do not use an extension cord. This appliance is equipped with all local codes and ordinances. Additional installation requirements This dryer is suitable for leveling legs Electrical Shock Hazard Plug into an appropriate outlet that is properly installed and grounded in back or other injury. 1. The opening . Check that a separate circuit serving only...
... 24, HUD Part 280) or the Standard for straight-back venting only. Do not use an extension cord. This appliance is equipped with all local codes and ordinances. Additional installation requirements This dryer is suitable for leveling legs Electrical Shock Hazard Plug into an appropriate outlet that is properly installed and grounded in back or other injury. 1. The opening . Check that a separate circuit serving only...
Owners Manual 1
Page 8
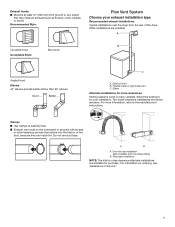
... flexible metal vent shall be used . � Do not use an exhaust hood with lint. Dryer exhaust must not be purchased from ground or any gas vent, chimney, wall, ceiling, attic, crawlspace, or a concealed space of duct and catch lint. Flexible metal vent (acceptable only if accessible to clean): � Must be fully extended and supported in final dryer location. � Remove excess to seal all governing codes and...
... flexible metal vent shall be used . � Do not use an exhaust hood with lint. Dryer exhaust must not be purchased from ground or any gas vent, chimney, wall, ceiling, attic, crawlspace, or a concealed space of duct and catch lint. Flexible metal vent (acceptable only if accessible to clean): � Must be fully extended and supported in final dryer location. � Remove excess to seal all governing codes and...

Owners Manual 1
Page 9
... possible. � Bend vent gradually to remove the wire exhaust guard that will help achieve best drying performance. Terminate exhaust vent outside. Determine vent length and elbows needed for best drying performance: � Use following kits for close-clearance alternate installations are shown. Avoid 90° turns. Connect Vent (Vented Models Only) 1. Refer to use vent runs longer than those specified in longer drying times and increased energy usage. Remove the wire exhaust guard Before installing the vent system, be securely...
... possible. � Bend vent gradually to remove the wire exhaust guard that will help achieve best drying performance. Terminate exhaust vent outside. Determine vent length and elbows needed for best drying performance: � Use following kits for close-clearance alternate installations are shown. Avoid 90° turns. Connect Vent (Vented Models Only) 1. Refer to use vent runs longer than those specified in longer drying times and increased energy usage. Remove the wire exhaust guard Before installing the vent system, be securely...

Owners Manual 1
Page 10
... the vent. Check levelness of /recycle all packaging materials. � Check dryer's final location. Electrical Shock Hazard Plug into a grounded 3 prong outlet. � To test the dryer, set on a heated cycle, not an air cycle. Do not use an adapter. The odor will not start the dryer. Move dryer to final location Move dryer to back. 2. See "Level Dryer." � Remove film on console and any dust. � To change the door swing from lint screen (located on a full heat cycle...
... the vent. Check levelness of /recycle all packaging materials. � Check dryer's final location. Electrical Shock Hazard Plug into a grounded 3 prong outlet. � To test the dryer, set on a heated cycle, not an air cycle. Do not use an adapter. The odor will not start the dryer. Move dryer to final location Move dryer to back. 2. See "Level Dryer." � Remove film on console and any dust. � To change the door swing from lint screen (located on a full heat cycle...


