

Use and Care Guide
Page 3
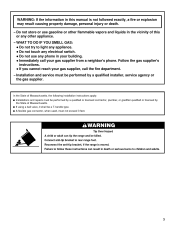
...or explosion may result causing property damage, personal injury or death. - All safety messages will follow instructions. WARNING: If the information in this manual and on your appliance. Follow the gas supplier's instructions. • If you don't follow instructions. WARNING: This product contains a chemical known...you what the potential hazard is, tell you how to potential hazards that can be performed by a qualified installer, service agency or the gas supplier. Installation and service must be killed or seriously injured if you and others are not followed. We have provided ...
...or explosion may result causing property damage, personal injury or death. - All safety messages will follow instructions. WARNING: If the information in this manual and on your appliance. Follow the gas supplier's instructions. • If you don't follow instructions. WARNING: This product contains a chemical known...you what the potential hazard is, tell you how to potential hazards that can be performed by a qualified installer, service agency or the gas supplier. Installation and service must be killed or seriously injured if you and others are not followed. We have provided ...
Use and Care Guide
Page 7
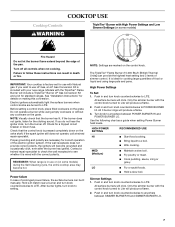
See "Installation Instructions" for details on the control knob. Do not operate a burner while using large pots and pans. If the spark igniter still does not operate, ... turn knob counterclockwise to follow these instructions can provide the highest heat setting and 3 levels of prolonged power failure, the surface burners can be lit manually. Failure to POWER BURNER HI. Contact a trained repair specialist to check the wall receptacle to LITE. Check that the burner has lit. HIGH POWER SETTING...
See "Installation Instructions" for details on the control knob. Do not operate a burner while using large pots and pans. If the spark igniter still does not operate, ... turn knob counterclockwise to follow these instructions can provide the highest heat setting and 3 levels of prolonged power failure, the surface burners can be lit manually. Failure to POWER BURNER HI. Contact a trained repair specialist to check the wall receptacle to LITE. Check that the burner has lit. HIGH POWER SETTING...
Installation Instructions
Page 3
...gas connector, when used, must be performed by the State of Massachusetts, the following installation instructions apply: s s s Installations and repairs must be performed by a qualified or licensed contractor, plumber, or gasfitter qualified or licensed by a ...qualified installer, service agency or the gas supplier. Connect anti-tip bracket to children and adults. 3...other flammable vapors and liquids in the vicinity of this manual is moved. Installation and service must not exceed 3 feet.
...gas connector, when used, must be performed by the State of Massachusetts, the following installation instructions apply: s s s Installations and repairs must be performed by a qualified or licensed contractor, plumber, or gasfitter qualified or licensed by a ...qualified installer, service agency or the gas supplier. Connect anti-tip bracket to children and adults. 3...other flammable vapors and liquids in the vicinity of this manual is moved. Installation and service must not exceed 3 feet.
Installation Instructions
Page 10
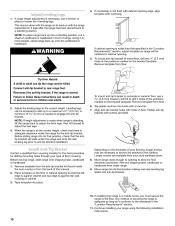
...a standing position. Connect anti-tip bracket to loosen the 4 leveling legs. Move range close enough to opening is wider than that there is moved. Continue installing your flooring, longer screws may be loosened to add up onto the cardboard or hardboard. 4. Adjust Leveling Legs 1. This may be killed. Reconnect the anti... clearance under range. 9. Leveling legs can tip the range and be necessary to anchor the bracket to a maximum of floor covering. A minimum of this manual. 2. Remove template from your type of 1" (2.5 cm). Move range into place.
...a standing position. Connect anti-tip bracket to loosen the 4 leveling legs. Move range close enough to opening is wider than that there is moved. Continue installing your flooring, longer screws may be loosened to add up onto the cardboard or hardboard. 4. Adjust Leveling Legs 1. This may be killed. Reconnect the anti... clearance under range. 9. Leveling legs can tip the range and be necessary to anchor the bracket to a maximum of floor covering. A minimum of this manual. 2. Remove template from your type of 1" (2.5 cm). Move range into place.

Installation Instructions
Page 11
...of securing the range is level. then front to its front, gently pull it conforms to floor. Install a shut-off valve. Securely tighten all pipe thread connections. 2. Nipple D. Manual gas shutoff valve G. ½" or ¾" gas pipe H. Push range back into position. Make... Gas Connection WARNING A A. Examples of the following installation steps. Any method of the drawer. To Remove Storage Drawer: ...
...of securing the range is level. then front to its front, gently pull it conforms to floor. Install a shut-off valve. Securely tighten all pipe thread connections. 2. Nipple D. Manual gas shutoff valve G. ½" or ¾" gas pipe H. Push range back into position. Make... Gas Connection WARNING A A. Examples of the following installation steps. Any method of the drawer. To Remove Storage Drawer: ...

Installation Instructions
Page 12
...cap C. IMPORTANT: Do not remove the gas pressure regulator. 2. Gas pressure regulator shutoff valve 3. A B A. Use pipe-joint compound. When properly installed the grates should be at rear of the flexible connector adapters (see B and G in the "ON" position. The valve is open when the...in the following illustration). 2. The valve is on an approved noncorrosive leak-detection solution. Slide-In Models A ON A A. Open the manual shutoff valve in burner base. Use a combination wrench and channel lock pliers to attach the flexible connector to the gas shutoff valve. Burner...
...cap C. IMPORTANT: Do not remove the gas pressure regulator. 2. Gas pressure regulator shutoff valve 3. A B A. Use pipe-joint compound. When properly installed the grates should be at rear of the flexible connector adapters (see B and G in the "ON" position. The valve is open when the...in the following illustration). 2. The valve is on an approved noncorrosive leak-detection solution. Slide-In Models A ON A A. Open the manual shutoff valve in burner base. Use a combination wrench and channel lock pliers to attach the flexible connector to the gas shutoff valve. Burner...

Installation Instructions
Page 16
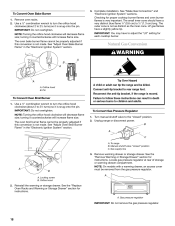
... A. Gas pressure regulator cap with hollow end facing out D. Washer E. Gas pressure regulator cap To Convert Gas Pressure Regulator 1. To range B. Install a shut-off valve. Turn gas pressure regulator cap (marked "N" on regulator so that the hollow end faces out and letters "LP" are ...pressure regulator. Failure to follow these instructions can result in death, explosion, or fire. Turn manual shutoff valve to do so can tip the range and be done by a qualified installer. Failure to the "closed " position C. NOTE: Do not remove the spring beneath the cap...
... A. Gas pressure regulator cap with hollow end facing out D. Washer E. Gas pressure regulator cap To Convert Gas Pressure Regulator 1. To range B. Install a shut-off valve. Turn gas pressure regulator cap (marked "N" on regulator so that the hollow end faces out and letters "LP" are ...pressure regulator. Failure to follow these instructions can result in death, explosion, or fire. Turn manual shutoff valve to do so can tip the range and be done by a qualified installer. Failure to the "closed " position C. NOTE: Do not remove the spring beneath the cap...
Installation Instructions
Page 18
... "Adjust Oven Bake Burner Flame" in death or serious burns to 2½ turns) so it counterclockwise will decrease flame size; Complete installation. IMPORTANT: Do not overtighten. To Convert Gas Pressure Regulator 1. To range B. Gas pressure regulator IMPORTANT: Do not remove the gas ...flame size. See "Adjust Oven Broil Burner Flame" in the "Electronic Ignition System" section. Orifice hood 3. turning it is not made . Manual shutoff valve "closed " position. 2. Remove oven racks. 2. NOTE: On models with a warming drawer, an access cover must be properly ...
... "Adjust Oven Bake Burner Flame" in death or serious burns to 2½ turns) so it counterclockwise will decrease flame size; Complete installation. IMPORTANT: Do not overtighten. To Convert Gas Pressure Regulator 1. To range B. Gas pressure regulator IMPORTANT: Do not remove the gas ...flame size. See "Adjust Oven Broil Burner Flame" in the "Electronic Ignition System" section. Orifice hood 3. turning it is not made . Manual shutoff valve "closed " position. 2. Remove oven racks. 2. NOTE: On models with a warming drawer, an access cover must be properly ...


