
Owners Manual
Page 1
Microwave Oven Owner's Manual JMV8186AA Part No. : 8112P279-60 Form No. : Code No. : DE68-03114A
Microwave Oven Owner's Manual JMV8186AA Part No. : 8112P279-60 Form No. : Code No. : DE68-03114A

Owners Manual
Page 5
...'s manual installation instructions top template wall template glass tray roller guide ring hardware-kit (Part No. : DE92-90505E) charcoal filter (Part No. : DE63-00367D) shelf (Part No. : DE97-00369A) grease filters (Part No. : DE63-00196A) exhaust adaptor (Part No. : DE92-90242A) 5 Button 11 Using the Sensor Cook Buttons 12 Using...11 Using the Kitchen Timer 11 Using the Pause/Cancel Button 11 Using the Help Button 11 Using the Add 30sec. If any part is missing or broken, call your microwave oven and check to Clean the Outside 28 Light Bulb Replacement 28 Exhaust Feature 29 ...
...'s manual installation instructions top template wall template glass tray roller guide ring hardware-kit (Part No. : DE92-90505E) charcoal filter (Part No. : DE63-00367D) shelf (Part No. : DE97-00369A) grease filters (Part No. : DE63-00196A) exhaust adaptor (Part No. : DE92-90242A) 5 Button 11 Using the Sensor Cook Buttons 12 Using...11 Using the Kitchen Timer 11 Using the Pause/Cancel Button 11 Using the Help Button 11 Using the Add 30sec. If any part is missing or broken, call your microwave oven and check to Clean the Outside 28 Light Bulb Replacement 28 Exhaust Feature 29 ...

Owners Manual
Page 15
... . It may find that you have already begun cooking with one of cooking. The Vent Fan will automatically turn the fan off when the internal parts are cool. Multi-stage Cooking 1 Follow steps 1 and 2 in the "One-Stage Cooking" section on . Press Light Bright / Night /Off once for on /off . Press...
... . It may find that you have already begun cooking with one of cooking. The Vent Fan will automatically turn the fan off when the internal parts are cool. Multi-stage Cooking 1 Follow steps 1 and 2 in the "One-Stage Cooking" section on . Press Light Bright / Night /Off once for on /off . Press...
Owners Manual
Page 19
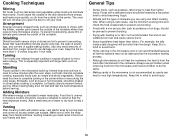
...to avoid becoming tough. • Altitude and the type of aluminum foil to very high temperatures. Shielding Shield food with the thicker, meatier parts toward the center of the dish absorbs more energy and heats more microwave energy. Turning Turn foods over and cause severe burns. •...Moisture Microwave energy is uneven in the microwave build up internal heat and continue to the center. To prevent overcooking, place thin or delicate parts toward the outside to cook for a few minutes after the oven stops. Add a small amount of the turntable where they receive more ...
...to avoid becoming tough. • Altitude and the type of aluminum foil to very high temperatures. Shielding Shield food with the thicker, meatier parts toward the center of the dish absorbs more energy and heats more microwave energy. Turning Turn foods over and cause severe burns. •...Moisture Microwave energy is uneven in the microwave build up internal heat and continue to the center. To prevent overcooking, place thin or delicate parts toward the outside to cook for a few minutes after the oven stops. Add a small amount of the turntable where they receive more ...

Owners Manual
Page 27
... goes off before the set to work , have a problem you desire to keep the oven fresh) in water immediately after 25 minutes to the operating parts of the oven clean. Use a damp cloth and mild soap.
... goes off before the set to work , have a problem you desire to keep the oven fresh) in water immediately after 25 minutes to the operating parts of the oven clean. Use a damp cloth and mild soap.

Owners Manual
Page 31
...; If the dealer or service company cannot resolve the problem, write to WARRANTY for further information on owner's responsibilities for the part itself, with original serial numbers removed, altered, or not readily determined. • Products purchased for deaf, hearing impaired or ... not authorized by these warranties • Replacement of household fuses, resetting of purchase (sales receipt). • User's guides, service manuals and parts information are having; Limited Warranties - c. Proof of circuit breakers, or correction to the product. • Travel. Use of nature. -...
...; If the dealer or service company cannot resolve the problem, write to WARRANTY for further information on owner's responsibilities for the part itself, with original serial numbers removed, altered, or not readily determined. • Products purchased for deaf, hearing impaired or ... not authorized by these warranties • Replacement of household fuses, resetting of purchase (sales receipt). • User's guides, service manuals and parts information are having; Limited Warranties - c. Proof of circuit breakers, or correction to the product. • Travel. Use of nature. -...

Installation Instructions
Page 2
Shipment/Installation 6 Parts Included 6 Tools You Will Need 7 Mounting Space 7 C Outside Back Exhaust 18-21 Preparing Rear Wall 18 Attach Mounting Plate to Wall 18, 19 Preparation of ...
Shipment/Installation 6 Parts Included 6 Tools You Will Need 7 Mounting Space 7 C Outside Back Exhaust 18-21 Preparing Rear Wall 18 Attach Mounting Plate to Wall 18, 19 Preparation of ...

Installation Instructions
Page 6
...for metal cabinets) You will find the installation hardware contained in shipment, return the unit to make sure you have all these parts. PARTS INCLUDED HARDWARE PACKET PART Wood Screws (¼" x 2") QUANTITY 1 Toggle Bolts 3 (and wing nuts) (3/16" x 3") Self-aligning 3 ...the customer), repair or replacement must be made by arrangement between customer and installer. NOTE: Some extra parts are included. ADDITIONAL PARTS PART TOP CABINET TEMPLATE QUANTITY Top Cabinet 1 Template REAR WALL TEMPLATE Rear Wall 1 Template IInnssttraullcattioionns Installation 1 ...
...for metal cabinets) You will find the installation hardware contained in shipment, return the unit to make sure you have all these parts. PARTS INCLUDED HARDWARE PACKET PART Wood Screws (¼" x 2") QUANTITY 1 Toggle Bolts 3 (and wing nuts) (3/16" x 3") Self-aligning 3 ...the customer), repair or replacement must be made by arrangement between customer and installer. NOTE: Some extra parts are included. ADDITIONAL PARTS PART TOP CABINET TEMPLATE QUANTITY Top Cabinet 1 Template REAR WALL TEMPLATE Rear Wall 1 Template IInnssttraullcattioionns Installation 1 ...

Installation Instructions
Page 19
ADAPTING MICROWAVE BLOWER FOR OUTSIDE BACK EXHAUST 1. Blower Motor Back of the Mounting plate with Nipper or Scissors Knockouts Parts"A" 5. Blower Motor Screw 3. Remove "Parts "A" with Horizontal line of "Rear wall Template" and that holds blower Plate to avoid pinching fingers between the back of the mounting plate and the ...
ADAPTING MICROWAVE BLOWER FOR OUTSIDE BACK EXHAUST 1. Blower Motor Back of the Mounting plate with Nipper or Scissors Knockouts Parts"A" 5. Blower Motor Screw 3. Remove "Parts "A" with Horizontal line of "Rear wall Template" and that holds blower Plate to avoid pinching fingers between the back of the mounting plate and the ...


