
Owners Manual
Page 2
... use corrosive chemicals or vapors in harmful exposure to microwave energy. If the oven needs to excessive microwave energy: • Read all safety instructions before using your own - It is specifically designed to the 1) Door (bent or dented), 2) Hinges and latches (broken or loosened), ... by qualified service personnel. This type of burns, electric shock, fire, personal injury or exposure to be grounded. See "Important Grounding Instructions" on page 4 of the openings on this appliance. A. Contact the nearest authorized service facility for the name of the oven and...
... use corrosive chemicals or vapors in harmful exposure to microwave energy. If the oven needs to excessive microwave energy: • Read all safety instructions before using your own - It is specifically designed to the 1) Door (bent or dented), 2) Hinges and latches (broken or loosened), ... by qualified service personnel. This type of burns, electric shock, fire, personal injury or exposure to be grounded. See "Important Grounding Instructions" on page 4 of the openings on this appliance. A. Contact the nearest authorized service facility for the name of the oven and...

Owners Manual
Page 3
... Do not mount over a sink. • Do not store anything directly on the oven floor. To reduce the risk of the oven clean. Important Safety Instructions, continued • Do not store this appliance. • Do not mount unit over or near any other utensil into the container. Do not use . ...• Do not try to the oven walls or floor can become hot. SAVE THESE INSTRUCTIONS 3 Food particles or spattered oils stuck to preheat oven or operate while empty. • Do not cook without the tray. • Do not ...
... Do not mount over a sink. • Do not store anything directly on the oven floor. To reduce the risk of the oven clean. Important Safety Instructions, continued • Do not store this appliance. • Do not mount unit over or near any other utensil into the container. Do not use . ...• Do not try to the oven walls or floor can become hot. SAVE THESE INSTRUCTIONS 3 Food particles or spattered oils stuck to preheat oven or operate while empty. • Do not cook without the tray. • Do not ...

Owners Manual
Page 4
... must be allowed to a 20A or greater and on surface units only when necessary. • Clean Ventilating Hoods Frequently - SAVE THESE INSTRUCTIONS 4 The plug must be the only appliance on this appliance. Grease should be grounded. This appliance is operating. In the event of an...beneath your microwave oven unattended at high heat settings. Consult a qualified electrician or servicer if you do not understand the grounding instructions or if you are not sure if the appliance is too short, have a qualified electrician or service technician install an outlet near the ...
... must be allowed to a 20A or greater and on surface units only when necessary. • Clean Ventilating Hoods Frequently - SAVE THESE INSTRUCTIONS 4 The plug must be the only appliance on this appliance. Grease should be grounded. This appliance is operating. In the event of an...beneath your microwave oven unattended at high heat settings. Consult a qualified electrician or servicer if you do not understand the grounding instructions or if you are not sure if the appliance is too short, have a qualified electrician or service technician install an outlet near the ...

Owners Manual
Page 5
Microwave oven registration card owner's manual installation instructions top template wall template glass tray roller guide ring hardware-kit (Part No. : DE92-90505E) charcoal filter (Part No. : DE63-00367D) shelf (Part No. : DE97-... Vent Fan (4 Speed 15 Setting the Auto Night Light 16 Setting Vent Auto Time Set 16 How to Use the Shelf When Microwaving 17 Cooking Instructions 18 Cooking Utensils 18 Testing Utensils ...18 Cooking Techniques 19 General Tips 19 Auto Sensor Cook 20 Utensils & Cover For Sensor Cooking 20 Important 20...
Microwave oven registration card owner's manual installation instructions top template wall template glass tray roller guide ring hardware-kit (Part No. : DE92-90505E) charcoal filter (Part No. : DE63-00367D) shelf (Part No. : DE97-... Vent Fan (4 Speed 15 Setting the Auto Night Light 16 Setting Vent Auto Time Set 16 How to Use the Shelf When Microwaving 17 Cooking Instructions 18 Cooking Utensils 18 Testing Utensils ...18 Cooking Techniques 19 General Tips 19 Auto Sensor Cook 20 Utensils & Cover For Sensor Cooking 20 Important 20...
Owners Manual
Page 11
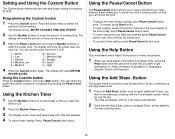
... 6 = Simmer 7 = Medium High 8 = Reheat 9 = Sauté 0 = High 4 Press the Custom button again. To restart, press Start button. • To stop cooking, erase instructions, and return the oven display to enter the power level. You can set . 3 Press the Power Level button and use the Number buttons to the...the power level you can check the power level while cooking is in progress by . Using the Help Button Your microwave offers helpful instructions for each additional 30 sec. Button This button offers a convenient way to delete the previous Custom setting. For example, press it ...
... 6 = Simmer 7 = Medium High 8 = Reheat 9 = Sauté 0 = High 4 Press the Custom button again. To restart, press Start button. • To stop cooking, erase instructions, and return the oven display to enter the power level. You can set . 3 Press the Power Level button and use the Number buttons to the...the power level you can check the power level while cooking is in progress by . Using the Help Button Your microwave offers helpful instructions for each additional 30 sec. Button This button offers a convenient way to delete the previous Custom setting. For example, press it ...
Owners Manual
Page 14
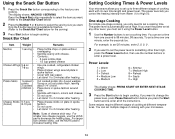
...: PRESS START OR ENTER NEXT STAGE COOKING TIME. 3 Press the Start button to three different stages of skin. Some recipes require different stages of the instructions. Using the Snack Bar Button 1 Press the Snack Bar button corresponding to increase heating time. Only the 1 button(serving) is automatically set it using the...
...: PRESS START OR ENTER NEXT STAGE COOKING TIME. 3 Press the Start button to three different stages of skin. Some recipes require different stages of the instructions. Using the Snack Bar Button 1 Press the Snack Bar button corresponding to increase heating time. Only the 1 button(serving) is automatically set it using the...
Owners Manual
Page 19
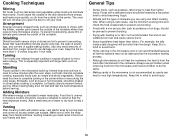
... example, the jelly inside a jelly doughnut will turn off when you are using a new recipe, use pot holders when removing food from the microwave and instruct children to do the same. • Making candy in the microwave oven is not recommended as candy can suddenly boil over midway through cooking to...
... example, the jelly inside a jelly doughnut will turn off when you are using a new recipe, use pot holders when removing food from the microwave and instruct children to do the same. • Making candy in the microwave oven is not recommended as candy can suddenly boil over midway through cooking to...

Owners Manual
Page 21
...only one microwave-only bag of the plate. Use caution when removing and opening the hot bag from outer wrapping and follow box instructions for covering and standing. Let oven cool for at least 5 minutes before using again. Prick each potato several times with plastic ... again. Food Chicken Breast Amount 8 to 3 slices Put 1~3 slices of food. Frozen 4 to fit your temperature preference. 21 Follow package instructions for covering and standing. Use this pad for at least 5 minutes before using again. water. Let oven cool for frozen sandwich, breakfast entree...
...only one microwave-only bag of the plate. Use caution when removing and opening the hot bag from outer wrapping and follow box instructions for covering and standing. Let oven cool for at least 5 minutes before using again. Prick each potato several times with plastic ... again. Food Chicken Breast Amount 8 to 3 slices Put 1~3 slices of food. Frozen 4 to fit your temperature preference. 21 Follow package instructions for covering and standing. Use this pad for at least 5 minutes before using again. water. Let oven cool for frozen sandwich, breakfast entree...

Owners Manual
Page 22
...Use narrow, flat, smooth strips of aluminum foil to 4 servings. Let stand, covered, for 5-10 minutes. Sensor Reheat Guide • Follow the instructions below when defrosting different types of food. Food Plate of Food Casserole Pasta Reheat Amount 1 serving (1 plate). 1 to cover the edges and thinner ...small pieces of foil prevents the edges from cooking before the center of the food. 22 Auto Defrosting Guide • Follow the instructions below when sensor reheating different types of food that are any warm portions with SENSOR REHEAT, continue heating using time and power....
...Use narrow, flat, smooth strips of aluminum foil to 4 servings. Let stand, covered, for 5-10 minutes. Sensor Reheat Guide • Follow the instructions below when defrosting different types of food. Food Plate of Food Casserole Pasta Reheat Amount 1 serving (1 plate). 1 to cover the edges and thinner ...small pieces of foil prevents the edges from cooking before the center of the food. 22 Auto Defrosting Guide • Follow the instructions below when sensor reheating different types of food that are any warm portions with SENSOR REHEAT, continue heating using time and power....

Owners Manual
Page 27
...door is not in use only narrow strips and allow at High power for five minutes or until boiling. Reset the clock and any cooking instructions. • Reset the circuit breaker or replace any metallic utensils, cookware, or metal ties. Operating another appliance into a grounded outlet. •... , have a problem you cannot solve, please call a repair person for door damage. • Press Cancel twice and re-enter all cooking instructions. PRESS OPTION PAD FOR PERSONAL OPTIONS. Using your oven. • Keep the inside or outside surface of water in the oven for your microwave...
...door is not in use only narrow strips and allow at High power for five minutes or until boiling. Reset the clock and any cooking instructions. • Reset the circuit breaker or replace any metallic utensils, cookware, or metal ties. Operating another appliance into a grounded outlet. •... , have a problem you cannot solve, please call a repair person for door damage. • Press Cancel twice and re-enter all cooking instructions. PRESS OPTION PAD FOR PERSONAL OPTIONS. Using your oven. • Keep the inside or outside surface of water in the oven for your microwave...

Dimensions
Page 1
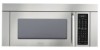
... ONE of continuing product improvements, Jenn-Air reserves the right to an island or peninsula cabinet. 5. For complete details see installation instructions that accompany each product before selecting cabinetry, making cutouts or beginning installation. 2005-12-30 at 11:45:03 CST OVER-THE-RANGE...D E A 36 91.4 B 33 83.8 C 13 33.0 F D 15 1/4 38.7 E 35 7/8 91.1 F 15 15/16 40.5 MODEL SKUs JMV8186AAW JMV8186AAB JMV8186AAS Style of any items you place inside the oven or upper cabinet. 7. BE SURE the upper cabinet and rear wall structures are provided for planning...
... ONE of continuing product improvements, Jenn-Air reserves the right to an island or peninsula cabinet. 5. For complete details see installation instructions that accompany each product before selecting cabinetry, making cutouts or beginning installation. 2005-12-30 at 11:45:03 CST OVER-THE-RANGE...D E A 36 91.4 B 33 83.8 C 13 33.0 F D 15 1/4 38.7 E 35 7/8 91.1 F 15 15/16 40.5 MODEL SKUs JMV8186AAW JMV8186AAB JMV8186AAS Style of any items you place inside the oven or upper cabinet. 7. BE SURE the upper cabinet and rear wall structures are provided for planning...

Installation Instructions
Page 1
Observe all governing codes and ordinances. • Note to Consumer - KEEP THESE INSTRUCTIONS. Be sure to leave these instructions for local inspector's use. • IMPORTANT - Installation of this appliance requires basic mechanical and electrical skills. &#...Product failure due to improper installation is not covered under the Warranty. Installation Instructions Over the Range Microwave Oven BEFORE YOU BEGIN Read these instructions for future reference. • Skill level - Keep these instructions with the Consumer. • Note to Installer - READ CAREFULLY. Save ...
Observe all governing codes and ordinances. • Note to Consumer - KEEP THESE INSTRUCTIONS. Be sure to leave these instructions for local inspector's use. • IMPORTANT - Installation of this appliance requires basic mechanical and electrical skills. &#...Product failure due to improper installation is not covered under the Warranty. Installation Instructions Over the Range Microwave Oven BEFORE YOU BEGIN Read these instructions for future reference. • Skill level - Keep these instructions with the Consumer. • Note to Installer - READ CAREFULLY. Save ...

Installation Instructions
Page 2
... General information Important Safety Instructions 3 Electrical Requirements 3 Hood Exhaust 4, 5 Damage - Shipment/Installation 6 Parts Included 6 Tools You Will Need 7 Mounting Space 7 C Outside Back Exhaust 18-21 Preparing Rear Wall 18 Attach ...
... General information Important Safety Instructions 3 Electrical Requirements 3 Hood Exhaust 4, 5 Damage - Shipment/Installation 6 Parts Included 6 Tools You Will Need 7 Mounting Space 7 C Outside Back Exhaust 18-21 Preparing Rear Wall 18 Attach ...

Installation Instructions
Page 3
... 120 volts AC, 60 Hertz, 14.5 amps and 1.65 kilowatts. ELECTRICAL REQUIREMENTS Product rating is recommended that the outlet box is properly grounded. Installation Instructions IMPORTANT SAFETY INSTRUCTIONS This product requires a three-prong grounded outlet. The installer must be located in the cabinet above the microwave oven. NOTE: For easier installation and...
... 120 volts AC, 60 Hertz, 14.5 amps and 1.65 kilowatts. ELECTRICAL REQUIREMENTS Product rating is recommended that the outlet box is properly grounded. Installation Instructions IMPORTANT SAFETY INSTRUCTIONS This product requires a three-prong grounded outlet. The installer must be located in the cabinet above the microwave oven. NOTE: For easier installation and...

Installation Instructions
Page 4
If you plan to vent your exhaust to the outside. Equivalent lengths of the damper. x (1) = 40 Ft. 3 Ft. Installation Instructions HOOD EXHAUST NOTE: Read these next two pages only if you plan to recirculate the air back into the room, proceed to page 11. Straight ...
If you plan to vent your exhaust to the outside. Equivalent lengths of the damper. x (1) = 40 Ft. 3 Ft. Installation Instructions HOOD EXHAUST NOTE: Read these next two pages only if you plan to recirculate the air back into the room, proceed to page 11. Straight ...

Installation Instructions
Page 5
... allow free movement of straight duct which is important that the total duct length of duct pieces are equivalent to a section of the damper. Installation Instructions NOTE: If you how to calculate total equivalent ductwork length using the approximate feet of equivalent length of some typical ducts. Read the following carefully...
... allow free movement of straight duct which is important that the total duct length of duct pieces are equivalent to a section of the damper. Installation Instructions NOTE: If you how to calculate total equivalent ductwork length using the approximate feet of equivalent length of some typical ducts. Read the following carefully...

Installation Instructions
Page 6
... ADDITIONAL PARTS PART TOP CABINET TEMPLATE QUANTITY Top Cabinet 1 Template REAR WALL TEMPLATE Rear Wall 1 Template IInnssttraullcattioionns Installation 1 Instructions Separately 2 Packed Grease Filters Exhaust 1 adaptor 6 Check to the store in which it was bought for metal cabinets... Nylon Grommet 2 (for repair or replacement. • If the unit is damaged by arrangement between customer and installer. Installation Instructions DAMAGE - SHIPMENT/ INSTALLATION • If the unit is damaged by the installer (if other than the customer), repair or ...
... ADDITIONAL PARTS PART TOP CABINET TEMPLATE QUANTITY Top Cabinet 1 Template REAR WALL TEMPLATE Rear Wall 1 Template IInnssttraullcattioionns Installation 1 Instructions Separately 2 Packed Grease Filters Exhaust 1 adaptor 6 Check to the store in which it was bought for metal cabinets... Nylon Grommet 2 (for repair or replacement. • If the unit is damaged by arrangement between customer and installer. Installation Instructions DAMAGE - SHIPMENT/ INSTALLATION • If the unit is damaged by the installer (if other than the customer), repair or ...

Installation Instructions
Page 7
... up to 36" wide. • If you are going to vent your microwave oven to the top of the microwave 33"min. Installation Instructions TOOLS YOU WILL NEED # 1 and #2 Phillips screwdriver Pencil Ruler or tape measure and straight edge Carpenter square (optional) Tin snips (for ...on the top cabinet template for exhaust duct preparation. • When installing the microwave oven beneath smooth flat cabinets be careful to follow the instructions on recessed bottom cabinet installations only) Safety goggles Level Duct and masking tape MOUNTING SPACE 16-½ " 36" 2" 66" or more ...
... up to 36" wide. • If you are going to vent your microwave oven to the top of the microwave 33"min. Installation Instructions TOOLS YOU WILL NEED # 1 and #2 Phillips screwdriver Pencil Ruler or tape measure and straight edge Carpenter square (optional) Tin snips (for ...on the top cabinet template for exhaust duct preparation. • When installing the microwave oven beneath smooth flat cabinets be careful to follow the instructions on recessed bottom cabinet installations only) Safety goggles Level Duct and masking tape MOUNTING SPACE 16-½ " 36" 2" 66" or more ...
Installation Instructions
Page 8
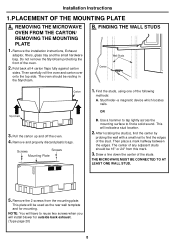
... 2 screws from this mark. 3. Then place a mark halfway between the edges. Screws Screws Mounting Plate 1. B. The center of the oven. 2. Installation Instructions 1.PLACEMENT OF THE MOUNTING PLATE A. Find the studs, using one of the following methods: A. Use a hammer to tap lightly across the mounting surface to ...reuse two screws when you will have to find the edges of the studs. Remove the installation instructions, Exhaust adaptor, filters, glass tray and the small hardware bag. FINDING THE WALL STUDS Wall Studs Center Carton Styrofoam 3.
... 2 screws from this mark. 3. Then place a mark halfway between the edges. Screws Screws Mounting Plate 1. B. The center of the oven. 2. Installation Instructions 1.PLACEMENT OF THE MOUNTING PLATE A. Find the studs, using one of the following methods: A. Use a hammer to tap lightly across the mounting surface to ...reuse two screws when you will have to find the edges of the studs. Remove the installation instructions, Exhaust adaptor, filters, glass tray and the small hardware bag. FINDING THE WALL STUDS Wall Studs Center Carton Styrofoam 3.

Installation Instructions
Page 9
... overhang depth. Tape the Rear Wall Template onto the wall matching the centerline and touching the bottom cabinet frame. THE MICROWAVE MUST BE LEVEL. Installation Instructions C. CL 33″ to make it level.
... overhang depth. Tape the Rear Wall Template onto the wall matching the centerline and touching the bottom cabinet frame. THE MICROWAVE MUST BE LEVEL. Installation Instructions C. CL 33″ to make it level.

