Owners Manual
Page 3
... tip if you don't follow the safety alert symbol and either the word "DANGER" or "WARNING." Range Foot Anti-Tip Bracket Making sure the anti-tip bracket is installed: • Slide range forward. • Look for details. Connect anti-tip bracket to potential hazards that can be killed. ...you and others are not followed. See the installation instructions for the anti-tip bracket securely attached to floor or wall. • Slide range back so rear range foot is , tell you what can result in this manual and on your appliance. Failure to the State of others . Reconnect...
... tip if you don't follow the safety alert symbol and either the word "DANGER" or "WARNING." Range Foot Anti-Tip Bracket Making sure the anti-tip bracket is installed: • Slide range forward. • Look for details. Connect anti-tip bracket to potential hazards that can be killed. ...you and others are not followed. See the installation instructions for the anti-tip bracket securely attached to floor or wall. • Slide range back so rear range foot is , tell you what can result in this manual and on your appliance. Failure to the State of others . Reconnect...

Owners Manual
Page 4
...the hood, turn the fan on Grease Fires - TO CHECK IF THE DEVICES ARE INSTALLED PROPERLY, SLIDE RANGE FORWARD, LOOK FOR ANTI-TIP BRACKET SECURELY ATTACHED TO FLOOR OR WALL, AND SLIDE RANGE BACK SO REAR RANGE FOOT IS UNDER ANTI-TIP BRACKET. ■ CAUTION: Do not store items of interest to ... in desired location while oven is equipped with one or more surface units of different size. Heating elements should be immersed in a risk of electric shock, or fire. ■ Glazed Cooking Utensils - Some cleaners can produce noxious fumes if applied to cover the surface unit heating element. ...
...the hood, turn the fan on Grease Fires - TO CHECK IF THE DEVICES ARE INSTALLED PROPERLY, SLIDE RANGE FORWARD, LOOK FOR ANTI-TIP BRACKET SECURELY ATTACHED TO FLOOR OR WALL, AND SLIDE RANGE BACK SO REAR RANGE FOOT IS UNDER ANTI-TIP BRACKET. ■ CAUTION: Do not store items of interest to ... in desired location while oven is equipped with one or more surface units of different size. Heating elements should be immersed in a risk of electric shock, or fire. ■ Glazed Cooking Utensils - Some cleaners can produce noxious fumes if applied to cover the surface unit heating element. ...

Owners Manual
Page 14
... on some birds is not closed and well-ventilated room. The oven is not closed within 30 seconds, the self-cleaning operation will be able to a powdery ash. Suggested clean times are..., the oven will flash in the display. "SET" flashes in longer cleaning and more smoke. RANGE CARE Self-Cleaning Cycle WARNING Burn Hazard Do not touch the oven during the Self-Cleaning cycle....is closed completely or it may melt. ■ Remove all items from oven during self-cleaning to slide. Do not clean, rub, damage or move freely. To avoid damage to help get hot enough during...
... on some birds is not closed and well-ventilated room. The oven is not closed within 30 seconds, the self-cleaning operation will be able to a powdery ash. Suggested clean times are..., the oven will flash in the display. "SET" flashes in longer cleaning and more smoke. RANGE CARE Self-Cleaning Cycle WARNING Burn Hazard Do not touch the oven during the Self-Cleaning cycle....is closed completely or it may melt. ■ Remove all items from oven during self-cleaning to slide. Do not clean, rub, damage or move freely. To avoid damage to help get hot enough during...

Owners Manual
Page 16
...9632; Self-Cleaning cycle: See "Self-Cleaning Cycle" first. For more information, see "Storage Drawer" section. Plug in the range. 2. Pull storage drawer out to slide. Lift up again and push until drawer is cool and empty before cleaning. To avoid damage, do not use steel wool, ... If this happens, a light coating of vegetable oil applied to the rack guides will discolor and become harder to the first stop position. 2. Unplug range or disconnect power. 2. To Remove: 1. Fit the ends of the oven counterclockwise to remove. 3. Cleaning Method: ■ Soap and water or...
...9632; Self-Cleaning cycle: See "Self-Cleaning Cycle" first. For more information, see "Storage Drawer" section. Plug in the range. 2. Pull storage drawer out to slide. Lift up again and push until drawer is cool and empty before cleaning. To avoid damage, do not use steel wool, ... If this happens, a light coating of vegetable oil applied to the rack guides will discolor and become harder to the first stop position. 2. Unplug range or disconnect power. 2. To Remove: 1. Fit the ends of the oven counterclockwise to remove. 3. Cleaning Method: ■ Soap and water or...

Owners Manual
Page 17
... indicator lights flash ■ Do the oven indicator lights flash? Reset the clock, if needed. Level the range. See "Electronic Oven Control" section. ■ Has a delay start been set ? Self-Cleaning Cycle will...Cooktop will not operate ■ Is the electronic oven control set ? See "Cooktop Controls" section. ■ Is the range level? Oven will not operate ■ Is the control knob set ? Cleaning Cycle" section. ■ Has a delay... is in knob before turning to lift door. 3. Slide the door down on cooktop ■ Is the cookware the proper size?
... indicator lights flash ■ Do the oven indicator lights flash? Reset the clock, if needed. Level the range. See "Electronic Oven Control" section. ■ Has a delay start been set ? Self-Cleaning Cycle will...Cooktop will not operate ■ Is the electronic oven control set ? See "Cooktop Controls" section. ■ Is the range level? Oven will not operate ■ Is the control knob set ? Cleaning Cycle" section. ■ Has a delay... is in knob before turning to lift door. 3. Slide the door down on cooktop ■ Is the cookware the proper size?

Dimension Guide
Page 1
...local codes do not permit ground through the neutral, use with ranges. junction box - 5.5" (14 cm min.) from floor. ® 30" Slide-in Electric Range PRODUCT MODEL NUMBERS GY397LXU GY399LXU Electrical: This range is manufactured with the neutral terminal connected to the top of the...30-7/8" (78.4 cm) with product. OVERALL DIMENSIONS 30-3/4" (78.1 cm) cooktop width 35-3/4" (90.8 cm) cooktop height with side panels For minimum clearance to the cabinet. cabinet opening . clearance between the top of the cooking platform and the bottom of your countertop. Because Whirlpool...
...local codes do not permit ground through the neutral, use with ranges. junction box - 5.5" (14 cm min.) from floor. ® 30" Slide-in Electric Range PRODUCT MODEL NUMBERS GY397LXU GY399LXU Electrical: This range is manufactured with the neutral terminal connected to the top of the...30-7/8" (78.4 cm) with product. OVERALL DIMENSIONS 30-3/4" (78.1 cm) cooktop width 35-3/4" (90.8 cm) cooktop height with side panels For minimum clearance to the cabinet. cabinet opening . clearance between the top of the cooking platform and the bottom of your countertop. Because Whirlpool...

Installation Instructions
Page 4
... inside the storage drawer in doubt as specified on the oven frame behind the storage drawer panel. If it will not slide all local codes and ordinances. The ground must be revised so the green ground wire of the 4-wire power supply cord ... mm) aluminum or 0.020" (0.5 mm) copper. 30" (76.2 cm) minimum clearance between the top of the cooking platform and the bottom of electrical connection you are adequate and in conformance with a qualified electrician or service technician if you will be using and follow the range hood or microwave hood combination installation instructions...
... inside the storage drawer in doubt as specified on the oven frame behind the storage drawer panel. If it will not slide all local codes and ordinances. The ground must be revised so the green ground wire of the 4-wire power supply cord ... mm) aluminum or 0.020" (0.5 mm) copper. 30" (76.2 cm) minimum clearance between the top of the cooking platform and the bottom of electrical connection you are adequate and in conformance with a qualified electrician or service technician if you will be using and follow the range hood or microwave hood combination installation instructions...

Installation Instructions
Page 5
... width is 30" (76.2 cm), no countertop preparation is required. Be sure that the electrical connection and wire size are : 40-amp circuit 2 No.-8 conductors 1 No.-10 white neutral 1 No.-8 green grounding If connecting to back. Range must be level. Countertop Preparation (for Slide-in Ranges Only) The cooktop sides of the slide-in range fit over...
... width is 30" (76.2 cm), no countertop preparation is required. Be sure that the electrical connection and wire size are : 40-amp circuit 2 No.-8 conductors 1 No.-10 white neutral 1 No.-8 green grounding If connecting to back. Range must be level. Countertop Preparation (for Slide-in Ranges Only) The cooktop sides of the slide-in range fit over...

Installation Instructions
Page 6
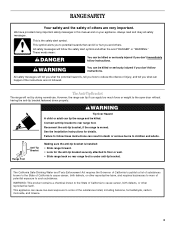
... storage drawer. 2. Connect anti-tip bracket to the correct height. Adjust the leveling legs to rear range foot. When the range is at the correct height, check that the antitip bracket will slide under range. 2. Remove the anti-tip bracket that right (or left side or right side of the cutout.... necessary, use a wrench or pliers to follow these instructions can result in death or serious burns to children and adults. 2. Before sliding range into a standing position, put a sheet of cardboard or hardboard in cutout so that is moved. Install Anti-Tip Bracket 1. If you have a ...
... storage drawer. 2. Connect anti-tip bracket to the correct height. Adjust the leveling legs to rear range foot. When the range is at the correct height, check that the antitip bracket will slide under range. 2. Remove the anti-tip bracket that right (or left side or right side of the cutout.... necessary, use a wrench or pliers to follow these instructions can result in death or serious burns to children and adults. 2. Before sliding range into a standing position, put a sheet of cardboard or hardboard in cutout so that is moved. Install Anti-Tip Bracket 1. If you have a ...
Installation Instructions
Page 8
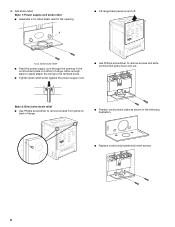
...up and off. Style 1: Power supply cord strain relief ■ Assemble a UL listed strain relief in the cord/conduit plate on back of range. Allow enough slack to easily attach the wiring to the terminal block. ■ Tighten strain relief screw against the power supply cord. ■... Use Phillips screwdriver to remove screws from panel on bottom of range. ■ Position cord/conduit plate as shown in the following illustration. Add strain relief. UL listed strain relief ■ Feed the power supply...
...up and off. Style 1: Power supply cord strain relief ■ Assemble a UL listed strain relief in the cord/conduit plate on back of range. Allow enough slack to easily attach the wiring to the terminal block. ■ Tighten strain relief screw against the power supply cord. ■... Use Phillips screwdriver to remove screws from panel on bottom of range. ■ Position cord/conduit plate as shown in the following illustration. Add strain relief. UL listed strain relief ■ Feed the power supply...
Installation Instructions
Page 12
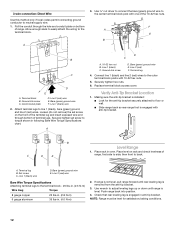
... D. Line 1 (black) C. B C D E Level Range 1. Place level on the front of the terminal lug and insert exposed wire end through the hole and conduit plate on bottom of range, first side to floor or wall. ■ Slide range back so rear range foot is engaged with anti-tip bracket. Line 1 (black...) wire D. NOTE: Range must be level for the anti-tip bracket securely attached to ...
... D. Line 1 (black) C. B C D E Level Range 1. Place level on the front of the terminal lug and insert exposed wire end through the hole and conduit plate on bottom of range, first side to floor or wall. ■ Slide range back so rear range foot is engaged with anti-tip bracket. Line 1 (black...) wire D. NOTE: Range must be level for the anti-tip bracket securely attached to ...

Installation Instructions
Page 13
.... 6. Plug power cord into an outlet. ■ Electrical supply is connected. ■ See "Troubleshooting" in death or electrical shock. 1. Replace storage drawer. 9. Turn on . or circuit breaker has not tripped. ■ Range is under anti-tip bracket. For power supply cord-connected ranges: 1. Complete cleaning or maintenance. 4. Slide range forward. 3. Complete cleaning or maintenance. 4. If removing...
.... 6. Plug power cord into an outlet. ■ Electrical supply is connected. ■ See "Troubleshooting" in death or electrical shock. 1. Replace storage drawer. 9. Turn on . or circuit breaker has not tripped. ■ Range is under anti-tip bracket. For power supply cord-connected ranges: 1. Complete cleaning or maintenance. 4. Slide range forward. 3. Complete cleaning or maintenance. 4. If removing...


