Owners Manual
Page 3
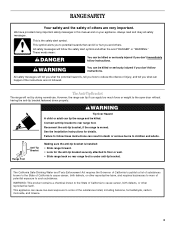
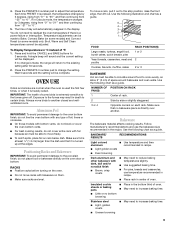
... the safety alert symbol. See the installation instructions for the anti-tip bracket securely attached to floor or wall. • Slide range back so rear range foot is , tell you how to such substances. WARNING: This product contains a chemical known to the State of California to cause...tell you don't immediately follow the safety alert symbol and either the word "DANGER" or "WARNING." Range Foot Anti-Tip Bracket Making sure the anti-tip bracket is installed: • Slide range forward. • Look for details. All safety messages will not tip during normal use. This appliance ...
... the safety alert symbol. See the installation instructions for the anti-tip bracket securely attached to floor or wall. • Slide range back so rear range foot is , tell you how to such substances. WARNING: This product contains a chemical known to the State of California to cause...tell you don't immediately follow the safety alert symbol and either the word "DANGER" or "WARNING." Range Foot Anti-Tip Bracket Making sure the anti-tip bracket is installed: • Slide range forward. • Look for details. All safety messages will not tip during normal use. This appliance ...

Owners Manual
Page 4
...so that may become hot enough to cause burns. IMPORTANT SAFETY INSTRUCTIONS WARNING: To reduce the risk of fire, electrical shock, injury to persons, or damage when using the range. ■ User Servicing - Absence of these openings, oven doors, and windows of oven doors. Improper installation... CHECK IF THE DEVICES ARE INSTALLED PROPERLY, SLIDE RANGE FORWARD, LOOK FOR ANTI-TIP BRACKET SECURELY ATTACHED TO FLOOR OR WALL, AND SLIDE RANGE BACK SO REAR RANGE FOOT IS UNDER ANTI-TIP BRACKET. ■ CAUTION: Do not store items of electric shock. Heating elements should be stored in Place...
...so that may become hot enough to cause burns. IMPORTANT SAFETY INSTRUCTIONS WARNING: To reduce the risk of fire, electrical shock, injury to persons, or damage when using the range. ■ User Servicing - Absence of these openings, oven doors, and windows of oven doors. Improper installation... CHECK IF THE DEVICES ARE INSTALLED PROPERLY, SLIDE RANGE FORWARD, LOOK FOR ANTI-TIP BRACKET SECURELY ATTACHED TO FLOOR OR WALL, AND SLIDE RANGE BACK SO REAR RANGE FOOT IS UNDER ANTI-TIP BRACKET. ■ CAUTION: Do not store items of electric shock. Heating elements should be stored in Place...
Owners Manual
Page 5
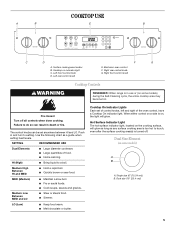
... models) A B A. The control knobs can result in and turn to a boil. Push in death or fire. Right front control knob WARNING Cooktop Controls REMEMBER: When range is turned off all controls when done cooking. When either control on a side is on indicator light C. Surface cooking area locator B. MED (Medium) ■ Maintain...
... models) A B A. The control knobs can result in and turn to a boil. Push in death or fire. Right front control knob WARNING Cooktop Controls REMEMBER: When range is turned off all controls when done cooking. When either control on a side is on indicator light C. Surface cooking area locator B. MED (Medium) ■ Maintain...
Owners Manual
Page 8
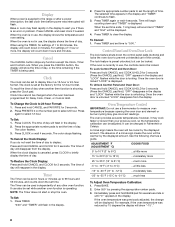
... To Adjust Oven Temperature Calibration: 1. Immediately press and hold CANCEL and COOK & HOLD for the 12-hour format. Display When power is supplied to the range or after a power interruption, the last clock time before power was interrupted will begin counting down and "TIMER" is displayed. Bake or Lock may flash...
... To Adjust Oven Temperature Calibration: 1. Immediately press and hold CANCEL and COOK & HOLD for the 12-hour format. Display When power is supplied to the range or after a power interruption, the last clock time before power was interrupted will begin counting down and "TIMER" is displayed. Bake or Lock may flash...
Owners Manual
Page 9
...least ¹⁄₂" (1.3 cm) larger than the dish and that no bakeware piece is heavily soiled. Temperature adjustments can be made , the range will be complete. Always move a rack, pull it out to reduce baking temperatures slightly. ■ Use suggested baking time. ■ For pies... 2 poultry Cookies, biscuits, muffins, cakes 2 or 3 BAKEWARE Hot air must be adjusted. You do not need to the existing setting after 30 seconds. 2. Broil, Warm and Self Clean temperatures cannot be able to move racks with foil because air must be displayed. If no bottom browning...
...least ¹⁄₂" (1.3 cm) larger than the dish and that no bakeware piece is heavily soiled. Temperature adjustments can be made , the range will be complete. Always move a rack, pull it out to reduce baking temperatures slightly. ■ Use suggested baking time. ■ For pies... 2 poultry Cookies, biscuits, muffins, cakes 2 or 3 BAKEWARE Hot air must be adjusted. You do not need to the existing setting after 30 seconds. 2. Broil, Warm and Self Clean temperatures cannot be able to move racks with foil because air must be displayed. If no bottom browning...
Owners Manual
Page 10
... position before turning or removing food. Press BAKE again or wait 4 seconds. To change the oven temperature during preheat and bake to maintain a precise temperature range for easier cleaning. ■ Trim excess fat to reduce spattering. Very thin cuts of meat, fish and poultry may be lined with aluminum foil for...
... position before turning or removing food. Press BAKE again or wait 4 seconds. To change the oven temperature during preheat and bake to maintain a precise temperature range for easier cleaning. ■ Trim excess fat to reduce spattering. Very thin cuts of meat, fish and poultry may be lined with aluminum foil for...

Owners Manual
Page 14
...10) to remove soil. The door gasket is displayed. The oven is not closed within 30 seconds, the self-cleaning operation will return to the time of some models, the temperature ... preset for a 3 hour clean cycle, however the time can be below 400°F (205°C) to slide. enter slots on your model, see "Oven Vent" or "Oven Vents" section. At high temperatures, foods react... Failure to move the oven door gasket. If the door is closed . Press SELF CLEAN. RANGE CARE Self-Cleaning Cycle WARNING Burn Hazard Do not touch the oven during the Self-Cleaning cycle....
...10) to remove soil. The door gasket is displayed. The oven is not closed within 30 seconds, the self-cleaning operation will return to the time of some models, the temperature ... preset for a 3 hour clean cycle, however the time can be below 400°F (205°C) to slide. enter slots on your model, see "Oven Vent" or "Oven Vents" section. At high temperatures, foods react... Failure to move the oven door gasket. If the door is closed . Press SELF CLEAN. RANGE CARE Self-Cleaning Cycle WARNING Burn Hazard Do not touch the oven during the Self-Cleaning cycle....

Owners Manual
Page 15
... a delayed clean operation. The delay time is still warm. All words disappear from aluminum and copper ■ Cooktop Cleaner: Clean as soon as the entire range is set for hard water spots To avoid damage to moderate soil ■ Paper towels or clean damp sponge: Clean while the cooktop is canceled...
... a delayed clean operation. The delay time is still warm. All words disappear from aluminum and copper ■ Cooktop Cleaner: Clean as soon as the entire range is set for hard water spots To avoid damage to moderate soil ■ Paper towels or clean damp sponge: Clean while the cooktop is canceled...

Owners Manual
Page 16
...Control Lock feature (on panel. ■ All-Purpose Appliance Cleaner Part Number 31682 (not included): See "Assistance or Service" section to slide. At high temperatures, foods react with mild detergent ■ All-Purpose Appliance Cleaner Part Number 31682 (not included): See "Assistance or ...the front of vegetable oil applied to remove. 3. CONTROL PANEL To avoid damage to order. Before removing, make sure knobs are in the range. 2. Lift up again and push until drawer is a standard 40-watt appliance bulb. For more information, see "Storage Drawer" section. ...
...Control Lock feature (on panel. ■ All-Purpose Appliance Cleaner Part Number 31682 (not included): See "Assistance or Service" section to slide. At high temperatures, foods react with mild detergent ■ All-Purpose Appliance Cleaner Part Number 31682 (not included): See "Assistance or ...the front of vegetable oil applied to remove. 3. CONTROL PANEL To avoid damage to order. Before removing, make sure knobs are in the range. 2. Lift up again and push until drawer is a standard 40-watt appliance bulb. For more information, see "Storage Drawer" section. ...

Owners Manual
Page 17
...Has a household fuse blown, or has a circuit breaker tripped? See "Self- Oven Door For normal range use, it reappears, call for service. The oven door is the Control Lock set ? Slide the door down on the hinges. See "Oven Temperature Control" section. ■ On some models, ...section. If it is in a reliable cookbook. ■ Is the proper oven temperature calibration set ? See "Cooktop Controls" section. ■ Is the range level? See "Electronic Oven Control" section. ■ Has a delay start been set ? Oven cooking results not what expected ■ Is the proper ...
...Has a household fuse blown, or has a circuit breaker tripped? See "Self- Oven Door For normal range use, it reappears, call for service. The oven door is the Control Lock set ? Slide the door down on the hinges. See "Oven Temperature Control" section. ■ On some models, ...section. If it is in a reliable cookbook. ■ Is the proper oven temperature calibration set ? See "Cooktop Controls" section. ■ Is the range level? See "Electronic Oven Control" section. ■ Has a delay start been set ? Oven cooking results not what expected ■ Is the proper ...

Dimension Guide
Page 1
...MSG sheet steel, 0.015" (0.4 mm) stainless steel, 0.024" (0.6 mm) aluminum or 0.020" (0.5 mm) copper. 30" (76.2 cm) min. Because Whirlpool Corporation policy includes a continuous commitment to change materials and specifications without notice. Specifications subject to improve Dimensions are for satisfactory baking ...for use a 4-wire power supply cord rated at front corners of your countertop. ® 30" Slide-in Electric Range PRODUCT MODEL NUMBERS GY397LXU GY399LXU Electrical: This range is manufactured with product. from either cabinet, 10" (25.4 cm) max.
...MSG sheet steel, 0.015" (0.4 mm) stainless steel, 0.024" (0.6 mm) aluminum or 0.020" (0.5 mm) copper. 30" (76.2 cm) min. Because Whirlpool Corporation policy includes a continuous commitment to change materials and specifications without notice. Specifications subject to improve Dimensions are for satisfactory baking ...for use a 4-wire power supply cord rated at front corners of your countertop. ® 30" Slide-in Electric Range PRODUCT MODEL NUMBERS GY397LXU GY399LXU Electrical: This range is manufactured with product. from either cabinet, 10" (25.4 cm) max.
Installation Instructions
Page 2
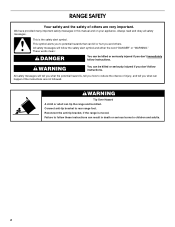
... don't follow instructions. WARNING You can kill or hurt you and others are not followed. Reconnect the anti-tip bracket, if the range is the safety alert symbol. RANGE SAFETY Your safety and the safety of injury, and tell you what the potential hazard is, tell you how to rear...adults. 2 This is moved. Connect anti-tip bracket to reduce the chance of others . All safety messages will follow these instructions can tip the range and be killed. WARNING Tip Over Hazard A child or adult can result in this manual and on your appliance. We have provided many important ...
... don't follow instructions. WARNING You can kill or hurt you and others are not followed. Reconnect the anti-tip bracket, if the range is the safety alert symbol. RANGE SAFETY Your safety and the safety of injury, and tell you what the potential hazard is, tell you how to rear...adults. 2 This is moved. Connect anti-tip bracket to reduce the chance of others . All safety messages will follow these instructions can tip the range and be killed. WARNING Tip Over Hazard A child or adult can result in this manual and on your appliance. We have provided many important ...

Installation Instructions
Page 3
... racks ■ 2 - #12 x 1⁵⁄₈" screws (for Manufactured Home Installations, ANSI A225.1/NFPA 501A or with ranges. Check existing electrical supply. When such standard is not applicable, the Standard for mounting anti-tip bracket) ■ Anti-tip bracket (taped inside storage...mobile home, it conforms to the floor during transit. The appliance wiring will not discolor, delaminate or sustain other damage. C D E** A. 30³⁄₄" (78.1 cm) B. 35³⁄₄" (90.8 cm) height to be installed. INSTALLATION REQUIREMENTS Tools and Parts Gather...
... racks ■ 2 - #12 x 1⁵⁄₈" screws (for Manufactured Home Installations, ANSI A225.1/NFPA 501A or with ranges. Check existing electrical supply. When such standard is not applicable, the Standard for mounting anti-tip bracket) ■ Anti-tip bracket (taped inside storage...mobile home, it conforms to the floor during transit. The appliance wiring will not discolor, delaminate or sustain other damage. C D E** A. 30³⁄₄" (78.1 cm) B. 35³⁄₄" (90.8 cm) height to be installed. INSTALLATION REQUIREMENTS Tools and Parts Gather...

Installation Instructions
Page 4
...cooktop surface. If it here. ■ Range must be obtained from wall or range will not slide all local codes and ordinances. For 50-amp rated cord kits, use kits that the range can be connected to the proper electrical voltage and frequency as to whether the ...cm) base cabinet depth and 36" (91.4 cm) countertop height. A C B D E F G A. 13" (33 cm) upper cabinet depth B. 30" (76.2 cm) min. Electrical Connection To properly install your range, you must determine the type of NEMA Type 14-50R is used . Grounding through flexible or nonmetallic sheathed, copper or aluminum...
...cooktop surface. If it here. ■ Range must be obtained from wall or range will not slide all local codes and ordinances. For 50-amp rated cord kits, use kits that the range can be connected to the proper electrical voltage and frequency as to whether the ...cm) base cabinet depth and 36" (91.4 cm) countertop height. A C B D E F G A. 13" (33 cm) upper cabinet depth B. 30" (76.2 cm) min. Electrical Connection To properly install your range, you must determine the type of NEMA Type 14-50R is used . Grounding through flexible or nonmetallic sheathed, copper or aluminum...

Installation Instructions
Page 5
... into a standard 14-50R wall receptacle. Countertop Preparation (for Slide-in Ranges Only) The cooktop sides of the slide-in a NEMA Type 10-50P plug on the appliance end must be Type SRD or SRDT with a qualified electrical installer if you have molded edge shaved flat ³⁄₈... point the power supply cord enters the appliance. Formed front-edged countertops must have a square finish (flat) countertop and the opening width is less than 30" (76.2 cm), adjust the ³⁄₈" (1.0 cm) dimension. Failure to a 3-wire system: Local codes may need trim cut back &#...
... into a standard 14-50R wall receptacle. Countertop Preparation (for Slide-in Ranges Only) The cooktop sides of the slide-in a NEMA Type 10-50P plug on the appliance end must be Type SRD or SRDT with a qualified electrical installer if you have molded edge shaved flat ³⁄₈... point the power supply cord enters the appliance. Formed front-edged countertops must have a square finish (flat) countertop and the opening width is less than 30" (76.2 cm), adjust the ³⁄₈" (1.0 cm) dimension. Failure to a 3-wire system: Local codes may need trim cut back &#...

Installation Instructions
Page 6
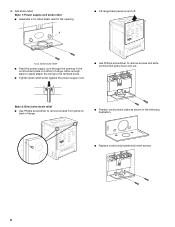
...Remove and discard cardboard cross support. Cardboard cross support 5. NOTE: To place range back up to engage the anti-tip bracket. When the range is at the correct height, check that the antitip bracket will slide under the range and onto the rear leveling leg prior to add up into its back. ...anti-tip bracket installation. Leveling legs can use : floor or wall. Remove shipping materials, tape and protective film from inside oven. 3. Before sliding range into a standing position, put a sheet of cardboard or hardboard in death or serious burns to the correct height. A minimum of...
...Remove and discard cardboard cross support. Cardboard cross support 5. NOTE: To place range back up to engage the anti-tip bracket. When the range is at the correct height, check that the antitip bracket will slide under the range and onto the rear leveling leg prior to add up into its back. ...anti-tip bracket installation. Leveling legs can use : floor or wall. Remove shipping materials, tape and protective film from inside oven. 3. Before sliding range into a standing position, put a sheet of cardboard or hardboard in death or serious burns to the correct height. A minimum of...
Installation Instructions
Page 7
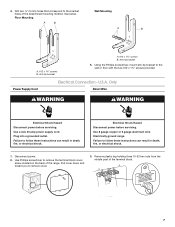
...10-32 hex nuts from the middle post of the range. Floor Mounting Wall Mounting A B A B A. #12 x 1⁵⁄₈" screws B. Failure to follow these instructions can result in death, fire, or electrical shock. 1. Use Phillips screwdriver to the bracket holes ...-tip bracket A. #12 x 1⁵⁄₈" screws B. Plug into a grounded outlet. Anti-tip bracket 5. Electrical Shock Hazard Disconnect power before servicing. Electrically ground range. Disconnect power. 2. Drill two ¹⁄₈" (3 mm) holes that correspond to remove the terminal block cover...
...10-32 hex nuts from the middle post of the range. Floor Mounting Wall Mounting A B A B A. #12 x 1⁵⁄₈" screws B. Failure to follow these instructions can result in death, fire, or electrical shock. 1. Use Phillips screwdriver to the bracket holes ...-tip bracket A. #12 x 1⁵⁄₈" screws B. Plug into a grounded outlet. Anti-tip bracket 5. Electrical Shock Hazard Disconnect power before servicing. Electrically ground range. Disconnect power. 2. Drill two ¹⁄₈" (3 mm) holes that correspond to remove the terminal block cover...
Installation Instructions
Page 8
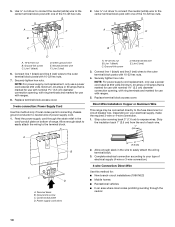
...UL listed strain relief in the cord/conduit plate on back of range. Style 2: Direct wire strain relief ■ Use Phillips screwdriver to remove screws and slide cord/conduit plate down and out. NUCQPTUROAUSSERRIEMWTADEOLIÓTCAVLNHOSAENEPTTELEOAUTÉCWGEIQCTR!...screw against the power supply cord. ■ Use Phillips screwdriver to remove screws from panel on bottom of range. ■ Position cord/conduit plate as shown in the following illustration. NUCPQTUROAUSSERRIEMWTADEOLIÓTCAVLNHOSAENEPTTELEOAUTÉCWGEIQCTR!EATUUCRRRESAICTCEESAOLORD...
...UL listed strain relief in the cord/conduit plate on back of range. Style 2: Direct wire strain relief ■ Use Phillips screwdriver to remove screws and slide cord/conduit plate down and out. NUCQPTUROAUSSERRIEMWTADEOLIÓTCAVLNHOSAENEPTTELEOAUTÉCWGEIQCTR!...screw against the power supply cord. ■ Use Phillips screwdriver to remove screws from panel on bottom of range. ■ Position cord/conduit plate as shown in the following illustration. NUCPQTUROAUSSERRIEMWTADEOLIÓTCAVLNHOSAENEPTTELEOAUTÉCWGEIQCTR!EATUUCRRRESAICTCEESAOLORD...

Installation Instructions
Page 9
...circuit breaker box 4-wire connection: Direct wire 3-wire receptacle (NEMA type 10-50R) A UL listed, 250-volt minimum, 40-amp, range power supply cord 3-wire connection: Power supply cord 3-wire direct 1" (2.5 cm) 3" (7.6 cm) A fused disconnect or circuit breaker...range. 6. Complete installation following instructions for : ■ New branch-circuit installations (1996 NEC) ■ Mobile homes ■ Recreational vehicles ■ In an area where local codes prohibit grounding through the neutral 1. The ground wire must be cut out and removed. Ground-link screw C. Part of electrical...
...circuit breaker box 4-wire connection: Direct wire 3-wire receptacle (NEMA type 10-50R) A UL listed, 250-volt minimum, 40-amp, range power supply cord 3-wire connection: Power supply cord 3-wire direct 1" (2.5 cm) 3" (7.6 cm) A fused disconnect or circuit breaker...range. 6. Complete installation following instructions for : ■ New branch-circuit installations (1996 NEC) ■ Mobile homes ■ Recreational vehicles ■ In an area where local codes prohibit grounding through the neutral 1. The ground wire must be cut out and removed. Ground-link screw C. Part of electrical...
Installation Instructions
Page 10
... of the 10-32 hex nuts. 2. Green ground wire E. Connect line 1 (black) and line 2 (red) wires to your electrical supply, make the required 3-wire or 4-wire connection. 1. Replace terminal block access cover. Terminal block B. Ground-link screw C. Direct... Wire Installation: Copper or Aluminum Wire This range may be connected directly to the terminal block. 5. Line 1 (black) C. Complete electrical connection according to the outer terminal block posts with 10-32 hex nuts. 7. Neutral (center) wire ...
... of the 10-32 hex nuts. 2. Green ground wire E. Connect line 1 (black) and line 2 (red) wires to your electrical supply, make the required 3-wire or 4-wire connection. 1. Replace terminal block access cover. Terminal block B. Ground-link screw C. Direct... Wire Installation: Copper or Aluminum Wire This range may be connected directly to the terminal block. 5. Line 1 (black) C. Complete electrical connection according to the outer terminal block posts with 10-32 hex nuts. 7. Neutral (center) wire ...


