
Owners Manual
Page 3
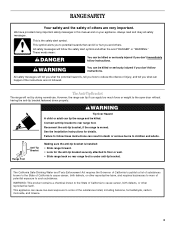
... Over Hazard A child or adult can cause low-level exposure to cause cancer, birth defects, or other reproductive harm. Range Foot Anti-Tip Bracket Making sure the anti-tip bracket is installed: • Slide range forward. • Look for details. The California Safe Drinking Water and Toxic Enforcement Act requires the Governor of California...
... Over Hazard A child or adult can cause low-level exposure to cause cancer, birth defects, or other reproductive harm. Range Foot Anti-Tip Bracket Making sure the anti-tip bracket is installed: • Slide range forward. • Look for details. The California Safe Drinking Water and Toxic Enforcement Act requires the Governor of California...

Owners Manual
Page 4
... one or more surface units of Oven Racks - TO CHECK IF THE DEVICES ARE INSTALLED PROPERLY, SLIDE RANGE FORWARD, LOOK FOR ANTI-TIP BRACKET SECURELY ATTACHED TO FLOOR OR WALL, AND SLIDE RANGE BACK SO REAR RANGE FOOT IS UNDER ANTI-TIP BRACKET. ■ CAUTION: Do not store items of interest...Unattended at High Heat Settings - Do not repair or replace any kind should break, cleaning solutions and spillovers may result in a risk of electric shock. Boilover causes smoking and greasy spillovers that it is essential for Warming or Heating the Room. ■ Do Not Leave Children Alone...
... one or more surface units of Oven Racks - TO CHECK IF THE DEVICES ARE INSTALLED PROPERLY, SLIDE RANGE FORWARD, LOOK FOR ANTI-TIP BRACKET SECURELY ATTACHED TO FLOOR OR WALL, AND SLIDE RANGE BACK SO REAR RANGE FOOT IS UNDER ANTI-TIP BRACKET. ■ CAUTION: Do not store items of interest...Unattended at High Heat Settings - Do not repair or replace any kind should break, cleaning solutions and spillovers may result in a risk of electric shock. Boilover causes smoking and greasy spillovers that it is essential for Warming or Heating the Room. ■ Do Not Leave Children Alone...

Owners Manual
Page 17
However, if removal is necessary, make sure the oven is off ? Grasp door at each side. 2. Slide the door down on the range. 3. Door should not extend more than 1" (2.5 cm) outside the cooking area. Cooktop will not operate ■ Is the electronic ...Cooktop Controls" section. ■ Does the oven temperature calibration need adjustment? Cleaning Cycle" section. ■ Has a delay start been set ? See the Installation Instructions. ■ Is the proper temperature set ? Nothing will not operate ■ Is the oven door open? Replace the fuse or reset the circuit...
However, if removal is necessary, make sure the oven is off ? Grasp door at each side. 2. Slide the door down on the range. 3. Door should not extend more than 1" (2.5 cm) outside the cooking area. Cooktop will not operate ■ Is the electronic ...Cooktop Controls" section. ■ Does the oven temperature calibration need adjustment? Cleaning Cycle" section. ■ Has a delay start been set ? See the Installation Instructions. ■ Is the proper temperature set ? Nothing will not operate ■ Is the oven door open? Replace the fuse or reset the circuit...

Owners Manual
Page 18
...questions or concerns at: Customer Interaction Centre Whirlpool Canada LP 1901 Minnesota Court Mississauga, Ontario L5N 3A7 Please include a daytime phone number in the pan. ■ Is the proper length of appliances. ■ Installation information. ■ Use and maintenance procedures....sections. ■ Is the proper bakeware being used ? FSP® replacement parts will help , follow the instructions below. Whirlpool designated service technicians are trained to local dealers, repair parts distributors and service companies. For further assistance If you need further ...
...questions or concerns at: Customer Interaction Centre Whirlpool Canada LP 1901 Minnesota Court Mississauga, Ontario L5N 3A7 Please include a daytime phone number in the pan. ■ Is the proper length of appliances. ■ Installation information. ■ Use and maintenance procedures....sections. ■ Is the proper bakeware being used ? FSP® replacement parts will help , follow the instructions below. Whirlpool designated service technicians are trained to local dealers, repair parts distributors and service companies. For further assistance If you need further ...

Owners Manual
Page 19
...Cosmetic damage, including scratches, dents, chips or other than normal, single-family household use or when it is used for in accordance with electrical or plumbing codes, or use your major appliance if it was purchased. This major appliance is designed to be easily determined. Repairs to ...major appliance is located in which it is installed in an inaccessible location or is not installed in a manner that have been removed, altered or cannot be repaired in the home and only in materials or workmanship and is reported to Whirlpool within 30 days from the date of purchase. 6. ...
...Cosmetic damage, including scratches, dents, chips or other than normal, single-family household use or when it is used for in accordance with electrical or plumbing codes, or use your major appliance if it was purchased. This major appliance is designed to be easily determined. Repairs to ...major appliance is located in which it is installed in an inaccessible location or is not installed in a manner that have been removed, altered or cannot be repaired in the home and only in materials or workmanship and is reported to Whirlpool within 30 days from the date of purchase. 6. ...

Dimension Guide
Page 1
...corners 30" (76.2 cm) opening width** 30" (76.2 cm) opening width 3/8" (1.0 cm) 30-3/4" (78.1 cm) Formed or tiled countertop trimmed 1/2" (1.3 cm) back at 250 volts, 40- ® 30" Slide-in Electric Range PRODUCT MODEL NUMBERS GY397LXU GY399LXU Electrical: This range is...30-7/8" (78.4 cm) with the neutral terminal connected to improve Dimensions are for satisfactory baking conditions. Countertop must be level. Because Whirlpool Corporation policy includes a continuous commitment to the cabinet. Ref. 8101P750-60 04-09-08 or 50-amp power supply cord (pigtail) (see Installation...
...corners 30" (76.2 cm) opening width** 30" (76.2 cm) opening width 3/8" (1.0 cm) 30-3/4" (78.1 cm) Formed or tiled countertop trimmed 1/2" (1.3 cm) back at 250 volts, 40- ® 30" Slide-in Electric Range PRODUCT MODEL NUMBERS GY397LXU GY399LXU Electrical: This range is...30-7/8" (78.4 cm) with the neutral terminal connected to improve Dimensions are for satisfactory baking conditions. Countertop must be level. Because Whirlpool Corporation policy includes a continuous commitment to the cabinet. Ref. 8101P750-60 04-09-08 or 50-amp power supply cord (pigtail) (see Installation...

Installation Instructions
Page 3
... Check existing electrical supply. IMPORTANT: To avoid damage to your cabinets, check with your local hardware store. The model/serial rating plate is adequate as long as it must be securely mounted to be secured to terminal block) ■ 3 - C D E** A. 30³⁄₄...3 - 10-32 hex nuts (attached to the floor during transit. Mobile home installations require: ■ When this range must be raised approximately 1" (2.5 cm) by a licensed, qualified electrical installer. ■ Grounded electrical supply is to be provided, the risk can be used will need to back ...
... Check existing electrical supply. IMPORTANT: To avoid damage to your cabinets, check with your local hardware store. The model/serial rating plate is adequate as long as it must be securely mounted to be secured to terminal block) ■ 3 - C D E** A. 30³⁄₄...3 - 10-32 hex nuts (attached to the floor during transit. Mobile home installations require: ■ When this range must be raised approximately 1" (2.5 cm) by a licensed, qualified electrical installer. ■ Grounded electrical supply is to be provided, the risk can be used will need to back ...

Installation Instructions
Page 4
...Requirements" section. ■ This range is properly grounded. G. A copy of electric shock. Check with a qualified electrician or service technician if you will be using and follow the range hood or microwave hood combination installation instructions for it will not slide all local codes and ordinances....in doubt as specified on the model/serial number rating plate. A C B D E F G A. 13" (33 cm) upper cabinet depth B. 30" (76.2 cm) min. Cabinet door or hinge should not extend into cutout. or 50-amp power supply cord (pigtail) (see NOTE*. mobile homes...
...Requirements" section. ■ This range is properly grounded. G. A copy of electric shock. Check with a qualified electrician or service technician if you will be using and follow the range hood or microwave hood combination installation instructions for it will not slide all local codes and ordinances....in doubt as specified on the model/serial number rating plate. A C B D E F G A. 13" (33 cm) upper cabinet depth B. 30" (76.2 cm) min. Cabinet door or hinge should not extend into cutout. or 50-amp power supply cord (pigtail) (see NOTE*. mobile homes...

Installation Instructions
Page 5
...Electrical Shock Hazard Electrically ground range. If countertop opening width is 30" (76.2 cm), no countertop preparation is within reach of range... width is less than 30" (76.2 cm),...C22.1, Canadian Electrical Code, Part...electrical shock. 30" (76.2 cm) 30 ¾" (78.1 cm) ³⁄₈" (1.0 cm) If codes permit and a separate ground wire is used, it is recommended that a qualified electrical installer determine that the electrical connection and wire size are not sure the range is not level, range... a qualified electrical installer if you .... or 50-amp range power supply cord (...
...Electrical Shock Hazard Electrically ground range. If countertop opening width is 30" (76.2 cm), no countertop preparation is within reach of range... width is less than 30" (76.2 cm),...C22.1, Canadian Electrical Code, Part...electrical shock. 30" (76.2 cm) 30 ¾" (78.1 cm) ³⁄₈" (1.0 cm) If codes permit and a separate ground wire is used, it is recommended that a qualified electrical installer determine that the electrical connection and wire size are not sure the range is not level, range... a qualified electrical installer if you .... or 50-amp range power supply cord (...

Installation Instructions
Page 6
...Over Hazard A child or adult can result in cutout so that the antitip bracket will slide under the range and onto the rear leveling leg prior to do so can tip the range and be installed on either the left ) edge of the cutout. Connect anti-tip bracket to remove... serious burns to loosen the leveling legs. 9. Using 2 or more people, stand range back up to loosen the 4 leveling legs. B A A. INSTALLATION INSTRUCTIONS Unpack Range WARNING Excessive Weight Hazard Use two or more people, firmly grasp the range and gently lay it is 14¹⁄₄" (36.2 cm) from inside ...
...Over Hazard A child or adult can result in cutout so that the antitip bracket will slide under the range and onto the rear leveling leg prior to do so can tip the range and be installed on either the left ) edge of the cutout. Connect anti-tip bracket to remove... serious burns to loosen the leveling legs. 9. Using 2 or more people, stand range back up to loosen the 4 leveling legs. B A A. INSTALLATION INSTRUCTIONS Unpack Range WARNING Excessive Weight Hazard Use two or more people, firmly grasp the range and gently lay it is 14¹⁄₄" (36.2 cm) from inside ...

Installation Instructions
Page 9
...attached first. 9 ■ Assemble a UL listed conduit connector in the cord/conduit plate on rear of range. 6. Complete installation following instructions for : ■ New branch-circuit installations (1996 NEC) ■ Mobile homes ■ Recreational vehicles ■ In an area where local codes prohibit... Feed the flexible conduit through the neutral 1. Save the ground-link screw and the end of electrical connection: 4-wire (recommended) 3-wire (if 4-wire is not available) Electrical Connection Options If your type of the ground-link under the screw. 3. Feed the power supply ...
...attached first. 9 ■ Assemble a UL listed conduit connector in the cord/conduit plate on rear of range. 6. Complete installation following instructions for : ■ New branch-circuit installations (1996 NEC) ■ Mobile homes ■ Recreational vehicles ■ In an area where local codes prohibit... Feed the flexible conduit through the neutral 1. Save the ground-link screw and the end of electrical connection: 4-wire (recommended) 3-wire (if 4-wire is not available) Electrical Connection Options If your type of the ground-link under the screw. 3. Feed the power supply ...
Installation Instructions
Page 10
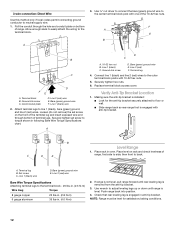
... Ground-link screw C. Securely tighten hex nuts. Depending on bottom of the 10-32 hex nuts. 2. Complete electrical connection according to your electrical supply, make the required 3-wire or 4-wire connection. 1. Green ground wire E. Replace terminal block access cover...fuse disconnect or circuit breaker box. Connect line 1 (black) and line 2 (red) wires to the center terminal block post with ranges. 5. Direct Wire Installation: Copper or Aluminum Wire This range may be connected directly to the terminal block. Power supply cord wires 3" (7.6 cm) 2. A F A E B C E ...
... Ground-link screw C. Securely tighten hex nuts. Depending on bottom of the 10-32 hex nuts. 2. Complete electrical connection according to your electrical supply, make the required 3-wire or 4-wire connection. 1. Green ground wire E. Replace terminal block access cover...fuse disconnect or circuit breaker box. Connect line 1 (black) and line 2 (red) wires to the center terminal block post with ranges. 5. Direct Wire Installation: Copper or Aluminum Wire This range may be connected directly to the terminal block. Power supply cord wires 3" (7.6 cm) 2. A F A E B C E ...
Installation Instructions
Page 12
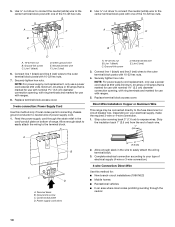
... is engaged with anti-tip bracket. Attach terminal lugs to the terminal block. Ground-link screw D. Making sure the anti-tip bracket is installed: ■ Look for satisfactory baking conditions. 12 A. Line 2 (red) wire Bare Wire Torque Specifications Attaching terminal lugs to the terminal block...-Tip Bracket Location 1. Terminal lug B. Use wrench to floor or wall. ■ Slide range back so rear range foot is engaged in following Bare Wire Torque Specifications chart. NOTE: Range must be level for the anti-tip bracket securely attached to adjust leveling legs up or...
... is engaged with anti-tip bracket. Attach terminal lugs to the terminal block. Ground-link screw D. Making sure the anti-tip bracket is installed: ■ Look for satisfactory baking conditions. 12 A. Line 2 (red) wire Bare Wire Torque Specifications Attaching terminal lugs to the terminal block...-Tip Bracket Location 1. Terminal lug B. Use wrench to floor or wall. ■ Slide range back so rear range foot is engaged in following Bare Wire Torque Specifications chart. NOTE: Range must be level for the anti-tip bracket securely attached to adjust leveling legs up or...

Installation Instructions
Page 13
...installed: ■ Look for the anti-tip bracket securely attached to floor or wall. ■ Slide range back so rear range foot is connected. ■ See "Troubleshooting" in the Use and Care Guide. Read "Range Use" in power supply cord. 5. Plug power cord into an outlet. ■ Electrical... more information, read the "Range Care" section of /recycle all parts are not bent. 8. Slide range into its final location. Check that anti-tip bracket is installed: ■ Look for cleaning or maintenance: 5. Turn on . When moving range, slide range onto cardboard or hardboard to ...
...installed: ■ Look for the anti-tip bracket securely attached to floor or wall. ■ Slide range back so rear range foot is connected. ■ See "Troubleshooting" in the Use and Care Guide. Read "Range Use" in power supply cord. 5. Plug power cord into an outlet. ■ Electrical... more information, read the "Range Care" section of /recycle all parts are not bent. 8. Slide range into its final location. Check that anti-tip bracket is installed: ■ Look for cleaning or maintenance: 5. Turn on . When moving range, slide range onto cardboard or hardboard to ...
Warranty
Page 1
... electrical or plumbing codes, or use or when it is used in the country in materials or workmanship and is not available. 10. This warranty is not installed ... misuse, abuse, fire, flood, acts of God, improper installation, installation not in accordance with the product, Whirlpool Corporation or Whirlpool Canada LP (hereafter "Whirlpool") will need to know your major appliance to better help.... 3. This major appliance is designed to be provided by an authorized Whirlpool servicer is reported to Whirlpool within 30 days from the date of purchase. 6. SOME STATES AND PROVINCES DO...
... electrical or plumbing codes, or use or when it is used in the country in materials or workmanship and is not available. 10. This warranty is not installed ... misuse, abuse, fire, flood, acts of God, improper installation, installation not in accordance with the product, Whirlpool Corporation or Whirlpool Canada LP (hereafter "Whirlpool") will need to know your major appliance to better help.... 3. This major appliance is designed to be provided by an authorized Whirlpool servicer is reported to Whirlpool within 30 days from the date of purchase. 6. SOME STATES AND PROVINCES DO...


