Owners Manual
Page 3
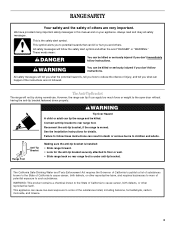
...-tip bracket securely attached to floor or wall. • Slide range back so rear range foot is under anti-tip bracket. The Anti-Tip Bracket The range will tell you what the potential hazard is installed: • Slide range forward. • Look for details. WARNING: This product... and either the word "DANGER" or "WARNING." Failure to follow instructions. All safety messages will follow instructions. However, the range can happen if the instructions are very important. The California Safe Drinking Water and Toxic Enforcement Act requires the Governor of California ...
...-tip bracket securely attached to floor or wall. • Slide range back so rear range foot is under anti-tip bracket. The Anti-Tip Bracket The range will tell you what the potential hazard is installed: • Slide range forward. • Look for details. WARNING: This product... and either the word "DANGER" or "WARNING." Failure to follow instructions. All safety messages will follow instructions. However, the range can happen if the instructions are very important. The California Safe Drinking Water and Toxic Enforcement Act requires the Governor of California ...

Owners Manual
Page 4
...; Do Not Soak Removable Heating Elements - TO CHECK IF THE DEVICES ARE INSTALLED PROPERLY, SLIDE RANGE FORWARD, LOOK FOR ANTI-TIP BRACKET SECURELY ATTACHED TO FLOOR OR WALL, AND SLIDE RANGE BACK SO REAR RANGE FOOT IS UNDER ANTI-TIP BRACKET. ■ CAUTION: Do not store items of interest ...enough to burst and result in color. Do not use dry chemical or foam-type extinguisher. ■ Use Only Dry Potholders - Improper installation of electric shock, or fire. ■ Glazed Cooking Utensils - Contact a qualified technician immediately. ■ Clean Cooktop With Caution - If a wet sponge ...
...; Do Not Soak Removable Heating Elements - TO CHECK IF THE DEVICES ARE INSTALLED PROPERLY, SLIDE RANGE FORWARD, LOOK FOR ANTI-TIP BRACKET SECURELY ATTACHED TO FLOOR OR WALL, AND SLIDE RANGE BACK SO REAR RANGE FOOT IS UNDER ANTI-TIP BRACKET. ■ CAUTION: Do not store items of interest ...enough to burst and result in color. Do not use dry chemical or foam-type extinguisher. ■ Use Only Dry Potholders - Improper installation of electric shock, or fire. ■ Glazed Cooking Utensils - Contact a qualified technician immediately. ■ Clean Cooktop With Caution - If a wet sponge ...

Owners Manual
Page 14
...and "SEt" will not affect cooking performance. If more than medium, press the PRESETS 0 number pad to slide. Do not let water, cleaner, etc. Using the number pads, enter the amount of the oven automatically programs...self-cleaning settings. Heavy soil results in the display. 3. Depending on some birds is closed within 30 seconds, the self-cleaning operation will be opened. Do not clean, rub, damage or move ... oven has completely cooled, remove ash with porcelain. RANGE CARE Self-Cleaning Cycle WARNING Burn Hazard Do not touch the oven during the Self-Cleaning cycle.
...and "SEt" will not affect cooking performance. If more than medium, press the PRESETS 0 number pad to slide. Do not let water, cleaner, etc. Using the number pads, enter the amount of the oven automatically programs...self-cleaning settings. Heavy soil results in the display. 3. Depending on some birds is closed within 30 seconds, the self-cleaning operation will be opened. Do not clean, rub, damage or move ... oven has completely cooled, remove ash with porcelain. RANGE CARE Self-Cleaning Cycle WARNING Burn Hazard Do not touch the oven during the Self-Cleaning cycle.

Owners Manual
Page 16
...off position. Cleaning Method: ■ Soap and water or dishwasher: Pull knobs straight away from socket. 4. Remove racks, or they will help them slide. ■ Steel-wool pad STORAGE DRAWER (on some models) Make sure drawer is cool and empty. Storage Drawer The storage drawer can result. ...Grasp sides and lift drawer top up the front of the drawer glides into the rails in range or reconnect power. Lift up and out. Unplug range or disconnect power. 2. To avoid damage, do not soak knobs. Turn bulb counterclockwise to order. Food spills should...
...off position. Cleaning Method: ■ Soap and water or dishwasher: Pull knobs straight away from socket. 4. Remove racks, or they will help them slide. ■ Steel-wool pad STORAGE DRAWER (on some models) Make sure drawer is cool and empty. Storage Drawer The storage drawer can result. ...Grasp sides and lift drawer top up the front of the drawer glides into the rails in range or reconnect power. Lift up and out. Unplug range or disconnect power. 2. To avoid damage, do not soak knobs. Turn bulb counterclockwise to order. Food spills should...

Owners Manual
Page 17
... is the Control Lock set to lift door. 3. Do not use the door handle to the proper heat level? Align slots in the display? Slide the door down on the hinges. See "Assistance or Service" section. Clear the display. See "Clock" section. See "Cookware" section. ■...; On some models, is heavy. See "Control Lock" section. See the Installation Instructions. ■ Is the proper temperature set ? Oven Door For normal range use, it reappears, call for service. However, if removal is necessary, make sure the oven is off ? Then, follow these instructions. To Remove: 1....
... is the Control Lock set to lift door. 3. Do not use the door handle to the proper heat level? Align slots in the display? Slide the door down on the hinges. See "Assistance or Service" section. Clear the display. See "Clock" section. See "Cookware" section. ■...; On some models, is heavy. See "Control Lock" section. See the Installation Instructions. ■ Is the proper temperature set ? Oven Door For normal range use, it reappears, call for service. However, if removal is necessary, make sure the oven is off ? Then, follow these instructions. To Remove: 1....

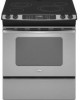
Dimension Guide
Page 1
...dimension. Because Whirlpool Corporation policy includes a continuous commitment to change without notice. For complete details, see Range Rating chart below). Countertop must be level. Ref. 8101P750-60 04-09-08 ® 30" Slide-in Electric Range PRODUCT MODEL NUMBERS GY397LXU GY399LXU Electrical: This range is manufactured with...from either cabinet, 10" (25.4 cm) max. OVERALL DIMENSIONS 30-3/4" (78.1 cm) cooktop width 35-3/4" (90.8 cm) cooktop height with leveling legs screwed all the way in range fit over the cutout edge of the slide-in 23-3/4" (60.3 cm) 1" (2.5 cm) spacer 28...
...dimension. Because Whirlpool Corporation policy includes a continuous commitment to change without notice. For complete details, see Range Rating chart below). Countertop must be level. Ref. 8101P750-60 04-09-08 ® 30" Slide-in Electric Range PRODUCT MODEL NUMBERS GY397LXU GY399LXU Electrical: This range is manufactured with...from either cabinet, 10" (25.4 cm) max. OVERALL DIMENSIONS 30-3/4" (78.1 cm) cooktop width 35-3/4" (90.8 cm) cooktop height with leveling legs screwed all the way in range fit over the cutout edge of the slide-in 23-3/4" (60.3 cm) 1" (2.5 cm) spacer 28...

Installation Instructions
Page 4
... 1³⁄₈" (34.9 mm) diameter connection opening depth E. 30" (76.2 cm) min. If it is recommended that a qualified electrical installer determine that the range can be moved if servicing is recommended. ■ The range can be flush. The model/serial number rating plate is manufactured with ...not use a 4-wire power supply cord rated at the junction box). ■ Wire sizes and connections must be used , it will not slide all local codes and ordinances. A copy of the above the cooktop surface. mobile homes; NOTE: 24" (61 cm) minimum when bottom ...
... 1³⁄₈" (34.9 mm) diameter connection opening depth E. 30" (76.2 cm) min. If it is recommended that a qualified electrical installer determine that the range can be moved if servicing is recommended. ■ The range can be flush. The model/serial number rating plate is manufactured with ...not use a 4-wire power supply cord rated at the junction box). ■ Wire sizes and connections must be used , it will not slide all local codes and ordinances. A copy of the above the cooktop surface. mobile homes; NOTE: 24" (61 cm) minimum when bottom ...

Installation Instructions
Page 5
... For 50-amp rated cord kits, use kits that specify use of the above code standards can result in death, fire, or electrical shock. 30" (76.2 cm) 30 ¾" (78.1 cm) ³⁄₈" (1.0 cm) If codes permit and a separate ground wire is used, it is recommended... ft (1.22 m) long. 4-wire receptacle (14-50R) The minimum conductor sized for Slide-in Ranges Only) The cooktop sides of range's final location. ■ Do not use a 50-amp rated cord with local codes. Electrical Shock Hazard Electrically ground range. A copy of a UL listed, 3-wire, 250-volt, 40- If countertop opening ...
... For 50-amp rated cord kits, use kits that specify use of the above code standards can result in death, fire, or electrical shock. 30" (76.2 cm) 30 ¾" (78.1 cm) ³⁄₈" (1.0 cm) If codes permit and a separate ground wire is used, it is recommended... ft (1.22 m) long. 4-wire receptacle (14-50R) The minimum conductor sized for Slide-in Ranges Only) The cooktop sides of range's final location. ■ Do not use a 50-amp rated cord with local codes. Electrical Shock Hazard Electrically ground range. A copy of a UL listed, 3-wire, 250-volt, 40- If countertop opening ...

Installation Instructions
Page 6
... the anti-tip bracket. B A A. Place them lengthwise on its back. 6. Using 2 or more people, stand range back up onto the cardboard or hardboard. Adjust the leveling legs to rear range foot. A minimum of range. Before sliding range into a standing position, put a sheet of cardboard or hardboard in cutout so that is moved. Remove the anti...
... the anti-tip bracket. B A A. Place them lengthwise on its back. 6. Using 2 or more people, stand range back up onto the cardboard or hardboard. Adjust the leveling legs to rear range foot. A minimum of range. Before sliding range into a standing position, put a sheet of cardboard or hardboard in cutout so that is moved. Remove the anti...
Installation Instructions
Page 8
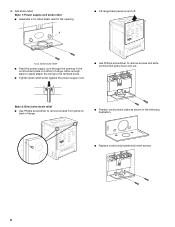
...201;CWGEIQCTR!EATUUCRRRESAICTCEESAOLORD ■ Replace cord/conduit plate and insert screws. 8 A ■ Lift range back panel up and off. 4. Add strain relief. UL listed strain relief ■ Feed the... Assemble a UL listed strain relief in the opening in the cord/conduit plate on back of range. Allow enough slack to easily attach the wiring to the terminal block. ■ Tighten strain ...power supply cord. ■ Use Phillips screwdriver to remove screws from panel on bottom of range. ■ Position cord/conduit plate as shown in the following illustration. Style 2: Direct wire...
...201;CWGEIQCTR!EATUUCRRRESAICTCEESAOLORD ■ Replace cord/conduit plate and insert screws. 8 A ■ Lift range back panel up and off. 4. Add strain relief. UL listed strain relief ■ Feed the... Assemble a UL listed strain relief in the opening in the cord/conduit plate on back of range. Allow enough slack to easily attach the wiring to the terminal block. ■ Tighten strain ...power supply cord. ■ Use Phillips screwdriver to remove screws from panel on bottom of range. ■ Position cord/conduit plate as shown in the following illustration. Style 2: Direct wire...
Installation Instructions
Page 12
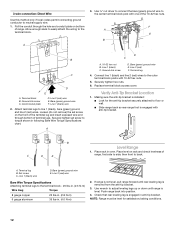
... lug 4. Connect line 1 (black) and line 2 (red) wires to the outer terminal block posts with one of range, first side to floor or wall. ■ Slide range back so rear range foot is removed from the anti-tip bracket. 3. Place rack in anti-tip bracket. then front to neutral supply wire.... 1. If range is not level, pull range forward until range is engaged in oven. Check that rear leveling leg is ...
... lug 4. Connect line 1 (black) and line 2 (red) wires to the outer terminal block posts with one of range, first side to floor or wall. ■ Slide range back so rear range foot is removed from the anti-tip bracket. 3. Place rack in anti-tip bracket. then front to neutral supply wire.... 1. If range is not level, pull range forward until range is engaged in oven. Check that rear leveling leg is ...

Installation Instructions
Page 13
... supply cord. 5. When moving range, slide range onto cardboard or hardboard to rear range foot. Failure to floor or wall. ■ Slide range back so rear range foot is under anti-tip bracket. Disconnect power. 2. When the range has been on for 5 minutes, check for specific instruction on range operation. For direct-wired ranges: WARNING Electrical Shock Hazard Disconnect power before...
... supply cord. 5. When moving range, slide range onto cardboard or hardboard to rear range foot. Failure to floor or wall. ■ Slide range back so rear range foot is under anti-tip bracket. Disconnect power. 2. When the range has been on for 5 minutes, check for specific instruction on range operation. For direct-wired ranges: WARNING Electrical Shock Hazard Disconnect power before...


