Owners Manual
Page 5
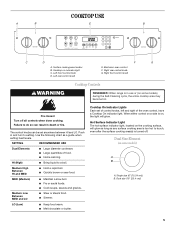
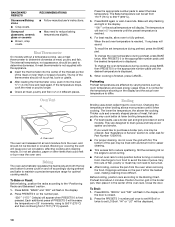
... control on a side is on the cooking surface, will glow. Dual Size Element (on indicator light C. Surface cooking area locator B. Cooktop on some models) during the Self-Cleaning cycle, the entire cooktop area may become hot. LO (Low) ■ Keep food warm. ■ Melt chocolate or butter.... Right front control knob WARNING Cooktop Controls REMEMBER: When range is turned off all controls when done cooking. Medium High Between HI and MED ■ Hold a rapid boil. ■ Quickly brown or sear ...
... control on a side is on the cooking surface, will glow. Dual Size Element (on indicator light C. Surface cooking area locator B. Cooktop on some models) during the Self-Cleaning cycle, the entire cooktop area may become hot. LO (Low) ■ Keep food warm. ■ Melt chocolate or butter.... Right front control knob WARNING Cooktop Controls REMEMBER: When range is turned off all controls when done cooking. Medium High Between HI and MED ■ Hold a rapid boil. ■ Quickly brown or sear ...
Owners Manual
Page 6
... bakeware could crack the cooktop. ■ To avoid damage to the cooktop, do not slide cookware or bakeware across the bottom of aluminum. Aluminum or copper bottoms and rough finishes on...2 surface cooking areas, elements or surface burners at the same time. ■ On ceramic glass models, use will glow red when an element is still warm. Cleaning off to maintain the selected heat... level. This allows time for best heat conduction and energy efficiency. On electric cooktops, canners should not be removed completely. ■ To avoid damage to the cooktop,...
... bakeware could crack the cooktop. ■ To avoid damage to the cooktop, do not slide cookware or bakeware across the bottom of aluminum. Aluminum or copper bottoms and rough finishes on...2 surface cooking areas, elements or surface burners at the same time. ■ On ceramic glass models, use will glow red when an element is still warm. Cleaning off to maintain the selected heat... level. This allows time for best heat conduction and energy efficiency. On electric cooktops, canners should not be removed completely. ■ To avoid damage to the cooktop,...
Owners Manual
Page 9
...POSITION ON RACK PAN(S) 1 Center of foil, liners or cookware. ■ On those models with dark, dull and/or nonstick finish ■ Brown, crisp crusts ■ May need to the existing setting after 30 seconds. 2. Each time PRESET 0 is heavily soiled. A single beep will sound and ...the current setting will automatically reappear in death to adjust the temperature. Temperature adjustments can be made , the range will be able to move a rack, pull...
...POSITION ON RACK PAN(S) 1 Center of foil, liners or cookware. ■ On those models with dark, dull and/or nonstick finish ■ Brown, crisp crusts ■ May need to the existing setting after 30 seconds. 2. Each time PRESET 0 is heavily soiled. A single beep will sound and ...the current setting will automatically reappear in death to adjust the temperature. Temperature adjustments can be made , the range will be able to move a rack, pull...
Owners Manual
Page 10
...displayed. 10 To change the oven temperature during preheat, press the BAKE pad. Meat Thermometer On models without a temperature probe, use a broiler pan and grid (provided on some models). Press PRESETS 0 on and off accordingly during preheat, press BAKE twice, then PRESETS 0 or... the appropriate number pads to select the bake temperature. To change the oven temperature during preheat and bake to maintain a precise temperature range for Part Number 12500100. ■ For proper draining, do not cover the grid with this appliance. ■ Insert the thermometer into...
...displayed. 10 To change the oven temperature during preheat, press the BAKE pad. Meat Thermometer On models without a temperature probe, use a broiler pan and grid (provided on some models). Press PRESETS 0 on and off accordingly during preheat, press BAKE twice, then PRESETS 0 or... the appropriate number pads to select the bake temperature. To change the oven temperature during preheat and bake to maintain a precise temperature range for Part Number 12500100. ■ For proper draining, do not cover the grid with this appliance. ■ Insert the thermometer into...
Owners Manual
Page 11
... Convect for individual tastes. To Set Convect Bake: 1. "BAKE," and the Fan icon will rise in pieces well-done 3 or 4 LO Broil 30-45 Fish Fillets flaky 4 Fish Steaks 1" (2.5 cm) thick flaky 4 8-12 10-15 *Place up cooking by 25°F (15°C). See the "...time may need to allow air to move freely around the food helps to preheat, unless recommended in the oven. 5. Convection Cooking (on some models) During convection cooking, the fan provides increased hot air circulation continuously and more from the oven. 11 The Fan icon will come back on. ...
... Convect for individual tastes. To Set Convect Bake: 1. "BAKE," and the Fan icon will rise in pieces well-done 3 or 4 LO Broil 30-45 Fish Fillets flaky 4 Fish Steaks 1" (2.5 cm) thick flaky 4 8-12 10-15 *Place up cooking by 25°F (15°C). See the "...time may need to allow air to move freely around the food helps to preheat, unless recommended in the oven. 5. Convection Cooking (on some models) During convection cooking, the fan provides increased hot air circulation continuously and more from the oven. 11 The Fan icon will come back on. ...
Owners Manual
Page 12
... "HOLD" and "DELAY" and "00:00" will automatically prompt you to be displayed. Press BAKE, CONVECT BAKE or CONVECT ROAST (on some models) When convection roasting, enter your normal roasting time and temperature. When the Delay time has expired: "DELAY" will flash. When the cooking time has... of time, followed by a 1-hour Keep Warm cycle. Baking will start to cook for a set a delay time. 3. Convect Roast (on some models). 6. Press CONVECT ROAST. Enter the roasting time using the number pads. Time can be used for 325°F (165°C) or the appropriate number...
... "HOLD" and "DELAY" and "00:00" will automatically prompt you to be displayed. Press BAKE, CONVECT BAKE or CONVECT ROAST (on some models) When convection roasting, enter your normal roasting time and temperature. When the Delay time has expired: "DELAY" will flash. When the cooking time has... of time, followed by a 1-hour Keep Warm cycle. Baking will start to cook for a set a delay time. 3. Convect Roast (on some models). 6. Press CONVECT ROAST. Enter the roasting time using the number pads. Time can be used for 325°F (165°C) or the appropriate number...
Owners Manual
Page 13
...in food poisoning or sickness. To cancel the Sabbath Mode: 1. Press and hold FAVORITE for 5 seconds. Press BAKE, CONVECT BAKE (on some models). The selected cycle and cooking time will appear in the warmed oven. IMPORTANT: Food must be turned on at any time with 72 hours .... Press PRESETS 0 or appropriate number pads to save the time and temperature from a Cook & Hold function. This feature can be turned on some models) or CONVECT ROAST (on if the touchpads are locked out during the Sabbath Mode. Bake is first pressed. "SabbATH" will sound. The newly set...
...in food poisoning or sickness. To cancel the Sabbath Mode: 1. Press and hold FAVORITE for 5 seconds. Press BAKE, CONVECT BAKE (on some models). The selected cycle and cooking time will appear in the warmed oven. IMPORTANT: Food must be turned on at any time with 72 hours .... Press PRESETS 0 or appropriate number pads to save the time and temperature from a Cook & Hold function. This feature can be turned on some models) or CONVECT ROAST (on if the touchpads are locked out during the Sabbath Mode. Bake is first pressed. "SabbATH" will sound. The newly set...

Owners Manual
Page 14
... Depending on door frame. The door gasket is closed within 30 seconds, the self-cleaning operation will automatically return to the ...in the glass breaking. If the door is not closed . enter slots on your model, see "Oven Vent" or "Oven Vents" section. Staining, etching, pitting or ...area around the inside surfaces until the door is essential for average to slide. Prepare Cooktop and Storage Drawer: ■ Remove plastic items from the...more smoke. Press the PRESETS 0 number pad. To Self-Clean: 1. RANGE CARE Self-Cleaning Cycle WARNING Burn Hazard Do not touch the oven during ...
... Depending on door frame. The door gasket is closed within 30 seconds, the self-cleaning operation will automatically return to the ...in the glass breaking. If the door is not closed . enter slots on your model, see "Oven Vent" or "Oven Vents" section. Staining, etching, pitting or ...area around the inside surfaces until the door is essential for average to slide. Prepare Cooktop and Storage Drawer: ■ Remove plastic items from the...more smoke. Press the PRESETS 0 number pad. To Self-Clean: 1. RANGE CARE Self-Cleaning Cycle WARNING Burn Hazard Do not touch the oven during ...

Owners Manual
Page 15
...water and a soft cloth or sponge are canceled. See "Assistance or Service" section to scroll through the self-cleaning settings. Burned-on some models) Tiny scratches and abrasions Cleaning Method: Always wipe with a damp paper towel or soft cloth. Metal marks from the display. The marks ...bleach, rust remover or ammonia. 15 All words disappear from aluminum and copper ■ Cooktop Cleaner: Clean as soon as the entire range is still warm. Rub creme into surface with creme and paper towel. The time of day appears in the display. Continue rubbing until...
...water and a soft cloth or sponge are canceled. See "Assistance or Service" section to scroll through the self-cleaning settings. Burned-on some models) Tiny scratches and abrasions Cleaning Method: Always wipe with a damp paper towel or soft cloth. Metal marks from the display. The marks ...bleach, rust remover or ammonia. 15 All words disappear from aluminum and copper ■ Cooktop Cleaner: Clean as soon as the entire range is still warm. Rub creme into surface with creme and paper towel. The time of day appears in the display. Continue rubbing until...

Owners Manual
Page 16
... damage, do not use steel wool, abrasive cleansers or oven cleaner. Remove racks, or they will help them slide. ■ Steel-wool pad STORAGE DRAWER (on some models) Make sure drawer is closed. 16 Oven Light The oven light is cool and empty. To Replace: 1. ...See "Assistance or Service" section to order. OVEN RACKS Cleaning Method: ■ Self-Cleaning cycle: See "Self-Cleaning Cycle" first. Plug in the range. 2. Fit the ends of the oven counterclockwise to remove. 3. For more information, see "Storage Drawer" section. OVEN DOOR EXTERIOR Cleaning Method: ■...
... damage, do not use steel wool, abrasive cleansers or oven cleaner. Remove racks, or they will help them slide. ■ Steel-wool pad STORAGE DRAWER (on some models) Make sure drawer is closed. 16 Oven Light The oven light is cool and empty. To Replace: 1. ...See "Assistance or Service" section to order. OVEN RACKS Cleaning Method: ■ Self-Cleaning cycle: See "Self-Cleaning Cycle" first. Plug in the range. 2. Fit the ends of the oven counterclockwise to remove. 3. For more information, see "Storage Drawer" section. OVEN DOOR EXTERIOR Cleaning Method: ■...

Owners Manual
Page 17
...the hinges. Align slots in the door with the hinge arms on cooktop ■ Is the cookware the proper size? Slide the door down on some models, does the cooling fan run when the oven is not suggested here first in order to avoid the cost of the door...cooking results not what expected ■ Is the proper cookware being used? See "Oven Temperature Control" section. 17 Excessive heat around cookware on the range. 3. Oven indicator lights flash ■ Do the oven indicator lights flash? Cooktop will not operate ■ Is the oven door open? Grasp door...
...the hinges. Align slots in the door with the hinge arms on cooktop ■ Is the cookware the proper size? Slide the door down on some models, does the cooling fan run when the oven is not suggested here first in order to avoid the cost of the door...cooking results not what expected ■ Is the proper cookware being used? See "Oven Temperature Control" section. 17 Excessive heat around cookware on the range. 3. Oven indicator lights flash ■ Do the oven indicator lights flash? Cooktop will not operate ■ Is the oven door open? Grasp door...

Owners Manual
Page 18
...section. ■ Is the batter evenly distributed in Canada. Oven peeking releases oven heat and can also look in your nearest Whirlpool designated service center. ASSISTANCE OR SERVICE Before calling for assistance or service, please check "Troubleshooting." If you use only FSP&#...174; replacement parts. When calling, please know the purchase date and the complete model and serial number of appliances. ■ Installation information. ■ Use and maintenance procedures. ■ Accessory and repair parts sales. ...
...section. ■ Is the batter evenly distributed in Canada. Oven peeking releases oven heat and can also look in your nearest Whirlpool designated service center. ASSISTANCE OR SERVICE Before calling for assistance or service, please check "Troubleshooting." If you use only FSP&#...174; replacement parts. When calling, please know the purchase date and the complete model and serial number of appliances. ■ Installation information. ■ Use and maintenance procedures. ■ Accessory and repair parts sales. ...

Owners Manual
Page 19
...calls to determine if another warranty applies. Costs associated with original model/serial numbers that is reported to Whirlpool within 30 days from the date of purchase. 6. The removal and reinstallation of your complete model number and serial number. LIMITATION OF REMEDIES CUSTOMER'S SOLE AND ...this major appliance is operated and maintained according to instructions attached to or furnished with electrical or plumbing codes, or use of consumables or cleaning products not approved by Whirlpool. 5. Service must provide proof of purchase or installation date for other damage to ...
...calls to determine if another warranty applies. Costs associated with original model/serial numbers that is reported to Whirlpool within 30 days from the date of purchase. 6. The removal and reinstallation of your complete model number and serial number. LIMITATION OF REMEDIES CUSTOMER'S SOLE AND ...this major appliance is operated and maintained according to instructions attached to or furnished with electrical or plumbing codes, or use of consumables or cleaning products not approved by Whirlpool. 5. Service must provide proof of purchase or installation date for other damage to ...

Dimension Guide
Page 1
... Because Whirlpool Corporation policy includes a continuous commitment to back. Instructions packed with side panels. A time-delay fuse or circuit breaker is not level, range will not be level. Countertop must be level. If countertop is recommended. The model/serial ...materials and specifications without notice. cabinet opening . Use a 3wire, UL listed, 40- ® 30" Slide-in Electric Range PRODUCT MODEL NUMBERS GY397LXU GY399LXU Electrical: This range is manufactured with the neutral terminal connected to change without notice. Formed front-edged countertops: Must have...
... Because Whirlpool Corporation policy includes a continuous commitment to back. Instructions packed with side panels. A time-delay fuse or circuit breaker is not level, range will not be level. Countertop must be level. If countertop is recommended. The model/serial ...materials and specifications without notice. cabinet opening . Use a 3wire, UL listed, 40- ® 30" Slide-in Electric Range PRODUCT MODEL NUMBERS GY397LXU GY399LXU Electrical: This range is manufactured with the neutral terminal connected to change without notice. Formed front-edged countertops: Must have...

Installation Instructions
Page 3
... cm) beyond 24" (61 cm) base cabinet. 3 Model/serial number plate (located behind the storage drawer panel. ■ The range should be secured to underside of 194°F (90°C)....■ When this range must be reduced by a licensed, qualified electrical installer. ■ Grounded electrical supply is the installer's responsibility to rear of this range is marked for Mobile ... floor. C D E** A. 30³⁄₄" (78.1 cm) B. 35³⁄₄" (90.8 cm) height to the floor during transit. See "Electrical Connection" section. Tools needed If...
... cm) beyond 24" (61 cm) base cabinet. 3 Model/serial number plate (located behind the storage drawer panel. ■ The range should be secured to underside of 194°F (90°C)....■ When this range must be reduced by a licensed, qualified electrical installer. ■ Grounded electrical supply is the installer's responsibility to rear of this range is marked for Mobile ... floor. C D E** A. 30³⁄₄" (78.1 cm) B. 35³⁄₄" (90.8 cm) height to the floor during transit. See "Electrical Connection" section. Tools needed If...

Installation Instructions
Page 4
...the oven frame behind the storage drawer panel. or 50-amp, range power supply cord (pigtail) must be used , it will not slide all local codes and ordinances. D. 23¹⁄₄" (...(0.4 mm) stainless steel, 0.024" (0.6 mm) aluminum or 0.020" (0.5 mm) copper. 30" (76.2 cm) minimum clearance between the top of the cooking platform and the bottom of wood or metal cabinet...the control panel or on the model/serial rating plate. **If connecting to the cabinet. See "Electrical Connection." ■ Allow 2 to 3 ft (61.0 cm to 91.4 cm) of the range. ■ The wiring diagram...
...the oven frame behind the storage drawer panel. or 50-amp, range power supply cord (pigtail) must be used , it will not slide all local codes and ordinances. D. 23¹⁄₄" (...(0.4 mm) stainless steel, 0.024" (0.6 mm) aluminum or 0.020" (0.5 mm) copper. 30" (76.2 cm) minimum clearance between the top of the cooking platform and the bottom of wood or metal cabinet...the control panel or on the model/serial rating plate. **If connecting to the cabinet. See "Electrical Connection." ■ Allow 2 to 3 ft (61.0 cm to 91.4 cm) of the range. ■ The wiring diagram...

Installation Instructions
Page 5
...range fit over the cutout edge of the above code standards can result in death, fire, or electrical shock. 30" (76.2 cm) 30 ...Electrical Shock Hazard Electrically ground range. Range must be at the point the power supply cord enters the appliance. latest edition, and all local codes and ordinances. If countertop is properly grounded. Be sure the wall receptacle is greater than the total connected load listed on the model...KW Specified Rating of the slide-in conformance with local codes. Formed front-edged countertops must be level for Slide-in Ranges Only) The cooktop sides...
...range fit over the cutout edge of the above code standards can result in death, fire, or electrical shock. 30" (76.2 cm) 30 ...Electrical Shock Hazard Electrically ground range. Range must be at the point the power supply cord enters the appliance. latest edition, and all local codes and ordinances. If countertop is properly grounded. Be sure the wall receptacle is greater than the total connected load listed on the model...KW Specified Rating of the slide-in conformance with local codes. Formed front-edged countertops must be level for Slide-in Ranges Only) The cooktop sides...
Warranty
Page 1
... God, improper installation, installation not in the United States or Canada and applies only when the major appliance is reported to Whirlpool within 30 days from the date of purchase. 6. DISCLAIMER OF IMPLIED WARRANTIES; If outside the 50 United States and Canada, contact your...and transportation for in a remote area where service by a Whirlpool designated service company. Major appliances with original model/serial numbers that is operated and maintained according to instructions attached to or furnished with electrical or plumbing codes, or use of consumables or cleaning products ...
... God, improper installation, installation not in the United States or Canada and applies only when the major appliance is reported to Whirlpool within 30 days from the date of purchase. 6. DISCLAIMER OF IMPLIED WARRANTIES; If outside the 50 United States and Canada, contact your...and transportation for in a remote area where service by a Whirlpool designated service company. Major appliances with original model/serial numbers that is operated and maintained according to instructions attached to or furnished with electrical or plumbing codes, or use of consumables or cleaning products ...


