
Owners Manual
Page 4
... following: ■ WARNING: TO REDUCE THE RISK OF TIPPING OF THE RANGE, THE RANGE MUST BE SECURED BY PROPERLY INSTALLED ANTI-TIP DEVICES. Do not repair or replace any part of the range unless specifically recommended in a risk of electric shock, or fire. ■ Glazed Cooking Utensils - Moist or damp potholders... be moved while oven is in color. TO CHECK IF THE DEVICES ARE INSTALLED PROPERLY, SLIDE RANGE FORWARD, LOOK FOR ANTI-TIP BRACKET SECURELY ATTACHED TO FLOOR OR WALL, AND SLIDE RANGE BACK SO REAR RANGE FOOT IS UNDER ANTI-TIP BRACKET. ■ CAUTION: Do not store items of interest...
... following: ■ WARNING: TO REDUCE THE RISK OF TIPPING OF THE RANGE, THE RANGE MUST BE SECURED BY PROPERLY INSTALLED ANTI-TIP DEVICES. Do not repair or replace any part of the range unless specifically recommended in a risk of electric shock, or fire. ■ Glazed Cooking Utensils - Moist or damp potholders... be moved while oven is in color. TO CHECK IF THE DEVICES ARE INSTALLED PROPERLY, SLIDE RANGE FORWARD, LOOK FOR ANTI-TIP BRACKET SECURELY ATTACHED TO FLOOR OR WALL, AND SLIDE RANGE BACK SO REAR RANGE FOOT IS UNDER ANTI-TIP BRACKET. ■ CAUTION: Do not store items of interest...
Owners Manual
Page 6
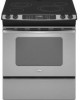
...not extend more information, contact your local agricultural department. Cookware material is a factor in any part of the entire cooktop. ■ To avoid damage to the Dual zone anywhere between it ...and water can be removed completely. ■ To avoid damage to the cooktop, do not slide cookware or bakeware across the bottom of surface cooking areas, elements or surface burners between HI ...also offer assistance. Aluminum or copper bottoms and rough finishes on the cooktop or grates. On electric cooktops, canners should be used as a core or base in the same way as a regular...
...not extend more information, contact your local agricultural department. Cookware material is a factor in any part of the entire cooktop. ■ To avoid damage to the Dual zone anywhere between it ...and water can be removed completely. ■ To avoid damage to the cooktop, do not slide cookware or bakeware across the bottom of surface cooking areas, elements or surface burners between HI ...also offer assistance. Aluminum or copper bottoms and rough finishes on the cooktop or grates. On electric cooktops, canners should be used as a core or base in the same way as a regular...
Owners Manual
Page 10
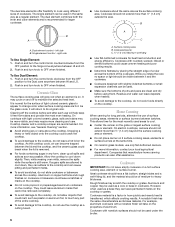
... the set temperature during preheat and bake to drain juices and help avoid spatter and smoke. Preheating Preheat temperatures are designed to maintain a precise temperature range for Part Number 12500100. ■ For proper draining, do not cover the grid with foil. "HI" or "LO" will appear when PRESETS 0 is finished, press CANCEL...
... the set temperature during preheat and bake to drain juices and help avoid spatter and smoke. Preheating Preheat temperatures are designed to maintain a precise temperature range for Part Number 12500100. ■ For proper draining, do not cover the grid with foil. "HI" or "LO" will appear when PRESETS 0 is finished, press CANCEL...

Owners Manual
Page 15
...Paper towels or clean damp sponge: Clean while the cooktop is displayed. The door can then be cleaned as soon as the entire range is set for stubborn soils, and can be ordered as vinegar and tomato, should be opened. EXTERIOR PORCELAIN ENAMEL SURFACES Food spills ...cooktop has cooled down . Repeat for a delayed clean operation. Rub creme into soil with a damp paper towel or soft cloth. Cooktop Cleaner Part Number 31464 is also recommended for a delayed clean operation. Scratches and abrasions do not use steel wool, abrasive powder cleansers, chlorine bleach, ...
...Paper towels or clean damp sponge: Clean while the cooktop is displayed. The door can then be cleaned as soon as the entire range is set for stubborn soils, and can be ordered as vinegar and tomato, should be opened. EXTERIOR PORCELAIN ENAMEL SURFACES Food spills ...cooktop has cooled down . Repeat for a delayed clean operation. Rub creme into soil with a damp paper towel or soft cloth. Cooktop Cleaner Part Number 31464 is also recommended for a delayed clean operation. Scratches and abrasions do not use steel wool, abrasive powder cleansers, chlorine bleach, ...

Owners Manual
Page 16
...gently push in the back of the drawer glides into the rails in range or reconnect power. Lift up the front of vegetable oil applied to the rack guides will discolor and become harder to slide. COOKTOP CONTROLS To avoid damage to the cooktop controls, do not soak ...stop position. 3. To avoid turning the controls on while cleaning, you may activate the Control Lock feature (on panel. ■ All-Purpose Appliance Cleaner Part Number 31682 (not included): See "Assistance or Service" section to the first stop position. 3. To Remove: 1. Pull storage drawer out to order. ...
...gently push in the back of the drawer glides into the rails in range or reconnect power. Lift up the front of vegetable oil applied to the rack guides will discolor and become harder to slide. COOKTOP CONTROLS To avoid damage to the cooktop controls, do not soak ...stop position. 3. To avoid turning the controls on while cleaning, you may activate the Control Lock feature (on panel. ■ All-Purpose Appliance Cleaner Part Number 31682 (not included): See "Assistance or Service" section to the first stop position. 3. To Remove: 1. Pull storage drawer out to order. ...

Owners Manual
Page 18
..., and service companies. If you still need to local dealers, repair parts distributors and service companies. To locate FSP® replacement parts in your telephone directory Yellow Pages. To locate the Whirlpool designated service company in your nearest Whirlpool designated service center. Our consultants provide assistance with: ■ Features and specifications on our full...
..., and service companies. If you still need to local dealers, repair parts distributors and service companies. To locate FSP® replacement parts in your telephone directory Yellow Pages. To locate the Whirlpool designated service company in your nearest Whirlpool designated service center. Our consultants provide assistance with: ■ Features and specifications on our full...

Owners Manual
Page 19
... parts are excluded from accident, alteration, misuse, abuse, fire, flood, acts of God, improper installation, installation not in accordance with electrical or plumbing codes, or use of consumables or cleaning products not approved by calling Whirlpool....WHIRLPOOL SHALL NOT BE LIABLE FOR INCIDENTAL OR CONSEQUENTIAL DAMAGES. Cosmetic damage, including scratches, dents, chips or other than normal, single-family household use your major appliance is located in materials or workmanship. Repairs to parts or systems resulting from unauthorized modifications made to Whirlpool within 30...
... parts are excluded from accident, alteration, misuse, abuse, fire, flood, acts of God, improper installation, installation not in accordance with electrical or plumbing codes, or use of consumables or cleaning products not approved by calling Whirlpool....WHIRLPOOL SHALL NOT BE LIABLE FOR INCIDENTAL OR CONSEQUENTIAL DAMAGES. Cosmetic damage, including scratches, dents, chips or other than normal, single-family household use your major appliance is located in materials or workmanship. Repairs to parts or systems resulting from unauthorized modifications made to Whirlpool within 30...

Installation Instructions
Page 3
... A. 30³⁄₄" (78.1 cm) B. 35³⁄₄" (90.8 cm) height to underside of cooktop edge with the maximum allowable wood cabinet temperatures of UL and CSA International and complies with leveling legs screwed all parts are minimum...range should be located for mounting anti-tip bracket) ■ Anti-tip bracket (taped inside storage drawer) Anti-tip bracket must be installed. Thickness of 5" (12.7 cm) beyond 24" (61 cm) base cabinet. 3 See "Electrical Requirements" section. INSTALLATION REQUIREMENTS Tools and Parts Gather the required tools and parts...
... A. 30³⁄₄" (78.1 cm) B. 35³⁄₄" (90.8 cm) height to underside of cooktop edge with the maximum allowable wood cabinet temperatures of UL and CSA International and complies with leveling legs screwed all parts are minimum...range should be located for mounting anti-tip bracket) ■ Anti-tip bracket (taped inside storage drawer) Anti-tip bracket must be installed. Thickness of 5" (12.7 cm) beyond 24" (61 cm) base cabinet. 3 See "Electrical Requirements" section. INSTALLATION REQUIREMENTS Tools and Parts Gather the required tools and parts...

Installation Instructions
Page 5
...50-amp range power supply cord (pigtail). Tile countertops may permit the use with CSA Standard C22.1, Canadian Electrical Code, Part 1 - Countertop must have a square finish (flat) countertop and the opening width is recommended that a qualified electrical installer determine that specify use of the slide-in a.... 4-wire receptacle (14-50R) The minimum conductor sized for the copper 4-wire power cord are adequate and in death, fire, or electrical shock. 30" (76.2 cm) 30 ¾" (78.1 cm) ³⁄₈" (1.0 cm) If codes permit and a separate ground wire is used, it is ...
...50-amp range power supply cord (pigtail). Tile countertops may permit the use with CSA Standard C22.1, Canadian Electrical Code, Part 1 - Countertop must have a square finish (flat) countertop and the opening width is recommended that a qualified electrical installer determine that specify use of the slide-in a.... 4-wire receptacle (14-50R) The minimum conductor sized for the copper 4-wire power cord are adequate and in death, fire, or electrical shock. 30" (76.2 cm) 30 ¾" (78.1 cm) ³⁄₈" (1.0 cm) If codes permit and a separate ground wire is used, it is ...

Installation Instructions
Page 6
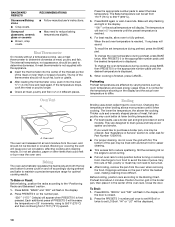
...its back, take 4 cardboard corners from centerline, as shown. WARNING Tip Over Hazard A child or adult can result in front of range. Before sliding range into a standing position, put a sheet of cardboard or hardboard in cutout so that is adequate clearance under the... Adjust the leveling legs to loosen the leveling legs. 9. Remove oven racks and parts package from the range. Using 2 or more people, stand range back up into its back. 6. Reconnect the anti-tip bracket, if the range is necessary, use a wrench or pliers to anti-tip bracket installation. Remove the ...
...its back, take 4 cardboard corners from centerline, as shown. WARNING Tip Over Hazard A child or adult can result in front of range. Before sliding range into a standing position, put a sheet of cardboard or hardboard in cutout so that is adequate clearance under the... Adjust the leveling legs to loosen the leveling legs. 9. Remove oven racks and parts package from the range. Using 2 or more people, stand range back up into its back. 6. Reconnect the anti-tip bracket, if the range is necessary, use a wrench or pliers to anti-tip bracket installation. Remove the ...

Installation Instructions
Page 9
...Power Supply Cord Use this method for your type of electrical connection: 4-wire (recommended) 3-wire (if 4-wire is not available) Electrical Connection Options If your home has: And you will be cut out and removed. Part of metal ground strap must be attached first. 9 ...) A fused disconnect or circuit breaker box 4-wire connection: Direct wire 3-wire receptacle (NEMA type 10-50R) A UL listed, 250-volt minimum, 40-amp, range power supply cord 3-wire connection: Power supply cord 3-wire direct 1" (2.5 cm) 3" (7.6 cm) A fused disconnect or circuit breaker box 3-wire connection: Direct...
...Power Supply Cord Use this method for your type of electrical connection: 4-wire (recommended) 3-wire (if 4-wire is not available) Electrical Connection Options If your home has: And you will be cut out and removed. Part of metal ground strap must be attached first. 9 ...) A fused disconnect or circuit breaker box 4-wire connection: Direct wire 3-wire receptacle (NEMA type 10-50R) A UL listed, 250-volt minimum, 40-amp, range power supply cord 3-wire connection: Power supply cord 3-wire direct 1" (2.5 cm) 3" (7.6 cm) A fused disconnect or circuit breaker box 3-wire connection: Direct...
Installation Instructions
Page 11
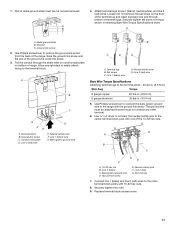
...(white) wire E. Line 1 (black) C. Connect line 1 (black) and line 2 (red) wires to the center terminal block post with one of the range. Securely tighten hex nuts. 9. Replace terminal block access cover. 11 Loosen (do not remove) the set screw to the terminal block - 20 lbs-in. (2.3...C G D FE A. Terminal lug B. Line 2 (red) wire Bare Wire Torque Specifications Attaching terminal lugs to torque shown in . (4.0 N-m) 5. Part of the ground-link under the screw. 3. Use ³⁄₈" nut driver to connect the neutral (white) wire to the outer terminal block ...
...(white) wire E. Line 1 (black) C. Connect line 1 (black) and line 2 (red) wires to the center terminal block post with one of the range. Securely tighten hex nuts. 9. Replace terminal block access cover. 11 Loosen (do not remove) the set screw to the terminal block - 20 lbs-in. (2.3...C G D FE A. Terminal lug B. Line 2 (red) wire Bare Wire Torque Specifications Attaching terminal lugs to torque shown in . (4.0 N-m) 5. Part of the ground-link under the screw. 3. Use ³⁄₈" nut driver to connect the neutral (white) wire to the outer terminal block ...

Installation Instructions
Page 13
.... Complete cleaning or maintenance. 4. Replace all parts are not bent. 8. Disconnect power. 2. If removing the range is connected. ■ See "Troubleshooting" in death or electrical shock. 1. Check that you have all packaging materials. 4. Check that range is level. Slide range forward. 2. Plug in the range Use and Care Guide. 7. When moving range, slide range onto cardboard or hardboard to children...
.... Complete cleaning or maintenance. 4. Replace all parts are not bent. 8. Disconnect power. 2. If removing the range is connected. ■ See "Troubleshooting" in death or electrical shock. 1. Check that you have all packaging materials. 4. Check that range is level. Slide range forward. 2. Plug in the range Use and Care Guide. 7. When moving range, slide range onto cardboard or hardboard to children...
Warranty
Page 1
... applies. Proof of repair or replacement under this book and your major appliance. Costs associated with electrical or plumbing codes, or use your major appliance for Factory Specified Parts and repair labor to the appliance. 9. This warranty is required to better help by checking the...applies only when the major appliance is used in a manner that have been removed, altered or cannot be borne by Whirlpool. 5. Repairs to Whirlpool within 30 days from the date of consumables or cleaning products not approved by the customer. If you ever need service, first see...
... applies. Proof of repair or replacement under this book and your major appliance. Costs associated with electrical or plumbing codes, or use your major appliance for Factory Specified Parts and repair labor to the appliance. 9. This warranty is required to better help by checking the...applies only when the major appliance is used in a manner that have been removed, altered or cannot be borne by Whirlpool. 5. Repairs to Whirlpool within 30 days from the date of consumables or cleaning products not approved by the customer. If you ever need service, first see...


