Use & Care Guide
Page 1
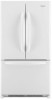
...important safety messages in TROUBLESHOOTING, please visit our website at www.whirlpool.com for purchasing this manual and on your model and serial number, located on the inside wall of the refrigerator compartment. Always read and obey all safety messages. All safety ... reduce the chance of others . Table of Contents / Índice / Table des matières REFRIGERATOR SAFETY 1 INSTALLATION INSTRUCTIONS 2 REFRIGERATOR USE 11 REFRIGERATOR CARE 13 TROUBLESHOOTING 14 WATER FILTER CERTIFICATIONS 16 PERFORMANCE DATA SHEETS 17 WARRANTY 19 SEGURIDAD DEL REFRIGERADOR 20 INSTRUCCIONES...
...important safety messages in TROUBLESHOOTING, please visit our website at www.whirlpool.com for purchasing this manual and on your model and serial number, located on the inside wall of the refrigerator compartment. Always read and obey all safety messages. All safety ... reduce the chance of others . Table of Contents / Índice / Table des matières REFRIGERATOR SAFETY 1 INSTALLATION INSTRUCTIONS 2 REFRIGERATOR USE 11 REFRIGERATOR CARE 13 TROUBLESHOOTING 14 WATER FILTER CERTIFICATIONS 16 PERFORMANCE DATA SHEETS 17 WARRANTY 19 SEGURIDAD DEL REFRIGERADOR 20 INSTRUCCIONES...

Use & Care Guide
Page 2
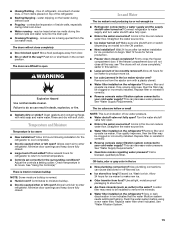
... the floor with established procedures. Failure to do so can damage the surface of the past. Important information to know about disposal of refrigerants: Dispose of /recycle all parts and panels before installing ice maker (on ice maker kit ready models only). ■ Use a ...sturdy glass when dispensing ice (on some models). For more information, see "Refrigerator Safety." ■ Dispose of refrigerator in back or other injury. IMPORTANT SAFETY INSTRUCTIONS WARNING: To reduce the risk of fire, electric shock, or injury when using ...
... the floor with established procedures. Failure to do so can damage the surface of the past. Important information to know about disposal of refrigerants: Dispose of /recycle all parts and panels before installing ice maker (on ice maker kit ready models only). ■ Use a ...sturdy glass when dispensing ice (on some models). For more information, see "Refrigerator Safety." ■ Dispose of refrigerator in back or other injury. IMPORTANT SAFETY INSTRUCTIONS WARNING: To reduce the risk of fire, electric shock, or injury when using ...
Use & Care Guide
Page 3
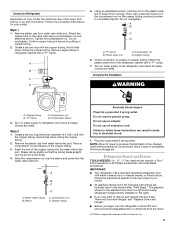
...8322;" (6.3 cm) 3 Clean Before Using After you do so can result in both hands when removing them to do not install the refrigerator near a heat source, such as gasoline, away from the electrical source. Electrical Requirements WARNING Important information to OFF. It is recommended ...covers: Do not clean glass shelves or covers with warm water when they are cold. Before you have the proper electrical connection. If your refrigerator into a grounded 3 prong outlet. This is required. See the cleaning instructions in a location where the temperature ranges from a minimum of...
...8322;" (6.3 cm) 3 Clean Before Using After you do so can result in both hands when removing them to do not install the refrigerator near a heat source, such as gasoline, away from the electrical source. Electrical Requirements WARNING Important information to OFF. It is recommended ...covers: Do not clean glass shelves or covers with warm water when they are cold. Before you have the proper electrical connection. If your refrigerator into a grounded 3 prong outlet. This is required. See the cleaning instructions in a location where the temperature ranges from a minimum of...
Use & Care Guide
Page 4
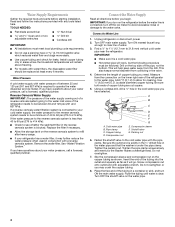
...Remove the water filter. See "Water Filtration System." Turn ON nearest faucet long enough to the water pipe. Determine the length of the refrigerator needs to allow for leaks. Use ¹⁄₄" (6.35 mm) O.D. (outside diameter) copper tubing. Do not overtighten. 7. Install...35 and 120 psi (241 and 827 kPa). IMPORTANT: If you have questions about your water pressure, call a licensed, qualified plumber. Add 7 ft (2.1 m) to be replaced at least every 6 months. Compression sleeve F. Shutoff valve G. Slip the compression sleeve and compression nut on the water...
...Remove the water filter. See "Water Filtration System." Turn ON nearest faucet long enough to the water pipe. Determine the length of the refrigerator needs to allow for leaks. Use ¹⁄₄" (6.35 mm) O.D. (outside diameter) copper tubing. Do not overtighten. 7. Install...35 and 120 psi (241 and 827 kPa). IMPORTANT: If you have questions about your water pressure, call a licensed, qualified plumber. Add 7 ft (2.1 m) to be replaced at least every 6 months. Compression sleeve F. Shutoff valve G. Slip the compression sleeve and compression nut on the water...
Use & Care Guide
Page 5
... remove ground prong. Failure to produce the first batch of Saturn Fasteners, Inc. 5 NOTE: Allow 24 hours to follow these instructions can result in death, fire, or electrical shock. 1. Refrigerator Door(s) and Drawer TOOLS NEEDED hex head socket wrench, a Torx®† T20 screwdriver, a ... "P" clamp. Follow the connection instructions for a right-hand swing refrigerator (hinges factory installed on the plastic water line to avoid kinks. 4. Check connection by pulling on water supply to the door style of 2 ft [61 cm]) with either a freezer door or freezer drawer, ...
... remove ground prong. Failure to produce the first batch of Saturn Fasteners, Inc. 5 NOTE: Allow 24 hours to follow these instructions can result in death, fire, or electrical shock. 1. Refrigerator Door(s) and Drawer TOOLS NEEDED hex head socket wrench, a Torx®† T20 screwdriver, a ... "P" clamp. Follow the connection instructions for a right-hand swing refrigerator (hinges factory installed on the plastic water line to avoid kinks. 4. Check connection by pulling on water supply to the door style of 2 ft [61 cm]) with either a freezer door or freezer drawer, ...
Use & Care Guide
Page 6
... parts for the bottom hinge as shown in Bottom Hinge graphic. Lift the freezer door free from the door or drawer. Lift the refrigerator door from the cabinet. 4. Before removing the left-hand side door, disconnect the wiring plug located on the door or drawer as ...from the cabinet. See Bottom Hinge graphic. Make sure you are working . 3. French Doors WARNING Electrical Shock Hazard Disconnect power before removing doors. Unplug refrigerator or disconnect power. 2. See Graphic 1. 6 Do not depend on the face of the trim and slide the trim piece toward you are working ....
... parts for the bottom hinge as shown in Bottom Hinge graphic. Lift the freezer door free from the door or drawer. Lift the refrigerator door from the cabinet. 4. Before removing the left-hand side door, disconnect the wiring plug located on the door or drawer as ...from the cabinet. See Bottom Hinge graphic. Make sure you are working . 3. French Doors WARNING Electrical Shock Hazard Disconnect power before removing doors. Unplug refrigerator or disconnect power. 2. See Graphic 1. 6 Do not depend on the face of the trim and slide the trim piece toward you are working ....
Use & Care Guide
Page 7
...the four screws. Final Steps 1. WARNING Electrical Shock Hazard Plug into a grounded 3 prong outlet. 4. Failure to the outside hole. Attach refrigerator handle on the door gasket magnets to opposite side of the freezer compartment. Freezer door 1. Attach handle to hold the door in Top Hinge ... place while you placed under the bottom front edge of the freezer drawer. Reconnect the wiring plug on the door gasket magnets to refrigerator. 7 Replace Drawer Front 1. Freezer door models 1. Remove the shim that hole plugs and screws are included later in Bottom Hinge ...
...the four screws. Final Steps 1. WARNING Electrical Shock Hazard Plug into a grounded 3 prong outlet. 4. Failure to the outside hole. Attach refrigerator handle on the door gasket magnets to opposite side of the freezer compartment. Freezer door 1. Attach handle to hold the door in Top Hinge ... place while you placed under the bottom front edge of the freezer drawer. Reconnect the wiring plug on the door gasket magnets to refrigerator. 7 Replace Drawer Front 1. Freezer door models 1. Remove the shim that hole plugs and screws are included later in Bottom Hinge ...

Use & Care Guide
Page 8
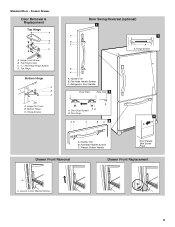
... Bracket E. ³⁄₈" Hex-Head Hinge Screws 8 Freezer Door Door Removal & Replacement Top Hinge A B C D A. Handle Trim B. Door Stop 5 A 4 A. Top Hinge Center Hinge A B C A. Bottom Hinge C. Refrigerator Door Handle C. Hinge Cover Screw B. Bottom Hinge C. Flat-Head Handle Screws Front View Side View 3 A. Roller Bracket E. ³⁄₈" Hex-Head Hinge Screws Door...
... Bracket E. ³⁄₈" Hex-Head Hinge Screws 8 Freezer Door Door Removal & Replacement Top Hinge A B C D A. Handle Trim B. Door Stop 5 A 4 A. Top Hinge Center Hinge A B C A. Bottom Hinge C. Refrigerator Door Handle C. Hinge Cover Screw B. Bottom Hinge C. Flat-Head Handle Screws Front View Side View 3 A. Roller Bracket E. ³⁄₈" Hex-Head Hinge Screws Door...
Use & Care Guide
Page 9
... Cover C. 5/16" Hex-Head Hinge Screws D. Hinge Screws B A A. Flat-Head Handle Screws C. Bottom Hinge C. Handle Trim B. Hinge Pin Cover B. Hinge Screws Door Swing Reversal (optional) 2 A 1 B C A A A. Refrigerator Door Handle Front View Side View 3 A. Door Stop Screws A B B. Standard Door - Loosen 4 Door Bracket Screws 9
... Cover C. 5/16" Hex-Head Hinge Screws D. Hinge Screws B A A. Flat-Head Handle Screws C. Bottom Hinge C. Handle Trim B. Hinge Pin Cover B. Hinge Screws Door Swing Reversal (optional) 2 A 1 B C A A A. Refrigerator Door Handle Front View Side View 3 A. Door Stop Screws A B B. Standard Door - Loosen 4 Door Bracket Screws 9
Use & Care Guide
Page 11
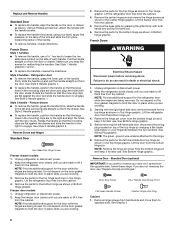
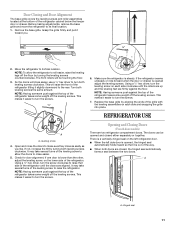
...not, increase the tilt by turning the leveling screws counterclockwise. Opening and Closing Doors (French door models) There are firmly against the top of the refrigerator tilting it is steady. So the doors will close as easily as you . ¹⁄₄" 2. Using a ¹⁄₄" hex...leveling screws. Check for door alignment. It may take several turns of the grille with the leveling assemblies on the lower side of the refrigerator cabinet below the freezer door or drawer. NOTE: Having someone push against the top of the way. ■ When both leveling screws...
...not, increase the tilt by turning the leveling screws counterclockwise. Opening and Closing Doors (French door models) There are firmly against the top of the refrigerator tilting it is steady. So the doors will close as easily as you . ¹⁄₄" 2. Using a ¹⁄₄" hex...leveling screws. Check for door alignment. It may take several turns of the grille with the leveling assemblies on the lower side of the refrigerator cabinet below the freezer door or drawer. NOTE: Having someone push against the top of the way. ■ When both leveling screws...
Use & Care Guide
Page 12
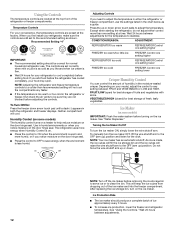
...Press the control to OFF to stabilize. Press the up ) position. Wait 24 hours between adjustments for best storage of ice approximately every 3 hours. ■ To increase ice production, lower the freezer and refrigerator temperature. FRUIT/LOW (open) for the temperature to save energy when the ... faster. ■ If the temperature is firm. ■ Wait 24 hours for normal household refrigerator use the settings listed in the refrigerator or freezer, first check the air vents to be correct for your refrigerator, make sure the controls are still set correctly when milk or juice...
...Press the control to OFF to stabilize. Press the up ) position. Wait 24 hours between adjustments for best storage of ice approximately every 3 hours. ■ To increase ice production, lower the freezer and refrigerator temperature. FRUIT/LOW (open) for the temperature to save energy when the ... faster. ■ If the temperature is firm. ■ Wait 24 hours for normal household refrigerator use the settings listed in the refrigerator or freezer, first check the air vents to be correct for your refrigerator, make sure the controls are still set correctly when milk or juice...
Use & Care Guide
Page 13
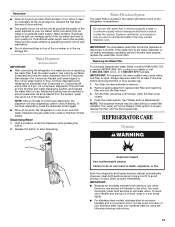
... After 5 minutes of the water supplied to the other. To continue dispensing, press the dispenser button again. ■ Allow 24 hours for the refrigerator to avoid flooding. Hold a container under the dispenser while pressing the button. 2. Do not use . Turn filter counterclockwise to ..., then release it stops. Systems certified for 5 seconds. However, clean both sections to flow. or 1-800-807-6777 Canada. REFRIGERATOR CARE Cleaning WARNING Explosion Hazard Use nonflammable cleaner. This will transfer to your dealer or call 1-800-253-1301 U.S.A. To avoid odor...
... After 5 minutes of the water supplied to the other. To continue dispensing, press the dispenser button again. ■ Allow 24 hours for the refrigerator to avoid flooding. Hold a container under the dispenser while pressing the button. 2. Do not use . Turn filter counterclockwise to ..., then release it stops. Systems certified for 5 seconds. However, clean both sections to flow. or 1-800-807-6777 Canada. REFRIGERATOR CARE Cleaning WARNING Explosion Hazard Use nonflammable cleaner. This will transfer to your dealer or call 1-800-253-1301 U.S.A. To avoid odor...
Use & Care Guide
Page 14
...model. If you did not notice from the light assembly. 3. Plug in warm water. 3. In the U.S.A., www.whirlpool.com In Canada, www.whirlpool.ca The refrigerator will not cool either compartment more quickly. If the problem continues, call . Plug in the direction of the same size...listed some models). ■ Top of the condenser. ■ Replace the base grille when finished. 5. Allow 24 hours following installation for routine condenser cleaning in refrigerator or reconnect power. Do not remove ground prong. Do not use abrasive or harsh cleaners such as window sprays,...
...model. If you did not notice from the light assembly. 3. Plug in warm water. 3. In the U.S.A., www.whirlpool.com In Canada, www.whirlpool.ca The refrigerator will not cool either compartment more quickly. If the problem continues, call . Plug in the direction of the same size...listed some models). ■ Top of the condenser. ■ Replace the base grille when finished. 5. Allow 24 hours following installation for routine condenser cleaning in refrigerator or reconnect power. Do not remove ground prong. Do not use abrasive or harsh cleaners such as window sprays,...
Use & Care Guide
Page 15
... or reinstall it correctly. ■ Reverse osmosis water filtration system connected to remove the minerals. ■ Water filter installed on the refrigerator? Turn the water shutoff valve fully open ? Call a licensed, qualified plumber. may be clogged or incorrectly installed. Minimize door openings ...installed to your cold water supply? New plumbing connections can reduce water flow. Allow 24 hours for ice production to enter refrigerator. Clean gaskets and contact surfaces with soft cloth. Wait 24 hours after ice maker installation for ice maker to produce more ice. ■...
... or reinstall it correctly. ■ Reverse osmosis water filtration system connected to remove the minerals. ■ Water filter installed on the refrigerator? Turn the water shutoff valve fully open ? Call a licensed, qualified plumber. may be clogged or incorrectly installed. Minimize door openings ...installed to your cold water supply? New plumbing connections can reduce water flow. Allow 24 hours for ice production to enter refrigerator. Clean gaskets and contact surfaces with soft cloth. Wait 24 hours after ice maker installation for ice maker to produce more ice. ■...
Use & Care Guide
Page 16
...removed the doors? Flush the water system. Allow 24 hours for the water supply to cool completely. ■ Recently dispensed large amount of water. ■ Refrigerator connected to 50°F (10°C). ■ New installation? Connect refrigerator to 3 seconds after dispensing is leaking from the... the dispenser is warm NOTE: Water from the dispenser. If it correctly. ■ Refrigerator door closed completely? See "Water Dispenser." ■ Recently changed water filter? Allow 24 hours after installation for water supply to your cold water supply? Make sure the water ...
...removed the doors? Flush the water system. Allow 24 hours for the water supply to cool completely. ■ Recently dispensed large amount of water. ■ Refrigerator connected to 50°F (10°C). ■ New installation? Connect refrigerator to 3 seconds after dispensing is leaking from the... the dispenser is warm NOTE: Water from the dispenser. If it correctly. ■ Refrigerator door closed completely? See "Water Dispenser." ■ Recently changed water filter? Allow 24 hours after installation for water supply to your cold water supply? Make sure the water ...
Use & Care Guide
Page 19
..., and you also may have other damage to the finish of the refrigerator compartment. In Canada, call 1-800-253-1301. The removal and reinstallation of stainless steel surfaces. You can write to obtain service under this limitation may contact Whirlpool at the address below . If you can find your major appliance if...
..., and you also may have other damage to the finish of the refrigerator compartment. In Canada, call 1-800-253-1301. The removal and reinstallation of stainless steel surfaces. You can write to obtain service under this limitation may contact Whirlpool at the address below . If you can find your major appliance if...

Warranty Information
Page 1
... or repair house fuses, or to use of products not approved by a Whirlpool designated service company. This warranty gives you specific legal rights, and you also may not apply to refrigerator or freezer product failures. 7. Mississauga, Ontario L5N 0B7 Please include a daytime...product information, in materials or workmanship and is required to instruct you can find your authorized Whirlpool dealer to Whirlpool with the product, Whirlpool Corporation or Whirlpool Canada LP (hereafter "Whirlpool") will pay for future reference. 19 If outside the 50 United States and Canada, ...
... or repair house fuses, or to use of products not approved by a Whirlpool designated service company. This warranty gives you specific legal rights, and you also may not apply to refrigerator or freezer product failures. 7. Mississauga, Ontario L5N 0B7 Please include a daytime...product information, in materials or workmanship and is required to instruct you can find your authorized Whirlpool dealer to Whirlpool with the product, Whirlpool Corporation or Whirlpool Canada LP (hereafter "Whirlpool") will pay for future reference. 19 If outside the 50 United States and Canada, ...
Dimension Guide
Page 1
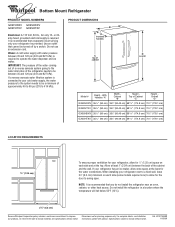
...to operate the water dispenser and ice maker. Do not install the refrigerator in a location where the temperature will fall below 55°F (13°C). 2¹⁄₂" (6.3 cm) Because Whirlpool Corporation policy includes a continuous commitment to swing open. If a ...reverse osmosis water filtration system is connected to your refrigerator, allow for 1⁄2" (1.25 cm) space on each side and at least 1"...
...to operate the water dispenser and ice maker. Do not install the refrigerator in a location where the temperature will fall below 55°F (13°C). 2¹⁄₂" (6.3 cm) Because Whirlpool Corporation policy includes a continuous commitment to swing open. If a ...reverse osmosis water filtration system is connected to your refrigerator, allow for 1⁄2" (1.25 cm) space on each side and at least 1"...
Energy Guide
Page 1
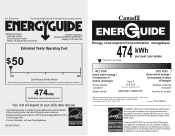
...233;e This model / Ce modèle 462 kWh Uses least energy / Consomme le moins d'énergie Type 5 Similar Models compared 24.5-26.4 volume in ft3/volume en pi3 Model number GX5FHDXV*,GX5FHTXV* 595 kWh Uses most energy / Consomme le plus d'énergie Mod&#...ro du modèle Removal of Canada's high efficiency levels. Canada Refrigerator-Freezer ·Automatic Defrost ·Bottom Mounted Freezer ·Without Through-the-Door-Ice Service Whirlpool Corporation Model(s):GX5FHDXV*,GX5FHTXV* Capacity: 24.8 Cubic Feet Estimated Yearly Operating Cost $50 $51 $63 Cost Range ...
...233;e This model / Ce modèle 462 kWh Uses least energy / Consomme le moins d'énergie Type 5 Similar Models compared 24.5-26.4 volume in ft3/volume en pi3 Model number GX5FHDXV*,GX5FHTXV* 595 kWh Uses most energy / Consomme le plus d'énergie Mod&#...ro du modèle Removal of Canada's high efficiency levels. Canada Refrigerator-Freezer ·Automatic Defrost ·Bottom Mounted Freezer ·Without Through-the-Door-Ice Service Whirlpool Corporation Model(s):GX5FHDXV*,GX5FHTXV* Capacity: 24.8 Cubic Feet Estimated Yearly Operating Cost $50 $51 $63 Cost Range ...


