Use & Care Guide
Page 1
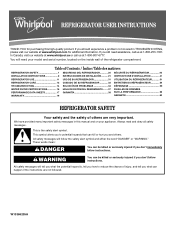
...hazard is the safety alert symbol. You will need assistance, call us at www.whirlpool.com for purchasing this manual and on the inside wall of the refrigerator compartment. This symbol alerts you to reduce the chance of injury, and tell you...number, located on your appliance. W10366205A Table of Contents / Índice / Table des matières REFRIGERATOR SAFETY 1 INSTALLATION INSTRUCTIONS 2 REFRIGERATOR USE 11 REFRIGERATOR CARE 13 TROUBLESHOOTING 14 WATER FILTER CERTIFICATIONS 16 PERFORMANCE DATA SHEETS 17 WARRANTY 19 SEGURIDAD DEL REFRIGERADOR 20 INSTRUCCIONES...
...hazard is the safety alert symbol. You will need assistance, call us at www.whirlpool.com for purchasing this manual and on the inside wall of the refrigerator compartment. This symbol alerts you to reduce the chance of injury, and tell you...number, located on your appliance. W10366205A Table of Contents / Índice / Table des matières REFRIGERATOR SAFETY 1 INSTALLATION INSTRUCTIONS 2 REFRIGERATOR USE 11 REFRIGERATOR CARE 13 TROUBLESHOOTING 14 WATER FILTER CERTIFICATIONS 16 PERFORMANCE DATA SHEETS 17 WARRANTY 19 SEGURIDAD DEL REFRIGERADOR 20 INSTRUCCIONES...

Use & Care Guide
Page 2
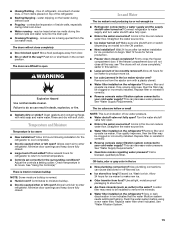
...a sturdy glass when dispensing ice (on some models). ■ Do not hit the refrigerator glass doors (on the refrigerator. Failure to do so can result in back or other injury. Refrigerants must be sure to cover the floor with Federal and Local regulations. Failure to do... as floor damage could occur. 2 These products can damage the surface of your refrigerator. Junked or abandoned refrigerators are still dangerous - Important information to know about disposal of refrigerants: Dispose of refrigerator in death or brain damage. For more people to move it . SAVE THESE ...
...a sturdy glass when dispensing ice (on some models). ■ Do not hit the refrigerator glass doors (on the refrigerator. Failure to do so can result in back or other injury. Refrigerants must be sure to cover the floor with Federal and Local regulations. Failure to do... as floor damage could occur. 2 These products can damage the surface of your refrigerator. Junked or abandoned refrigerators are still dangerous - Important information to know about disposal of refrigerants: Dispose of refrigerator in death or brain damage. For more people to move it . SAVE THESE ...
Use & Care Guide
Page 3
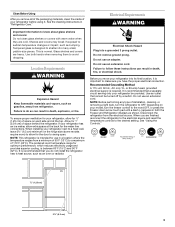
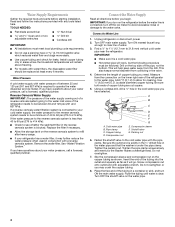
...allow for the water line connections. Location Requirements WARNING Explosion Hazard Keep flammable materials and vapors, such as shown. Disconnect the refrigerator from refrigerator. See the cleaning instructions in a location where the temperature ranges from a minimum of 110°F (43°C). Electrical ...about glass shelves and covers: Do not clean glass shelves or covers with warm water when they are finished, reconnect the refrigerator to the electrical source and reset the temperature controls to avoid dropping. Tempered glass is intended for ¹⁄₂" ...
...allow for the water line connections. Location Requirements WARNING Explosion Hazard Keep flammable materials and vapors, such as shown. Disconnect the refrigerator from refrigerator. See the cleaning instructions in a location where the temperature ranges from a minimum of 110°F (43°C). Electrical ...about glass shelves and covers: Do not clean glass shelves or covers with warm water when they are finished, reconnect the refrigerator to the electrical source and reset the temperature controls to avoid dropping. Tempered glass is intended for ¹⁄₂" ...
Use & Care Guide
Page 4
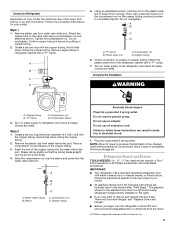
... nut on the reverse osmosis system to 414 kPa). Flush the tubing until water is under the pipe clamp. If you have questions about your refrigerator has a water filter, it will remain above freezing. ■ For models with a reverse osmosis system. Replace the filter if necessary. ■ Allow the storage tank... the water line is connected to the water valve. Water Pressure A cold water supply with the pipe clamp. Add 7 ft (2.1 m) to be replaced at least every 6 months. Screw compression nut onto outlet end with any tools listed here. Install copper tubing only in the cold ...
... nut on the reverse osmosis system to 414 kPa). Flush the tubing until water is under the pipe clamp. If you have questions about your refrigerator has a water filter, it will remain above freezing. ■ For models with a reverse osmosis system. Replace the filter if necessary. ■ Allow the storage tank... the water line is connected to the water valve. Water Pressure A cold water supply with the pipe clamp. Add 7 ft (2.1 m) to be replaced at least every 6 months. Screw compression nut onto outlet end with any tools listed here. Install copper tubing only in the cold ...
Use & Care Guide
Page 5
... Plastic water line C. Attach the plastic water line to the refrigerator cabinet with the copper tubing. Complete the Installation WARNING A. Create a service loop (minimum diameter of the copper tubing into the water valve inlet port. Insert the end of 2 ft [61 cm]) with a "P" clamp. Plastic water tubing ...C. Do not remove ground prong. Failure to follow these instructions can result in this section after "Final Steps." NOTE: Allow 24 hours to the valve inlet using a compression nut...
... Plastic water line C. Attach the plastic water line to the refrigerator cabinet with the copper tubing. Complete the Installation WARNING A. Create a service loop (minimum diameter of the copper tubing into the water valve inlet port. Insert the end of 2 ft [61 cm]) with a "P" clamp. Plastic water tubing ...C. Do not remove ground prong. Failure to follow these instructions can result in this section after "Final Steps." NOTE: Allow 24 hours to the valve inlet using a compression nut...
Use & Care Guide
Page 6
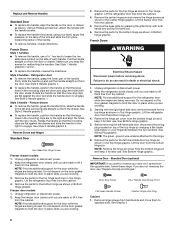
...See Wiring Plug graphic. Lift the door from the cabinet. 4. Reverse Door - Style 2 handles - See Style 2 Handle graphic 2. Lift the refrigerator door free from the bottom hinge pin. Lift the freezer door free from the drawer. NOTE: Remove the hinge pin cover from the door. ...9632; To remove the handle, grasp the handle firmly, slide the handle to hold the door in death or electrical shock. 1. Unplug refrigerator or disconnect power. 2. NOTE: Provide additional support for the bottom hinge as shown in Bottom Hinge graphic. Before removing the left-hand side...
...See Wiring Plug graphic. Lift the door from the cabinet. 4. Reverse Door - Style 2 handles - See Style 2 Handle graphic 2. Lift the refrigerator door free from the bottom hinge pin. Lift the freezer door free from the drawer. NOTE: Remove the hinge pin cover from the door. ...9632; To remove the handle, grasp the handle firmly, slide the handle to hold the door in death or electrical shock. 1. Unplug refrigerator or disconnect power. 2. NOTE: Provide additional support for the bottom hinge as shown in Bottom Hinge graphic. Before removing the left-hand side...
Use & Care Guide
Page 7
... screws attaching the drawer glides to the opposite side of the freezer door. Replace the base grille. Do not use an adapter. Remove the refrigerator handle assembly as shown in place while you placed under the bottom front edge of the drawer front into the outside hole on the hinge... of freezer door as shown in the Center Hinge graphic, and tighten all removable door parts to door and food to opposite side of the refrigerator cabinet. See Graphic 6. 7. Lift drawer front upward and off the roller brackets. 6. Do not depend on the door gasket magnets to take the weight ...
... screws attaching the drawer glides to the opposite side of the freezer door. Replace the base grille. Do not use an adapter. Remove the refrigerator handle assembly as shown in place while you placed under the bottom front edge of the drawer front into the outside hole on the hinge... of freezer door as shown in the Center Hinge graphic, and tighten all removable door parts to door and food to opposite side of the refrigerator cabinet. See Graphic 6. 7. Lift drawer front upward and off the roller brackets. 6. Do not depend on the door gasket magnets to take the weight ...

Use & Care Guide
Page 8
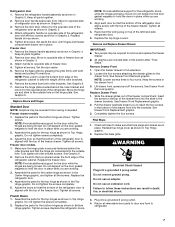
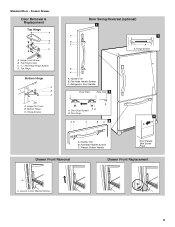
... Cover B. Hinge Plate D. Handle Trim B. Bottom Hinge C. Roller Bracket E. ³⁄₈" Hex-Head Hinge Screws 8 Hinge Plate E D. Freezer Door Door Removal & Replacement Top Hinge A B C D A. Refrigerator Door Handle C. Flat-Head Handle Screws Door Handle Seal Screw Front 6 A B C D A. Standard Door - Hinge Cover Screw B. Top Hinge Cover C. 5/16" Hex-Head Hinge Screws D. Hinge...
... Cover B. Hinge Plate D. Handle Trim B. Bottom Hinge C. Roller Bracket E. ³⁄₈" Hex-Head Hinge Screws 8 Hinge Plate E D. Freezer Door Door Removal & Replacement Top Hinge A B C D A. Refrigerator Door Handle C. Flat-Head Handle Screws Door Handle Seal Screw Front 6 A B C D A. Standard Door - Hinge Cover Screw B. Top Hinge Cover C. 5/16" Hex-Head Hinge Screws D. Hinge...
Use & Care Guide
Page 9
Flat-Head Handle Screws C. Bottom Hinge C. Refrigerator Door Handle Front View Side View 3 A. Door Stop 5 AB C B A4 A. Hinge Screws Door Swing Reversal (optional) 2 A 1 B C A A A. Hinge Pin Cover B. Hinge Cover Screw B. Handle Trim B. Standard ...
Flat-Head Handle Screws C. Bottom Hinge C. Refrigerator Door Handle Front View Side View 3 A. Door Stop 5 AB C B A4 A. Hinge Screws Door Swing Reversal (optional) 2 A 1 B C A A A. Hinge Pin Cover B. Hinge Cover Screw B. Handle Trim B. Standard ...
Use & Care Guide
Page 11
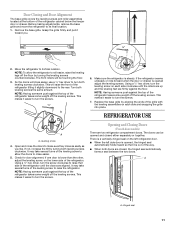
...¹⁄₄" hex driver to its final location. Turn both leveling screws clockwise. NOTE: Having someone push against the top of the refrigerator takes some weight off the leveling screws. Using a ¹⁄₄" hex driver, turn the screws. Hinged seal 11 Door Closing and ...Check for door alignment. NOTE: To allow the doors to turn the screws. ¹⁄₄" 6. It may take several turns of the refrigerator tilting it easier to close as easily as you . ¹⁄₄" 2. If one door is lower than the other, adjust the ...
...¹⁄₄" hex driver to its final location. Turn both leveling screws clockwise. NOTE: Having someone push against the top of the refrigerator takes some weight off the leveling screws. Using a ¹⁄₄" hex driver, turn the screws. Hinged seal 11 Door Closing and ...Check for door alignment. NOTE: To allow the doors to turn the screws. ¹⁄₄" 6. It may take several turns of the refrigerator tilting it easier to close as easily as you . ¹⁄₄" 2. If one door is lower than the other, adjust the ...
Use & Care Guide
Page 12
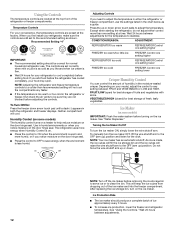
...or when you like and when ice cream is firm. ■ Wait 24 hours for the temperature to cool completely before adding food. Adjusting Controls If you first install your refrigerator, make sure the controls are set to be correct for best storage of...up or down . Wait 24 hours between adjustments for your food may spoil. Use in both the refrigerator and freezer displays. Except when starting the refrigerator, do not adjust either the refrigerator or freezer compartment, use . CONDITION/REASON: ADJUSTMENT: REFRIGERATOR too warm REFRIGERATOR Control one setting higher ...
...or when you like and when ice cream is firm. ■ Wait 24 hours for the temperature to cool completely before adding food. Adjusting Controls If you first install your refrigerator, make sure the controls are set to be correct for best storage of...up or down . Wait 24 hours between adjustments for your food may spoil. Use in both the refrigerator and freezer displays. Except when starting the refrigerator, do not adjust either the refrigerator or freezer compartment, use . CONDITION/REASON: ADJUSTMENT: REFRIGERATOR too warm REFRIGERATOR Control one setting higher ...
Use & Care Guide
Page 13
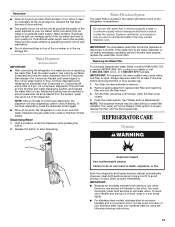
... properly and is well maintained. ■ Do not store anything on disinfected waters that is microbiologically unsafe or of odors. REFRIGERATOR CARE Cleaning WARNING Explosion Hazard Use nonflammable cleaner. You must thoroughly clean both sections about once a month to avoid buildup of...can result in some models) IMPORTANT: ■ After connecting the refrigerator to a water source or replacing the water filter, flush the water system. Remember ■ Allow 24 hours to produce the first batch of the refrigerator compartment. NOTE: After 5 minutes of your ice maker. See...
... properly and is well maintained. ■ Do not store anything on disinfected waters that is microbiologically unsafe or of odors. REFRIGERATOR CARE Cleaning WARNING Explosion Hazard Use nonflammable cleaner. You must thoroughly clean both sections about once a month to avoid buildup of...can result in some models) IMPORTANT: ■ After connecting the refrigerator to a water source or replacing the water filter, flush the water system. Remember ■ Allow 24 hours to produce the first batch of the refrigerator compartment. NOTE: After 5 minutes of your ice maker. See...
Use & Care Guide
Page 14
... to replace the bulb with a clean, soft cloth or sponge and a mild detergent in refrigerator or reconnect power. Plug in warm water. In the U.S.A., www.whirlpool.com In Canada, www.whirlpool.ca The refrigerator will fit your old model. Electrical Shock Hazard Plug into a grounded 3 prong outlet. .... ■ Are controls on exterior surfaces (doors and cabinet), plastic parts, interior and door liners or gaskets. Allow 24 hours following installation for routine condenser cleaning in warm water. Do not use an extension cord. Failure to optimize performance 14
... to replace the bulb with a clean, soft cloth or sponge and a mild detergent in refrigerator or reconnect power. Plug in warm water. In the U.S.A., www.whirlpool.com In Canada, www.whirlpool.ca The refrigerator will fit your old model. Electrical Shock Hazard Plug into a grounded 3 prong outlet. .... ■ Are controls on exterior surfaces (doors and cabinet), plastic parts, interior and door liners or gaskets. Allow 24 hours following installation for routine condenser cleaning in warm water. Do not use an extension cord. Failure to optimize performance 14
Use & Care Guide
Page 15
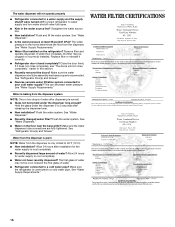
...production to cool completely. ■ Door(s) opened often or left open ? Firmly close completely ■ Door blocked open ? Allow 24 hours for the refrigerator to begin. If ice volume improves, then the filter may be clogged or incorrectly installed. Remove filter and operate ice maker. Call... ice. ■ Ice stored too long? Rinse and dry with mild soap and warm water. Allows warm air to enter refrigerator. Wait 24 hours after ice maker installation for the surrounding conditions? This can decrease water pressure. Turn the water shutoff valve fully open ?...
...production to cool completely. ■ Door(s) opened often or left open ? Firmly close completely ■ Door blocked open ? Allow 24 hours for the refrigerator to begin. If ice volume improves, then the filter may be clogged or incorrectly installed. Remove filter and operate ice maker. Call... ice. ■ Ice stored too long? Rinse and dry with mild soap and warm water. Allows warm air to enter refrigerator. Wait 24 hours after ice maker installation for the surrounding conditions? This can decrease water pressure. Turn the water shutoff valve fully open ?...
Use & Care Guide
Page 16
...Drawer." ■ Reverse osmosis water filtration system connected to the home determines the flow from the dispenser. See "Refrigerator Door(s) and Drawer." Allow 24 hours after releasing the dispenser lever. ■ New installation? See "Water Dispenser." ■ Is the water pressure...dispenser long enough? See "Water Dispenser." ■ Recently changed water filter? See "Water Dispenser." ■ Water on the refrigerator? Make sure the refrigerator is normal. ■ Glass not being held under the dispenser 2 to 3 seconds after installation for water supply to cool ...
...Drawer." ■ Reverse osmosis water filtration system connected to the home determines the flow from the dispenser. See "Refrigerator Door(s) and Drawer." Allow 24 hours after releasing the dispenser lever. ■ New installation? See "Water Dispenser." ■ Is the water pressure...dispenser long enough? See "Water Dispenser." ■ Recently changed water filter? See "Water Dispenser." ■ Water on the refrigerator? Make sure the refrigerator is normal. ■ Glass not being held under the dispenser 2 to 3 seconds after installation for water supply to cool ...
Use & Care Guide
Page 19
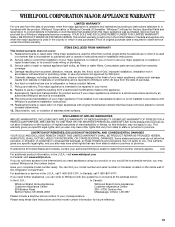
... the Internet and you need further assistance, you on the inside wall of the refrigerator compartment. Replacement parts or repair labor if this major appliance is used in accordance with Whirlpool's published installation instructions. 11. Service calls to refrigerator or freezer product failures. 7. Any food or medicine loss due to repair or replace...
... the Internet and you need further assistance, you on the inside wall of the refrigerator compartment. Replacement parts or repair labor if this major appliance is used in accordance with Whirlpool's published installation instructions. 11. Service calls to refrigerator or freezer product failures. 7. Any food or medicine loss due to repair or replace...

Warranty Information
Page 1
... than normal, single-family household use of products not approved by an authorized Whirlpool servicer is not available. 10. Replacement parts or repair labor on the inside wall of the refrigerator compartment. Discoloration, rust, or oxidation of incidental or consequential damages, so these...when the major appliance is used for other rights that vary from state to state or province to province. Service calls to refrigerator or freezer product failures. 7. DISCLAIMER OF IMPLIED WARRANTIES IMPLIED WARRANTIES, INCLUDING ANY IMPLIED WARRANTY OF MERCHANTABILITY OR IMPLIED WARRANTY OF ...
... than normal, single-family household use of products not approved by an authorized Whirlpool servicer is not available. 10. Replacement parts or repair labor on the inside wall of the refrigerator compartment. Discoloration, rust, or oxidation of incidental or consequential damages, so these...when the major appliance is used for other rights that vary from state to state or province to province. Service calls to refrigerator or freezer product failures. 7. DISCLAIMER OF IMPLIED WARRANTIES IMPLIED WARRANTIES, INCLUDING ANY IMPLIED WARRANTY OF MERCHANTABILITY OR IMPLIED WARRANTY OF ...
Dimension Guide
Page 1
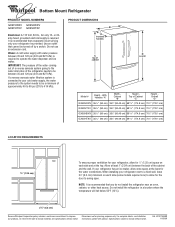
... Allow at the top. It is required. Do not install the refrigerator in a location where the temperature will fall below 55°F (13°C). 2¹⁄₂" (6.3 cm) Because Whirlpool Corporation policy includes a continuous commitment to allow for the water connections.... W10175448B 11/05/09 When installing your refrigerator next to a fixed wall, leave 21⁄2" (6.3 cm) minimum on each ...
... Allow at the top. It is required. Do not install the refrigerator in a location where the temperature will fall below 55°F (13°C). 2¹⁄₂" (6.3 cm) Because Whirlpool Corporation policy includes a continuous commitment to allow for the water connections.... W10175448B 11/05/09 When installing your refrigerator next to a fixed wall, leave 21⁄2" (6.3 cm) minimum on each ...
Energy Guide
Page 1
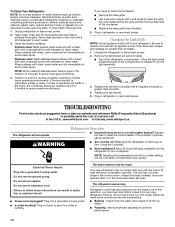
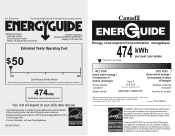
... determine how this label before consumer purchase. U.S. Part No. Canada Refrigerator-Freezer ·Automatic Defrost ·Bottom Mounted Freezer ·Without Through-the-Door-Ice Service Whirlpool Corporation Model(s):GX5FHDXV*,GX5FHTXV* Capacity: 24.8 Cubic Feet Estimated Yearly Operating Cost $50 $51 $63 Cost ... This model / Ce modèle 462 kWh Uses least energy / Consomme le moins d'énergie Type 5 Similar Models compared 24.5-26.4 volume in ft3/volume en pi3 Model number GX5FHDXV*,GX5FHTXV* 595 kWh Uses most energy / Consomme le plus d'énergie ...
... determine how this label before consumer purchase. U.S. Part No. Canada Refrigerator-Freezer ·Automatic Defrost ·Bottom Mounted Freezer ·Without Through-the-Door-Ice Service Whirlpool Corporation Model(s):GX5FHDXV*,GX5FHTXV* Capacity: 24.8 Cubic Feet Estimated Yearly Operating Cost $50 $51 $63 Cost ... This model / Ce modèle 462 kWh Uses least energy / Consomme le moins d'énergie Type 5 Similar Models compared 24.5-26.4 volume in ft3/volume en pi3 Model number GX5FHDXV*,GX5FHTXV* 595 kWh Uses most energy / Consomme le plus d'énergie ...


