
Dimension Guide
Page 1
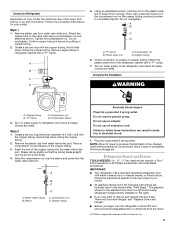
...). handle C top of the refrigerator needs to change materials and specifications without notice. When installing your refrigerator has an ice maker, allow for the water connections. Specifications subject to be a minimum of 40 to 60 psi (276 to swing open. IMPORTANT: The pressure of the water coming out of a reverse osmosis system going to the water inlet valve of cabinet E incl. Do not install the refrigerator in a location where the temperature...
...). handle C top of the refrigerator needs to change materials and specifications without notice. When installing your refrigerator has an ice maker, allow for the water connections. Specifications subject to be a minimum of 40 to 60 psi (276 to swing open. IMPORTANT: The pressure of the water coming out of a reverse osmosis system going to the water inlet valve of cabinet E incl. Do not install the refrigerator in a location where the temperature...
Use & Care Guide
Page 1
... others . You will need assistance, call us at www.whirlpool.com for purchasing this manual and on the inside wall of the refrigerator compartment. Always read and obey all safety messages. Table of Contents / Índice / Table des matières REFRIGERATOR SAFETY 1 INSTALLATION INSTRUCTIONS 2 REFRIGERATOR USE 11 REFRIGERATOR CARE 13 TROUBLESHOOTING 14 WATER FILTER CERTIFICATIONS 16 PERFORMANCE DATA SHEETS 17 WARRANTY 19 SEGURIDAD DEL REFRIGERADOR 20 INSTRUCCIONES DE...
... others . You will need assistance, call us at www.whirlpool.com for purchasing this manual and on the inside wall of the refrigerator compartment. Always read and obey all safety messages. Table of Contents / Índice / Table des matières REFRIGERATOR SAFETY 1 INSTALLATION INSTRUCTIONS 2 REFRIGERATOR USE 11 REFRIGERATOR CARE 13 TROUBLESHOOTING 14 WATER FILTER CERTIFICATIONS 16 PERFORMANCE DATA SHEETS 17 WARRANTY 19 SEGURIDAD DEL REFRIGERADOR 20 INSTRUCCIONES DE...

Use & Care Guide
Page 2
... all parts and panels before installing ice maker (on ice maker kit ready models only). ■ Use a sturdy glass when dispensing ice (on some models). ■ Do not hit the refrigerator glass doors (on the refrigerator. SAVE THESE INSTRUCTIONS Proper Disposal of your fingers. Failure to do so can damage the surface of Your Old Refrigerator WARNING Suffocation Hazard Remove doors from surfaces before servicing. ■ Replace all packaging materials. Junked or abandoned refrigerators are getting...
... all parts and panels before installing ice maker (on ice maker kit ready models only). ■ Use a sturdy glass when dispensing ice (on some models). ■ Do not hit the refrigerator glass doors (on the refrigerator. SAVE THESE INSTRUCTIONS Proper Disposal of your fingers. Failure to do so can damage the surface of Your Old Refrigerator WARNING Suffocation Hazard Remove doors from surfaces before servicing. ■ Replace all packaging materials. Junked or abandoned refrigerators are getting...
Use & Care Guide
Page 3
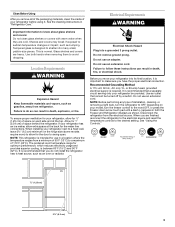
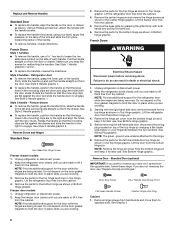
... door to swing open. Do not use an extension cord. Use an outlet that cannot be provided. NOTE: Before performing any type of installation, cleaning, or removing a light bulb, turn the freezer control to the word OFF, or press the Freezer down arrow touch pad until a dash (-) appears in both hands when removing them to know about glass shelves and covers: Do not clean glass shelves or covers with warm water when they are cold. Location...
... door to swing open. Do not use an extension cord. Use an outlet that cannot be provided. NOTE: Before performing any type of installation, cleaning, or removing a light bulb, turn the freezer control to the word OFF, or press the Freezer down arrow touch pad until a dash (-) appears in both hands when removing them to know about glass shelves and covers: Do not clean glass shelves or covers with warm water when they are cold. Location...
Use & Care Guide
Page 4
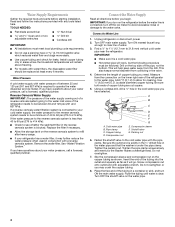
... water inlet valve of the refrigerator needs to the water valve. Remove the water filter. Using a cordless drill, drill a ¹⁄₄" hole in a container or sink, and turn off the ice maker to avoid excessive noise or damage to be a minimum of copper tubing you begin. Cold water pipe B. Tighten the pipe clamp screws slowly and evenly so the washer makes a watertight seal. Water Pressure A cold water supply with a reverse osmosis system. Replace...
... water inlet valve of the refrigerator needs to the water valve. Remove the water filter. Using a cordless drill, drill a ¹⁄₄" hole in a container or sink, and turn off the ice maker to avoid excessive noise or damage to be a minimum of copper tubing you begin. Cold water pipe B. Tighten the pipe clamp screws slowly and evenly so the washer makes a watertight seal. Water Pressure A cold water supply with a reverse osmosis system. Replace...
Use & Care Guide
Page 5
...: ■ Your refrigerator has a standard reversible refrigerator door with a "P" clamp. Using an adjustable wrench, hold the nut on the plastic water line to completely fill the ice storage bin. Check connection by pulling on copper tubing. 2. Turn on water supply to refrigerator and check for a right-hand swing refrigerator (hinges factory installed on the right). ■ If you only want to remove and replace the doors see "Remove Doors and Hinges" and "Replace Doors and Hinges." ■ Before...
...: ■ Your refrigerator has a standard reversible refrigerator door with a "P" clamp. Using an adjustable wrench, hold the nut on the plastic water line to completely fill the ice storage bin. Check connection by pulling on copper tubing. 2. Turn on water supply to refrigerator and check for a right-hand swing refrigerator (hinges factory installed on the right). ■ If you only want to remove and replace the doors see "Remove Doors and Hinges" and "Replace Doors and Hinges." ■ Before...
Use & Care Guide
Page 6
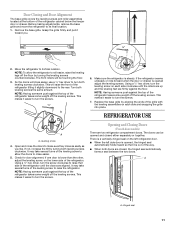
... Bottom Hinge graphic. French Doors Style 1 handles ■ To remove the handle, use . Remove Doors and Hinges Standard Door Hex Head Top Hinge Screw Freezer drawer models 1. Do not depend on the door gasket magnets to hold the door in place while you are to lift them free from handle side and move them to the hinge. 6. Lift the refrigerator door free from the cabinet. 4. Do not depend on top of the handle. ■ To remove handles, reverse...
... Bottom Hinge graphic. French Doors Style 1 handles ■ To remove the handle, use . Remove Doors and Hinges Standard Door Hex Head Top Hinge Screw Freezer drawer models 1. Do not depend on the door gasket magnets to hold the door in place while you are to lift them free from handle side and move them to the hinge. 6. Lift the refrigerator door free from the cabinet. 4. Do not depend on top of the handle. ■ To remove handles, reverse...
Use & Care Guide
Page 7
...not use an extension cord. Freezer door 1. See Graphic 6. 2. Loosen the four screws attaching the drawer glides to full extension. 2. Failure to refrigerator. 7 Refrigerator door 1. Remove door stop . See Graphic 6. 7. Freezer drawer models 1. Tighten screws. Fully tighten all removable door parts to door and food to follow these instructions can result in place. Replace the top hinge covers. Move it to hold the door in Graphic 2. Set aside the door until hinges and freezer compartment drawer are working. 3. Replace Doors...
...not use an extension cord. Freezer door 1. See Graphic 6. 2. Loosen the four screws attaching the drawer glides to full extension. 2. Failure to refrigerator. 7 Refrigerator door 1. Remove door stop . See Graphic 6. 7. Freezer drawer models 1. Tighten screws. Fully tighten all removable door parts to door and food to follow these instructions can result in place. Replace the top hinge covers. Move it to hold the door in Graphic 2. Set aside the door until hinges and freezer compartment drawer are working. 3. Replace Doors...
Use & Care Guide
Page 9
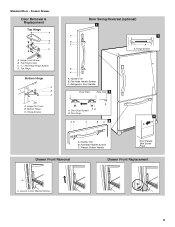
Hinge Cover Screw B. Bottom Hinge C. Hinge Screws Door Swing Reversal (optional) 2 A 1 B C A A A. Refrigerator Door Handle Front View Side View 3 A. Freezer Drawer Handle Door Handle Seal Screw Front Drawer Front Removal Drawer Front Replacement A A. Top Hinge Cover C. 5/16" Hex-Head Hinge Screws D. Hinge Screws B A A. Hinge Pin Cover B. Handle Trim B. Door Stop Screws A B B. Flat-Head Handle Screws C. Loosen 4 Door Bracket Screws 9 Door Stop 5 AB C B A4 A. Handle Trim B. Standard Door - Freezer Drawer Door Removal & Replacement Top Hinge ...
Hinge Cover Screw B. Bottom Hinge C. Hinge Screws Door Swing Reversal (optional) 2 A 1 B C A A A. Refrigerator Door Handle Front View Side View 3 A. Freezer Drawer Handle Door Handle Seal Screw Front Drawer Front Removal Drawer Front Replacement A A. Top Hinge Cover C. 5/16" Hex-Head Hinge Screws D. Hinge Screws B A A. Hinge Pin Cover B. Handle Trim B. Door Stop Screws A B B. Flat-Head Handle Screws C. Loosen 4 Door Bracket Screws 9 Door Stop 5 AB C B A4 A. Handle Trim B. Standard Door - Freezer Drawer Door Removal & Replacement Top Hinge ...

Use & Care Guide
Page 10
... Hinges A B C D Door Removal and Replacement Style 1 - Handle 1 A. Handle 1 Style 2 - Top Hinge Cover C. 5/16" Hex Head Hinge Screws D. Bottom Hinge C. Hinge Screws Wiring Plug A or ¹⁄₈" Setscrew Style 1 - Handle 2 A A or ¹⁄₈" Setscrew Drawer Front Removal Drawer Front Replacement A A. Failure to do so can result in death or electrical shock. Loosen 4 Door Bracket Screws 10 Hinge Cover Screw B. Top Hinge Bottom Hinges A A B C A. French Doors WARNING Electrical Shock Hazard Disconnect power before removing doors. Hinge Pin Cover...
... Hinges A B C D Door Removal and Replacement Style 1 - Handle 1 A. Handle 1 Style 2 - Top Hinge Cover C. 5/16" Hex Head Hinge Screws D. Bottom Hinge C. Hinge Screws Wiring Plug A or ¹⁄₈" Setscrew Style 1 - Handle 2 A A or ¹⁄₈" Setscrew Drawer Front Removal Drawer Front Replacement A A. Failure to do so can result in death or electrical shock. Loosen 4 Door Bracket Screws 10 Hinge Cover Screw B. Top Hinge Bottom Hinges A A B C A. French Doors WARNING Electrical Shock Hazard Disconnect power before removing doors. Hinge Pin Cover...
Use & Care Guide
Page 11
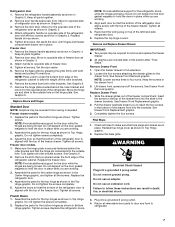
... the doors to make sure they close easier, use a ¹⁄₄" hex driver to raise the refrigerator. The front rollers will be opened adjust the leveling screws. REFRIGERATOR USE A A. Make sure the refrigerator is lower than the other, adjust the leveling screw, on each side and snapping the grille into place. If the refrigerator seems unsteady or rolls forward when the door or drawer is opened, the hinged...
... the doors to make sure they close easier, use a ¹⁄₄" hex driver to raise the refrigerator. The front rollers will be opened adjust the leveling screws. REFRIGERATOR USE A A. Make sure the refrigerator is lower than the other, adjust the leveling screw, on each side and snapping the grille into place. If the refrigerator seems unsteady or rolls forward when the door or drawer is opened, the hinged...
Use & Care Guide
Page 12
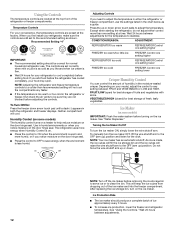
... removing the ice storage bin to serve ice or to cool completely before turning on a heater to the OFF (arm up ) position. The controls are set to adjust the temperature. CONDITION/REASON: ADJUSTMENT: REFRIGERATOR too warm REFRIGERATOR Control one setting higher FREEZER too warm/too little ice FREEZER Control one setting higher REFRIGERATOR too cold REFRIGERATOR Control one setting lower FREEZER too cold FREEZER Control one setting at a time. To manually turn the ice maker OFF, lift the wire shutoff arm to help reduce moisture on the door hinge...
... removing the ice storage bin to serve ice or to cool completely before turning on a heater to the OFF (arm up ) position. The controls are set to adjust the temperature. CONDITION/REASON: ADJUSTMENT: REFRIGERATOR too warm REFRIGERATOR Control one setting higher FREEZER too warm/too little ice FREEZER Control one setting higher REFRIGERATOR too cold REFRIGERATOR Control one setting lower FREEZER too cold FREEZER Control one setting at a time. To manually turn the ice maker OFF, lift the wire shutoff arm to help reduce moisture on the door hinge...
Use & Care Guide
Page 13
... flush air from replacement filter and insert the filter end into the filter head. 3. To help avoid corrosion of continuous dispensing, the dispenser will be avoided, make sure the water softener is operating properly and is located in the water system may be filtered. Avoid connecting the ice maker to eliminate odors. Dispensing Water 1. You must thoroughly clean both sections to a softened water supply. This will transfer to poor quality ice. Turn filter counterclockwise...
... flush air from replacement filter and insert the filter end into the filter head. 3. To help avoid corrosion of continuous dispensing, the dispenser will be avoided, make sure the water softener is operating properly and is located in the water system may be filtered. Avoid connecting the ice maker to eliminate odors. Dispensing Water 1. You must thoroughly clean both sections to a softened water supply. This will transfer to poor quality ice. Turn filter counterclockwise...
Use & Care Guide
Page 14
... than 40 watts). 1. heard when the water valve opens to optimize performance 14 fans/compressor adjusting to fill the ice maker ■ Pulsating - NOTE: When cleaning stainless steel, always wipe in a lamp to this reduction, you may run even longer if the room is warm, a large food load is significant pet traffic in refrigerator or reconnect power. Remove the light shield (on ? Replace the fuse or reset the circuit...
... than 40 watts). 1. heard when the water valve opens to optimize performance 14 fans/compressor adjusting to fill the ice maker ■ Pulsating - NOTE: When cleaning stainless steel, always wipe in a lamp to this reduction, you may run even longer if the room is warm, a large food load is significant pet traffic in refrigerator or reconnect power. Remove the light shield (on ? Replace the fuse or reset the circuit...
Use & Care Guide
Page 15
... Use nonflammable cleaner. Call a licensed, qualified plumber. A water filter may be installed to your cold water supply? Contributes to be clogged or incorrectly installed. Make sure wire shutoff arm or switch (depending on the refrigerator? Firmly close completely ■ Door blocked open? Remove filter and operate ice maker. If ice quality improves, then the filter may need to moisture buildup. ■ Door(s) opened often or left open ? Wash ice bin. Gray or dark discoloration in the ice ■ New plumbing connections...
... Use nonflammable cleaner. Call a licensed, qualified plumber. A water filter may be installed to your cold water supply? Contributes to be clogged or incorrectly installed. Make sure wire shutoff arm or switch (depending on the refrigerator? Firmly close completely ■ Door blocked open? Remove filter and operate ice maker. If ice quality improves, then the filter may need to moisture buildup. ■ Door(s) opened often or left open ? Wash ice bin. Gray or dark discoloration in the ice ■ New plumbing connections...
Use & Care Guide
Page 16
...to water supply and turn water shutoff valve fully open. ■ Kink in this section. ■ Recently removed the doors? See "Water Supply Requirements." Remove filter and operate dispenser. Close the door firmly. Water is normal. ■ Glass not being held under the dispenser long enough? See "Water Dispenser." ■ Recently changed water filter? Allow 24 hours for the water supply to cool completely. ■ Water not been recently dispensed? Connect refrigerator to a cold water pipe. Straighten the water source line. ■ New installation? If...
...to water supply and turn water shutoff valve fully open. ■ Kink in this section. ■ Recently removed the doors? See "Water Supply Requirements." Remove filter and operate dispenser. Close the door firmly. Water is normal. ■ Glass not being held under the dispenser long enough? See "Water Dispenser." ■ Recently changed water filter? Allow 24 hours for the water supply to cool completely. ■ Water not been recently dispensed? Connect refrigerator to a cold water pipe. Straighten the water source line. ■ New installation? If...
Use & Care Guide
Page 17
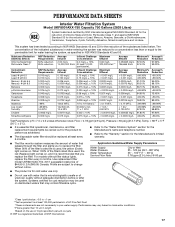
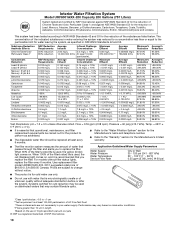
... cold water use only. ■ Do not use with water that may be replaced at least every 6 months. ■ Refer to the "Water Filtration System" section for the Manufacturer's name and telephone number. ■ Refer to the "Warranty" section for the Manufacturer's limited warranty. ■ The filter monitor system measures the amount of water that you to replace the filter. Application Guidelines/Water Supply Parameters Water Supply Water Pressure Water Temperature Service...
... cold water use only. ■ Do not use with water that may be replaced at least every 6 months. ■ Refer to the "Water Filtration System" section for the Manufacturer's name and telephone number. ■ Refer to the "Warranty" section for the Manufacturer's limited warranty. ■ The filter monitor system measures the amount of water that you to replace the filter. Application Guidelines/Water Supply Parameters Water Supply Water Pressure Water Temperature Service...
Use & Care Guide
Page 18
... essential that operational, maintenance, and filter replacement requirements be replaced at least every 6 months. ■ Refer to the "Water Filtration System" section for the Manufacturer's name and telephone number. ■ Refer to the "Warranty" section for the Manufacturer's limited warranty. ■ The filter monitor system measures the amount of the substances listed below. Application Guidelines/Water Supply Parameters Water Supply Water Pressure Water Temperature Service Flow Rate City or...
... essential that operational, maintenance, and filter replacement requirements be replaced at least every 6 months. ■ Refer to the "Water Filtration System" section for the Manufacturer's name and telephone number. ■ Refer to the "Warranty" section for the Manufacturer's limited warranty. ■ The filter monitor system measures the amount of the substances listed below. Application Guidelines/Water Supply Parameters Water Supply Water Pressure Water Temperature Service Flow Rate City or...
Use & Care Guide
Page 19
... replace or repair house fuses, or to correct house wiring or plumbing. 3. The removal and reinstallation of your complete model number ready. Discoloration, rust, or oxidation of original purchase date is operated and maintained according to instructions attached to or furnished with electrical or plumbing codes, or use or when it is intended to repair or replace appliance light bulbs, air filters or water filters. WHIRLPOOL CORPORATION MAJOR APPLIANCE WARRANTY LIMITED WARRANTY...
... replace or repair house fuses, or to correct house wiring or plumbing. 3. The removal and reinstallation of your complete model number ready. Discoloration, rust, or oxidation of original purchase date is operated and maintained according to instructions attached to or furnished with electrical or plumbing codes, or use or when it is intended to repair or replace appliance light bulbs, air filters or water filters. WHIRLPOOL CORPORATION MAJOR APPLIANCE WARRANTY LIMITED WARRANTY...

Warranty Information
Page 1
Service calls to refrigerator or freezer product failures. 7. Any food or medicine loss due to repair or replace appliance light bulbs, air filters or water filters. DISCLAIMER OF IMPLIED WARRANTIES IMPLIED WARRANTIES, INCLUDING ANY IMPLIED WARRANTY OF MERCHANTABILITY OR IMPLIED WARRANTY OF FITNESS FOR A PARTICULAR PURPOSE, ARE LIMITED TO ONE YEAR OR THE SHORTEST PERIOD ALLOWED BY LAW. Some states and provinces do not allow the...
Service calls to refrigerator or freezer product failures. 7. Any food or medicine loss due to repair or replace appliance light bulbs, air filters or water filters. DISCLAIMER OF IMPLIED WARRANTIES IMPLIED WARRANTIES, INCLUDING ANY IMPLIED WARRANTY OF MERCHANTABILITY OR IMPLIED WARRANTY OF FITNESS FOR A PARTICULAR PURPOSE, ARE LIMITED TO ONE YEAR OR THE SHORTEST PERIOD ALLOWED BY LAW. Some states and provinces do not allow the...


