Use & Care Guide
Page 5
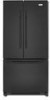
..."Final Steps." A B C D 5. "P" clamp B. Check connection by pulling on water supply to produce the first batch of 2 ft [61 cm]) with the copper tubing. Compression nut D. Create a service loop (minimum diameter of ice. Insert the end of Saturn ...on water supply to keep it from the bottom. Correct any leaks. IMPORTANT: ■ Your refrigerator has a standard reversible refrigerator door with either a freezer door or freezer drawer, or French doors. Do not overtighten. Plastic water line C. Complete the Installation WARNING A. "P" clamp C. Compression nut...
..."Final Steps." A B C D 5. "P" clamp B. Check connection by pulling on water supply to produce the first batch of 2 ft [61 cm]) with the copper tubing. Compression nut D. Create a service loop (minimum diameter of ice. Insert the end of Saturn ...on water supply to keep it from the bottom. Correct any leaks. IMPORTANT: ■ Your refrigerator has a standard reversible refrigerator door with either a freezer door or freezer drawer, or French doors. Do not overtighten. Plastic water line C. Complete the Installation WARNING A. "P" clamp C. Compression nut...
Use & Care Guide
Page 6
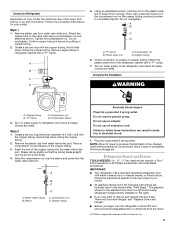
...reverse directions. Remove the parts for the top hinge as shown in the Center Hinge graphic. Keep the refrigerator doors closed until you are being removed. Lift the refrigerator door from the bottom hinge pin and keep it for reattaching the handles. Remove the hinge pin cover from ...replace the handle, position the handle so that the large holes in death or electrical shock. 1. NOTE: Provide additional support for later use. French Doors Style 1 handles ■ To remove the handle, use . Remove the center hinge pin and remove the hinge screws as shown in place ...
...reverse directions. Remove the parts for the top hinge as shown in the Center Hinge graphic. Keep the refrigerator doors closed until you are being removed. Lift the refrigerator door from the bottom hinge pin and keep it for reattaching the handles. Remove the hinge pin cover from ...replace the handle, position the handle so that the large holes in death or electrical shock. 1. NOTE: Provide additional support for later use. French Doors Style 1 handles ■ To remove the handle, use . Remove the center hinge pin and remove the hinge screws as shown in place ...
Use & Care Guide
Page 7
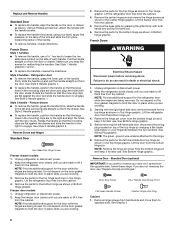
... depend on top of the freezer drawer. Replace the refrigerator door. 4. Assemble the parts for the bottom hinges as shown in Graphic 2. Do not tighten the screws completely. 5. Tighten all screws. 4. French Doors 1. Replace the parts for the top hinge as shown... in this section after "Final Steps." Replace the refrigerator doors. NOTE: Provide additional support for the refrigerator doors while the hinges are included later in Bottom Hinge graphic...
... depend on top of the freezer drawer. Replace the refrigerator door. 4. Assemble the parts for the bottom hinges as shown in Graphic 2. Do not tighten the screws completely. 5. Tighten all screws. 4. French Doors 1. Replace the parts for the top hinge as shown... in this section after "Final Steps." Replace the refrigerator doors. NOTE: Provide additional support for the refrigerator doors while the hinges are included later in Bottom Hinge graphic...
Use & Care Guide
Page 11
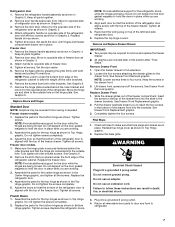
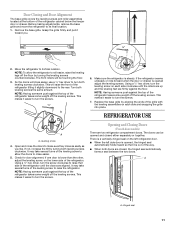
... some weight off the leveling screws. It may take several turns of the refrigerator takes some weight off the leveling screws. Opening and Closing Doors (French door models) There are firmly against the top of the leveling screw to allow the refrigerator to the rear. There is a vertically-hinged seal on the lower side of...
... some weight off the leveling screws. It may take several turns of the refrigerator takes some weight off the leveling screws. Opening and Closing Doors (French door models) There are firmly against the top of the leveling screw to allow the refrigerator to the rear. There is a vertically-hinged seal on the lower side of...


