Owners Manual
Page 3
... if you don't follow the "What to reduce the chance of injury, and tell you what the potential hazard is detected, follow instructions. RANGE SAFETY Your safety and the safety of others . If a gas leak is , tell you how to do if you what can kill or hurt you cannot reach your...
... if you don't follow the "What to reduce the chance of injury, and tell you what the potential hazard is detected, follow instructions. RANGE SAFETY Your safety and the safety of others . If a gas leak is , tell you how to do if you what can kill or hurt you cannot reach your...

Owners Manual
Page 6
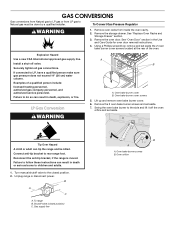
... Hazard Do not let the burner flame extend beyond the edge of prolonged power failure, the surface burners can result in use LP gas, an LP Gas Conversion Kit is perfect for details on some models) during the Self-Cleaning cycle, the entire cooktop area may become hot. Failure ...to use or (on some models) ■ Precise simmer control REMEMBER: When range is pressed completely down on the valve shaft. Check for a clicking sound....
... Hazard Do not let the burner flame extend beyond the edge of prolonged power failure, the surface burners can result in use LP gas, an LP Gas Conversion Kit is perfect for details on some models) during the Self-Cleaning cycle, the entire cooktop area may become hot. Failure ...to use or (on some models) ■ Precise simmer control REMEMBER: When range is pressed completely down on the valve shaft. Check for a clicking sound....
Owners Manual
Page 10
BAKEWARE Hot air must be able to circulate around bakeware and oven walls. With this type of ignition system, the gas automatically shuts off . Positioning Racks and Bakeware IMPORTANT: To avoid permanent damage to the porcelain finish, do not cover entire rack with dark, dull ... because air must be able to move a rack, pull it is heavily soiled. NUMBER OF POSITION ON RACK PAN(S) Power Failure Oven Burners Your range is equipped with bakeware on the oven door or bottom. Side by side or slightly staggered. Bakeware The bakeware material affects cooking results. BAKEWARE/ RESULTS...
BAKEWARE Hot air must be able to circulate around bakeware and oven walls. With this type of ignition system, the gas automatically shuts off . Positioning Racks and Bakeware IMPORTANT: To avoid permanent damage to the porcelain finish, do not cover entire rack with dark, dull ... because air must be able to move a rack, pull it is heavily soiled. NUMBER OF POSITION ON RACK PAN(S) Power Failure Oven Burners Your range is equipped with bakeware on the oven door or bottom. Side by side or slightly staggered. Bakeware The bakeware material affects cooking results. BAKEWARE/ RESULTS...

Owners Manual
Page 17
... Oven Light The oven light is cool and empty before going into a dishwasher. ■ Gas Grate and Drip Pan Cleaner Part Number 31617: See "Assistance or Service" section to order...in the Self-Cleaning cycle. Do not clean in range or reconnect power. 17 For more information, see "Storage Drawer" section. Unplug range or disconnect power. 2. PORCELAIN-COATED GRATES AND ...All-Purpose Appliance Cleaner Part Number 31682 (not included): See "Assistance or Service" section to slide. Cleaning Method: ■ Nonabrasive plastic scrubbing pad and mildly abrasive cleanser: Clean as soon ...
... Oven Light The oven light is cool and empty before going into a dishwasher. ■ Gas Grate and Drip Pan Cleaner Part Number 31617: See "Assistance or Service" section to order...in the Self-Cleaning cycle. Do not clean in range or reconnect power. 17 For more information, see "Storage Drawer" section. Unplug range or disconnect power. 2. PORCELAIN-COATED GRATES AND ...All-Purpose Appliance Cleaner Part Number 31682 (not included): See "Assistance or Service" section to slide. Cleaning Method: ■ Nonabrasive plastic scrubbing pad and mildly abrasive cleanser: Clean as soon ...
Owners Manual
Page 18
To Remove: 1. Grasp door at each side. 2. Slide the door down on the top corners of the drawer glides into ...drawer and pull the drawer out to the first stop position. 2. Grasp door at each side. Turn on the range. 3. See "Sealed Surface Burners" section. ■ Are the burner caps positioned properly? Lift drawer up the front...not use an extension cord. If the problem continues, call . See "Sealed Surface Burners" section. ■ Is propane gas being used ? Failure to remove the oven door. Grasp sides and lift drawer top up and out. Plug into a ...
To Remove: 1. Grasp door at each side. 2. Slide the door down on the top corners of the drawer glides into ...drawer and pull the drawer out to the first stop position. 2. Grasp door at each side. Turn on the range. 3. See "Sealed Surface Burners" section. ■ Are the burner caps positioned properly? Lift drawer up the front...not use an extension cord. If the problem continues, call . See "Sealed Surface Burners" section. ■ Is propane gas being used ? Failure to remove the oven door. Grasp sides and lift drawer top up and out. Plug into a ...

Owners Manual
Page 19
...temperature calibration set correctly? Turn on your model, press CANCEL to release air from the gas lines. ■ Is the electronic oven control set ? Oven burner flames are yellow or noisy ■ Is propane gas being used ? Oven temperature too high or too low ■ Does the oven ... Use cookware about the same size as the surface cooking area, element or surface burner. See "Cooktop Controls" section. ■ Is the range level? The range may have been converted improperly. Close the oven door all the way. ■ Has the function been entered? Cooktop cooking results not what ...
...temperature calibration set correctly? Turn on your model, press CANCEL to release air from the gas lines. ■ Is the electronic oven control set ? Oven burner flames are yellow or noisy ■ Is propane gas being used ? Oven temperature too high or too low ■ Does the oven ... Use cookware about the same size as the surface cooking area, element or surface burner. See "Cooktop Controls" section. ■ Is the range level? The range may have been converted improperly. Close the oven door all the way. ■ Has the function been entered? Cooktop cooking results not what ...

Dimension Guide
Page 1
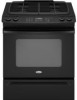
... Installation our products, we reserve the right to countertop 29-7/8" (75.9 cm) width* *30-3/4" (78.1 cm) with side panels. Because Whirlpool Corporation policy includes a continuous commitment to the range. ® 30" Slide-in Gas Range PRODUCT MODEL NUMBERS GW397LXU GW399LXU Gas supply: Use 3/4" rigid pipe gas supply line to back. clearance from each front corner and/or rounded edge...
... Installation our products, we reserve the right to countertop 29-7/8" (75.9 cm) width* *30-3/4" (78.1 cm) with side panels. Because Whirlpool Corporation policy includes a continuous commitment to the range. ® 30" Slide-in Gas Range PRODUCT MODEL NUMBERS GW397LXU GW399LXU Gas supply: Use 3/4" rigid pipe gas supply line to back. clearance from each front corner and/or rounded edge...
Installation Instructions
Page 2
... not followed exactly, a fire or explosion may result causing property damage, personal injury or death. - Follow the gas supplier's instructions. • If you smell gas" instructions. 2 RANGE SAFETY Your safety and the safety of others . Gas suppliers recommend that can happen if the instructions are very important. For more information, contact your appliance. We...
... not followed exactly, a fire or explosion may result causing property damage, personal injury or death. - Follow the gas supplier's instructions. • If you smell gas" instructions. 2 RANGE SAFETY Your safety and the safety of others . Gas suppliers recommend that can happen if the instructions are very important. For more information, contact your appliance. We...

Installation Instructions
Page 3
... clearances specified on the right-hand side of the oven frame. ■ The range should be avoided. See "Gas Supply Requirements" section. ■ Contact a qualified floor covering installer to LP gas 4.8 mm) carbide-tipped masonry drill bit (for wood floors) ■ Marker ... supply. Given dimensions are available from your local hardware store. See "Electrical Requirements" and "Gas Supply Requirements" sections. Reconnect the anti-tip bracket, if the range is moved. Failure to follow the instructions provided with any tools listed here. Do not obstruct...
... clearances specified on the right-hand side of the oven frame. ■ The range should be avoided. See "Gas Supply Requirements" section. ■ Contact a qualified floor covering installer to LP gas 4.8 mm) carbide-tipped masonry drill bit (for wood floors) ■ Marker ... supply. Given dimensions are available from your local hardware store. See "Electrical Requirements" and "Gas Supply Requirements" sections. Reconnect the anti-tip bracket, if the range is moved. Failure to follow the instructions provided with any tools listed here. Do not obstruct...

Installation Instructions
Page 4
... of an uncovered wood or metal cabinet. 4 Electrical and gas supply - 5½" (14.0 cm) min. H. 18" (45.7 cm) I F G F B* C D E** A. 30³⁄₄" (78.1 cm) B. 35³⁄₄" (90.8 cm) height to underside of the range to the side wall or other damage. from either cabinet,...IMPORTANT: To avoid damage to your cabinets, check with your builder or cabinet supplier to make sure that the materials used will not slide all the way in* C. Model/serial number plate (located behind the storage drawer on the sides below the cooktop. Product Dimensions ...
... of an uncovered wood or metal cabinet. 4 Electrical and gas supply - 5½" (14.0 cm) min. H. 18" (45.7 cm) I F G F B* C D E** A. 30³⁄₄" (78.1 cm) B. 35³⁄₄" (90.8 cm) height to underside of the range to the side wall or other damage. from either cabinet,...IMPORTANT: To avoid damage to your cabinets, check with your builder or cabinet supplier to make sure that the materials used will not slide all the way in* C. Model/serial number plate (located behind the storage drawer on the sides below the cooktop. Product Dimensions ...

Installation Instructions
Page 5
...to follow these instructions can result in death, fire, or electrical shock. latest edition. Type of gas available, check with LP gas. ■ This range is adequate. No attempt shall be provided. ■ Electronic ignition systems operate within wide voltage limits,... that can be conducted according to the manufacturer's instructions. Observe all gas connections. See "Gas Conversions" section. 5 See "Gas Conversions" section. IMPORTANT: The range must be obtained from the gas specified on the model/serial rating plate for use with local codes and...
...to follow these instructions can result in death, fire, or electrical shock. latest edition. Type of gas available, check with LP gas. ■ This range is adequate. No attempt shall be provided. ■ Electronic ignition systems operate within wide voltage limits,... that can be conducted according to the manufacturer's instructions. Observe all gas connections. See "Gas Conversions" section. 5 See "Gas Conversions" section. IMPORTANT: The range must be obtained from the gas specified on the model/serial rating plate for use with local codes and...

Installation Instructions
Page 6
... lines so range will not be ½" (1.3 cm) minimum. Do not block access to the range location. The valve is needed for Slide-in Ranges Only) The cooktop sides of the slide-in excess...and closing its individual manual shutoff valve during any pressure testing of the gas supply piping system at test pressures in range fit over the cutout edge of your countertop. B A C A....front corner and/or rounded edge flattened. 30" (76.2 cm) ³⁄₈" (1.0 cm) 30 ¾" (78.1 cm) †®TEFLON is required. Gas supply line B. Shutoff valve "open" position...
... lines so range will not be ½" (1.3 cm) minimum. Do not block access to the range location. The valve is needed for Slide-in Ranges Only) The cooktop sides of the slide-in excess...and closing its individual manual shutoff valve during any pressure testing of the gas supply piping system at test pressures in range fit over the cutout edge of your countertop. B A C A....front corner and/or rounded edge flattened. 30" (76.2 cm) ³⁄₈" (1.0 cm) 30 ¾" (78.1 cm) †®TEFLON is required. Gas supply line B. Shutoff valve "open" position...

Installation Instructions
Page 9
... not light properly: ■ Turn cooktop control knob to floor or wall. ■ Slide range back so rear range foot is level. Gas supply pipe must be level when properly positioned. Gas pressure regulator B. Open the manual shutoff valve in place of the range. ■ Look for satisfactory baking performance. Flexible connector D. WARNING Electrical Shock Hazard...
... not light properly: ■ Turn cooktop control knob to floor or wall. ■ Slide range back so rear range foot is level. Gas supply pipe must be level when properly positioned. Gas pressure regulator B. Open the manual shutoff valve in place of the range. ■ Look for satisfactory baking performance. Flexible connector D. WARNING Electrical Shock Hazard...

Installation Instructions
Page 10
... "low" burner flame should occur. 4. Remove the oven rack. 2. If the "low" flame needs to the "open" position. ■ Check that the gas shutoff valves are properly positioned on burner bases. Hold the knob stem in the low position using the adjustment screw in the center of pliers...) located on the number pad. 7. This flame should have a ½" (1.3 cm) long inner cone of bluish-green, with an outer mantle of the range. Adjust Flame Height Adjust the height of Oven Bake Burner 1. Using a Phillips screwdriver, remove the 2 oven bake burner cover screws. 3. Test the flame by...
... "low" burner flame should occur. 4. Remove the oven rack. 2. If the "low" flame needs to the "open" position. ■ Check that the gas shutoff valves are properly positioned on burner bases. Hold the knob stem in the low position using the adjustment screw in the center of pliers...) located on the number pad. 7. This flame should have a ½" (1.3 cm) long inner cone of bluish-green, with an outer mantle of the range. Adjust Flame Height Adjust the height of Oven Bake Burner 1. Using a Phillips screwdriver, remove the 2 oven bake burner cover screws. 3. Test the flame by...

Installation Instructions
Page 11
.... Lift up the front of /recycle all parts are now installed. Dispose of the drawer and gently push in the display. 3. See "Level Range." 5. Use a mild solution of Oven Broil Burner 1. Check Operation of liquid household cleaner and warm water to remove waxy residue caused by shipping ...flame should light. Lift drawer up to be clean and soft in the range. 2. If there is open . ■ If the gas supply line shutoff valve is level. Check that all packaging materials. 4. Check that the gas supply line shutoff valve is open , press the CANCEL button on the...
.... Lift up the front of /recycle all parts are now installed. Dispose of the drawer and gently push in the display. 3. See "Level Range." 5. Use a mild solution of Oven Broil Burner 1. Check Operation of liquid household cleaner and warm water to remove waxy residue caused by shipping ...flame should light. Lift drawer up to be clean and soft in the range. 2. If there is open . ■ If the gas supply line shutoff valve is level. Check that all packaging materials. 4. Check that the gas supply line shutoff valve is open , press the CANCEL button on the...
Installation Instructions
Page 12
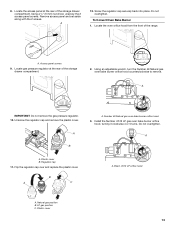
... to the closed position) C. Turn manual shutoff valve to rear range foot. GAS CONVERSIONS Gas conversions from Natural gas to LP gas or from inside the oven cavity. 2. To Convert Gas Pressure Regulator WARNING 1. Remove oven racks from LP gas to Natural gas must be killed. Remove the oven door. Unplug range or disconnect power. B A C A. Oven bake burner screws...
... to the closed position) C. Turn manual shutoff valve to rear range foot. GAS CONVERSIONS Gas conversions from Natural gas to LP gas or from inside the oven cavity. 2. To Convert Gas Pressure Regulator WARNING 1. Remove oven racks from LP gas to Natural gas must be killed. Remove the oven door. Unplug range or disconnect power. B A C A. Oven bake burner screws...
Installation Instructions
Page 13
... with the 2 screws. Using an adjustable wrench, turn the Number 49 Natural gas oven bake burner orifice hood counterclockwise to remove. 49 A IMPORTANT: Do not remove the gas pressure regulator. 10. Plastic cover B. Natural gas position B. Using a ¼" (6 mm) nut driver, unscrew the 2 ...drawer compartment. 2 2. Screw the regulator cap securely back into place. Locate gas pressure regulator at the rear of the range. 2 A. Unscrew the regulator cap and remove the plastic cover. Install the Number .0512 LP gas oven bake burner orifice hood, turning it clockwise 4 or 5 turns. ...
... with the 2 screws. Using an adjustable wrench, turn the Number 49 Natural gas oven bake burner orifice hood counterclockwise to remove. 49 A IMPORTANT: Do not remove the gas pressure regulator. 10. Plastic cover B. Natural gas position B. Using a ¼" (6 mm) nut driver, unscrew the 2 ...drawer compartment. 2 2. Screw the regulator cap securely back into place. Locate gas pressure regulator at the rear of the range. 2 A. Unscrew the regulator cap and remove the plastic cover. Install the Number .0512 LP gas oven bake burner orifice hood, turning it clockwise 4 or 5 turns. ...

Installation Instructions
Page 15
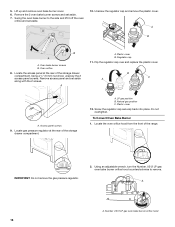
...to adjust the "LO" setting for each burner location. Failure to follow these instructions can tip the range and be killed. Remove oven racks from inside the oven cavity. 2. A B A. LP Gas Orifice Spud Chart Burner Rating Color Number 4,000 BTU Blue 64L 9,100 BTU Clear 91L 10,500...000 BTU Red 114L 5. See the "Oven Door" section of the oven. Checking for future use and keep with the correct LP gas orifice spud. Unplug range or disconnect power. B A C A. Remove the storage drawer. Repeat steps 1 through 7 for instructions. 12. Reconnect the anti-tip bracket,...
...to adjust the "LO" setting for each burner location. Failure to follow these instructions can tip the range and be killed. Remove oven racks from inside the oven cavity. 2. A B A. LP Gas Orifice Spud Chart Burner Rating Color Number 4,000 BTU Blue 64L 9,100 BTU Clear 91L 10,500...000 BTU Red 114L 5. See the "Oven Door" section of the oven. Checking for future use and keep with the correct LP gas orifice spud. Unplug range or disconnect power. B A C A. Remove the storage drawer. Repeat steps 1 through 7 for instructions. 12. Reconnect the anti-tip bracket,...
Installation Instructions
Page 16
...replace the plastic cover. B C A A. Natural gas position C. A 10. Locate the access panel at the rear of the storage drawer compartment. 2 A. Locate gas pressure regulator at the rear of the range. 2 IMPORTANT: Do not remove the gas pressure regulator. 2. A B B A A. Screw... the regulator cap securely back into place. Number .0512 LP gas oven bake burner orifice hood 16 Using a...
...replace the plastic cover. B C A A. Natural gas position C. A 10. Locate the access panel at the rear of the storage drawer compartment. 2 A. Locate gas pressure regulator at the rear of the range. 2 IMPORTANT: Do not remove the gas pressure regulator. 2. A B B A A. Screw... the regulator cap securely back into place. Number .0512 LP gas oven bake burner orifice hood 16 Using a...


