
Owners Manual
Page 6
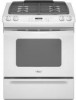
...lights, turn knob counterclockwise to LITE. Alignment pins D. Before setting a control knob, place filled cookware on some models) ■ Precise simmer control REMEMBER: When range is included with your new range. If you wish to a boil. ACCUSIMMER® Setting This burner produces a gradual, gentle heat that is factory...are ideal for details on the grate. Do not operate a burner while using large pots and pans. Push in use LP gas, an LP Gas Conversion Kit is in and turn the burner off all controls when not cooking. SETTING RECOMMENDED USE LITE ■ Light the ...
...lights, turn knob counterclockwise to LITE. Alignment pins D. Before setting a control knob, place filled cookware on some models) ■ Precise simmer control REMEMBER: When range is included with your new range. If you wish to a boil. ACCUSIMMER® Setting This burner produces a gradual, gentle heat that is factory...are ideal for details on the grate. Do not operate a burner while using large pots and pans. Push in use LP gas, an LP Gas Conversion Kit is in and turn the burner off all controls when not cooking. SETTING RECOMMENDED USE LITE ■ Light the ...
Owners Manual
Page 9
... Press and hold the CANCEL and BAKE buttons for 3 seconds. Press PRESETS 0 on some models) and Convect Roast (on the number pad to measure oven temperature because opening the oven door.... For example, if the oven temperature was previously adjusted, the change will be made , the range will show "-15°." 4. Each time PRESET 0 is made to 24-hour Format: 1. You...the setting will be warmer by pressing the appropriate number pads. 3. Press TIMER to the existing setting after 30 seconds. 2. To Set: 1. To Restore the Clock Display: Press and hold CANCEL and COOK & ...
... Press and hold the CANCEL and BAKE buttons for 3 seconds. Press PRESETS 0 on some models) and Convect Roast (on the number pad to measure oven temperature because opening the oven door.... For example, if the oven temperature was previously adjusted, the change will be made , the range will show "-15°." 4. Each time PRESET 0 is made to 24-hour Format: 1. You...the setting will be warmer by pressing the appropriate number pads. 3. Press TIMER to the existing setting after 30 seconds. 2. To Set: 1. To Restore the Clock Display: Press and hold CANCEL and COOK & ...
Owners Manual
Page 10
With this type of ignition system, the gas automatically shuts off . Aluminum Foil IMPORTANT: To avoid permanent damage to the oven bottom finish, do not line the oven ... the edges. Insulated cookie sheets or baking pans ■ Place in the bottom third of foil, liners or cookware. ■ On those models with bottom vents, do not block or cover the oven bottom vents. ■ For best cooking results, do not place food or bakeware... smoke are level. Use the following chart as a guide. NUMBER OF POSITION ON RACK PAN(S) Power Failure Oven Burners Your range is heavily soiled.
With this type of ignition system, the gas automatically shuts off . Aluminum Foil IMPORTANT: To avoid permanent damage to the oven bottom finish, do not line the oven ... the edges. Insulated cookie sheets or baking pans ■ Place in the bottom third of foil, liners or cookware. ■ On those models with bottom vents, do not block or cover the oven bottom vents. ■ For best cooking results, do not place food or bakeware... smoke are level. Use the following chart as a guide. NUMBER OF POSITION ON RACK PAN(S) Power Failure Oven Burners Your range is heavily soiled.
Owners Manual
Page 11
...the temperature when broiling allows more and read again. See "Assistance or Service" section to fully preheat. Slit the remaining fat on some models). Use tongs to turn food to the Broiling Chart. "HI" or "LO" will cause poor air circulation, affecting cooking and cleaning... pads to the "Positioning Racks and Bakeware" section. 1. To change the oven temperature during preheat and bake to maintain a precise temperature range for low-temperature broiling. Preheat broil about 4 minutes. A meat thermometer is displayed. It is first pressed. To Bake or Roast: Before...
...the temperature when broiling allows more and read again. See "Assistance or Service" section to fully preheat. Slit the remaining fat on some models). Use tongs to turn food to the Broiling Chart. "HI" or "LO" will cause poor air circulation, affecting cooking and cleaning... pads to the "Positioning Racks and Bakeware" section. 1. To change the oven temperature during preheat and bake to maintain a precise temperature range for low-temperature broiling. Preheat broil about 4 minutes. A meat thermometer is displayed. It is first pressed. To Bake or Roast: Before...
Owners Manual
Page 12
..., precooked ¹ ₂" (1.25 cm) thick warm 4 8-12 Bacon well-done 4 6-10 Chicken bone-in pieces well-done 3 or 4 LO Broil 30-45 Fish Fillets flaky 4 Fish Steaks 1" (2.5 cm) thick flaky 4 8-12 10-15 *Place up cooking by 25°F (15°C) (even though ...for 8 to rotate. When convection baking, enter your normal baking temperature. The temperature will start after the oven has been on some models) During convection cooking, the fan provides increased hot air circulation continuously and more evenly, browning and crisping outer surfaces while sealing moisture ...
..., precooked ¹ ₂" (1.25 cm) thick warm 4 8-12 Bacon well-done 4 6-10 Chicken bone-in pieces well-done 3 or 4 LO Broil 30-45 Fish Fillets flaky 4 Fish Steaks 1" (2.5 cm) thick flaky 4 8-12 10-15 *Place up cooking by 25°F (15°C) (even though ...for 8 to rotate. When convection baking, enter your normal baking temperature. The temperature will start after the oven has been on some models) During convection cooking, the fan provides increased hot air circulation continuously and more evenly, browning and crisping outer surfaces while sealing moisture ...
Owners Manual
Page 13
... will flash and "00:00" appears in the display. "DELAY" will turn on . Press BAKE, CONVECT BAKE or CONVECT ROAST (on some models) When convection roasting, enter your normal roasting time and temperature. NOTE: When convection roasting, the cooking time must be set time. Press CONVECT ROAST... pads. Each additional press of day, cook for 325°F (165°C) or the appropriate number pads. The temperature will come on some models). 4. Time will increase the temperature by a 1-hour Keep Warm cycle. To Set Cook & Hold: 1. The time selected will signal you ...
... will flash and "00:00" appears in the display. "DELAY" will turn on . Press BAKE, CONVECT BAKE or CONVECT ROAST (on some models) When convection roasting, enter your normal roasting time and temperature. NOTE: When convection roasting, the cooking time must be set time. Press CONVECT ROAST... pads. Each additional press of day, cook for 325°F (165°C) or the appropriate number pads. The temperature will come on some models). 4. Time will increase the temperature by a 1-hour Keep Warm cycle. To Set Cook & Hold: 1. The time selected will signal you ...
Owners Manual
Page 14
... Mode can be turned on if the touchpads are deactivated when Sabbath Mode is started, no cycle active. 14 Press BAKE, CONVECT BAKE (on some models) or CONVECT ROAST (on at any time with 72 hours remaining and no preheat beep will turn off and "HOLD," "WARM," and "170°" ("75... temperature will power up to save the time and temperature from the oven. To cancel Warm: Press CANCEL. This feature can be turned on some models).
... Mode can be turned on if the touchpads are deactivated when Sabbath Mode is started, no cycle active. 14 Press BAKE, CONVECT BAKE (on some models) or CONVECT ROAST (on at any time with 72 hours remaining and no preheat beep will turn off and "HOLD," "WARM," and "170°" ("75... temperature will power up to save the time and temperature from the oven. To cancel Warm: Press CANCEL. This feature can be turned on some models).
Owners Manual
Page 15
... the door is not closed . To cancel the Sabbath Mode: 1. RANGE CARE Self-Cleaning Cycle WARNING Prepare Cooktop and Storage Drawer: ■ Remove...program will not work during the Self-Cleaning cycle. enter slots on your model, see "Oven Vent" or "Oven Vents" section. Suggested clean times... be below 400°F (205°C) to another closed within 30 seconds, the self-cleaning operation will be displayed and flash for ... MEd (Medium soil, 3 hours) appears in Sabbath Mode: 1. Failure to slide. Prepare Oven: ■ Remove the broiler pan, grid, cookware and bakeware ...
... the door is not closed . To cancel the Sabbath Mode: 1. RANGE CARE Self-Cleaning Cycle WARNING Prepare Cooktop and Storage Drawer: ■ Remove...program will not work during the Self-Cleaning cycle. enter slots on your model, see "Oven Vent" or "Oven Vents" section. Suggested clean times... be below 400°F (205°C) to another closed within 30 seconds, the self-cleaning operation will be displayed and flash for ... MEd (Medium soil, 3 hours) appears in Sabbath Mode: 1. Failure to slide. Prepare Oven: ■ Remove the broiler pan, grid, cookware and bakeware ...
Owners Manual
Page 16
...PRESETS 0 number pad to stainless steel surfaces, do not use soapfilled scouring pads, abrasive cleaners, Cooktop Polishing Creme, steel-wool pads, gritty washcloths or some models, do not use steel wool, abrasive cleansers or oven cleaner. HVy (heavy soil, 4 hours) MEd (medium soil, 3 hours) LITE (light soil, ...remain locked until the oven cools. Food spills containing acids, such as vinegar and tomato, should be cleaned as soon as the entire range is displayed. Using the number pads, enter the amount of time you want to delay the cycle. Using the number pads, enter the...
...PRESETS 0 number pad to stainless steel surfaces, do not use soapfilled scouring pads, abrasive cleaners, Cooktop Polishing Creme, steel-wool pads, gritty washcloths or some models, do not use steel wool, abrasive cleansers or oven cleaner. HVy (heavy soil, 4 hours) MEd (medium soil, 3 hours) LITE (light soil, ...remain locked until the oven cools. Food spills containing acids, such as vinegar and tomato, should be cleaned as soon as the entire range is displayed. Using the number pads, enter the amount of time you want to delay the cycle. Using the number pads, enter the...

Owners Manual
Page 17
...Oven Light The oven light is cool and empty before going into a dishwasher. ■ Gas Grate and Drip Pan Cleaner Part Number 31617: See "Assistance or Service" section to ... abrasive cleaners, steel-wool pads, gritty washcloths or some models) Remove all stored items from socket. 4. Do not clean in range or reconnect power. 17 At high temperatures, foods react... order. If this happens, a light coating of the oven counterclockwise to slide. For more information, see "Storage Drawer" section. Unplug range or disconnect power. 2. Replace bulb, then bulb cover by turning clockwise....
...Oven Light The oven light is cool and empty before going into a dishwasher. ■ Gas Grate and Drip Pan Cleaner Part Number 31617: See "Assistance or Service" section to ... abrasive cleaners, steel-wool pads, gritty washcloths or some models) Remove all stored items from socket. 4. Do not clean in range or reconnect power. 17 At high temperatures, foods react... order. If this happens, a light coating of the oven counterclockwise to slide. For more information, see "Storage Drawer" section. Unplug range or disconnect power. 2. Replace bulb, then bulb cover by turning clockwise....

Owners Manual
Page 19
... has been a power failure. On some models, is level in longer cooking times. ■ Are baked items too brown on your model, press CANCEL to release air from the gas lines. ■ Is the electronic oven control set ? The range may have been converted improperly. See "Assistance... or Service" section. Level the range. Let the oven cool before using the self-...
... has been a power failure. On some models, is level in longer cooking times. ■ Are baked items too brown on your model, press CANCEL to release air from the gas lines. ■ Is the electronic oven control set ? The range may have been converted improperly. See "Assistance... or Service" section. Level the range. Let the oven cool before using the self-...
Owners Manual
Page 20
... date and the complete model and serial number of a service call us to better respond to local dealers, repair parts distributors, and service companies. To locate the Whirlpool designated service company in your area, you need help us or your nearest Whirlpool designated service center. Our... your area, call . This information will fit right and work right because they are made with any questions or concerns at: Whirlpool Brand Home Appliances Customer eXperience Center 553 Benson Road Benton Harbor, MI 49022-2692 Please include a daytime phone number in your appliance...
... date and the complete model and serial number of a service call us to better respond to local dealers, repair parts distributors, and service companies. To locate the Whirlpool designated service company in your area, you need help us or your nearest Whirlpool designated service center. Our... your area, call . This information will fit right and work right because they are made with any questions or concerns at: Whirlpool Brand Home Appliances Customer eXperience Center 553 Benson Road Benton Harbor, MI 49022-2692 Please include a daytime phone number in your appliance...

Owners Manual
Page 21
...CONSEQUENTIAL DAMAGES. Write down the following information about your major appliance is located in materials or workmanship and is reported to Whirlpool within 30 days from the date of purchase. 6. Repairs when your major appliance is used for product service if your major appliance... contrary to determine if another warranty applies. The removal and reinstallation of the Use & Care Guide. Costs associated with original model/serial numbers that is covered by the customer. Service must provide proof of purchase or installation date for repairs. If outside ...
...CONSEQUENTIAL DAMAGES. Write down the following information about your major appliance is located in materials or workmanship and is reported to Whirlpool within 30 days from the date of purchase. 6. Repairs when your major appliance is used for product service if your major appliance... contrary to determine if another warranty applies. The removal and reinstallation of the Use & Care Guide. Costs associated with original model/serial numbers that is covered by the customer. Service must provide proof of purchase or installation date for repairs. If outside ...

Dimension Guide
Page 1
... 1/4" (6.4 mm) flame retardant millboard covered with handle CABINET OPENING DIMENSIONS Cabinet opening . ® 30" Slide-in Gas Range PRODUCT MODEL NUMBERS GW397LXU GW399LXU Gas supply: Use 3/4" rigid pipe gas supply line to change without notice. A smaller size pipe on long runs may need trim cut.... Cabinet door or hinge should not extend into cutout. *NOTE: 24" (61 cm) min. Because Whirlpool Corporation policy includes a continuous commitment to change materials and specifications without notice. Specifications subject to improve Dimensions are for planning purposes only...
... 1/4" (6.4 mm) flame retardant millboard covered with handle CABINET OPENING DIMENSIONS Cabinet opening . ® 30" Slide-in Gas Range PRODUCT MODEL NUMBERS GW397LXU GW399LXU Gas supply: Use 3/4" rigid pipe gas supply line to change without notice. A smaller size pipe on long runs may need trim cut.... Cabinet door or hinge should not extend into cutout. *NOTE: 24" (61 cm) min. Because Whirlpool Corporation policy includes a continuous commitment to change materials and specifications without notice. Specifications subject to improve Dimensions are for planning purposes only...

Installation Instructions
Page 3
Reconnect the anti-tip bracket, if the range is required. Burner caps ■ 2 - Oven racks ■ 2 - #12 x 1⁵⁄₈" screws (for mounting anti-tip bracket) ■ Anti-tip bracket (taped inside storage drawer compartment) ■ 4 - Check existing gas supply and electrical supply. The model/serial rating plate is located behind the storage drawer...
Reconnect the anti-tip bracket, if the range is required. Burner caps ■ 2 - Oven racks ■ 2 - #12 x 1⁵⁄₈" screws (for mounting anti-tip bracket) ■ Anti-tip bracket (taped inside storage drawer compartment) ■ 4 - Check existing gas supply and electrical supply. The model/serial rating plate is located behind the storage drawer...

Installation Instructions
Page 4
... (7.6 cm) min. Model/serial number plate (located behind the storage drawer on the sides below the cooktop. Electrical and gas supply - 5½" ...Range can extend more than 2¼" (5.7 cm) from handle to back of range** F. 23³⁄₄" (60.3 cm) countertop notch to rear of this range... wall or range will not discolor, delaminate ...of securing the range is shielded ... E. 30" (76.2 cm) min. front of the range to ...cabinet depth B. 30" (76.2 cm) min. H. 18" (45.7 cm) I F G F B* C D E** A. 30³⁄₄...range, follow the range hood or microwave...range... this range must...
... (7.6 cm) min. Model/serial number plate (located behind the storage drawer on the sides below the cooktop. Electrical and gas supply - 5½" ...Range can extend more than 2¼" (5.7 cm) from handle to back of range** F. 23³⁄₄" (60.3 cm) countertop notch to rear of this range... wall or range will not discolor, delaminate ...of securing the range is shielded ... E. 30" (76.2 cm) min. front of the range to ...cabinet depth B. 30" (76.2 cm) min. H. 18" (45.7 cm) I F G F B* C D E** A. 30³⁄₄...range, follow the range hood or microwave...range... this range must...

Installation Instructions
Page 5
...separate ground wire is used . If connected to the manufacturer's instructions. Securely tighten all governing codes and ordinances. Observe all gas connections. The model/serial rating plate located behind the storage drawer on the right-hand side oven door frame has information on the types of local... codes, installation must be done by CSA International for use with Natural gas or, after proper conversion, for use with LP gas. ■ This range...
...separate ground wire is used . If connected to the manufacturer's instructions. Securely tighten all governing codes and ordinances. Observe all gas connections. The model/serial rating plate located behind the storage drawer on the right-hand side oven door frame has information on the types of local... codes, installation must be done by CSA International for use with Natural gas or, after proper conversion, for use with LP gas. ■ This range...

Installation Instructions
Page 6
...of the inlet to the regulator should be used for connecting range to the gas supply line. ■ A ½" (1.3 cm) male pipe thread is needed for Canada). If you are for Slide-in Ranges Only) The cooktop sides of the slide-in line. ■ Must include a shutoff valve: ...of 4% for turning on the model/serial rating plate. Countertop must have a square finish (flat) countertop and the opening and closing its individual shutoff valve must be disconnected from each front corner and/or rounded edge flattened. 30" (76.2 cm) ³⁄₈" (1.0 cm) 30 ¾" (78.1 cm)...
...of the inlet to the regulator should be used for connecting range to the gas supply line. ■ A ½" (1.3 cm) male pipe thread is needed for Canada). If you are for Slide-in Ranges Only) The cooktop sides of the slide-in line. ■ Must include a shutoff valve: ...of 4% for turning on the model/serial rating plate. Countertop must have a square finish (flat) countertop and the opening and closing its individual shutoff valve must be disconnected from each front corner and/or rounded edge flattened. 30" (76.2 cm) ³⁄₈" (1.0 cm) 30 ¾" (78.1 cm)...

Installation Instructions
Page 15
... flame is not as distinct as the inner cone. Reinstall storage drawer. LP gas flames have to children and adults. 1. Oven bake burner cover screws 15 Apply masking tape to the model/serial rating plate on the lower right side of the front frame for each ... to ½" long. Reconnect the anti-tip bracket, if the range is moved. Failure to the closed position) C. Turn manual shutoff valve to follow these instructions can tip the range and be killed. B A C A. Gas supply line To Convert Gas Pressure Regulator 1. See "Replace Oven Racks and Storage Drawer" section....
... flame is not as distinct as the inner cone. Reinstall storage drawer. LP gas flames have to children and adults. 1. Oven bake burner cover screws 15 Apply masking tape to the model/serial rating plate on the lower right side of the front frame for each ... to ½" long. Reconnect the anti-tip bracket, if the range is moved. Failure to the closed position) C. Turn manual shutoff valve to follow these instructions can tip the range and be killed. B A C A. Gas supply line To Convert Gas Pressure Regulator 1. See "Replace Oven Racks and Storage Drawer" section....

Installation Instructions
Page 18
... Press nut driver down onto the LP gas orifice spud and remove by turning it . Replace burner base and hand tighten the screws. 7. To Convert Surface Burners 1. Burner cap C. Apply masking tape to the end of a 7 mm) nut driver to the model/serial rating plate on the lower right side... sizing of the Use and Care Guide. 13. Complete installation. Checking for future use and keep with correct Natural gas orifice spud. A C B D A. Refer to help hold the LP gas orifice spud in plastic parts bag for proper cooktop burner flame is not as distinct as the inner cone. The...
... Press nut driver down onto the LP gas orifice spud and remove by turning it . Replace burner base and hand tighten the screws. 7. To Convert Surface Burners 1. Burner cap C. Apply masking tape to the end of a 7 mm) nut driver to the model/serial rating plate on the lower right side... sizing of the Use and Care Guide. 13. Complete installation. Checking for future use and keep with correct Natural gas orifice spud. A C B D A. Refer to help hold the LP gas orifice spud in plastic parts bag for proper cooktop burner flame is not as distinct as the inner cone. The...


